Operating Guide
Page 17
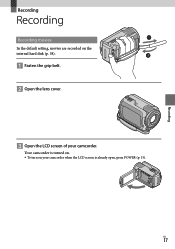
Recording Recording Recording Recording movies In the default setting, movies are recorded on the internal hard disk (p. 38). Fasten the grip belt. Open the lens cover. Open the LCD screen of your camcorder when the LCD screen is turned on. To turn on your camcorder. US 17 Your camcorder is already open, press POWER (p. 15).
Recording Recording Recording Recording movies In the default setting, movies are recorded on the internal hard disk (p. 38). Fasten the grip belt. Open the lens cover. Open the LCD screen of your camcorder when the LCD screen is turned on. To turn on your camcorder. US 17 Your camcorder is already open, press POWER (p. 15).
Operating Guide
Page 18
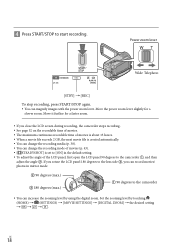
Move it further for a slower zoom. Set the zooming level by using the digital zoom. Press START/STOP to the camcorder You can magnify images with the power zoom lever. US 18 Power zoom lever Wide Telephoto [STBY] [REC] To stop ...[DIGITAL ZOOM] the desired setting . If you rotate the LCD panel 180 degrees to the lens side , you close the LCD screen during recording, the camcorder stops recording. See page 52 on the recordable time of movies. The maximum continuous recordable time of movies...
Move it further for a slower zoom. Set the zooming level by using the digital zoom. Press START/STOP to the camcorder You can magnify images with the power zoom lever. US 18 Power zoom lever Wide Telephoto [STBY] [REC] To stop ...[DIGITAL ZOOM] the desired setting . If you rotate the LCD panel 180 degrees to the lens side , you close the LCD screen during recording, the camcorder stops recording. See page 52 on the recordable time of movies. The maximum continuous recordable time of movies...
Operating Guide
Page 19
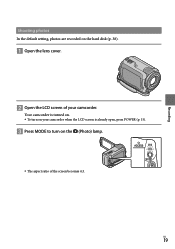
US 19 Recording Shooting photos In the default setting, photos are recorded on the (Photo) lamp. The aspect ratio of your camcorder. Your camcorder is turned on. To turn on your camcorder when the LCD screen is already open, press POWER (p. 15). Press MODE to turn on the hard disk (p. 38). Open the lens cover. Open the LCD screen of the screen becomes 4:3.
US 19 Recording Shooting photos In the default setting, photos are recorded on the (Photo) lamp. The aspect ratio of your camcorder. Your camcorder is turned on. To turn on your camcorder when the LCD screen is already open, press POWER (p. 15). Press MODE to turn on the hard disk (p. 38). Open the lens cover. Open the LCD screen of the screen becomes 4:3.
Operating Guide
Page 49
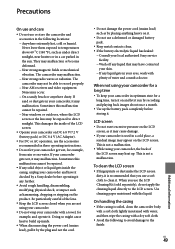
Never leave them exposed to clean it. If your camcorder gets wet, it checked by placing anything heavy on the product. Be particularly careful of the lens. Keep the LCD screen closed when you use a soft cloth to temperatures above 60 C (140 °F), such as under ... the battery pack completely before operating it any further. Avoid rough handling, disassembling, modifying, physical shock, or impact such as by a Sony dealer before storing it may be able to the LCD screen. They may occur. On a sandy beach or anywhere dusty. Precautions On...
Never leave them exposed to clean it. If your camcorder gets wet, it checked by placing anything heavy on the product. Be particularly careful of the lens. Keep the LCD screen closed when you use a soft cloth to temperatures above 60 C (140 °F), such as under ... the battery pack completely before operating it any further. Avoid rough handling, disassembling, modifying, physical shock, or impact such as by a Sony dealer before storing it may be able to the LCD screen. They may occur. On a sandy beach or anywhere dusty. Precautions On...
Operating Guide
Page 50
... the following instances: When there are not recording the date. Procedures Connect your camcorder to little dirt or dust. To prevent mold, periodically clean the lens as described above substances on your hands Leaving the casing in contact with rubber ...chemicals such as thinner, benzine, alcohol, chemical cloths, repellent, insecticide and sunscreen Handling the camcorder with above . Use your camcorder or a computer, you may not delete data from the "Handycam Handbook" " on disposal/transfer of "Memory Stick PRO Duo" media Even if you delete data ...
... the following instances: When there are not recording the date. Procedures Connect your camcorder to little dirt or dust. To prevent mold, periodically clean the lens as described above substances on your hands Leaving the casing in contact with rubber ...chemicals such as thinner, benzine, alcohol, chemical cloths, repellent, insecticide and sunscreen Handling the camcorder with above . Use your camcorder or a computer, you may not delete data from the "Handycam Handbook" " on disposal/transfer of "Memory Stick PRO Duo" media Even if you delete data ...
Operating Guide
Page 51
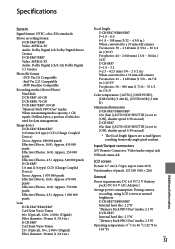
... Creator Photo file format : DCF Ver.2.0 Compatible : Exif Ver.2.21 Compatible : MPF Baseline Compatible Recording media (Movie/Photo) Hard disk: DCR-SR47: 60 GB DCR-SR48: 70 GB DCR-SR67/SR87: 80 GB "Memory Stick PRO Duo" media When measureing media capacity, 1 GB equals 1 billion bytes, a portion of pixels... pixels Effective (Movie, 16:9): Approx. 670 000 pixels Effective (Photos, 16:9): Approx. 750 000 pixels Effective (Photos, 4:3): Approx. 1 000 000 pixels Lens DCR-SR47/SR48/SR67 Carl Zeiss Vario-Tessar 60× (Optical), 120×, 2 000× (Digital) Filter diameter: 30 mm (1 3/16 in...
... Creator Photo file format : DCF Ver.2.0 Compatible : Exif Ver.2.21 Compatible : MPF Baseline Compatible Recording media (Movie/Photo) Hard disk: DCR-SR47: 60 GB DCR-SR48: 70 GB DCR-SR67/SR87: 80 GB "Memory Stick PRO Duo" media When measureing media capacity, 1 GB equals 1 billion bytes, a portion of pixels... pixels Effective (Movie, 16:9): Approx. 670 000 pixels Effective (Photos, 16:9): Approx. 750 000 pixels Effective (Photos, 4:3): Approx. 1 000 000 pixels Lens DCR-SR47/SR48/SR67 Carl Zeiss Vario-Tessar 60× (Optical), 120×, 2 000× (Digital) Filter diameter: 30 mm (1 3/16 in...
Operating Guide
Page 56
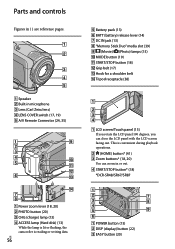
... This is convenient during playback operations. (HOME) button* (41) Zoom buttons* (18, 20) You can zoom in microphone Lens (Carl Zeiss lens) LENS COVER switch (17, 19) A/V Remote Connector (24, 35) Battery pack (13) BATT (battery) release lever (14) ...facing out. Parts and controls Figures in ( ) are reference pages. Speaker Built-in or out. START/STOP button* (18) *DCR-SR48/SR67/SR87 Power zoom lever (18, 20) PHOTO button (20) CHG (charge) lamp (13) ACCESS lamp ...
... This is convenient during playback operations. (HOME) button* (41) Zoom buttons* (18, 20) You can zoom in microphone Lens (Carl Zeiss lens) LENS COVER switch (17, 19) A/V Remote Connector (24, 35) Battery pack (13) BATT (battery) release lever (14) ...facing out. Parts and controls Figures in ( ) are reference pages. Speaker Built-in or out. START/STOP button* (18) *DCR-SR48/SR67/SR87 Power zoom lever (18, 20) PHOTO button (20) CHG (charge) lamp (13) ACCESS lamp ...


