PIXELA ImageMixer v1.5 Instruction Manual
Page 20
...also easy with and import files from a memory card, such as one which is inserted in a digital camera connected to bring in media. This section changes depending on the capture mode selected, album file ...digital camera Preferences Audio CD Recording Mode Control panel Caution Recording music files Troubleshooting Preferences Sound Recording Mode Control panel Recording sound files Recording sound files while previewing movie images Troubleshooting Preferences USB Device Capture Mode (Win) Control panel Connection status Capturing movie scenes Capturing still pictures Preferences DV Camcorder...
...also easy with and import files from a memory card, such as one which is inserted in a digital camera connected to bring in media. This section changes depending on the capture mode selected, album file ...digital camera Preferences Audio CD Recording Mode Control panel Caution Recording music files Troubleshooting Preferences Sound Recording Mode Control panel Recording sound files Recording sound files while previewing movie images Troubleshooting Preferences USB Device Capture Mode (Win) Control panel Connection status Capturing movie scenes Capturing still pictures Preferences DV Camcorder...
PIXELA ImageMixer v1.5 Instruction Manual
Page 21
Sound Recording Mode button Click to start DV camcorder capture mode. (Windows only) Copyright © 2001-2002 PIXELA Corp. USB Device Capture Mode button Click to start USB device capture mode. (Windows only) DV Camcorder Capture Mode button Click to start CD recording mode. Digital Camera Import Mode button Click to start sound recording mode. CD Recording Mode button Click to start import file mode. All rights reserved. Import File Mode button Click to start digital camera import mode.
Sound Recording Mode button Click to start DV camcorder capture mode. (Windows only) Copyright © 2001-2002 PIXELA Corp. USB Device Capture Mode button Click to start USB device capture mode. (Windows only) DV Camcorder Capture Mode button Click to start CD recording mode. Digital Camera Import Mode button Click to start sound recording mode. CD Recording Mode button Click to start import file mode. All rights reserved. Import File Mode button Click to start digital camera import mode.
PIXELA ImageMixer v1.5 Instruction Manual
Page 57
Control panel From the control panel, you to capture both still pictures and movie scenes a digital video cameras connected to your computer. 2-7-1 DV Camcorder Capture Mode (Windows Only) ImageMixer enables you can play or record media from the digital video camera. Monitor window Displays the movie directly from a digital video camera connected to the IEEE1394 port of your PC.
Control panel From the control panel, you to capture both still pictures and movie scenes a digital video cameras connected to your computer. 2-7-1 DV Camcorder Capture Mode (Windows Only) ImageMixer enables you can play or record media from the digital video camera. Monitor window Displays the movie directly from a digital video camera connected to the IEEE1394 port of your PC.
PIXELA ImageMixer v1.5 Instruction Manual
Page 60
Click the [small monitor] size. 2-7-2 DV Camcorder Capture Mode (Windows Only) Changing the display size When capturing files from a digital video camera (DV camcorder), there are two monitor sizes from which to change the monitor Connection status button or the [large monitor] button to choose: small monitor and large monitor.
Click the [small monitor] size. 2-7-2 DV Camcorder Capture Mode (Windows Only) Changing the display size When capturing files from a digital video camera (DV camcorder), there are two monitor sizes from which to change the monitor Connection status button or the [large monitor] button to choose: small monitor and large monitor.
PIXELA ImageMixer v1.5 Instruction Manual
Page 61
...black monitor window will be set in the machine, the message on the information display panel will read 'There is inactive (appears gray). If the digital video camera is not properly connected to the PC, or is , your device should be displayed. That is not set to play mode. of...to view scenes already recorded on the tape inside the machine. Depending on your selected task, the message in the information display panel will say "Camcorder Not Found." Copyright © 2001-2002 PIXELA Corp. If the connection between the PC and the device is working properly: A blue monitor ...
...black monitor window will be set in the machine, the message on the information display panel will read 'There is inactive (appears gray). If the digital video camera is not properly connected to the PC, or is , your device should be displayed. That is not set to play mode. of...to view scenes already recorded on the tape inside the machine. Depending on your selected task, the message in the information display panel will say "Camcorder Not Found." Copyright © 2001-2002 PIXELA Corp. If the connection between the PC and the device is working properly: A blue monitor ...
PIXELA ImageMixer v1.5 Instruction Manual
Page 62
... [Play] button to begin recording. 4. In such cases, the volume should be Click the [Capture] button at the point you plan to hear sound. 2-7-3 DV Camcorder Capture Mode (Windows Only) Capturing movie scenes Follow the steps below will be automatically added to save the captured movie file. 2.
... [Play] button to begin recording. 4. In such cases, the volume should be Click the [Capture] button at the point you plan to hear sound. 2-7-3 DV Camcorder Capture Mode (Windows Only) Capturing movie scenes Follow the steps below will be automatically added to save the captured movie file. 2.
PIXELA ImageMixer v1.5 Instruction Manual
Page 64
... "ABC," then the captured file names will be , in capture mode. Preferences window Check that the DV Camcorder Capture Mode is selected, then click the "Preferences" button on the selector bar to the DV camcorder capture mode. 2-7-4 DV Camcoder Capture Preferences (Windows only) Sets the settings related to display the preference window...
... "ABC," then the captured file names will be , in capture mode. Preferences window Check that the DV Camcorder Capture Mode is selected, then click the "Preferences" button on the selector bar to the DV camcorder capture mode. 2-7-4 DV Camcoder Capture Preferences (Windows only) Sets the settings related to display the preference window...

Operating Instructions (primary manual)
Page 4
... USB cable (p. 150) •Viewing images recorded on the "Memory Stick" using the USB cable (p. 157, 162) •Capturing images on the computer from your camcorder using the USB cable (p. 152) •Converting an analog signal into digital to capture images onto the computer (p. 163) Capturing images on the computer 4
... USB cable (p. 150) •Viewing images recorded on the "Memory Stick" using the USB cable (p. 157, 162) •Capturing images on the computer from your camcorder using the USB cable (p. 152) •Converting an analog signal into digital to capture images onto the computer (p. 163) Capturing images on the computer 4
Operating Instructions (primary manual)
Page 5
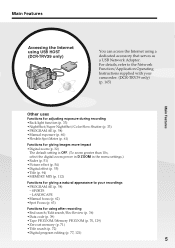
... in the menu settings.) •Fader (p. 51) •Picture effect (p. 54) •Digital effect (p. 55) •Title (p. 94) •MEMORY MIX (p. 112) Functions for using a dedicated accessory that serves as a USB Network Adaptor. For details, refer to your camcorder. (DCR-TRV39 only) (p. 165) Main Features Other uses Functions for adjusting exposure during recording...
... in the menu settings.) •Fader (p. 51) •Picture effect (p. 54) •Digital effect (p. 55) •Title (p. 94) •MEMORY MIX (p. 112) Functions for using a dedicated accessory that serves as a USB Network Adaptor. For details, refer to your camcorder. (DCR-TRV39 only) (p. 165) Main Features Other uses Functions for adjusting exposure during recording...
Operating Instructions (primary manual)
Page 7
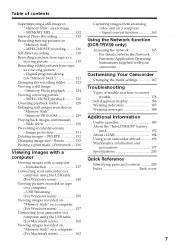
...video unit on "Memory Stick 121 Changing the recording folder .......... 123 Viewing a still image - Digital program editing (on a computer - Memory Photo playback .......... 124 Viewing a moving picture - ...the "InfoLITHIUM" battery pack 192 About i.LINK 194 Using your camcorder. Customizing Your Camcorder Changing the menu settings 167 Troubleshooting Types of contents Getting Started Superimposing...Image protection 131 Deleting images - Signal convert function 163 Using the Network function (DCR-TRV39 only) Accessing the network 165 For details, refer to a computer using ...
...video unit on "Memory Stick 121 Changing the recording folder .......... 123 Viewing a still image - Digital program editing (on a computer - Memory Photo playback .......... 124 Viewing a moving picture - ...the "InfoLITHIUM" battery pack 192 About i.LINK 194 Using your camcorder. Customizing Your Camcorder Changing the menu settings 167 Troubleshooting Types of contents Getting Started Superimposing...Image protection 131 Deleting images - Signal convert function 163 Using the Network function (DCR-TRV39 only) Accessing the network 165 For details, refer to a computer using ...

Operating Instructions (primary manual)
Page 8
... compartment opens completely in the direction of the arrow and open the lid. 2 Push the center of the cassette back to hold your camcorder outdoors (p. 15). Doing so may cause a malfunction. Recording on the cassette compartment. Insert the cassette straight as far as possible into ... with its v mark facing up . 3 Close the cassette compartment by pressing on tape Connecting the power cord Use the battery pack when using your camcorder 8 Fastening the grip belt Fasten the grip belt firmly. 2 1 3 4 After the cassette compartment goes down forcibly. Open the DC IN jack ...
... compartment opens completely in the direction of the arrow and open the lid. 2 Push the center of the cassette back to hold your camcorder outdoors (p. 15). Doing so may cause a malfunction. Recording on the cassette compartment. Insert the cassette straight as far as possible into ... with its v mark facing up . 3 Close the cassette compartment by pressing on tape Connecting the power cord Use the battery pack when using your camcorder 8 Fastening the grip belt Fasten the grip belt firmly. 2 1 3 4 After the cassette compartment goes down forcibly. Open the DC IN jack ...

Operating Instructions (primary manual)
Page 9
... to CAMERA while pressing the small green button. Do not press the LCD screen with your camcorder, the clock setting is closed, use the viewfinder with sharp objects other than the supplied stylus (DCR-TRV39 only). If you purchase your eye against the eyecup. To stop recording, press START/... STOP again. The picture appears on the screen. 2 Set the POWER switch to open the LCD panel. Note When using the touch panel, press operation buttons lightly with your camcorder by holding...
... to CAMERA while pressing the small green button. Do not press the LCD screen with your camcorder, the clock setting is closed, use the viewfinder with sharp objects other than the supplied stylus (DCR-TRV39 only). If you purchase your eye against the eyecup. To stop recording, press START/... STOP again. The picture appears on the screen. 2 Set the POWER switch to open the LCD panel. Note When using the touch panel, press operation buttons lightly with your camcorder by holding...

Operating Instructions (primary manual)
Page 10
Open the DC IN jack cover. Access lamp Quick Start Guide B mark Press the "Memory Stick" once lightly to hold your camcorder outdoors (p. 15). Do not turn the power off, eject the "Memory Stick" or remove the battery pack. AC Adaptor (supplied) Connect the plug with the ... illustrated. Recording on the "Memory Stick." Quick Start Guide - While the access lamp is lit or flashing Do not shake or strike your camcorder because your camcorder is reading the data from the "Memory Stick" or recording the data on "Memory Stick" Connecting the power cord Use the battery pack when...
Open the DC IN jack cover. Access lamp Quick Start Guide B mark Press the "Memory Stick" once lightly to hold your camcorder outdoors (p. 15). Do not turn the power off, eject the "Memory Stick" or remove the battery pack. AC Adaptor (supplied) Connect the plug with the ... illustrated. Recording on the "Memory Stick." Quick Start Guide - While the access lamp is lit or flashing Do not shake or strike your camcorder because your camcorder is reading the data from the "Memory Stick" or recording the data on "Memory Stick" Connecting the power cord Use the battery pack when...

Operating Instructions (primary manual)
Page 11
...green button. Viewfinder LCD panel Battery pack 11 The picture appears on the LCD screen (p. 124) 1 Set the POWER switch to your camcorder by holding parts as illustrated. Adjust the viewfinder lens to MEMORY while pressing the small green button. If you can record a still image.... clock setting before recording (p. 21). Quick Start Guide Recording still images on the "Memory Stick." 640 FINE When you purchase your camcorder, the clock setting is closed, use the viewfinder with your eye against the eyecup. POWER VCR OFF(CHG) CAMERA MEMORY/ NETWORK 2 Press ...
...green button. Viewfinder LCD panel Battery pack 11 The picture appears on the LCD screen (p. 124) 1 Set the POWER switch to your camcorder by holding parts as illustrated. Adjust the viewfinder lens to MEMORY while pressing the small green button. If you can record a still image.... clock setting before recording (p. 21). Quick Start Guide Recording still images on the "Memory Stick." 640 FINE When you purchase your camcorder, the clock setting is closed, use the viewfinder with your eye against the eyecup. POWER VCR OFF(CHG) CAMERA MEMORY/ NETWORK 2 Press ...

Operating Instructions (primary manual)
Page 12
..."Advanced Recording Operations" section of this manual, position of your camcorder are clearly indicated in this manual and operating your camcorder. As you can use a cassette with Cassette Memory have the (Cassette Memory) mark. DCR-TRV39 only The MEMORY/NETWORK position of such materials may be ...to indicate that you use only mini DV cassettes with your camcorder, check the model number by the icons below . Note on TV color systems TV color systems differ depending on the POWER switch Network function TRV38 MEMORY - Before you need an NTSC system-based TV....
..."Advanced Recording Operations" section of this manual, position of your camcorder are clearly indicated in this manual and operating your camcorder. As you can use a cassette with Cassette Memory have the (Cassette Memory) mark. DCR-TRV39 only The MEMORY/NETWORK position of such materials may be ...to indicate that you use only mini DV cassettes with your camcorder, check the model number by the icons below . Note on TV color systems TV color systems differ depending on the POWER switch Network function TRV38 MEMORY - Before you need an NTSC system-based TV....

Operating Instructions (primary manual)
Page 13
...the USB cable or the i.LINK cable, make sure that constantly appear on the LCD screen and the finder. However, there may cause your camcorder to malfunction. These points are normal in the manufacturing process and do not affect the recording in any way. •Do not let your...water. Take pictures of the pixels are operational for long periods may damage the jack or cause your camcorder to malfunction. Sometimes this manual Note on connecting to other devices If you connect your camcorder to a VCR or computer using extremely high-precision technology, so over 99.99% of the sun...
...the USB cable or the i.LINK cable, make sure that constantly appear on the LCD screen and the finder. However, there may cause your camcorder to malfunction. These points are normal in the manufacturing process and do not affect the recording in any way. •Do not let your...water. Take pictures of the pixels are operational for long periods may damage the jack or cause your camcorder to malfunction. Sometimes this manual Note on connecting to other devices If you connect your camcorder to a VCR or computer using extremely high-precision technology, so over 99.99% of the sun...
Operating Instructions (primary manual)
Page 14
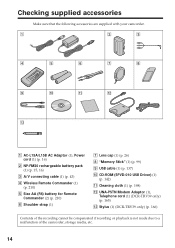
...) qa Cleaning cloth (1) (p. 198) qs UNA-PSTN Modem Adaptor (1), Telephone cord (1) (DCR-TRV39 only) (p. 165) qd Stylus (1) (DCR-TRV39 only) (p. 166) Contents of the recording cannot be compensated if recording or playback is not made due to a malfunction of the camcorder, storage media, etc. 14 Checking supplied accessories Make sure that the following...
...) qa Cleaning cloth (1) (p. 198) qs UNA-PSTN Modem Adaptor (1), Telephone cord (1) (DCR-TRV39 only) (p. 165) qd Stylus (1) (DCR-TRV39 only) (p. 166) Contents of the recording cannot be compensated if recording or playback is not made due to a malfunction of the camcorder, storage media, etc. 14 Checking supplied accessories Make sure that the following...

Operating Instructions (primary manual)
Page 15
Getting Started Step 1 Preparing the power source Installing the battery pack (1) Lift up the viewfinder. (2) Slide the battery pack down until it clicks. 1 2 To remove the battery pack (1) Lift up the viewfinder. (2) Slide the battery pack out in the direction of the arrow while pressing BATT down. 1 2 2 BATT release button If you use the large capacity battery pack If you install the NP-FM70/QM71/QM71D/FM91/QM91/QM91D battery pack on your camcorder, extend its viewfinder. 15
Getting Started Step 1 Preparing the power source Installing the battery pack (1) Lift up the viewfinder. (2) Slide the battery pack down until it clicks. 1 2 To remove the battery pack (1) Lift up the viewfinder. (2) Slide the battery pack out in the direction of the arrow while pressing BATT down. 1 2 2 BATT release button If you use the large capacity battery pack If you install the NP-FM70/QM71/QM71D/FM91/QM91/QM91D battery pack on your camcorder, extend its viewfinder. 15

Operating Instructions (primary manual)
Page 16
... the battery pack attached for about one hour after charging it for details of "InfoLITHIUM" battery pack. (1) Install the battery pack on your camcorder to the DC IN jack with the "InfoLITHIUM" battery pack (M series). Step 1 Preparing the power source Charging the battery pack Use the ...CHG) CAMERA MEMORY/ NETWORK After charging the battery pack Disconnect the AC Adaptor from the DC IN jack on your camcorder. (2) Connect the AC Adaptor supplied with your camcorder. 16 Your camcorder operates only with the DC plug's v mark facing up. (3) Connect the power cord to the AC Adaptor. ...
... the battery pack attached for about one hour after charging it for details of "InfoLITHIUM" battery pack. (1) Install the battery pack on your camcorder to the DC IN jack with the "InfoLITHIUM" battery pack (M series). Step 1 Preparing the power source Charging the battery pack Use the ...CHG) CAMERA MEMORY/ NETWORK After charging the battery pack Disconnect the AC Adaptor from the DC IN jack on your camcorder. (2) Connect the AC Adaptor supplied with your camcorder. 16 Your camcorder operates only with the DC plug's v mark facing up. (3) Connect the power cord to the AC Adaptor. ...

Operating Instructions (primary manual)
Page 17
Until your camcorder calculates the actual remaining battery time "---- Getting Started Step 1 Preparing the power source Note Prevent metallic objects from a wall outlet as soon as possible to ... 240 (180) NP-QM71/QM71D 260 (200) NP-FM91/QM91/QM91D 360 (300) Approximate minutes at 25°C (77°F) to cut off . Recording time DCR-TRV38 Battery pack Recording with the viewfinder Continuous Typical* NP-FM30 (supplied) 95 55 NP-FM50 155 90 NP-FM70 320 185 NP-QM71/QM71D 375...
Until your camcorder calculates the actual remaining battery time "---- Getting Started Step 1 Preparing the power source Note Prevent metallic objects from a wall outlet as soon as possible to ... 240 (180) NP-QM71/QM71D 260 (200) NP-FM91/QM91/QM91D 360 (300) Approximate minutes at 25°C (77°F) to cut off . Recording time DCR-TRV38 Battery pack Recording with the viewfinder Continuous Typical* NP-FM30 (supplied) 95 55 NP-FM50 155 90 NP-FM70 320 185 NP-QM71/QM71D 375...


