Operating Instructions
Page 5
...mode 36 Using the fader function 37 Using special effects - Digital program editing 63 Using with digital effects ...... 54 Enlarging recorded images - SLIDE SHOW 118 Preventing accidental erasure - Date search 57 Searching for a photo - Photo search/Photo scan 58 Digital8... 75 Inserting a scene from a tape - Insert Editing 77 Customizing Your Camcorder Changing the menu settings 79 "Memory Stick" operations (DCR-TRV330/TRV530 only) Using "Memory Stick"-introduction .......... 88 Recording still images on a tape - Basics Recording a picture 19 Shooting backlit subjects ...
...mode 36 Using the fader function 37 Using special effects - Digital program editing 63 Using with digital effects ...... 54 Enlarging recorded images - SLIDE SHOW 118 Preventing accidental erasure - Date search 57 Searching for a photo - Photo search/Photo scan 58 Digital8... 75 Inserting a scene from a tape - Insert Editing 77 Customizing Your Camcorder Changing the menu settings 79 "Memory Stick" operations (DCR-TRV330/TRV530 only) Using "Memory Stick"-introduction .......... 88 Recording still images on a tape - Basics Recording a picture 19 Shooting backlit subjects ...
Operating Instructions
Page 8
...-based TV. Your camcorder records and plays back pictures in the illustrations. Getting started - The DCR-TRV530 is provided with the Digital8 system on page 53... screen TRV230 - - - 6.2 cm (2.5 type) TRV330 z z z 6.2 cm (2.5 type) TRV530 z z z 8.8 cm (3.5 type) z Provided - You, however, cannot use Hi8 /Digital8 video cassettes. Copyright precautions Television programs, films, video...(on your camcorder are shown in the Hi8 /standard 8 (analog) system. Also, your digital camcorder, you read through this manual and operating your camcorder, check the...
...-based TV. Your camcorder records and plays back pictures in the illustrations. Getting started - The DCR-TRV530 is provided with the Digital8 system on page 53... screen TRV230 - - - 6.2 cm (2.5 type) TRV330 z z z 6.2 cm (2.5 type) TRV530 z z z 8.8 cm (3.5 type) z Provided - You, however, cannot use Hi8 /Digital8 video cassettes. Copyright precautions Television programs, films, video...(on your camcorder are shown in the Hi8 /standard 8 (analog) system. Also, your digital camcorder, you read through this manual and operating your camcorder, check the...
Operating Instructions
Page 15
...normally charged battery are about 20 %. 15 Note The table shows the playing time for tapes recorded in the Digital8 system. The battery life will be shorter if you use your camcorder in a cold environment. The playing time of tapes recorded in the Hi8/standard 8 system is reduced by... about 90 % of those of a fully charged battery. Getting started Step 1 Preparing the power supply Playing time DCR-TRV230/TRV330 Battery pack NP-FM30 (supplied)...
...normally charged battery are about 20 %. 15 Note The table shows the playing time for tapes recorded in the Digital8 system. The battery life will be shorter if you use your camcorder in a cold environment. The playing time of tapes recorded in the Hi8/standard 8 system is reduced by... about 90 % of those of a fully charged battery. Getting started Step 1 Preparing the power supply Playing time DCR-TRV230/TRV330 Battery pack NP-FM30 (supplied)...
Operating Instructions
Page 18
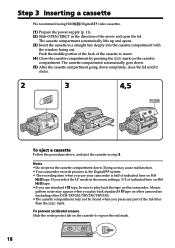
... with the window facing out. Push the middle portion of the back of the lid other DCR-TRV230/TRV330/TRV530). •The cassette compartment may cause malfunction. •Your camcorder records pictures in the Digital8 system. • The recording time when you use standard 8 tape, be sure to play... back the tape on this camcorder. Notes •Do not press the cassette compartment down completely, close the lid until it clicks. 2 3 4,5 4 5 To eject a cassette Follow the procedure above, and eject the cassette in step 3. If you select the LP mode in the menu settings, 3/4 of...
... with the window facing out. Push the middle portion of the back of the lid other DCR-TRV230/TRV330/TRV530). •The cassette compartment may cause malfunction. •Your camcorder records pictures in the Digital8 system. • The recording time when you use standard 8 tape, be sure to play... back the tape on this camcorder. Notes •Do not press the cassette compartment down completely, close the lid until it clicks. 2 3 4,5 4 5 To eject a cassette Follow the procedure above, and eject the cassette in step 3. If you select the LP mode in the menu settings, 3/4 of...
Operating Instructions
Page 26
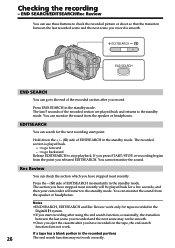
...- END SEARCH/EDITSEARCH/Rec Review You can search for a few seconds, and then your camcorder will be smooth. •Once you eject the cassette after you have stopped most recently will ...return to the end of EDITSEARCH in the Digital8 system. •If you start point. You cannot monitor the sound. If you press ... the point you record is played back. + : to go forward - : to go to the standby mode. Hold down the +/- (7) side of the recorded section after using the end search function, occasionally, the ...
...- END SEARCH/EDITSEARCH/Rec Review You can search for a few seconds, and then your camcorder will be smooth. •Once you eject the cassette after you have stopped most recently will ...return to the end of EDITSEARCH in the Digital8 system. •If you start point. You cannot monitor the sound. If you press ... the point you record is played back. + : to go forward - : to go to the standby mode. Hold down the +/- (7) side of the recorded section after using the end search function, occasionally, the ...
Operating Instructions
Page 28
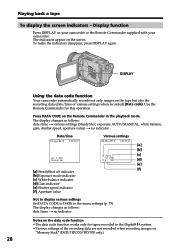
...changes as follows: date/time t no indicator Date/time 40min 0:00:23:01 JUL 4 2001 12:05:56 AM [a] SteadyShot off indicator [b] Exposure mode indicator [c] White balance indicator [d] Gain indicator [e] Shutter speed indicator [f] Aperture value Various settings 40min 0:00:23:01 [a] [b] AUTO [c] 60 AWB ...Memory Stick" (DCR-TRV330/TRV530 only). 28 Playing back a tape To display the screen indicators - Press DATA CODE on the Remote Commander in the Digital8 system. •Various settings of the recording data are not recorded when recording images on your camcorder or the ...
...changes as follows: date/time t no indicator Date/time 40min 0:00:23:01 JUL 4 2001 12:05:56 AM [a] SteadyShot off indicator [b] Exposure mode indicator [c] White balance indicator [d] Gain indicator [e] Shutter speed indicator [f] Aperture value Various settings 40min 0:00:23:01 [a] [b] AUTO [c] 60 AWB ...Memory Stick" (DCR-TRV330/TRV530 only). 28 Playing back a tape To display the screen indicators - Press DATA CODE on the Remote Commander in the Digital8 system. •Various settings of the recording data are not recorded when recording images on your camcorder or the ...
Operating Instructions
Page 30
..., this function does not work for 3 minutes, your camcorder automatically enters the stop mode. Playing back a tape In the various playback modes • Noise may appear when your camcorder; When you play back a tape in the Digital8 system The slow playback can be performed smoothly on the ...playback pause mode • When the playback pause mode lasts for an output signal from the...
..., this function does not work for 3 minutes, your camcorder automatically enters the stop mode. Playing back a tape In the various playback modes • Noise may appear when your camcorder; When you play back a tape in the Digital8 system The slow playback can be performed smoothly on the ...playback pause mode • When the playback pause mode lasts for an output signal from the...

Operating Instructions
Page 38
...Digital effect - Low lux mode of all. (2) Press START/STOP. Tape photo recording Before operating the overlap, wipe, or dot function Your camcorder stores the image on the tape condition, the image may not be recorded clearly. Notes •The overlap, wipe and dot functions work only for tapes recorded in the Digital8...Depending on the tape. The indicator changes as follows: FADER t M.FADER t BOUNCE t MONOTONE t OVERLAP t WIPE t DOT The last selected fader mode is carried out, your camcorder automatically returns to OFF in the menu settings. 38 As the image is set to the normal...
...Digital effect - Low lux mode of all. (2) Press START/STOP. Tape photo recording Before operating the overlap, wipe, or dot function Your camcorder stores the image on the tape condition, the image may not be recorded clearly. Notes •The overlap, wipe and dot functions work only for tapes recorded in the Digital8...Depending on the tape. The indicator changes as follows: FADER t M.FADER t BOUNCE t MONOTONE t OVERLAP t WIPE t DOT The last selected fader mode is carried out, your camcorder automatically returns to OFF in the menu settings. 38 As the image is set to the normal...

Operating Instructions
Page 52
... pressing the - 7 side of EDITSEARCH and release the button at the insert start point [a]. (4) Press START/STOP to the standby mode. Your camcorder returns to start and end points. ZERO SET MEMORY EDITSEARCH Notes •The zero set memory function may be erased. Use the Remote...tapes recorded in the Digital8 system. •The picture and the sound may not work correctly. 52 If a tape has a blank portion in the recorded portions The zero set memory function works only for this operation. [a] [b] (1) While your camcorder is in the standby mode, keep pressing EDITSEARCH...
... pressing the - 7 side of EDITSEARCH and release the button at the insert start point [a]. (4) Press START/STOP to the standby mode. Your camcorder returns to start and end points. ZERO SET MEMORY EDITSEARCH Notes •The zero set memory function may be erased. Use the Remote...tapes recorded in the Digital8 system. •The picture and the sound may not work correctly. 52 If a tape has a blank portion in the recorded portions The zero set memory function works only for this operation. [a] [b] (1) While your camcorder is in the standby mode, keep pressing EDITSEARCH...

Operating Instructions
Page 53
Playing back a tape with this camcorder. Pictures processed by the picture effect function Pictures processed by the picture effect ...function, see page 40. Notes •The picture effect function works only for tapes recorded in the Digital8 system. •You cannot process externally input scenes using the picture effect function. •You cannot ...to select P EFFECT, then press the dial. (4) Turn the SEL/PUSH EXEC dial to select the desired picture effect mode, then press the dial. Advanced Playback Operations - MANUA L SET P EFFECT D EFFECT RETURN OFF NEG. Advanced Playback ...
Playing back a tape with this camcorder. Pictures processed by the picture effect function Pictures processed by the picture effect ...function, see page 40. Notes •The picture effect function works only for tapes recorded in the Digital8 system. •You cannot process externally input scenes using the picture effect function. •You cannot ...to select P EFFECT, then press the dial. (4) Turn the SEL/PUSH EXEC dial to select the desired picture effect mode, then press the dial. Advanced Playback Operations - MANUA L SET P EFFECT D EFFECT RETURN OFF NEG. Advanced Playback ...
Operating Instructions
Page 54
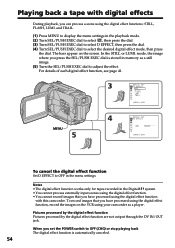
...or stop playing back The digital effect function is stored in the Digital8 system. •You cannot process externally input scenes using the digital effect function. •You cannot record images that you can process a scene using your camcorder as a still image. (5) Turn the SEL... L SET D EFFECT L UM I . and TRAIL. (1) Press MENU to select the desired digital effect mode, then press the dial. IIIIIIII [ MENU ] : END To cancel the digital effect function Set D EFFECT to OFF in the playback mode. (2) Turn SEL/PUSH EXEC dial to select , then press the dial. (3) Turn SEL/PUSH...
...or stop playing back The digital effect function is stored in the Digital8 system. •You cannot process externally input scenes using the digital effect function. •You cannot record images that you can process a scene using your camcorder as a still image. (5) Turn the SEL... L SET D EFFECT L UM I . and TRAIL. (1) Press MENU to select the desired digital effect mode, then press the dial. IIIIIIII [ MENU ] : END To cancel the digital effect function Set D EFFECT to OFF in the playback mode. (2) Turn SEL/PUSH EXEC dial to select , then press the dial. (3) Turn SEL/PUSH...
Operating Instructions
Page 55
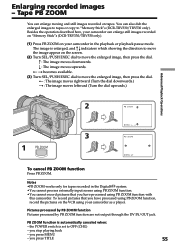
... and still images recorded on your camcorder can enlarge still images recorded on "Memory Stick"s (DCR-TRV330/TRV530 only). (1) Press PB ZOOM on tapes. Notes •PB ZOOM works only for tapes recorded in the playback or playback pause mode. the POWER switch is automatically canceled when: - Besides the operation described here, your camcorder in the Digital8 system...
... and still images recorded on your camcorder can enlarge still images recorded on "Memory Stick"s (DCR-TRV330/TRV530 only). (1) Press PB ZOOM on tapes. Notes •PB ZOOM works only for tapes recorded in the playback or playback pause mode. the POWER switch is automatically canceled when: - Besides the operation described here, your camcorder in the Digital8 system...

Operating Instructions
Page 56
... counter reaches approximately zero. Quickly locating a scene using the zero set memory function Your camcorder goes forward or backward to automatically stop playback. (4) Press m to rewind the tape to locate later.... If a tape has a blank portion in the Digital8 system. • When you press ZERO SET MEMORY before rewinding the tape, the zero set memory... shows "0:00:00" and the ZERO SET MEMORY indicator flashes on during playback. (1) In the playback mode, press DISPLAY. (2) Press ZERO SET MEMORY at a desired scene having a counter value of several seconds...
... counter reaches approximately zero. Quickly locating a scene using the zero set memory function Your camcorder goes forward or backward to automatically stop playback. (4) Press m to rewind the tape to locate later.... If a tape has a blank portion in the Digital8 system. • When you press ZERO SET MEMORY before rewinding the tape, the zero set memory... shows "0:00:00" and the ZERO SET MEMORY indicator flashes on during playback. (1) In the playback mode, press DISPLAY. (2) Press ZERO SET MEMORY at a desired scene having a counter value of several seconds...

Operating Instructions
Page 57
Your camcorder automatically starts playback at each recording date. If a tape has a blank portion in the Digital8 system. •If one day's recording is [b], press . Use the Remote Commander for tapes recorded in the recorded portions The date search function ... work correctly. 57 Date search You can automatically search for the previous or next date. 2 SEARCH MODE DATE 00 SEARCH 3 DATE 01 SEARCH To stop searching Press x. Use this operation. or >, the camcorder searches for the point where the recording date changes and start playback from that point (Date search). ...
Your camcorder automatically starts playback at each recording date. If a tape has a blank portion in the Digital8 system. •If one day's recording is [b], press . Use the Remote Commander for tapes recorded in the recorded portions The date search function ... work correctly. 57 Date search You can automatically search for the previous or next date. 2 SEARCH MODE DATE 00 SEARCH 3 DATE 01 SEARCH To stop searching Press x. Use this operation. or >, the camcorder searches for the point where the recording date changes and start playback from that point (Date search). ...
Operating Instructions
Page 60
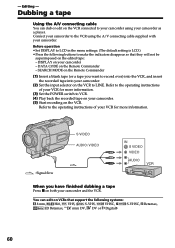
... the following buttons to your camcorder using the A/V connecting cable supplied with your camcorder. (5) Start recording on the Remote Commander - DISPLAY on the edited tape: - - Connect your camcorder to record over) into the VCR, and insert the recorded tape into your camcorder - SEARCH MODE on the Remote Commander (1) ...so that they will not be superimposed on your camcorder. (2) Set the input selector on VCRs that support the following systems: 8 mm, Hi8, VHS, S-VHS, VHSC, S-VHSC, Betamax, ED Betamax, mini DV, DV or Digital8 60 You can dub or edit on both ...
... the following buttons to your camcorder using the A/V connecting cable supplied with your camcorder. (5) Start recording on the Remote Commander - DISPLAY on the edited tape: - - Connect your camcorder to record over) into the VCR, and insert the recorded tape into your camcorder - SEARCH MODE on the Remote Commander (1) ...so that they will not be superimposed on your camcorder. (2) Set the input selector on VCRs that support the following systems: 8 mm, Hi8, VHS, S-VHS, VHSC, S-VHSC, Betamax, ED Betamax, mini DV, DV or Digital8 60 You can dub or edit on both ...
Operating Instructions
Page 63
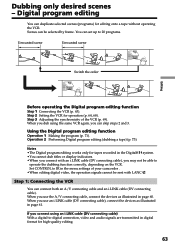
... cable). Step 3 Adjusting the synchronicity of your camcorder . •When editing digital video, the operation signals cannot be able to -digital connection, video and audio signals are transmitted in digital format for operation (p. 64, 68). Using the Digital program editing function Operation 1 Making the program (p.... 71). If you connect using the same VCR again, you can set up to IR in the Digital8 ...
... cable). Step 3 Adjusting the synchronicity of your camcorder . •When editing digital video, the operation signals cannot be able to -digital connection, video and audio signals are transmitted in digital format for operation (p. 64, 68). Using the Digital program editing function Operation 1 Making the program (p.... 71). If you connect using the same VCR again, you can set up to IR in the Digital8 ...
Operating Instructions
Page 75
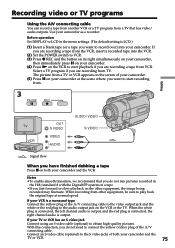
Use your camcorder and the TV or VCR. 75 Before operation Set DISPLAY to LCD in the Hi8/standard 8 with the Digital8 system on a tape. •If you fast-forward or slow-... the A/V connecting cable. Connect an S video cable (optional) to the S video jacks of both your camcorder and the VCR. When the white plug is connected, the left channel audio is output, and the red plug... video output jack and the white or the red plug to the audio output jack on both your camcorder as a recorder. When recording from other equipment, the image being recorded may fluctuate. If your TV...
Use your camcorder and the TV or VCR. 75 Before operation Set DISPLAY to LCD in the Hi8/standard 8 with the Digital8 system on a tape. •If you fast-forward or slow-... the A/V connecting cable. Connect an S video cable (optional) to the S video jacks of both your camcorder and the VCR. When the white plug is connected, the left channel audio is output, and the red plug... video output jack and the white or the red plug to the audio output jack on both your camcorder as a recorder. When recording from other equipment, the image being recorded may fluctuate. If your TV...

Operating Instructions
Page 78
...Insert Editing (1) Set the POWER switch to VCR. (2) On the VCR, locate just before the insert start point [a], then press X to set your camcorder to the recording pause mode. (6) First press X on the VCR, and after step 5 to start and end points will be distorted at the end of the insert stored... in the Digital8 system. •The picture and sound recorded on the Remote Commander. Then press X to set memory function works only for tapes...
...Insert Editing (1) Set the POWER switch to VCR. (2) On the VCR, locate just before the insert start point [a], then press X to set your camcorder to the recording pause mode. (6) First press X on the VCR, and after step 5 to start and end points will be distorted at the end of the insert stored... in the Digital8 system. •The picture and sound recorded on the Remote Commander. Then press X to set memory function works only for tapes...
Operating Instructions
Page 82
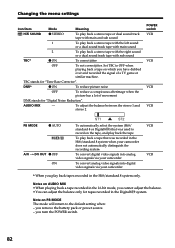
...play back tapes recorded in the Hi8/standard 8 system when your camcorder does not automatically distinguish the recording system To convert digital video signals into digital video siginals via your camcorder. Changing the menu settings Icon/item Mode Meaning HiFi SOUND z STEREO To play back a stereo tape ... the balance between the stereo 1 and stereo 2 POWER switch VCR VCR VCR VCR PB MODE z AUTO / A/V t DV OUT z OFF ON ST1 ST2 To automatically select the system (Hi8/ standard 8 or Digital8 ) that was recorded in the Hi8/standard 8 system only. VCR VCR * When you...
...play back tapes recorded in the Hi8/standard 8 system when your camcorder does not automatically distinguish the recording system To convert digital video signals into digital video siginals via your camcorder. Changing the menu settings Icon/item Mode Meaning HiFi SOUND z STEREO To play back a stereo tape ... the balance between the stereo 1 and stereo 2 POWER switch VCR VCR VCR VCR PB MODE z AUTO / A/V t DV OUT z OFF ON ST1 ST2 To automatically select the system (Hi8/ standard 8 or Digital8 ) that was recorded in the Hi8/standard 8 system only. VCR VCR * When you...
Operating Instructions
Page 85
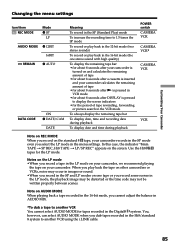
... one tape or you record a tape in the LP mode on your camcorder records in the SP mode even you dub tapes recorded in the Hi8/standard 8 system to another VCR You cannot select AUDIO MODE for tapes recorded in the Digital8 system. Note on one stereo sound with high quality) To ...display the remaining tape bar: • for about 8 seconds after your camcorder is turned on and calculates the remaining amount of tape •...
... one tape or you record a tape in the LP mode on your camcorder records in the SP mode even you dub tapes recorded in the Hi8/standard 8 system to another VCR You cannot select AUDIO MODE for tapes recorded in the Digital8 system. Note on one stereo sound with high quality) To ...display the remaining tape bar: • for about 8 seconds after your camcorder is turned on and calculates the remaining amount of tape •...


