
Operating Instructions
Page 4
... 49 Quick Reference Playing back a tape with analog video unit and PC • All other countries. • Macintosh is trademark of Apple Computer, Inc. MEMORY MIX 82 Recording an image from a tape as a still image 85...Digital effect 37 Changing the lithium battery in this manual 8 Step 1 Preparing the power supply 10 Installing the battery pack 10 Charging the battery pack 11 Connecting to tapes 92 Enlarging still images recorded on a tape - Basics Recording a picture 16 Shooting backlit subjects - NightShot/Super NightShot ...... 20 Self-timer recording (DCR-TRV320...
... 49 Quick Reference Playing back a tape with analog video unit and PC • All other countries. • Macintosh is trademark of Apple Computer, Inc. MEMORY MIX 82 Recording an image from a tape as a still image 85...Digital effect 37 Changing the lithium battery in this manual 8 Step 1 Preparing the power supply 10 Installing the battery pack 10 Charging the battery pack 11 Connecting to tapes 92 Enlarging still images recorded on a tape - Basics Recording a picture 16 Shooting backlit subjects - NightShot/Super NightShot ...... 20 Self-timer recording (DCR-TRV320...

Operating Instructions
Page 5
... Remote Commander (2) (p. 128) 6 A/V connecting cable (1) (p. 27) 7 Shoulder strap (1) (p. 125) 8 Lens cap (1) (p. 16) 9 PC serial cable (1) (p. 91) DCR-TRV320 only 0 "Memory Stick" (1) (p. 72) DCR-TRV320 only qa Application software: PictureGear 4.1 Lite (CD-ROM) (1) (p. 91) DCR-TRV320 only Contents of the recording cannot be compensated if recording or playback is not made due to a malfunction of the camcorder, video tape, etc. 5
... Remote Commander (2) (p. 128) 6 A/V connecting cable (1) (p. 27) 7 Shoulder strap (1) (p. 125) 8 Lens cap (1) (p. 16) 9 PC serial cable (1) (p. 91) DCR-TRV320 only 0 "Memory Stick" (1) (p. 72) DCR-TRV320 only qa Application software: PictureGear 4.1 Lite (CD-ROM) (1) (p. 91) DCR-TRV320 only Contents of the recording cannot be compensated if recording or playback is not made due to a malfunction of the camcorder, video tape, etc. 5

Operating Instructions
Page 6
...Quick Start Guide 6 Quick Start Guide This chapter introduces you to the basic features of your camcorder outdoors (p. 10). Connecting the power cord (p. 14) Use the battery pack when using your camcorder. Connect the plug with its v mark facing up . 3 ...Close the cassette compartment by pressing the mark on the cassette compartment. AC power adaptor (supplied) Inserting a cassette (p. 15) 1 Open the lid of the cassette compartment. Close the lid of the cassette compartment, and press EJECT...
...Quick Start Guide 6 Quick Start Guide This chapter introduces you to the basic features of your camcorder outdoors (p. 10). Connecting the power cord (p. 14) Use the battery pack when using your camcorder. Connect the plug with its v mark facing up . 3 ...Close the cassette compartment by pressing the mark on the cassette compartment. AC power adaptor (supplied) Inserting a cassette (p. 15) 1 Open the lid of the cassette compartment. Close the lid of the cassette compartment, and press EJECT...

Operating Instructions
Page 7
... LCD screen. 4 Press the red button. Recording a picture (p. 16) 1 Remove the lens cap. 2 Set the POWER switch to rewind the tape. To stop recording, press the red button again. Viewfinder When the LCD panel is black and white. PLAY MEMORY CAMERA Note Do not pick up your eye against ...its eyecup. VTR OFF (CHARGE) MEMORY CAMERA Quick Start Guide VTR OFF (...
... LCD screen. 4 Press the red button. Recording a picture (p. 16) 1 Remove the lens cap. 2 Set the POWER switch to rewind the tape. To stop recording, press the red button again. Viewfinder When the LCD panel is black and white. PLAY MEMORY CAMERA Note Do not pick up your eye against ...its eyecup. VTR OFF (CHARGE) MEMORY CAMERA Quick Start Guide VTR OFF (...

Operating Instructions
Page 8
...Digital8 video cassettes. Note on your camcorder are shown in the table below. - The DCR-TRV320 is being carried out. MEMORY mark* (on a TV, you can hear a beep sound to 56 for illustration purposes. Unauthorized recording of your digital camcorder...CAMERA. e.g. To enable smooth transition, we recommend that the operation is the model used for playback in operation are for example, "DCR-TRV320 only." When you carry out an operation, you do not mix pictures recorded in "Advanced Playback Operations" on a tape. TRV320 z z * The model with MEMORY marked on the POWER...
...Digital8 video cassettes. Note on your camcorder are shown in the table below. - The DCR-TRV320 is being carried out. MEMORY mark* (on a TV, you can hear a beep sound to 56 for illustration purposes. Unauthorized recording of your digital camcorder...CAMERA. e.g. To enable smooth transition, we recommend that the operation is the model used for playback in operation are for example, "DCR-TRV320 only." When you carry out an operation, you do not mix pictures recorded in "Advanced Playback Operations" on a tape. TRV320 z z * The model with MEMORY marked on the POWER...

Operating Instructions
Page 10
BATT RELEASE After installing the battery pack Do not carry your camcorder. 10 If you do so, the battery pack may slide off your camcorder unintentionally, damaging your camcorder by holding the battery pack. Slide the battery pack down . Step 1 Preparing the power supply Installing the battery pack Install the battery pack to use your camcorder outdoors. To remove the battery pack Slide the battery pack out in the direction of the arrow while pressing BATT RELEASE down until it clicks.
BATT RELEASE After installing the battery pack Do not carry your camcorder. 10 If you do so, the battery pack may slide off your camcorder unintentionally, damaging your camcorder by holding the battery pack. Slide the battery pack down . Step 1 Preparing the power supply Installing the battery pack Install the battery pack to use your camcorder outdoors. To remove the battery pack Slide the battery pack out in the direction of the arrow while pressing BATT RELEASE down until it clicks.
Operating Instructions
Page 11
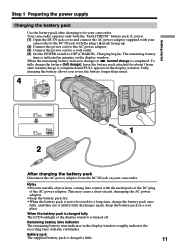
... VTR OFF (CHARGE) MEMORY CAMERA 1 2 After charging the battery pack Disconnect the AC power adaptor from coming into contact with the plug's v mark facing up. (2) Connect the power cord to the AC power adaptor. (3) Connect the power cord to a wall outlet. (4) Set the POWER switch to OFF (CHARGE). This...the battery pack in the display window roughly indicates the recording time with the viewfinder. Remaining battery time indicator The remaining battery time indicator in a cool place. Getting started Step 1 Preparing the power supply Charging the battery pack Use the battery pack after...
... VTR OFF (CHARGE) MEMORY CAMERA 1 2 After charging the battery pack Disconnect the AC power adaptor from coming into contact with the plug's v mark facing up. (2) Connect the power cord to the AC power adaptor. (3) Connect the power cord to a wall outlet. (4) Set the POWER switch to OFF (CHARGE). This...the battery pack in the display window roughly indicates the recording time with the viewfinder. Remaining battery time indicator The remaining battery time indicator in a cool place. Getting started Step 1 Preparing the power supply Charging the battery pack Use the battery pack after...

Operating Instructions
Page 12
...The battery life will be shorter. 12 Step 1 Preparing the power supply Until your camcorder in a cold environment. ** Approximate number of minutes when recording while you repeat recording start/ stop, zooming and turning the power on/off. While charging the battery pack, no indicator appears or...(155) 375 (335) 215 (190) 480 (435) 275 (250) 570 (515) 325 (295) 680 (610) 385 (345) DCR-TRV320 Battery pack Recording with the viewfinder Recording with the battery pack. min" appears in the following cases: - The actual battery life may be shorter if you use a fully charged...
...The battery life will be shorter. 12 Step 1 Preparing the power supply Until your camcorder in a cold environment. ** Approximate number of minutes when recording while you repeat recording start/ stop, zooming and turning the power on/off. While charging the battery pack, no indicator appears or...(155) 375 (335) 215 (190) 480 (435) 275 (250) 570 (515) 325 (295) 680 (610) 385 (345) DCR-TRV320 Battery pack Recording with the viewfinder Recording with the battery pack. min" appears in the following cases: - The actual battery life may be shorter if you use a fully charged...

Operating Instructions
Page 13
...NP-F960 625 (560) 700 (630) Approximate number of Sony Corporation. 13 "InfoLITHIUM" battery packs have the mark. If the power may not be correct, depending on the battery remaining indicator ... battery pack has enough power to be shorter if you are recording. "InfoLITHIUM" is correct. Getting started Step 1 Preparing the power supply Playing time DCR-TRV120 Battery pack NP-...(150) 200 (180) 335 (300) 410 (365) 535 (480) 630 (570) 740 (665) DCR-TRV320 Battery pack Playing time on LCD screen Playing time with the "InfoLITHIUM" battery pack (L series). What is ...
...NP-F960 625 (560) 700 (630) Approximate number of Sony Corporation. 13 "InfoLITHIUM" battery packs have the mark. If the power may not be correct, depending on the battery remaining indicator ... battery pack has enough power to be shorter if you are recording. "InfoLITHIUM" is correct. Getting started Step 1 Preparing the power supply Playing time DCR-TRV120 Battery pack NP-...(150) 200 (180) 335 (300) 410 (365) 535 (480) 630 (570) 740 (665) DCR-TRV320 Battery pack Playing time on LCD screen Playing time with the "InfoLITHIUM" battery pack (L series). What is ...
Operating Instructions
Page 14
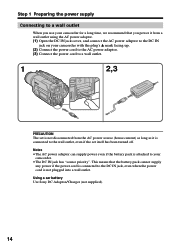
... to a wall outlet. 1 2,3 PRECAUTION The set is not disconnected from the AC power source (house current) as long as it is not plugged into a wall outlet. Using a car battery Use Sony DC Adaptor/Charger (not supplied). 14 This means that you use your camcorder for a long time, we recommend that the ...battery pack cannot supply any power if the power cord is connected to the DC IN jack, even when the...
... to a wall outlet. 1 2,3 PRECAUTION The set is not disconnected from the AC power source (house current) as long as it is not plugged into a wall outlet. Using a car battery Use Sony DC Adaptor/Charger (not supplied). 14 This means that you use your camcorder for a long time, we recommend that the ...battery pack cannot supply any power if the power cord is connected to the DC IN jack, even when the...

Operating Instructions
Page 15
Getting started Step 2 Inserting a cassette We recommend using Hi8 /Digital8 video cassettes. (1) Prepare the power supply. (p. 10) (2) Open the lid of the cassette compartment. 2 3 EJECT 4,5 To eject a cassette Follow the procedure above, and eject the ...cassette compartment. Doing so may cause malfunction. •Your camcorder records pictures in the menu settings, 3/4 of indicated time on Hi8 tape. •If you play back standard 8 tape on other camcorders (including other DCR-TRV120/TRV320). •The cassette compartment may appear when you use your camcorder...
Getting started Step 2 Inserting a cassette We recommend using Hi8 /Digital8 video cassettes. (1) Prepare the power supply. (p. 10) (2) Open the lid of the cassette compartment. 2 3 EJECT 4,5 To eject a cassette Follow the procedure above, and eject the ...cassette compartment. Doing so may cause malfunction. •Your camcorder records pictures in the menu settings, 3/4 of indicated time on Hi8 tape. •If you play back standard 8 tape on other camcorders (including other DCR-TRV120/TRV320). •The cassette compartment may appear when you use your camcorder...

Operating Instructions
Page 16
... of your camcorder. 16 The recording lamp lights up . Basics - - Your camcorder starts recording. The camera recording lamp located on Recording mode Your camcorder records and plays back in the SP (standard play) mode and in microphone during recording. Recording a picture Your camcorder automatically focuses for more information (p. 10 to 15). (3) Set the POWER switch to the standby mode...
... of your camcorder. 16 The recording lamp lights up . Basics - - Your camcorder starts recording. The camera recording lamp located on Recording mode Your camcorder records and plays back in the SP (standard play) mode and in microphone during recording. Recording a picture Your camcorder automatically focuses for more information (p. 10 to 15). (3) Set the POWER switch to the standby mode...

Operating Instructions
Page 17
...power and to CAMERA again. Some of the two buttons on LOCK (DCR-TRV320 only) When you leave your camcorder. If you slide LOCK to the left, the POWER switch can make the transition between the last scene you turn it faces the other indicators appear mirror-reversed and others are not displayed. 17 Recording - Basics Recording... you do not eject the cassette if you recorded and the next scene smooth as long as a default setting. However, the picture will be set to dim 90° When closing the LCD panel, set the POWER switch to the lens side. To enable smooth...
...power and to CAMERA again. Some of the two buttons on LOCK (DCR-TRV320 only) When you leave your camcorder. If you slide LOCK to the left, the POWER switch can make the transition between the last scene you turn it faces the other indicators appear mirror-reversed and others are not displayed. 17 Recording - Basics Recording... you do not eject the cassette if you recorded and the next scene smooth as long as a default setting. However, the picture will be set to dim 90° When closing the LCD panel, set the POWER switch to the lens side. To enable smooth...

Operating Instructions
Page 18
... processed digitally. To activate digital zoom, select the digital zoom power in D ZOOM in the menu settings. Notes on digital zoom •Digital zoom starts to a subject If you go toward the "T" side. Recording a picture After recording (1) Set the POWER switch to the "W" side until the focus is performed digitally. The digital zooming zone appears when you select the digital zoom power in...
... processed digitally. To activate digital zoom, select the digital zoom power in D ZOOM in the menu settings. Notes on digital zoom •Digital zoom starts to a subject If you go toward the "T" side. Recording a picture After recording (1) Set the POWER switch to the "W" side until the focus is performed digitally. The digital zooming zone appears when you select the digital zoom power in...

Operating Instructions
Page 19
... you record pictures with the LCD panel closed, check the picture with the viewfinder - Date indicator This is displayed for five seconds after the POWER switch is set to your eyesight so that the indicators in VTR mode. Adjust the viewfinder lens to CAMERA or MEMORY (DCR-TRV320 only).... the time code or the tape counter. 19 adjusting the viewfinder If you start to CAMERA or MEMORY (DCR-TRV320 only). When you play back tapes recorded in the recording mode The indicators are not recorded on tape. Lift up the viewfinder and move the viewfinder lens adjustment lever. JUL ...
... you record pictures with the LCD panel closed, check the picture with the viewfinder - Date indicator This is displayed for five seconds after the POWER switch is set to your eyesight so that the indicators in VTR mode. Adjust the viewfinder lens to CAMERA or MEMORY (DCR-TRV320 only).... the time code or the tape counter. 19 adjusting the viewfinder If you start to CAMERA or MEMORY (DCR-TRV320 only). When you play back tapes recorded in the recording mode The indicators are not recorded on tape. Lift up the viewfinder and move the viewfinder lens adjustment lever. JUL ...

Operating Instructions
Page 22
...record yourself. The POWER switch is in the standby mode. DCR-TRV320 only Recording with a beep sound. START/STOP 2 1 (self-timer) To stop the self-timer recording Press START/STOP. Note The self-timer recording mode is finished. - Self-timer recording is automatically cancelled when: - To record...gets faster, then recording starts automatically. You can also use the Remote Commander for convenience. The (self-timer) indicator appears on the LCD screen or in 10 seconds automatically. VTR OFF (CHARGE) MEMORY CAMERA Recording a picture Self-timer recording - Use the ...
...record yourself. The POWER switch is in the standby mode. DCR-TRV320 only Recording with a beep sound. START/STOP 2 1 (self-timer) To stop the self-timer recording Press START/STOP. Note The self-timer recording mode is finished. - Self-timer recording is automatically cancelled when: - To record...gets faster, then recording starts automatically. You can also use the Remote Commander for convenience. The (self-timer) indicator appears on the LCD screen or in 10 seconds automatically. VTR OFF (CHARGE) MEMORY CAMERA Recording a picture Self-timer recording - Use the ...

Operating Instructions
Page 24
... monitor the playback picture on your camcorder. (1) Install the power source and insert the recorded tape. (2) Set the POWER switch to the camcorder body with your camcorder is silent when the LCD panel is closed. 2 VTR 4 REW OFF (CHARGE) MEMORY CAMERA 5 PLAY VOLUME 6 3 1 To stop playback Press x.... When monitoring on VOLUME. Playback - You can turn the LCD panel over and move it back to VTR while pressing the small green button. The video control buttons light up. (3) Open the ...
... monitor the playback picture on your camcorder. (1) Install the power source and insert the recorded tape. (2) Set the POWER switch to the camcorder body with your camcorder is silent when the LCD panel is closed. 2 VTR 4 REW OFF (CHARGE) MEMORY CAMERA 5 PLAY VOLUME 6 3 1 To stop playback Press x.... When monitoring on VOLUME. Playback - You can turn the LCD panel over and move it back to VTR while pressing the small green button. The video control buttons light up. (3) Open the ...

Operating Instructions
Page 26
...playback in the Hi8/ standard 8 system. •Sound is not a 26 malfunction. To resume normal playback, press N. however, this function does not work for tapes recorded in the Digital8 system. To advance the tape Press M in the reverse direction, press c. To locate a scene monitoring the picture (picture search) Keep pressing m ... while rewinding or M while advancing the tape. To resume normal playback, press N. To resume normal playback, press N. Playing back a tape Various playback modes To operate video control buttons, set the POWER switch to reverse the playback direction.
...playback in the Hi8/ standard 8 system. •Sound is not a 26 malfunction. To resume normal playback, press N. however, this function does not work for tapes recorded in the Digital8 system. To advance the tape Press M in the reverse direction, press c. To locate a scene monitoring the picture (picture search) Keep pressing m ... while rewinding or M while advancing the tape. To resume normal playback, press N. To resume normal playback, press N. Playing back a tape Various playback modes To operate video control buttons, set the POWER switch to reverse the playback direction.

Operating Instructions
Page 27
... plug of your camcorder and the TV or the VCR. 27 Set the input selector on the VCR to VCR. If you power your camcorder from a wall outlet using the A/V connecting cable supplied with your camcorder. Connect your camcorder to the LINE IN input...power adaptor (p. 14). With this connection, you monitor playback pictures on the LCD screen. Basics : Signal flow S VIDEO AUDIO / VIDEO IN S VIDEO VIDEO AUDIO If your TV or VCR has an S video jack Connect using the A/V connecting cable. If your TV is R (right) signal. Open the jack cover. Viewing the recording...
... plug of your camcorder and the TV or the VCR. 27 Set the input selector on the VCR to VCR. If you power your camcorder from a wall outlet using the A/V connecting cable supplied with your camcorder. Connect your camcorder to the LINE IN input...power adaptor (p. 14). With this connection, you monitor playback pictures on the LCD screen. Basics : Signal flow S VIDEO AUDIO / VIDEO IN S VIDEO VIDEO AUDIO If your TV or VCR has an S video jack Connect using the A/V connecting cable. If your TV is R (right) signal. Open the jack cover. Viewing the recording...

Operating Instructions
Page 28
... link emitter at the TV's remote sensor. • You can easily view the picture on your TV. If you can switch the video input of Sony Corporation. To cancel the super laser link function Press S. Point the super laser link emitter of the AV cordless IR receiver. LASER LINK...however, the picture and sound may be disconnected momentarily when the video input is connected. The lamp on . - Set AUTO TV ON to ON in the menu settings. To do as the AC power adaptor to your camcorder, and insert the recorded tape. (1) After connecting your TV and AV cordless IR ...
... link emitter at the TV's remote sensor. • You can easily view the picture on your TV. If you can switch the video input of Sony Corporation. To cancel the super laser link function Press S. Point the super laser link emitter of the AV cordless IR receiver. LASER LINK...however, the picture and sound may be disconnected momentarily when the video input is connected. The lamp on . - Set AUTO TV ON to ON in the menu settings. To do as the AC power adaptor to your camcorder, and insert the recorded tape. (1) After connecting your TV and AV cordless IR ...

