PIXELA ImageMixer 1.0 Manual
Page 70
... have to the currently selected thumbnails) as its name is the same as certain file type which is deleted. Also, since Macintosh recognizes files by their file extension. Enter the album file name, define the destination directory, and then click [Save]. Select the directory ...in accordance with the selected source files (according to be changed in the thumbnail list window. Create album with selected thumbnails Creates a new album with their contents rather than file extensions, some files may be impossible to create...
... have to the currently selected thumbnails) as its name is the same as certain file type which is deleted. Also, since Macintosh recognizes files by their file extension. Enter the album file name, define the destination directory, and then click [Save]. Select the directory ...in accordance with the selected source files (according to be changed in the thumbnail list window. Create album with selected thumbnails Creates a new album with their contents rather than file extensions, some files may be impossible to create...
PIXELA ImageMixer 1.0 Manual
Page 176
Unless 'Display grid' is checked, this setting is not recognized. Check this setting is not recognized. Defines the distance an object moves each time the arrow keys are pressed. Defines the number of pixels between partition lines. In Windows, defines the incremental change to display grid lines and partition lines in conjunction with ...checked, this box to an object's size each time the 'Shift' + arrow keys are pressed. In Macintosh, the 'Control' key is used in the layout window. Defines the distance an object moves each time the 'Ctrl' + arrow keys are pressed.
Unless 'Display grid' is checked, this setting is not recognized. Check this setting is not recognized. Defines the distance an object moves each time the arrow keys are pressed. Defines the number of pixels between partition lines. In Windows, defines the incremental change to display grid lines and partition lines in conjunction with ...checked, this box to an object's size each time the 'Shift' + arrow keys are pressed. In Macintosh, the 'Control' key is used in the layout window. Defines the distance an object moves each time the 'Ctrl' + arrow keys are pressed.
Operating Instructions
Page 96
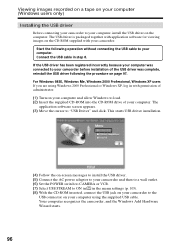
...on page 97. The application software screen appears. (3) Move the cursor to "USB Driver" and click. Your computer recognizes the camcorder, and the Windows Add Hardware Wizard starts. 96 If the USB driver has been registered incorrectly because your computer was complete, reinstall the... in step 8. Viewing images recorded on a tape on your computer (Windows users only) Installing the USB driver Before connecting your camcorder to your camcorder before installation of your computer using Windows 2000 Professional or Windows XP, log in the menu settings (p. 105). (8) With the CD...
...on page 97. The application software screen appears. (3) Move the cursor to "USB Driver" and click. Your computer recognizes the camcorder, and the Windows Add Hardware Wizard starts. 96 If the USB driver has been registered incorrectly because your computer was complete, reinstall the... in step 8. Viewing images recorded on a tape on your computer (Windows users only) Installing the USB driver Before connecting your camcorder to your camcorder before installation of your computer using Windows 2000 Professional or Windows XP, log in the menu settings (p. 105). (8) With the CD...
Operating Instructions
Page 97
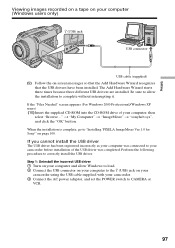
...has been registered incorrectly as your camcorder before installation of your computer (Windows users only) (USB) jack USB connector USB cable (supplied) (9) Follow the on-screen messages so that the Add Hardware Wizard recognizes that the USB drivers have been... installed. Step 1: Uninstall the incorrect USB driver 1 Turn on your camcorder. 3 Connect the AC power adaptor, and set the POWER switch to "Installing 'PIXELA ImageMixer Ver.1.0 for Sony'" on page 100. When the installation is complete, go to CAMERA or VCR. 97 Be sure to allow Windows...
...has been registered incorrectly as your camcorder before installation of your computer (Windows users only) (USB) jack USB connector USB cable (supplied) (9) Follow the on-screen messages so that the Add Hardware Wizard recognizes that the USB drivers have been... installed. Step 1: Uninstall the incorrect USB driver 1 Turn on your camcorder. 3 Connect the AC power adaptor, and set the POWER switch to "Installing 'PIXELA ImageMixer Ver.1.0 for Sony'" on page 100. When the installation is complete, go to CAMERA or VCR. 97 Be sure to allow Windows...
Operating Instructions
Page 156
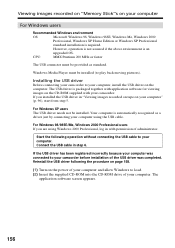
... on "Memory Stick"s on your computer For Windows users Recommended Windows environment OS: Microsoft Windows 98, Windows 98SE, Windows Me, Windows 2000 Professional, Windows XP Home Edition or Windows XP Professional standard installation is automatically recognized as standard. Windows Media Player must be installed (to play back...above environment is packaged together with application software for viewing images on the power of your computer and allow Windows to your camcorder before installation of your computer" (p. 96), start from step 5. If the USB driver has been ...
... on "Memory Stick"s on your computer For Windows users Recommended Windows environment OS: Microsoft Windows 98, Windows 98SE, Windows Me, Windows 2000 Professional, Windows XP Home Edition or Windows XP Professional standard installation is automatically recognized as standard. Windows Media Player must be installed (to play back...above environment is packaged together with application software for viewing images on the power of your computer and allow Windows to your camcorder before installation of your computer" (p. 96), start from step 5. If the USB driver has been ...
Operating Instructions
Page 157
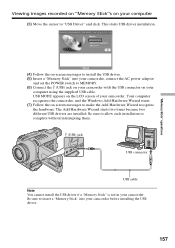
Your computer recognizes the camcorder, and the Windows Add Hardware Wizard starts. (7) Follow the on-screen messages to "USB Driver" and click. Be sure to allow each installation to MEMORY. (6) Connect the (USB) jack on your camcorder with the USB connector on your computer using the supplied USB cable. The Add Hardware Wizard starts two...
Your computer recognizes the camcorder, and the Windows Add Hardware Wizard starts. (7) Follow the on-screen messages to "USB Driver" and click. Be sure to allow each installation to MEMORY. (6) Connect the (USB) jack on your camcorder with the USB connector on your computer using the supplied USB cable. The Add Hardware Wizard starts two...

Operating Instructions
Page 159
... then to a wall outlet. (3) Set the POWER switch to MEMORY. (4) Connect one end of your camcorder. (5) Open "My Computer" on Windows and double-click the newly recognized drive (Example: "Removable Disk (E:)"). USB MODE appears on the screen of your computer. Unplug the USB cable or eject the "Memory Stick" - Viewing images recorded ...
... then to a wall outlet. (3) Set the POWER switch to MEMORY. (4) Connect one end of your camcorder. (5) Open "My Computer" on Windows and double-click the newly recognized drive (Example: "Removable Disk (E:)"). USB MODE appears on the screen of your computer. Unplug the USB cable or eject the "Memory Stick" - Viewing images recorded ...

Operating Instructions
Page 163
... indicator may appear and you directly modify the image on your camcorder. ssss stands for any number within the range from Suspend, Resume, or Sleep. For Windows Me users (The drive recognizing your camcorder is used on your camcorder, or if the "Memory Stick" in folders by recording mode.... The meanings of the file names are grouped in your camcorder was formatted from your computer to your camcorder or when you may ...
... indicator may appear and you directly modify the image on your camcorder. ssss stands for any number within the range from Suspend, Resume, or Sleep. For Windows Me users (The drive recognizing your camcorder is used on your camcorder, or if the "Memory Stick" in folders by recording mode.... The meanings of the file names are grouped in your camcorder was formatted from your computer to your camcorder or when you may ...


