
Operating Instructions
Page 2
... the same time it is very easy to persons. Your Handycam is loaded with superior picture and sound quality. RECYCLING LITHIUM-ION BATTERIES Lithium-Ion batteries are recyclable. OPERATION IS SUBJECT TO THE FOLLOWING TWO CONDITIONS:...OF THE FCC RULES. THIS CLASS B DIGITAL APPARATUS COMPLIES WITH CANADIAN ICES-003. 2 Congratulations on your used rechargeable batteries to rain or moisture. Welcome! Never expose the battery pack to come. You will soon be... For more information regarding recycling of this Sony Handycam. Caution: Do not handle damaged or leaking Lithium-Ion...
... the same time it is very easy to persons. Your Handycam is loaded with superior picture and sound quality. RECYCLING LITHIUM-ION BATTERIES Lithium-Ion batteries are recyclable. OPERATION IS SUBJECT TO THE FOLLOWING TWO CONDITIONS:...OF THE FCC RULES. THIS CLASS B DIGITAL APPARATUS COMPLIES WITH CANADIAN ICES-003. 2 Congratulations on your used rechargeable batteries to rain or moisture. Welcome! Never expose the battery pack to come. You will soon be... For more information regarding recycling of this Sony Handycam. Caution: Do not handle damaged or leaking Lithium-Ion...
Operating Instructions
Page 5
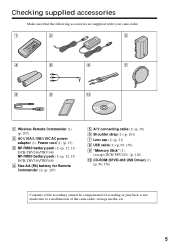
... Make sure that the following accessories are supplied with your camcorder. 1 2 3 4 5 6 7 8 9 0 1 Wireless Remote Commander (1) (p. 207) 2 AC-L10A/L10B/L10C AC power adaptor (1), Power cord (1) (p. 13) 3 NP-FM30 battery pack (1) (p. 12, 13) DCR-TRV240/TRV340 NP-FM50 battery pack (1) (p. 12, 13) DCR-TRV740/TRV840 4 Size AA (R6) battery for Remote Commander (2) (p. 207) 5 A/V connecting cable (1) (p. 38) 6 Shoulder strap (1) (p. 201...
... Make sure that the following accessories are supplied with your camcorder. 1 2 3 4 5 6 7 8 9 0 1 Wireless Remote Commander (1) (p. 207) 2 AC-L10A/L10B/L10C AC power adaptor (1), Power cord (1) (p. 13) 3 NP-FM30 battery pack (1) (p. 12, 13) DCR-TRV240/TRV340 NP-FM50 battery pack (1) (p. 12, 13) DCR-TRV740/TRV840 4 Size AA (R6) battery for Remote Commander (2) (p. 207) 5 A/V connecting cable (1) (p. 38) 6 Shoulder strap (1) (p. 201...

Operating Instructions
Page 6
...57 Superimposing a title 58 Making your computer (Windows users only 94 Customizing Your Camcorder Changing the menu settings 105 6 ZERO SET MEMORY 67 Searching a recording by ...Dubbing only desired scenes - Digital program editing (on tapes 74 Capturing images from a VCR - NightShot/Super NightShot/ Color Slow Shutter 29 Self-timer recording (except DCR-TRV240 31 Checking recordings - Basics...Started Using this manual 10 Step 1 Preparing the power supply ... 12 Installing the battery pack 12 Charging the battery pack 13 Connecting to a wall outlet 17 Step 2 Setting the date and ...
...57 Superimposing a title 58 Making your computer (Windows users only 94 Customizing Your Camcorder Changing the menu settings 105 6 ZERO SET MEMORY 67 Searching a recording by ...Dubbing only desired scenes - Digital program editing (on tapes 74 Capturing images from a VCR - NightShot/Super NightShot/ Color Slow Shutter 29 Self-timer recording (except DCR-TRV240 31 Checking recordings - Basics...Started Using this manual 10 Step 1 Preparing the power supply ... 12 Installing the battery pack 12 Charging the battery pack 13 Connecting to a wall outlet 17 Step 2 Setting the date and ...
Operating Instructions
Page 7
... Digital8 system, recording and playback 187 About the "InfoLITHIUM" battery pack 189 About i.LINK 191 Using your camcorder abroad .......... 193 Maintenance information and precautions 194 Specifications 199 Quick...Digital program editing (on "Memory Stick"s - Introduction 116 Recording still images on "Memory Stick"s 146 Viewing still images - Getting Started Table of trouble and how to tape 164 Enlarging still images recorded on "Memory Stick"s - PRINT MARK 174 Using the optional printer 176 Troubleshooting Types of contents "Memory Stick" operations (except DCR-TRV240...
... Digital8 system, recording and playback 187 About the "InfoLITHIUM" battery pack 189 About i.LINK 191 Using your camcorder abroad .......... 193 Maintenance information and precautions 194 Specifications 199 Quick...Digital program editing (on "Memory Stick"s - Introduction 116 Recording still images on "Memory Stick"s 146 Viewing still images - Getting Started Table of trouble and how to tape 164 Enlarging still images recorded on "Memory Stick"s - PRINT MARK 174 Using the optional printer 176 Troubleshooting Types of contents "Memory Stick" operations (except DCR-TRV240...

Operating Instructions
Page 8
... compartment goes down completely, close the lid until it clicks. AC power adaptor (supplied) Inserting a cassette (p. 20) 1 Slide OPEN/EJECT in the direction of your camcorder outdoors (p. 12). Connect the plug with the window facing up . Quick Start Guide 8 Quick Start Guide This chapter introduces you to insert the cassette. 3 Close... the basic features of the arrow and open the lid. 2 Insert the cassette in parentheses "( )" for more information. Connecting the power cord (p. 17) Use the battery pack when using your camcorder.
... compartment goes down completely, close the lid until it clicks. AC power adaptor (supplied) Inserting a cassette (p. 20) 1 Slide OPEN/EJECT in the direction of your camcorder outdoors (p. 12). Connect the plug with the window facing up . Quick Start Guide 8 Quick Start Guide This chapter introduces you to insert the cassette. 3 Close... the basic features of the arrow and open the lid. 2 Insert the cassette in parentheses "( )" for more information. Connecting the power cord (p. 17) Use the battery pack when using your camcorder.

Operating Instructions
Page 9
... the small green button. REW 3 Press N to CAMERA while pressing the small green button. Your camcorder starts recording. The picture in the viewfinder is set the clock setting before recording (p. 18). If you purchase your... camcorder, the clock setting is black and white. PLAY Quick Start Guide OFCFR(CHG) 1 Set the... button again. Viewfinder When the LCD panel is closed, use the viewfinder with your camcorder by holding the viewfinder, the LCD panel, or the battery pack. 9
... the small green button. REW 3 Press N to CAMERA while pressing the small green button. Your camcorder starts recording. The picture in the viewfinder is set the clock setting before recording (p. 18). If you purchase your... camcorder, the clock setting is black and white. PLAY Quick Start Guide OFCFR(CHG) 1 Set the... button again. Viewfinder When the LCD panel is closed, use the viewfinder with your camcorder by holding the viewfinder, the LCD panel, or the battery pack. 9

Operating Instructions
Page 12
BATT (battery) release lever If you install the large-capacity battery pack If you install the NP-FM70/QM71/FM90/QM91/FM91 battery pack on your camcorder, extend its viewfinder. 12 Step 1 Preparing the power supply Installing the battery pack (1) Lift up the viewfinder. (2) Slide the battery pack down until it clicks. 1 2 To remove the battery pack (1) Lift up the viewfinder. (2) Slide the battery pack out in the direction of the arrow while pressing BATT (battery) release lever down.
BATT (battery) release lever If you install the large-capacity battery pack If you install the NP-FM70/QM71/FM90/QM91/FM91 battery pack on your camcorder, extend its viewfinder. 12 Step 1 Preparing the power supply Installing the battery pack (1) Lift up the viewfinder. (2) Slide the battery pack down until it clicks. 1 2 To remove the battery pack (1) Lift up the viewfinder. (2) Slide the battery pack out in the direction of the arrow while pressing BATT (battery) release lever down.
Operating Instructions
Page 13
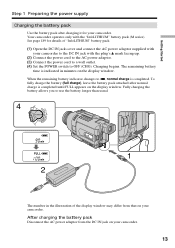
... DC IN jack cover and connect the AC power adaptor supplied with your camcorder. 13 After charging the battery pack Disconnect the AC power adaptor from that on the display window. To fully charge the battery (full charge), leave the battery pack attached after charging it for details of the display window may differ...
... DC IN jack cover and connect the AC power adaptor supplied with your camcorder. 13 After charging the battery pack Disconnect the AC power adaptor from that on the display window. To fully charge the battery (full charge), leave the battery pack attached after charging it for details of the display window may differ...

Operating Instructions
Page 14
... window roughly indicates the recording time when recording using the viewfinder. The battery pack is wrong with the battery pack. Your camcorder operates only with the "InfoLITHIUM" battery. While charging the battery pack No indicator appears or the indicator flashes in the display window in...is a trademark of the display window is charged fully The LCD backlight of Sony Corporation. 14 Step 1 Preparing the power supply Note Prevent metallic objects from the wall outlet as soon as battery consumption with compatible electronic equipment. This unit is "InfoLITHIUM"? When the...
... window roughly indicates the recording time when recording using the viewfinder. The battery pack is wrong with the battery pack. Your camcorder operates only with the "InfoLITHIUM" battery. While charging the battery pack No indicator appears or the indicator flashes in the display window in...is a trademark of the display window is charged fully The LCD backlight of Sony Corporation. 14 Step 1 Preparing the power supply Note Prevent metallic objects from the wall outlet as soon as battery consumption with compatible electronic equipment. This unit is "InfoLITHIUM"? When the...

Operating Instructions
Page 15
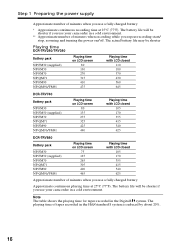
...300) The charging time may increase if the battery's temperature is extremely high or low because of minutes to charge an empty battery pack at 25°C (77°F) 1) Supplied with DCR-TRV240/TRV340 2) Supplied with DCR-TRV740/TRV840 Recording time DCR-TRV240/TRV340 Battery pack NP-FM30 (supplied) NP-FM50 NP...260 520 300 Recording with the LCD screen Continuous* Typical** 70 40 110 60 240 135 275 155 360 205 420 240 DCR-TRV840 Battery pack Recording with the viewfinder Recording with the LCD screen Continuous* Typical** Continuous* Typical** NP-FM30 85 45 65 35 ...
...300) The charging time may increase if the battery's temperature is extremely high or low because of minutes to charge an empty battery pack at 25°C (77°F) 1) Supplied with DCR-TRV240/TRV340 2) Supplied with DCR-TRV740/TRV840 Recording time DCR-TRV240/TRV340 Battery pack NP-FM30 (supplied) NP-FM50 NP...260 520 300 Recording with the LCD screen Continuous* Typical** 70 40 110 60 240 135 275 155 360 205 420 240 DCR-TRV840 Battery pack Recording with the viewfinder Recording with the LCD screen Continuous* Typical** Continuous* Typical** NP-FM30 85 45 65 35 ...
Operating Instructions
Page 16
Note The table shows the playing time for tapes recorded in a cold environment. The actual battery life may be shorter Playing time DCR-TRV240/TRV340 Battery pack NP-FM30 (supplied) NP-FM50 NP-FM70 NP-QM71 NP-FM90 NP-QM91/FM91 Playing time on LCD screen 80 ... number of minutes when you use a fully charged battery * Approximate continuous recording time at 25°C (77°F). The battery life will be shorter if you use your camcorder in the Digital8 system. The battery life will be shorter if you use your camcorder in a cold environment. ** Approximate number of tapes...
Note The table shows the playing time for tapes recorded in a cold environment. The actual battery life may be shorter Playing time DCR-TRV240/TRV340 Battery pack NP-FM30 (supplied) NP-FM50 NP-FM70 NP-QM71 NP-FM90 NP-QM91/FM91 Playing time on LCD screen 80 ... number of minutes when you use a fully charged battery * Approximate continuous recording time at 25°C (77°F). The battery life will be shorter if you use your camcorder in the Digital8 system. The battery life will be shorter if you use your camcorder in a cold environment. ** Approximate number of tapes...

Operating Instructions
Page 17
... the power supply Connecting to a wall outlet When you use your camcorder for a long time, we recommend that the battery pack cannot supply any power if the power cord is connected to ...the DC IN jack, even when the power cord is connected to the DC IN jack on your camcorder. •The...plugged into a wall outlet. Notes •The AC power adaptor can supply power even if the battery pack is attached to your camcorder with the plug's v mark facing up. (2) Connect the power cord to the AC power ...
... the power supply Connecting to a wall outlet When you use your camcorder for a long time, we recommend that the battery pack cannot supply any power if the power cord is connected to ...the DC IN jack, even when the power cord is connected to the DC IN jack on your camcorder. •The...plugged into a wall outlet. Notes •The AC power adaptor can supply power even if the battery pack is attached to your camcorder with the plug's v mark facing up. (2) Connect the power cord to the AC power ...

Operating Instructions
Page 18
If you do not use your camcorder will be cleared from memory (bars may appear) because the built-in rechargeable battery installed in , then press the dial. (3) Turn the SEL/PUSH EXEC dial to adjust the desired year, then press the dial. (4) Set the month, day ... hour and then the minute. (1) Set the POWER switch to CAMERA or MEMORY (except DCR-TRV240), and then press MENU to display the menu settings. (2) Turn the SEL/PUSH EXEC dial to select CLOCK SET in your camcorder for about half a year, the date and time settings may be displayed each time that...
If you do not use your camcorder will be cleared from memory (bars may appear) because the built-in rechargeable battery installed in , then press the dial. (3) Turn the SEL/PUSH EXEC dial to adjust the desired year, then press the dial. (4) Set the month, day ... hour and then the minute. (1) Set the POWER switch to CAMERA or MEMORY (except DCR-TRV240), and then press MENU to display the menu settings. (2) Turn the SEL/PUSH EXEC dial to select CLOCK SET in your camcorder for about half a year, the date and time settings may be displayed each time that...
Operating Instructions
Page 22
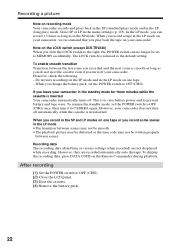
Note on the LOCK switch (except DCR-TRV240) When you slide the LOCK switch to the right, the POWER switch ...you leave your camcorder. To display the recording data, press DATA CODE on recording mode Your camcorder records and plays back in the SP (standard play back the tape on your camcorder, we recommend that you change the battery pack, set ...(1) Set the POWER switch to OFF (CHG). (2) Close the LCD panel. (3) Eject the cassette. (4) Remove the battery pack. 22 To enable smooth transition Transition between scenes may not be smooth. •The playback picture may be distorted or...
Note on the LOCK switch (except DCR-TRV240) When you slide the LOCK switch to the right, the POWER switch ...you leave your camcorder. To display the recording data, press DATA CODE on recording mode Your camcorder records and plays back in the SP (standard play back the tape on your camcorder, we recommend that you change the battery pack, set ...(1) Set the POWER switch to OFF (CHG). (2) Close the LCD panel. (3) Eject the cassette. (4) Remove the battery pack. 22 To enable smooth transition Transition between scenes may not be smooth. •The playback picture may be distorted or...

Operating Instructions
Page 27
...Indicators displayed in minutes to CAMERA or MEMORY (except DCR-TRV240). You cannot reset the time code or the tape counter. 27 When you play back tapes recorded in VCR mode. You cannot rewrite only the time code. Remaining battery time Format Recording mode STBY/REC 50min SP REC ...0:00:01 Time code/Tape counter Remaining tape This appears after the POWER switch is set to CAMERA or MEMORY (except DCR-TRV240). The indicator may not be displayed. Recording -...
...Indicators displayed in minutes to CAMERA or MEMORY (except DCR-TRV240). You cannot reset the time code or the tape counter. 27 When you play back tapes recorded in VCR mode. You cannot rewrite only the time code. Remaining battery time Format Recording mode STBY/REC 50min SP REC ...0:00:01 Time code/Tape counter Remaining tape This appears after the POWER switch is set to CAMERA or MEMORY (except DCR-TRV240). The indicator may not be displayed. Recording -...
Operating Instructions
Page 36
..."s (except DCR-TRV240). The display changes as follows when you are not recorded when recording images on the Remote Commander during playback. The tape is your camcorder to VCR. The indicator may not be correct, depending on the data code function •The data code function works only for the correct remaining battery time...
..."s (except DCR-TRV240). The display changes as follows when you are not recorded when recording images on the Remote Commander during playback. The tape is your camcorder to VCR. The indicator may not be correct, depending on the data code function •The data code function works only for the correct remaining battery time...

Operating Instructions
Page 108
... switch VCR VCR VCR VCR A/V t DV OUT z OFF ON PB MODE z AUTO / ST1 ST2 To output digital images and sound in analog format using your camcorder To output analog images and sound in digital format using your camcorder (p. 88) To automatically select the system (Hi8/ standard 8 or Digital8 ) that was used to record on... with the left sound or a dual sound track tape with sub sound TBC* z ON To correct jitter OFF To not correct jitter. you remove the battery pack or power source. - Set TBC to the default setting when: -
... switch VCR VCR VCR VCR A/V t DV OUT z OFF ON PB MODE z AUTO / ST1 ST2 To output digital images and sound in analog format using your camcorder To output analog images and sound in digital format using your camcorder (p. 88) To automatically select the system (Hi8/ standard 8 or Digital8 ) that was used to record on... with the left sound or a dual sound track tape with sub sound TBC* z ON To correct jitter OFF To not correct jitter. you remove the battery pack or power source. - Set TBC to the default setting when: -

Operating Instructions
Page 109
Even if you use power sources other than the battery pack, BRIGHT is automatically selected. POWER switch CAMERA VCR MEMORY To darken To lighten z BRT NORMAL To set the brightness on the viewfinder screen to ... CAMERA VCR MEMORY Notes on LCD B.L. To adjust the color on the LCD screen to adjust the following page) Customizing Your Camcorder 109 and VF B.L. •When you select BRIGHT, battery life is reduced by about 10 percent during recording. •When you adjust LCD BRIGHT, LCD B.L., LCD COLOR and/or VF...
Even if you use power sources other than the battery pack, BRIGHT is automatically selected. POWER switch CAMERA VCR MEMORY To darken To lighten z BRT NORMAL To set the brightness on the viewfinder screen to ... CAMERA VCR MEMORY Notes on LCD B.L. To adjust the color on the LCD screen to adjust the following page) Customizing Your Camcorder 109 and VF B.L. •When you select BRIGHT, battery life is reduced by about 10 percent during recording. •When you adjust LCD BRIGHT, LCD B.L., LCD COLOR and/or VF...

Operating Instructions
Page 114
... to 0, the clock returns to their default settings. If you press DISPLAY with your camcorder is removed. 114 The clock changes by the time difference you set to V-OUT/LCD in memory even when the battery is connected with the i.LINK cable) In more than five minutes after removing the power... source The AUDIO MIX, FLASH LVL, COMMANDER and HiFi SOUND settings are held in the menu settings, the picture from a TV or VCR will not appear on the screen even when your camcorder is...
... to 0, the clock returns to their default settings. If you press DISPLAY with your camcorder is removed. 114 The clock changes by the time difference you set to V-OUT/LCD in memory even when the battery is connected with the i.LINK cable) In more than five minutes after removing the power... source The AUDIO MIX, FLASH LVL, COMMANDER and HiFi SOUND settings are held in the menu settings, the picture from a TV or VCR will not appear on the screen even when your camcorder is...

Operating Instructions
Page 115
... up the camera recording lamp at the front of your camcorder To turn the camera recording lamp off the backlight on display window To turn on the backlight on display window POWER switch CAMERA MEMORY VCR CAMERA VCR MEMORY * Except DCR-TRV240 When recording a close subject When REC LAMP is set ...REC LAMP to ON, the red camera recording lamp on the front of the camcorder may reflect on INDICATOR •When you select BL ON, battery life is reduced by about 10 percent during ...
... up the camera recording lamp at the front of your camcorder To turn the camera recording lamp off the backlight on display window To turn on the backlight on display window POWER switch CAMERA MEMORY VCR CAMERA VCR MEMORY * Except DCR-TRV240 When recording a close subject When REC LAMP is set ...REC LAMP to ON, the red camera recording lamp on the front of the camcorder may reflect on INDICATOR •When you select BL ON, battery life is reduced by about 10 percent during ...


