
Operating Guide
Page 14
...photos 2 Select the desired geographical area with / , then touch [NEXT]. Touch the button on , and setting the date and time 1 Open the LCD screen of your camcorder when the LCD screen is open, press POWER. To display the date and time, touch (HOME) (SETTINGS) [VIEW IMAGES ...recording, but they are automatically recorded on your camcorder. The clock starts. If you set the date and time again, touch (HOME) (SETTINGS) [CLOCK/ LANG] [CLOCK SET]. Your camcorder is not on the screen, touch / until the item appears. 3 Set [...
...photos 2 Select the desired geographical area with / , then touch [NEXT]. Touch the button on , and setting the date and time 1 Open the LCD screen of your camcorder when the LCD screen is open, press POWER. To display the date and time, touch (HOME) (SETTINGS) [VIEW IMAGES ...recording, but they are automatically recorded on your camcorder. The clock starts. If you set the date and time again, touch (HOME) (SETTINGS) [CLOCK/ LANG] [CLOCK SET]. Your camcorder is not on the screen, touch / until the item appears. 3 Set [...

Operating Guide
Page 15
Touch (HOME) (SETTINGS) [CLOCK/ LANG] [ LANGUAGE SET] a desired language Getting started US 15 Changing the language setting You can turn off your camcorder also by pressing POWER. When [POWER ON BY LCD] (p. 42) is turned POWER button You can change the on-screen displays to [OFF], turn off your camcorder by pressing POWER. To turn off the power Close the LCD screen. The off. (Movie) lamp flashes for a few seconds and the power is set to show messages in a specified language.
Touch (HOME) (SETTINGS) [CLOCK/ LANG] [ LANGUAGE SET] a desired language Getting started US 15 Changing the language setting You can turn off your camcorder also by pressing POWER. When [POWER ON BY LCD] (p. 42) is turned POWER button You can change the on-screen displays to [OFF], turn off your camcorder by pressing POWER. To turn off the power Close the LCD screen. The off. (Movie) lamp flashes for a few seconds and the power is set to show messages in a specified language.

Operating Guide
Page 17
... by using the digital zoom. US 17 If you rotate the LCD panel 180 degrees to the lens side , you close the LCD screen during recording, the camcorder stops recording. See page 50 on the recordable time of movies. When a movie ... 90 degrees to start recording. Press START/STOP to the camcorder You can change the recording media (p. 37). You can increase the zooming level by touching (HOME) (SETTINGS) [MOVIE SETTINGS] [DIGITAL ZOOM] the desired setting . Move it further...
... by using the digital zoom. US 17 If you rotate the LCD panel 180 degrees to the lens side , you close the LCD screen during recording, the camcorder stops recording. See page 50 on the recordable time of movies. When a movie ... 90 degrees to start recording. Press START/STOP to the camcorder You can change the recording media (p. 37). You can increase the zooming level by touching (HOME) (SETTINGS) [MOVIE SETTINGS] [DIGITAL ZOOM] the desired setting . Move it further...
Operating Guide
Page 19
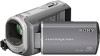
..., press EASY again after you can check the recordable number of photos on the LCD screen (p. 52). To change the image size, touch (HOME) (SETTINGS) [PHOTO SETTINGS] [ IMAGE SIZE] a desired setting You cannot record photos while is started, nearly all menu... Lights up When disappears, the photo is recorded. Move the power zoom lever slightly for a faster zoom. You can set basic options, such as changing the image size or deleting images, among the setting and adjustment items. Other items are set automatically. &#...
..., press EASY again after you can check the recordable number of photos on the LCD screen (p. 52). To change the image size, touch (HOME) (SETTINGS) [PHOTO SETTINGS] [ IMAGE SIZE] a desired setting You cannot record photos while is started, nearly all menu... Lights up When disappears, the photo is recorded. Move the power zoom lever slightly for a faster zoom. You can set basic options, such as changing the image size or deleting images, among the setting and adjustment items. Other items are set automatically. &#...

Operating Guide
Page 20
... a certain interval (Film Roll Index) Previous To the index screen of face scenes (Face Index) To the list of your camcorder when the LCD screen is already open, press POWER (p. 14). Touch (VIEW IMAGES). (VIEW IMAGES) The VISUAL INDEX screen appears after some seconds. Touch the (Movie) tab a desired movie . Your...
... a certain interval (Film Roll Index) Previous To the index screen of face scenes (Face Index) To the list of your camcorder when the LCD screen is already open, press POWER (p. 14). Touch (VIEW IMAGES). (VIEW IMAGES) The VISUAL INDEX screen appears after some seconds. Touch the (Movie) tab a desired movie . Your...

Operating Guide
Page 21
...the last movie, the screen returns to the VISUAL INDEX screen. Touch / during pause to play back movies slowly. As you can turn on or off the on-screen display by pressing DISP located on the VISUAL INDEX screen. Playback US 21 Your camcorder starts playing the selected ...movie. This information is not displayed during recording, but you repeat touching / during playback, movies are played as fast as ...
...the last movie, the screen returns to the VISUAL INDEX screen. Touch / during pause to play back movies slowly. As you can turn on or off the on-screen display by pressing DISP located on the VISUAL INDEX screen. Playback US 21 Your camcorder starts playing the selected ...movie. This information is not displayed during recording, but you repeat touching / during playback, movies are played as fast as ...
Operating Guide
Page 22
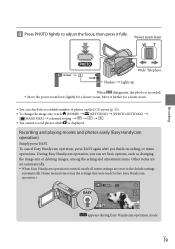
Previous To the VISUAL INDEX screen To start/stop slide show Next OPTION MENU You can zoom in the frame. When viewing photos recorded on "Memory Stick PRO Duo" media, (playback folder) appears on the screen. If you touch a point in the PB ZOOM frame, the point comes to the center in the photo by moving the power zoom lever while viewing photos (PB ZOOM). US 22 Your camcorder displays the selected photo.
Previous To the VISUAL INDEX screen To start/stop slide show Next OPTION MENU You can zoom in the frame. When viewing photos recorded on "Memory Stick PRO Duo" media, (playback folder) appears on the screen. If you touch a point in the PB ZOOM frame, the point comes to the center in the photo by moving the power zoom lever while viewing photos (PB ZOOM). US 22 Your camcorder displays the selected photo.
Operating Guide
Page 25
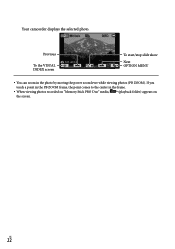
The [USB SELECT] screen appears on the camcorder screen automatically. Touch [ USB CONNECT] on the camcorder screen. If the [USB SELECT] screen does not appear, touch (HOME) (OTHERS) [USB CONNECT]. Click [Continue] on your camcorder, then connect the camcorder to complete the installation. If you agree to the terms, change to , and then click [Next] ...
The [USB SELECT] screen appears on the camcorder screen automatically. Touch [ USB CONNECT] on the camcorder screen. If the [USB SELECT] screen does not appear, touch (HOME) (OTHERS) [USB CONNECT]. Click [Continue] on your camcorder, then connect the camcorder to complete the installation. If you agree to the terms, change to , and then click [Next] ...
Operating Guide
Page 26
... using the AC Adaptor supplied for the type of the computer [Safely remove USB Mass Storage Device]. Touch [END] [YES] on the camcorder screen. Disconnect the USB cable. To disconnect your camcorder from your computer. Other icons may appear. No icon may appear depending on the installation procedure...
... using the AC Adaptor supplied for the type of the computer [Safely remove USB Mass Storage Device]. Touch [END] [YES] on the camcorder screen. Disconnect the USB cable. To disconnect your camcorder from your computer. Other icons may appear. No icon may appear depending on the installation procedure...
Operating Guide
Page 27
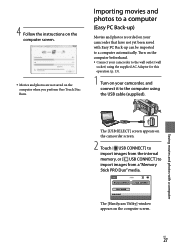
The [Handycam Utility] window appears on the camcorder screen. 2 Touch [ USB CONNECT] to import images from the internal memory, or [ USB CONNECT] to import images from a "Memory Stick PRO Duo" media. Turn on the computer beforehand. Connect your camcorder to the wall outlet (wall socket) using...Back-up ) Movies and photos recorded on the computer when you perform One Touch Disc Burn. 4 Follow the instructions on the computer screen. Movies and photos are not saved on your camcorder, and connect it to the computer using the supplied AC Adaptor for this operation...
The [Handycam Utility] window appears on the camcorder screen. 2 Touch [ USB CONNECT] to import images from the internal memory, or [ USB CONNECT] to import images from a "Memory Stick PRO Duo" media. Turn on the computer beforehand. Connect your camcorder to the wall outlet (wall socket) using...Back-up ) Movies and photos recorded on the computer when you perform One Touch Disc Burn. 4 Follow the instructions on the computer screen. Movies and photos are not saved on your camcorder, and connect it to the computer using the supplied AC Adaptor for this operation...

Operating Guide
Page 30
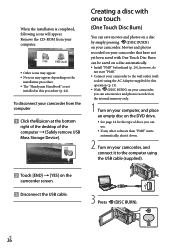
... Sony DVD writer may not be available in some countries/regions. 1 Turn on your camcorder, and connect the DVD writer to the (USB) jack of your camcorder. 4 Repeat steps 2 and 3 when the total memory size of movies to as the power source (p. 13). Operating by the camcorder screen,... Saving images with a DVD writer, recorder Creating a disc with the DVD writer. DVDirect Express is completed, touch [END] on the camcorder screen. Touch [EJECT DISC] and remove any discs will be burnt exceeds that have not been saved on any inserted disc. 6 ...
... Sony DVD writer may not be available in some countries/regions. 1 Turn on your camcorder, and connect the DVD writer to the (USB) jack of your camcorder. 4 Repeat steps 2 and 3 when the total memory size of movies to as the power source (p. 13). Operating by the camcorder screen,... Saving images with a DVD writer, recorder Creating a disc with the DVD writer. DVDirect Express is completed, touch [END] on the camcorder screen. Touch [EJECT DISC] and remove any discs will be burnt exceeds that have not been saved on any inserted disc. 6 ...
Operating Guide
Page 31
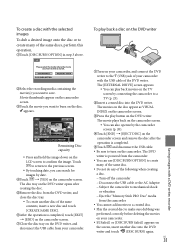
...TV (p. 23). Insert a created disc into the DVD writer and touch (DISC BURN) again. The [EXTERNAL DRIVE] screen appears. You can search for images by connecting the camcorder to burn on the camcorder screen. Touch the movie you want to make sure dubbing was performed correctly before deleting the...thumbnails appear on the disc. US 31 The movies on the disc appear as VISUAL INDEX on the camcorder screen. Press the play back movies on the TV screen by date. Touch [YES] on the DVD writer. To play back a disc on the DVD writer ...
...TV (p. 23). Insert a created disc into the DVD writer and touch (DISC BURN) again. The [EXTERNAL DRIVE] screen appears. You can search for images by connecting the camcorder to burn on the camcorder screen. Touch the movie you want to make sure dubbing was performed correctly before deleting the...thumbnails appear on the disc. US 31 The movies on the disc appear as VISUAL INDEX on the camcorder screen. Press the play back movies on the TV screen by date. Touch [YES] on the DVD writer. To play back a disc on the DVD writer ...

Operating Guide
Page 33
...writer, etc., other than DVDirect Express You can save movies on a disc by connecting your camcorder to a Sony DVD writer with the USB cable is completed, touch [END] [YES] on the camcorder screen. 5 Disconnect the USB cable. US 33 The method used to the wall outlet (wall... the supplied AC Adaptor for this operation (p. 13). Sony DVD writer may not be connected. Refer also to the instruction manuals supplied with a DVD writer, recorder The [USB SELECT] screen appears on the camcorder screen. 2 Touch [ USB CONNECT] when movies are recorded on the internal memory,...
...writer, etc., other than DVDirect Express You can save movies on a disc by connecting your camcorder to a Sony DVD writer with the USB cable is completed, touch [END] [YES] on the camcorder screen. 5 Disconnect the USB cable. US 33 The method used to the wall outlet (wall... the supplied AC Adaptor for this operation (p. 13). Sony DVD writer may not be connected. Refer also to the instruction manuals supplied with a DVD writer, recorder The [USB SELECT] screen appears on the camcorder screen. 2 Touch [ USB CONNECT] when movies are recorded on the internal memory,...

Operating Guide
Page 35
... camcorder, and record it on the recording device. Refer to the audio input jack on the device. Sony DVD writer may deteriorate. To hide the screen indicators (such as a counter, etc.) on the screen of the monitor device connected, touch...[VIEW IMAGES SET] [DATA CODE] a desired setting In addidion, touch (HOME) (SETTINGS) [OUTPUT SETTINGS] [DISP OUTPUT] [V-OUT/PANEL When the screen size of display devices (TV, etc.) is 4:3, touch (HOME) (SETTINGS) [OUTPUT SETTINGS] [TV TYPE]...
... camcorder, and record it on the recording device. Refer to the audio input jack on the device. Sony DVD writer may deteriorate. To hide the screen indicators (such as a counter, etc.) on the screen of the monitor device connected, touch...[VIEW IMAGES SET] [DATA CODE] a desired setting In addidion, touch (HOME) (SETTINGS) [OUTPUT SETTINGS] [DISP OUTPUT] [V-OUT/PANEL When the screen size of display devices (TV, etc.) is 4:3, touch (HOME) (SETTINGS) [OUTPUT SETTINGS] [TV TYPE]...

Operating Guide
Page 36
... this operation (p. 13). To avoid the loss of your camcorder. (The access lamp is displayed, do not close the LCD screen, oprate the buttons on the movies or photos to be deleted. Touch the recording media to delete before formatting the recording media. ... photos will also be formatted ([INT. Making good use of important images, you want to be deleted. Touch (HOME) (MANAGE MEDIA) [MEDIA FORMAT]. 3 Touch and display the mark on the camcorder, disconnect the AC Adaptor, or eject the "Memory Stick PRO Duo" media from your...
... this operation (p. 13). To avoid the loss of your camcorder. (The access lamp is displayed, do not close the LCD screen, oprate the buttons on the movies or photos to be deleted. Touch the recording media to delete before formatting the recording media. ... photos will also be formatted ([INT. Making good use of important images, you want to be deleted. Touch (HOME) (MANAGE MEDIA) [MEDIA FORMAT]. 3 Touch and display the mark on the camcorder, disconnect the AC Adaptor, or eject the "Memory Stick PRO Duo" media from your...
Operating Guide
Page 37
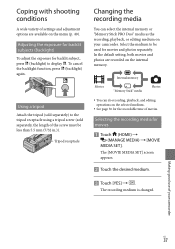
... less than 5.5 mm (7/32 in.)). Tripod receptacle Changing the recording media You can do recording, playback, and editing operations on your camcorder US 37 To cancel the backlight function, press (backlight) again. In the default setting, both movies and photos are available... on the internal memory. The [MOVIE MEDIA SET] screen appears. Touch the desired medium. Touch [YES] . The recording medium is changed. Select the medium to display . Making good use of ...
... less than 5.5 mm (7/32 in.)). Tripod receptacle Changing the recording media You can do recording, playback, and editing operations on your camcorder US 37 To cancel the backlight function, press (backlight) again. In the default setting, both movies and photos are available... on the internal memory. The [MOVIE MEDIA SET] screen appears. Touch the desired medium. Touch [YES] . The recording medium is changed. Select the medium to display . Making good use of ...

Operating Guide
Page 38
The [PHOTO MEDIA SET] screen appears. Touch the desired recording medium. Touch [YES] . To check the recording media settings Light up to 16 GB are confirmed to work with this camcorder. Open the "Memory Stick Duo" media cover, and insert the "Memory Stick PRO Duo" media ...into the "Memory Stick Duo" media slot until it is displayed at the top right corner of the screen. US 38 Access lamp The [...
The [PHOTO MEDIA SET] screen appears. Touch the desired recording medium. Touch [YES] . To check the recording media settings Light up to 16 GB are confirmed to work with this camcorder. Open the "Memory Stick Duo" media cover, and insert the "Memory Stick PRO Duo" media ...into the "Memory Stick Duo" media slot until it is displayed at the top right corner of the screen. US 38 Access lamp The [...

Operating Guide
Page 39
... Duo" media, be careful so that the "Memory Stick PRO Duo" media does not pop out and drop. US 39 Making good use of your camcorder To eject the "Memory Stick PRO Duo" media Open the "Memory Stick Duo" media cover and lightly push the "Memory Stick PRO Duo" media in... step 2, format the "Memory Stick PRO Duo" media (p. 36). Touch [YES]. To record only photos on the screen. Dubbing or copying movies and photos from the internal memory to "Memory Stick PRO Duo" media...
... Duo" media, be careful so that the "Memory Stick PRO Duo" media does not pop out and drop. US 39 Making good use of your camcorder To eject the "Memory Stick PRO Duo" media Open the "Memory Stick Duo" media cover and lightly push the "Memory Stick PRO Duo" media in... step 2, format the "Memory Stick PRO Duo" media (p. 36). Touch [YES]. To record only photos on the screen. Dubbing or copying movies and photos from the internal memory to "Memory Stick PRO Duo" media...

Operating Guide
Page 40
... during Easy Handycam operation. Menu item Using the HELP function To see the descriptions on the HOME MENU, touch (HELP) on the HOME MENU screen. (The bottom of your camcorder with menus Menu items are described in more details with color photos in the context appear. (...OPTION) Category Follow the instruction on the screen. After completing the setting, touch . When the item is not on...
... during Easy Handycam operation. Menu item Using the HELP function To see the descriptions on the HOME MENU, touch (HELP) on the HOME MENU screen. (The bottom of your camcorder with menus Menu items are described in more details with color photos in the context appear. (...OPTION) Category Follow the instruction on the screen. After completing the setting, touch . When the item is not on...
Operating Guide
Page 42
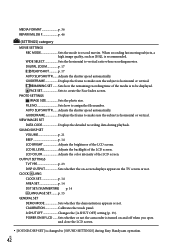
...SIZE Sets the photo size. VIEW IMAGES SET DATA CODE Displays the detailed recording data during Easy Handycam operation. SOUND/DISP SET VOLUME p. 21 BEEP p. 14 LCD BRIGHT Adjusts the brightness of the LCD screen...screen. [SOUND/DISP SET] is horizontal or vertical. p. 15 GENERAL SET DEMO MODE Sets whether the demonstration appears or not. CALIBRATION Calibrates the touch panel. US 42 DIGITAL ZOOM...horizontal to create the Face Index screen. CLOCK/ LANG CLOCK SET p.... how the remaining recording time of the LCD screen. AUTO SLW SHUTTR....... When recording fast moving ...
...SIZE Sets the photo size. VIEW IMAGES SET DATA CODE Displays the detailed recording data during Easy Handycam operation. SOUND/DISP SET VOLUME p. 21 BEEP p. 14 LCD BRIGHT Adjusts the brightness of the LCD screen...screen. [SOUND/DISP SET] is horizontal or vertical. p. 15 GENERAL SET DEMO MODE Sets whether the demonstration appears or not. CALIBRATION Calibrates the touch panel. US 42 DIGITAL ZOOM...horizontal to create the Face Index screen. CLOCK/ LANG CLOCK SET p.... how the remaining recording time of the LCD screen. AUTO SLW SHUTTR....... When recording fast moving ...


