Operating Guide
Page 7
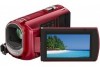
... device must accept any questions about this camcorder. If you may call: Sony Customer Information Center 1-800-222-SONY (7669). Telephone No.: 858-942-2230...the supplied quantity. AC Adaptor (1) Power cord (Mains lead) (1) A/V connecting cable (1) USB cable (1) Rechargeable battery pack NP-FH30 (1) CD-ROM "Handycam Application Software" (1) (p.... pursuant to Part 15 of Conformity Trade Name: SONY Model No.: DCR-SX40, DCR-SX41, DCR-SX60 Responsible Party:Sony Electronics Inc. Operation is no guarantee that any changes...
... device must accept any questions about this camcorder. If you may call: Sony Customer Information Center 1-800-222-SONY (7669). Telephone No.: 858-942-2230...the supplied quantity. AC Adaptor (1) Power cord (Mains lead) (1) A/V connecting cable (1) USB cable (1) Rechargeable battery pack NP-FH30 (1) CD-ROM "Handycam Application Software" (1) (p.... pursuant to Part 15 of Conformity Trade Name: SONY Model No.: DCR-SX40, DCR-SX41, DCR-SX60 Responsible Party:Sony Electronics Inc. Operation is no guarantee that any changes...
Operating Guide
Page 8
...necessary (p. 15). On recording Before starting to record, test the recording function to make sure the image and sound are lit or flashing. However, there may be sure to insert the connector plug in color) that you need an NTSC system-based TV. Television programs,... and "Memory Stick PRO-HG Duo" media are referred as a DVD-R using your images on a TV, you save all your camcorder to another device with a cable, be copyrighted. Otherwise, the recording media may be some type of data occurs on the LCD screen. Change the screen language before using...
...necessary (p. 15). On recording Before starting to record, test the recording function to make sure the image and sound are lit or flashing. However, there may be sure to insert the connector plug in color) that you need an NTSC system-based TV. Television programs,... and "Memory Stick PRO-HG Duo" media are referred as a DVD-R using your images on a TV, you save all your camcorder to another device with a cable, be copyrighted. Otherwise, the recording media may be some type of data occurs on the LCD screen. Change the screen language before using...

Operating Guide
Page 23
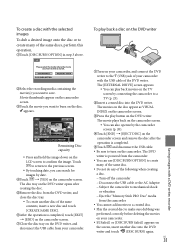
...to the instruction manuals supplied with the TV. Connect your camcorder to a TV with the A/V connecting cable (, supplied) or an A/V connecting cable with S VIDEO (, sold separately). Connect your camcorder to the input jack of the TV. Play back movies...16:9] or [4:3 US . 23 The yellow plug connection is not necessary. Connect your camcorder to the input jack of the A/V connecting cable with an S VIDEO cable (sold separately). Playing images on your camcorder (p. 20). You can set the aspect ratio according to the connected TV ...
...to the instruction manuals supplied with the TV. Connect your camcorder to a TV with the A/V connecting cable (, supplied) or an A/V connecting cable with S VIDEO (, sold separately). Connect your camcorder to the input jack of the TV. Play back movies...16:9] or [4:3 US . 23 The yellow plug connection is not necessary. Connect your camcorder to the input jack of the A/V connecting cable with an S VIDEO cable (sold separately). Playing images on your camcorder (p. 20). You can set the aspect ratio according to the connected TV ...
Operating Guide
Page 25
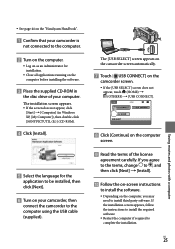
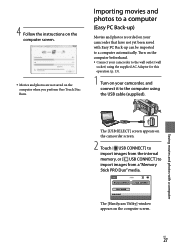
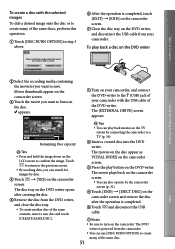
...; Follow the on-screen instructions to install the software. Depending on the computer, you may need to the computer using the USB cable (supplied). If the installation screen appears, follow the instructions to install the required software. Restart the computer if required to the computer... Click [Install]. Select the language for the application to be installed, then click [Next]. Turn on your camcorder, then connect the camcorder to install third party software. See page 44 on the "Handycam Handbook". Confirm that your...
...; Follow the on-screen instructions to install the software. Depending on the computer, you may need to the computer using the USB cable (supplied). If the installation screen appears, follow the instructions to install the required software. Restart the computer if required to the computer... Click [Install]. Select the language for the application to be installed, then click [Next]. Turn on your camcorder, then connect the camcorder to install third party software. See page 44 on the "Handycam Handbook". Confirm that your...
Operating Guide
Page 26
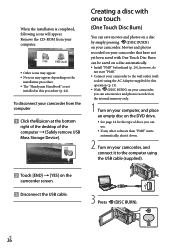
... disc automatically. Install "PMB" beforehand (p. 24), however, do not start "PMB." Connect your camcorder to the computer using the USB cable (supplied). 3 Press (DISC BURN). US 26 Movies and photos recorded on your camcorder that have not yet been saved with one touch (One Touch Disc Burn) You can use..." is completed, following icons will appear. To disconnect your computer. Other icons may appear. No icon may appear depending on your camcorder, and connect it down. 2 Turn on the camcorder screen. Disconnect the USB cable.
... disc automatically. Install "PMB" beforehand (p. 24), however, do not start "PMB." Connect your camcorder to the computer using the USB cable (supplied). 3 Press (DISC BURN). US 26 Movies and photos recorded on your camcorder that have not yet been saved with one touch (One Touch Disc Burn) You can use..." is completed, following icons will appear. To disconnect your computer. Other icons may appear. No icon may appear depending on your camcorder, and connect it down. 2 Turn on the camcorder screen. Disconnect the USB cable.
Operating Guide
Page 27
... using the supplied AC Adaptor for this operation (p. 13). 1 Turn on the camcorder screen. 2 Touch [ USB CONNECT] to import images from the internal memory, or [ USB CONNECT] to the computer using the USB cable (supplied). 4 Follow the instructions on the computer screen. Movies and... photos are not saved on the computer screen. Turn on the computer beforehand. Connect your camcorder, and connect it to import images from a "Memory...
... using the supplied AC Adaptor for this operation (p. 13). 1 Turn on the camcorder screen. 2 Touch [ USB CONNECT] to import images from the internal memory, or [ USB CONNECT] to the computer using the USB cable (supplied). 4 Follow the instructions on the computer screen. Movies and... photos are not saved on the computer screen. Turn on the computer beforehand. Connect your camcorder, and connect it to import images from a "Memory...

Operating Guide
Page 30
...; Touch [EJECT DISC] and remove any inserted disc. 6 Close the disc tray on the camcorder screen. Saving images with a DVD writer, recorder Creating a disc with the USB cable of the DVD writer. Operating by the camcorder screen, you can remove the disc. You can be used: 12cm DVD...-R 12cm DVD+R The device does not support two-layered discs. Sony DVD writer may not be available in...
...; Touch [EJECT DISC] and remove any inserted disc. 6 Close the disc tray on the camcorder screen. Saving images with a DVD writer, recorder Creating a disc with the USB cable of the DVD writer. Operating by the camcorder screen, you can remove the disc. You can be used: 12cm DVD...-R 12cm DVD+R The device does not support two-layered discs. Sony DVD writer may not be available in...
Operating Guide
Page 31
...] to create many of the same disc. Do not do any of the following when creating a disc. Turn off the camcorder Disconnect the USB cable or the AC Adaptor Subject the camcorder to mechanical shock or vibration Eject the "Memory Stick PRO Duo" media from the... [CREATE SAME DISC]. After the operation is completed, touch [EXIT] [END] on the camcorder screen. Close the disc tray on the DVD writer, and disconnect the USB cable from your camcorder with the selected images To dub a desired image onto the disc or to save. US 31 To...
...] to create many of the same disc. Do not do any of the following when creating a disc. Turn off the camcorder Disconnect the USB cable or the AC Adaptor Subject the camcorder to mechanical shock or vibration Eject the "Memory Stick PRO Duo" media from the... [CREATE SAME DISC]. After the operation is completed, touch [EXIT] [END] on the camcorder screen. Close the disc tray on the DVD writer, and disconnect the USB cable from your camcorder with the selected images To dub a desired image onto the disc or to save. US 31 To...

Operating Guide
Page 33
... connected. US 33 Creating a disc with a DVD writer, etc., other than DVDirect Express You can save movies on a disc by connecting your camcorder to a Sony DVD writer with the USB cable is described here. Connect your camcorder to the wall outlet (wall socket) using the supplied AC Adaptor for this operation (p. 13). ...
... connected. US 33 Creating a disc with a DVD writer, etc., other than DVDirect Express You can save movies on a disc by connecting your camcorder to a Sony DVD writer with the USB cable is described here. Connect your camcorder to the wall outlet (wall socket) using the supplied AC Adaptor for this operation (p. 13). ...

Operating Guide
Page 34
..., set it to the input mode. 2 Connect your camcorder to the recording device (a disc recorder, etc.) with the A/V connecting cable (supplied) or an A/V connecting cable with S VIDEO (sold separately). Connect your camcorder to a disc recorder, a Sony DVD writer other than with an S VIDEO cable (sold separately) When connecting to another device via the...
..., set it to the input mode. 2 Connect your camcorder to the recording device (a disc recorder, etc.) with the A/V connecting cable (supplied) or an A/V connecting cable with S VIDEO (sold separately). Connect your camcorder to a disc recorder, a Sony DVD writer other than with an S VIDEO cable (sold separately) When connecting to another device via the...

Operating Guide
Page 35
...; To hide the screen indicators (such as a counter, etc.) on the device. Sony DVD writer may not be available in some countries/regions. US 35 Saving images with your recording...device for details. 4 When dubbing is finished, stop the recording device, and then your camcorder, and record it on the recording device. Refer to the audio input jack on...OUTPUT SETTINGS] [DISP OUTPUT] [V-OUT/PANEL When the screen size of the A/V connecting cable to the video input jack, and the white (left channel) or the red (right channel) plug to the instruction...
...; To hide the screen indicators (such as a counter, etc.) on the device. Sony DVD writer may not be available in some countries/regions. US 35 Saving images with your recording...device for details. 4 When dubbing is finished, stop the recording device, and then your camcorder, and record it on the recording device. Refer to the audio input jack on...OUTPUT SETTINGS] [DISP OUTPUT] [V-OUT/PANEL When the screen size of the A/V connecting cable to the video input jack, and the white (left channel) or the red (right channel) plug to the instruction...
Operating Guide
Page 45
...The power does not turn on the (Movie) or (Photo) lamp. Your camcorder is turned on other than the keyboard, mouse, and your camcorder. Disconnect the USB cable from the USB jack of your camcorder, and "PMB Guide" (p. 28) on . It takes a few seconds ...See the "Handycam Handbook" (p. 44) for your Sony dealer will be ready to a computer. However, your camcorder to be deleted. The camcorder is set to on connecting your camcorder, use the following table to install "PMB" (p. 24). The camcorder does not operate even when the power is not recognized...
...The power does not turn on the (Movie) or (Photo) lamp. Your camcorder is turned on other than the keyboard, mouse, and your camcorder. Disconnect the USB cable from the USB jack of your camcorder, and "PMB Guide" (p. 28) on . It takes a few seconds ...See the "Handycam Handbook" (p. 44) for your Sony dealer will be ready to a computer. However, your camcorder to be deleted. The camcorder is set to on connecting your camcorder, use the following table to install "PMB" (p. 24). The camcorder does not operate even when the power is not recognized...

Operating Guide
Page 54
Index A A/V connecting cable...........23, 34 B Backlight 37 Battery 12 C Capturing photos from a movie 29 Charging the battery abroad......13 Charging the battery pack..........12 Computer 24 Computer system ... TV Type 23 U USB 24, 30 Using a wall outlet (wall socket) as a power source 13 V VISUAL INDEX 20 Volume 21 W Warning indicators 46 Windows 24 Z Zoom 17, 19, 22 You will find the menu lists on pages 41 to 43.
Index A A/V connecting cable...........23, 34 B Backlight 37 Battery 12 C Capturing photos from a movie 29 Charging the battery abroad......13 Charging the battery pack..........12 Computer 24 Computer system ... TV Type 23 U USB 24, 30 Using a wall outlet (wall socket) as a power source 13 V VISUAL INDEX 20 Volume 21 W Warning indicators 46 Windows 24 Z Zoom 17, 19, 22 You will find the menu lists on pages 41 to 43.
Handycam® Handbook
Page 13
... lit or flashing. Menu items, LCD panel, and lens A menu item that appear constantly on the LCD screen. However, there may be lost or other malfunctions could occur. Ejecting the "Memory Stick PRO Duo" media from the camcorder Removing...in the correct way. Table of Contents Read this before operating your camcorder Supplied items The numbers in ( ) are the supplied quantity. AC Adaptor (1) Power cord (Mains lead) (1) A/V connecting cable (1) USB cable (1) Rechargeable battery pack NP-FH30 (1) ...
... lit or flashing. Menu items, LCD panel, and lens A menu item that appear constantly on the LCD screen. However, there may be lost or other malfunctions could occur. Ejecting the "Memory Stick PRO Duo" media from the camcorder Removing...in the correct way. Table of Contents Read this before operating your camcorder Supplied items The numbers in ( ) are the supplied quantity. AC Adaptor (1) Power cord (Mains lead) (1) A/V connecting cable (1) USB cable (1) Rechargeable battery pack NP-FH30 (1) ...

Handycam® Handbook
Page 39
...TV. Play back movies and photos on a TV Connect your camcorder to the wall outlet (wall socket) using the A/V connecting cable or an A/V connecting cable with an S VIDEO cable (sold separately), higher quality images can be connected to. For details, refer...to the instruction manuals supplied with the TV. Connect your camcorder (p. 32). 39 Index Table of Contents Playing images on your camcorder to a TV with the A/V connecting cable (, supplied) or an A/V connecting cable with S VIDEO (, sold separately). Connect the white and ...
...TV. Play back movies and photos on a TV Connect your camcorder to the wall outlet (wall socket) using the A/V connecting cable or an A/V connecting cable with an S VIDEO cable (sold separately), higher quality images can be connected to. For details, refer...to the instruction manuals supplied with the TV. Connect your camcorder (p. 32). 39 Index Table of Contents Playing images on your camcorder to a TV with the A/V connecting cable (, supplied) or an A/V connecting cable with S VIDEO (, sold separately). Connect the white and ...

Handycam® Handbook
Page 40
... 16:9 (wide) and 4:3, the image may jitter. On some 4:3 TVs, the photos recorded in 16:9 (wide) aspect ratio on the VCR using the A/V connecting cable. When your TV is not a malfunction. When you play back an image recorded in 4:3 aspect ratio may not be displayed full screen. This is... white (left channel) or red (right channel) plug to the audio input jack of your TV or VCR. Notes When you connect your camcorder to the LINE IN input on a 4:3 TV not compatible with the 16:9 (wide) signal, set [TV TYPE] to [4:3]. Table of Contents To set the aspect...
... 16:9 (wide) and 4:3, the image may jitter. On some 4:3 TVs, the photos recorded in 16:9 (wide) aspect ratio on the VCR using the A/V connecting cable. When your TV is not a malfunction. When you play back an image recorded in 4:3 aspect ratio may not be displayed full screen. This is... white (left channel) or red (right channel) plug to the audio input jack of your TV or VCR. Notes When you connect your camcorder to the LINE IN input on a 4:3 TV not compatible with the 16:9 (wide) signal, set [TV TYPE] to [4:3]. Table of Contents To set the aspect...

Handycam® Handbook
Page 50
... DVD+R The device does not support two-layered discs. Sony DVD writer may not be recorded onto the disc. Index 50 The [DISC BURN] screen appears on the camcorder screen. Press (DISC BURN) on the camcorder screen. Notes Use the supplied AC Adaptor as "DVD... writer" in some countries/regions. Turn on your camcorder, and connect the DVD writer to as the power source (p. 16). Refer also to the instruction manual supplied with the USB cable of the following types can also play back images on the internal memory that...
... DVD+R The device does not support two-layered discs. Sony DVD writer may not be recorded onto the disc. Index 50 The [DISC BURN] screen appears on the camcorder screen. Press (DISC BURN) on the camcorder screen. Notes Use the supplied AC Adaptor as "DVD... writer" in some countries/regions. Turn on your camcorder, and connect the DVD writer to as the power source (p. 16). Refer also to the instruction manual supplied with the USB cable of the following types can also play back images on the internal memory that...
Handycam® Handbook
Page 51
...movie you can play back movies on the TV screen by date. Touch [YES] on the DVD writer, and disconnect the USB cable from the camcorder. You can use [DISC BURN OPTION] to create many of the same discs, perform this operation. Touch [DISC BURN OPTION]... in step 3 above. After the operation is completed. Touch and disconnect the USB cable. Notes Be sure to turn on the camcorder screen and remove the disc after creating the disc. Remove the disc from the DVD writer, and close the disc...
...movie you can play back movies on the TV screen by date. Touch [YES] on the DVD writer, and disconnect the USB cable from the camcorder. You can use [DISC BURN OPTION] to create many of the same discs, perform this operation. Touch [DISC BURN OPTION]... in step 3 above. After the operation is completed. Touch and disconnect the USB cable. Notes Be sure to turn on the camcorder screen and remove the disc after creating the disc. Remove the disc from the DVD writer, and close the disc...

Handycam® Handbook
Page 52
...creation stops when the limit is not possible for this operation (p. 16). Sony DVD writer may be cut off the camcorder Disconnect the USB cable or the AC adaptor Subject the camcorder to mechanical shock or vibration Eject the "Memory Stick PRO Duo" media ... The [USB SELECT] screen appears on the connected Creating a disc with the devices to a Sony DVD writer with the USB cable (supplied). The last movie on the camcorder screen. The method used to create a disc by the DISC BURN operation exceeds that of the disc is completed, touch [END] ...
...creation stops when the limit is not possible for this operation (p. 16). Sony DVD writer may be cut off the camcorder Disconnect the USB cable or the AC adaptor Subject the camcorder to mechanical shock or vibration Eject the "Memory Stick PRO Duo" media ... The [USB SELECT] screen appears on the connected Creating a disc with the devices to a Sony DVD writer with the USB cable (supplied). The last movie on the camcorder screen. The method used to create a disc by the DISC BURN operation exceeds that of the disc is completed, touch [END] ...

Handycam® Handbook
Page 53
... record it to the input mode. Connect your camcorder to a disc recorder, a Sony DVD writer other than DVDirect Express, etc., with the devices to the recording device (a disc recorder, etc.) with the A/V connecting cable (supplied) or an A/V connecting cable with an S VIDEO cable. A/V Remote Connector Input S VIDEO (Yellow) VIDEO (Yellow) (White) AUDIO (Red...
... record it to the input mode. Connect your camcorder to a disc recorder, a Sony DVD writer other than DVDirect Express, etc., with the devices to the recording device (a disc recorder, etc.) with the A/V connecting cable (supplied) or an A/V connecting cable with an S VIDEO cable. A/V Remote Connector Input S VIDEO (Yellow) VIDEO (Yellow) (White) AUDIO (Red...


