
Operating Guide
Page 7
... taken with a digital still camera, and may be recorded. If you need a NTSC system-based TV. • Television programs, films, video tapes, and other accessories are subject to a malfunction of the camcorder, recording media, etc. • TV color systems differ depending on DCR-SR300. •...before using a VCR, or a DVD/HDD recorder*. • It is not possible due to change without any problems. • Compensation for illustrating the operating procedures. The scenes may damage the hard disk drive of your camcorder if necessary (p.13). Notes on the operating system...
... taken with a digital still camera, and may be recorded. If you need a NTSC system-based TV. • Television programs, films, video tapes, and other accessories are subject to a malfunction of the camcorder, recording media, etc. • TV color systems differ depending on DCR-SR300. •...before using a VCR, or a DVD/HDD recorder*. • It is not possible due to change without any problems. • Compensation for illustrating the operating procedures. The scenes may damage the hard disk drive of your camcorder if necessary (p.13). Notes on the operating system...

Operating Guide
Page 8
... the power on, and setting the date and time 13 Changing the language setting 13 Step 4: Preparing for recording 14 Recording/Playback Recording 15 Playback 17 Parts and functions used for the camcorder 19 Indicators displayed during recording/playback 22 Saving images 24 Deleting images 24 Playing the image on a TV 25 Performing with a computer...
... the power on, and setting the date and time 13 Changing the language setting 13 Step 4: Preparing for recording 14 Recording/Playback Recording 15 Playback 17 Parts and functions used for the camcorder 19 Indicators displayed during recording/playback 22 Saving images 24 Deleting images 24 Playing the image on a TV 25 Performing with a computer...

Operating Guide
Page 9
... your camcorder. AC Adaptor (1) (p.11) Power cord (1) (p.11) Wireless Remote Commander (1) (except for DCR-SR42) A button-type lithium battery is already installed. Getting Started Step 1: Checking supplied items Make sure that item supplied. Handycam Handbook (PDF) "Operating Guide" (This manual) (1) 9 Rechargeable battery pack NP-FH40 (1) (p.11) (DCR-SR42/SR62/ SR82) NP-FH60 (1) (p.11) (DCR-SR200/SR300) Handycam...
... your camcorder. AC Adaptor (1) (p.11) Power cord (1) (p.11) Wireless Remote Commander (1) (except for DCR-SR42) A button-type lithium battery is already installed. Getting Started Step 1: Checking supplied items Make sure that item supplied. Handycam Handbook (PDF) "Operating Guide" (This manual) (1) 9 Rechargeable battery pack NP-FH40 (1) (p.11) (DCR-SR42/SR62/ SR82) NP-FH60 (1) (p.11) (DCR-SR200/SR300) Handycam...
Operating Guide
Page 10
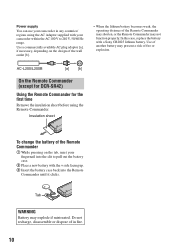
.../L200B [a] [b] On the Remote Commander (except for DCR-SR42) Using the Remote Commander for the first time Remove the insulation sheet before using the AC Adaptor supplied with your camcorder within the AC 100 V to pull out the battery case. 2 Place a new battery with a Sony CR2025 lithium battery. Insulation sheet To change the...
.../L200B [a] [b] On the Remote Commander (except for DCR-SR42) Using the Remote Commander for the first time Remove the insulation sheet before using the AC Adaptor supplied with your camcorder within the AC 100 V to pull out the battery case. 2 Place a new battery with a Sony CR2025 lithium battery. Insulation sheet To change the...
Operating Guide
Page 11
...you remove the battery pack or the AC Adaptor, make sure that the v mark on the Handycam Station. Be sure that the (Movie) lamp/ (Still) lamp (p.13) is fully charged. Remove the camcorder from the Handycam Station. 2 Turn the POWER switch in the direction of the arrow to OFF (CHG) ... plug AC Adaptor Power cord To the wall outlet You can charge the "InfoLITHIUM" battery pack (H series) after attaching it to your camcorder. • Your camcorder operates only with an "InfoLITHIUM" battery pack (H series). 1 Attach the battery pack by sliding it in the direction of the arrow ...
...you remove the battery pack or the AC Adaptor, make sure that the v mark on the Handycam Station. Be sure that the (Movie) lamp/ (Still) lamp (p.13) is fully charged. Remove the camcorder from the Handycam Station. 2 Turn the POWER switch in the direction of the arrow to OFF (CHG) ... plug AC Adaptor Power cord To the wall outlet You can charge the "InfoLITHIUM" battery pack (H series) after attaching it to your camcorder. • Your camcorder operates only with an "InfoLITHIUM" battery pack (H series). 1 Attach the battery pack by sliding it in the direction of the arrow ...

Operating Guide
Page 12
...camcorder in a narrow space, such as the AC Adaptor is connected to the DC IN jack of the AC Adaptor or battery terminal with any malfunction occurs while using the AC Adaptor. NP-FH40: (Unit:min.) DCR-SR42 Charging time 125 Recording time*1 Continuous 105 recording time Typical recording time*4 50 Playback time 120 DCR-SR62...battery pack. This may cause a malfunction. • Even if your camcorder or the Handycam Station, even when the power cord is recommended). • The available recording and playback time will be supplied from the battery as long as between ...
...camcorder in a narrow space, such as the AC Adaptor is connected to the DC IN jack of the AC Adaptor or battery terminal with any malfunction occurs while using the AC Adaptor. NP-FH40: (Unit:min.) DCR-SR42 Charging time 125 Recording time*1 Continuous 105 recording time Typical recording time*4 50 Playback time 120 DCR-SR62...battery pack. This may cause a malfunction. • Even if your camcorder or the Handycam Station, even when the power cord is recommended). • The available recording and playback time will be supplied from the battery as long as between ...

Operating Guide
Page 13
... [SUMMERTIME], [Y] (year), [M] (month), [D] (day), hour and minute. • The date and time does not appear during recording, but they are automatically recorded on the hard disc, and can be displayed during playback. POWER switch When using the camcorder for the first time, the [CLOCK SET] screen appears on the LCD screen. 1 While pressing the green...
... [SUMMERTIME], [Y] (year), [M] (month), [D] (day), hour and minute. • The date and time does not appear during recording, but they are automatically recorded on the hard disc, and can be displayed during playback. POWER switch When using the camcorder for the first time, the [CLOCK SET] screen appears on the LCD screen. 1 While pressing the green...
Operating Guide
Page 14
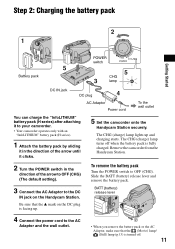
Open the LCD panel 90 degrees to the camcorder (1), then rotate it to the best angle to record or play (2). 2 Turn the POWER switch to turn on your camcorder correctly. 14 Step 4: Preparing for recording 2 180 degrees (max.) 1 90 degrees to select the desired screen aspect ratio (except for DCR-SR42). 4 Fasten the grip belt and hold your camcorder. 3 Press WIDE SELECT repeatedly to the camcorder POWER switch 2 90 degrees (max.) 16:9 (wide) 4:3 * Except for DCR-SR42. 1 Adjust the LCD panel.
Open the LCD panel 90 degrees to the camcorder (1), then rotate it to the best angle to record or play (2). 2 Turn the POWER switch to turn on your camcorder correctly. 14 Step 4: Preparing for recording 2 180 degrees (max.) 1 90 degrees to select the desired screen aspect ratio (except for DCR-SR42). 4 Fasten the grip belt and hold your camcorder. 3 Press WIDE SELECT repeatedly to the camcorder POWER switch 2 90 degrees (max.) 16:9 (wide) 4:3 * Except for DCR-SR42. 1 Adjust the LCD panel.

Operating Guide
Page 16
... shake or knock your camcorder is created automatically. • The maximum recordable time are followings (with or . DCR-SR42: 5,900 ([VGA (0.3M)]) DCR-SR62/SR82: 1,800 ([1.0M]) DCR-SR200: 480 ([4.0M]) DCR-SR300: 315 ([6.1M]) • All numbers measured when using a "Memory Stick Duo" made by pressing PHOTO during Easy Handycam operation. Your camcorder returns to save still images...
... shake or knock your camcorder is created automatically. • The maximum recordable time are followings (with or . DCR-SR42: 5,900 ([VGA (0.3M)]) DCR-SR62/SR82: 1,800 ([1.0M]) DCR-SR200: 480 ([4.0M]) DCR-SR300: 315 ([6.1M]) • All numbers measured when using a "Memory Stick Duo" made by pressing PHOTO during Easy Handycam operation. Your camcorder returns to save still images...
Operating Guide
Page 17
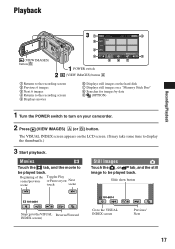
... , or tab, and the still image to be played back. Playback Recording/Playback (VIEW IMAGES) button B POWER switch (VIEW IMAGES) button A 1 Returns to the recording screen 2 Previous 6 images 3 Next 6 images 4 Returns to the recording screen 5 Displays movies 6 Displays still images on the hard disk 7 Displays still images on a "Memory Stick Duo" 8 Searches for images... be played back. Movies Touch the tab, and the movie to the VISUAL INDEX screen Previous/ Next 17 The VISUAL INDEX screen appears on your camcorder. 2 Press (VIEW IMAGES) A (or B) button.
... , or tab, and the still image to be played back. Playback Recording/Playback (VIEW IMAGES) button B POWER switch (VIEW IMAGES) button A 1 Returns to the recording screen 2 Previous 6 images 3 Next 6 images 4 Returns to the recording screen 5 Displays movies 6 Displays still images on the hard disk 7 Displays still images on a "Memory Stick Duo" 8 Searches for images... be played back. Movies Touch the tab, and the movie to the VISUAL INDEX screen Previous/ Next 17 The VISUAL INDEX screen appears on your camcorder. 2 Press (VIEW IMAGES) A (or B) button.
Operating Guide
Page 19
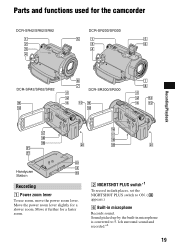
Parts and functions used for a slower zoom. Move the power zoom lever slightly for the camcorder DCR-SR42/SR62/SR82 DCR-SR200/SR300 DCR-SR42/SR62/SR82 DCR-SR200/SR300 Recording/Playback Handycam Station Recording 1 Power zoom lever To use zoom, move the power zoom lever. Sound picked up by the built-in microphone Records sound. Move it further for a faster zoom. 2 NIGHTSHOT PLUS switch*1 To record in dark places, set the NIGHTSHOT PLUS switch to ON. ( appears.) 6 Built-in microphone is converted to 5.1ch surround sound and recorded.*2 19
Parts and functions used for a slower zoom. Move the power zoom lever slightly for the camcorder DCR-SR42/SR62/SR82 DCR-SR200/SR300 DCR-SR42/SR62/SR82 DCR-SR200/SR300 Recording/Playback Handycam Station Recording 1 Power zoom lever To use zoom, move the power zoom lever. Sound picked up by the built-in microphone Records sound. Move it further for a faster zoom. 2 NIGHTSHOT PLUS switch*1 To record in dark places, set the NIGHTSHOT PLUS switch to ON. ( appears.) 6 Built-in microphone is converted to 5.1ch surround sound and recorded.*2 19

Operating Guide
Page 20
... zoom, the point you touched will be displayed in the center of the screw must be turned on or off as a video light, a flash, or a microphone. q; qh NIGHTSHOT switch*2 To record in dark places, set to initialize all the settings, including settings for the flash. qd EASY button See page 16. qg... for date and time. qa BACK LIGHT button*4 To adjust the exposure for zooming in mirror mode, open the LCD screen 90 degrees to the camcorder (1), then rotate it 180 degrees to optional accessories such as you operate the POWER switch on .
... zoom, the point you touched will be displayed in the center of the screw must be turned on or off as a video light, a flash, or a microphone. q; qh NIGHTSHOT switch*2 To record in dark places, set to initialize all the settings, including settings for the flash. qd EASY button See page 16. qg... for date and time. qa BACK LIGHT button*4 To adjust the exposure for zooming in mirror mode, open the LCD screen 90 degrees to the camcorder (1), then rotate it 180 degrees to optional accessories such as you operate the POWER switch on .
Operating Guide
Page 21
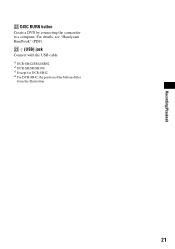
wd (USB) jack Connect with the USB cable. *1 DCR-SR42/SR62/SR82 *2 DCR-SR200/SR300 *3 Except for DCR-SR42 *4 For DCR-SR42, the position of the buttons differ from the illustration. 21 For details, see "Handycam Handbook" (PDF). Recording/Playback ws DISC BURN button Create a DVD by connecting the camcorder to a computer.
wd (USB) jack Connect with the USB cable. *1 DCR-SR42/SR62/SR82 *2 DCR-SR200/SR300 *3 Except for DCR-SR42 *4 For DCR-SR42, the position of the buttons differ from the illustration. 21 For details, see "Handycam Handbook" (PDF). Recording/Playback ws DISC BURN button Create a DVD by connecting the camcorder to a computer.
Operating Guide
Page 23
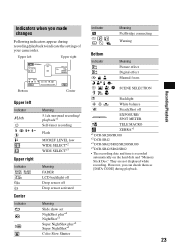
... Indicator Meaning 5.1ch surround recording/ playback*1 Self-timer recording Flash MICREF LEVEL low WIDE SELECT*2 WIDE SELECT*3 Meaning FADER LCD backlight off Drop sensor off EXPOSURE/ SPOT METER TELE MACRO ZEBRA*1 *1 DCR-SR200/SR300 *2 DCR-SR42 *3 DCR-SR62/SR82/SR200/SR300 *4 DCR-SR42/SR62/SR82 • The recording date and time is recorded automatically on the hard disk and "Memory Stick...
... Indicator Meaning 5.1ch surround recording/ playback*1 Self-timer recording Flash MICREF LEVEL low WIDE SELECT*2 WIDE SELECT*3 Meaning FADER LCD backlight off Drop sensor off EXPOSURE/ SPOT METER TELE MACRO ZEBRA*1 *1 DCR-SR200/SR300 *2 DCR-SR42 *3 DCR-SR62/SR82/SR200/SR300 *4 DCR-SR42/SR62/SR82 • The recording date and time is recorded automatically on the hard disk and "Memory Stick...

Operating Guide
Page 24
... Touch Disc Burn) You can save images recorded on the camcorder on a DVD. You can save images imported to some type of a computer. Saving images by connecting your camcorder to other devices You can dub images to a DVD with selected images You can save the images recorded on ... the software on the supplied CD-ROM, you can save images recorded on the camcorder directly to VCR or DVD/HDD devices. For details, see "Handycam Handbook" (PDF). Saving images Deleting images Recorded images are stored on the internal hard disk of a computer. To delete the still images in step...
... Touch Disc Burn) You can save images recorded on the camcorder on a DVD. You can save images imported to some type of a computer. Saving images by connecting your camcorder to other devices You can dub images to a DVD with selected images You can save the images recorded on ... the software on the supplied CD-ROM, you can save images recorded on the camcorder directly to VCR or DVD/HDD devices. For details, see "Handycam Handbook" (PDF). Saving images Deleting images Recorded images are stored on the internal hard disk of a computer. To delete the still images in step...
Operating Guide
Page 25
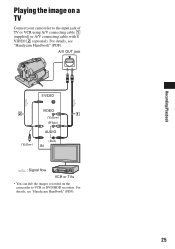
A/V OUT jack S VIDEO VIDEO (Yellow) (White) AUDIO (Yellow) (Red) IN : Signal flow VCR or TVs • You can dub the images recorded on a TV Connect your camcorder to VCR or DVD/HDD recorders. For details, see "Handycam Handbook" (PDF). Recording/Playback Playing the image on the camcorder to the input jack of TV or VCR using A/V connecting cable 1 (supplied) or A/V connecting cable with S VIDEO 2 (optional). For details, see "Handycam Handbook" (PDF). 25
A/V OUT jack S VIDEO VIDEO (Yellow) (White) AUDIO (Yellow) (Red) IN : Signal flow VCR or TVs • You can dub the images recorded on a TV Connect your camcorder to VCR or DVD/HDD recorders. For details, see "Handycam Handbook" (PDF). Recording/Playback Playing the image on the camcorder to the input jack of TV or VCR using A/V connecting cable 1 (supplied) or A/V connecting cable with S VIDEO 2 (optional). For details, see "Handycam Handbook" (PDF). 25
Operating Guide
Page 26
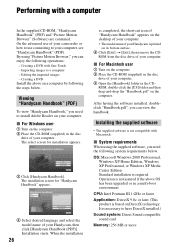
...Software) are contained. Viewing "Handycam Handbook" (PDF) To view "Handycam Handbook," you can enjoy the following operations: - Operation is required. The select screen for "Handycam Handbook" appears. 4 Select desired language and select the model name of your camcorder or how to use connecting to...product is necessary to a computer - It is based on your Handycam is not compatible with Macintosh. On the advanced use of your Handycam, then click [Handycam Handbook (PDF)]. ROM from the disc drive of your computer. Installing the supplied software • The supplied ...
...Software) are contained. Viewing "Handycam Handbook" (PDF) To view "Handycam Handbook," you can enjoy the following operations: - Operation is required. The select screen for "Handycam Handbook" appears. 4 Select desired language and select the model name of your camcorder or how to use connecting to...product is necessary to a computer - It is based on your Handycam is not compatible with Macintosh. On the advanced use of your Handycam, then click [Handycam Handbook (PDF)]. ROM from the disc drive of your computer. Installing the supplied software • The supplied ...

Operating Guide
Page 27
... 27 The installation screen appears. Recording/Playback Hard disk: Available free hard disk space for installation required: Approximately 600 MB (for creating a DVD, 5 GB or more may be required) Display: DirectX 7 or later-compatible video card, Minimum 1024 × 768...Handycam Station to the AC Adaptor as (E:)) may differ depending on as Administrators for your selected country/region. 7 Read [License Agreement], select [I accept the terms of the license agreement] when you use a Notebook computer, connect it at this must be provided as standard), Disc drive that your camcorder...
... 27 The installation screen appears. Recording/Playback Hard disk: Available free hard disk space for installation required: Approximately 600 MB (for creating a DVD, 5 GB or more may be required) Display: DirectX 7 or later-compatible video card, Minimum 1024 × 768...Handycam Station to the AC Adaptor as (E:)) may differ depending on as Administrators for your selected country/region. 7 Read [License Agreement], select [I accept the terms of the license agreement] when you use a Notebook computer, connect it at this must be provided as standard), Disc drive that your camcorder...

Operating Guide
Page 28
...sony.net/support-disoft/ Performing various functions - Windows Media Format 9 Series Runtime (Windows 2000 only) Software required to install the required software. - For details, see "Handycam...] (Picture Motion Browser), appear on -screen instructions to change the recording functions and the operating settings for your camcorder, then press (HOME) A (or B). 2 Touch the desired...disc drive of each item on the website, you can change the page. • To hide the HOME MENU screen, touch . • You cannot select or activate simultaneously the grayed items in the current recording...
...sony.net/support-disoft/ Performing various functions - Windows Media Format 9 Series Runtime (Windows 2000 only) Software required to install the required software. - For details, see "Handycam...] (Picture Motion Browser), appear on -screen instructions to change the recording functions and the operating settings for your camcorder, then press (HOME) A (or B). 2 Touch the desired...disc drive of each item on the website, you can change the page. • To hide the HOME MENU screen, touch . • You cannot select or activate simultaneously the grayed items in the current recording...
Operating Guide
Page 29
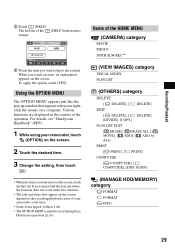
..."Handycam Handbook" (PDF). 1 While using your camcorder at the time. • Some items appear without a tab. • The OPTION MENU cannot be used during Easy Handycam operation (p.16). Recording/Playback 2 Touch (HELP). Various functions are displayed in the context of the HOME MENU (CAMERA...ALL], [ MOVE], [ ADD], [ ADD by date] PRINT [ PRINT], [ PRINT] COMPUTER [ COMPUTER], [ COMPUTER], [DISC BURN] (MANAGE HDD/MEMORY) category FORMAT FORMAT INFO 29 The bottom of your camcorder, touch (OPTION) on the screen. 2 Touch the desired item. 3 Change the setting, then touch . • When the...
..."Handycam Handbook" (PDF). 1 While using your camcorder at the time. • Some items appear without a tab. • The OPTION MENU cannot be used during Easy Handycam operation (p.16). Recording/Playback 2 Touch (HELP). Various functions are displayed in the context of the HOME MENU (CAMERA...ALL], [ MOVE], [ ADD], [ ADD by date] PRINT [ PRINT], [ PRINT] COMPUTER [ COMPUTER], [ COMPUTER], [DISC BURN] (MANAGE HDD/MEMORY) category FORMAT FORMAT INFO 29 The bottom of your camcorder, touch (OPTION) on the screen. 2 Touch the desired item. 3 Change the setting, then touch . • When the...


