

Operating Guide
Page 9
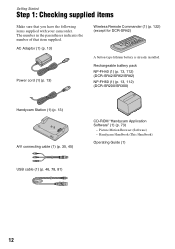
... you have the following items supplied with your camcorder. Getting Started Step 1: Checking supplied items Make sure that item supplied. Handycam Handbook (PDF) "Operating Guide" (This manual) (1) 9 Picture Motion Browser (Software) - Rechargeable battery pack NP-FH40 (1) (p.11) (DCR-SR42/SR62/ SR82) NP-FH60 (1) (p.11) (DCR-SR200/SR300) Handycam Station (1) (p.11) A/V connecting cable (1) (p.25) USB cable (1) (p.27...
... you have the following items supplied with your camcorder. Getting Started Step 1: Checking supplied items Make sure that item supplied. Handycam Handbook (PDF) "Operating Guide" (This manual) (1) 9 Picture Motion Browser (Software) - Rechargeable battery pack NP-FH40 (1) (p.11) (DCR-SR42/SR62/ SR82) NP-FH60 (1) (p.11) (DCR-SR200/SR300) Handycam Station (1) (p.11) A/V connecting cable (1) (p.25) USB cable (1) (p.27...
Operating Guide
Page 10
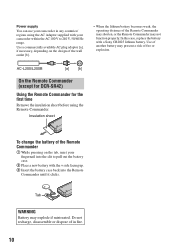
... if mistreated. AC-L200/L200B [a] [b] On the Remote Commander (except for DCR-SR42) Using the Remote Commander for the first time Remove the insulation sheet before using the AC Adaptor supplied with a Sony CR2025 lithium battery. Use a commercially available AC plug adaptor [a], if necessary,... depending on the design of the wall outlet [b]. • When the lithium battery becomes weak, the operating distance of the Remote Commander 1 While pressing on the tab, inset your camcorder within ...
... if mistreated. AC-L200/L200B [a] [b] On the Remote Commander (except for DCR-SR42) Using the Remote Commander for the first time Remove the insulation sheet before using the AC Adaptor supplied with a Sony CR2025 lithium battery. Use a commercially available AC plug adaptor [a], if necessary,... depending on the design of the wall outlet [b]. • When the lithium battery becomes weak, the operating distance of the Remote Commander 1 While pressing on the tab, inset your camcorder within ...

Operating Guide
Page 12
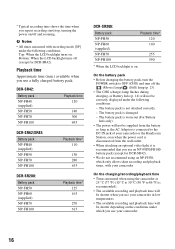
...on the camcorder. NP-FH40: (Unit:min.) DCR-SR42 Charging time 125 Recording time*1 Continuous 105 recording time Typical recording time*4 50 Playback time 120 DCR-SR62/ SR82 125 90*2 100*3 45*2 50*3 110*2 12 NP-FH60: (Unit:min.) DCR-SR200 DCR-SR300 Charging time 135 135 Recording time*1 Continuous recording time 115*2...]. *2 When the LCD backlight turns on. *3When the LCD backlight turns off. *4 Typical recording time shows the time when you use your camcorder or the Handycam Station, even when the power cord is set to the wall outlet via the AC Adaptor. ...
...on the camcorder. NP-FH40: (Unit:min.) DCR-SR42 Charging time 125 Recording time*1 Continuous 105 recording time Typical recording time*4 50 Playback time 120 DCR-SR62/ SR82 125 90*2 100*3 45*2 50*3 110*2 12 NP-FH60: (Unit:min.) DCR-SR200 DCR-SR300 Charging time 135 135 Recording time*1 Continuous recording time 115*2...]. *2 When the LCD backlight turns on. *3When the LCD backlight turns off. *4 Typical recording time shows the time when you use your camcorder or the Handycam Station, even when the power cord is set to the wall outlet via the AC Adaptor. ...
Operating Guide
Page 14
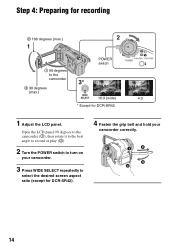
Open the LCD panel 90 degrees to the camcorder (1), then rotate it to the best angle to record or play (2). 2 Turn the POWER switch to turn on your camcorder. 3 Press WIDE SELECT repeatedly to the camcorder POWER switch 2 90 degrees (max.) 16:9 (wide) 4:3 * Except for DCR-SR42). 4 Fasten the grip belt and hold your camcorder correctly. 14 Step 4: Preparing for recording 2 180 degrees (max.) 1 90 degrees to select the desired screen aspect ratio (except for DCR-SR42. 1 Adjust the LCD panel.
Open the LCD panel 90 degrees to the camcorder (1), then rotate it to the best angle to record or play (2). 2 Turn the POWER switch to turn on your camcorder. 3 Press WIDE SELECT repeatedly to the camcorder POWER switch 2 90 degrees (max.) 16:9 (wide) 4:3 * Except for DCR-SR42). 4 Fasten the grip belt and hold your camcorder correctly. 14 Step 4: Preparing for recording 2 180 degrees (max.) 1 90 degrees to select the desired screen aspect ratio (except for DCR-SR42. 1 Adjust the LCD panel.

Operating Guide
Page 16
...DCR-SR42/SR62: approx. 10 hours and 50 minutes DCR-SR82: approx. 21 hours and 40 minutes DCR-SR200/SR300: approx. 14 hours and 30 minutes To record still images on a "Memory Stick Duo" You can change the recording media of still images to recording standby mode. Do not shake or knock your camcorder... )); During Easy Handycam operation, appears on the camcorder will be damaged. • If you insert the "Memory Stick Duo" into the Memory Stick Duo slot in once. 16 • When the ACCESS lamp is lit or flashing, your camcorder is still being written onto the hard disk or "Memory...
...DCR-SR42/SR62: approx. 10 hours and 50 minutes DCR-SR82: approx. 21 hours and 40 minutes DCR-SR200/SR300: approx. 14 hours and 30 minutes To record still images on a "Memory Stick Duo" You can change the recording media of still images to recording standby mode. Do not shake or knock your camcorder... )); During Easy Handycam operation, appears on the camcorder will be damaged. • If you insert the "Memory Stick Duo" into the Memory Stick Duo slot in once. 16 • When the ACCESS lamp is lit or flashing, your camcorder is still being written onto the hard disk or "Memory...
Operating Guide
Page 19
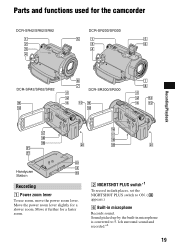
Move it further for the camcorder DCR-SR42/SR62/SR82 DCR-SR200/SR300 DCR-SR42/SR62/SR82 DCR-SR200/SR300 Recording/Playback Handycam Station Recording 1 Power zoom lever To use zoom, move the power zoom lever. Sound picked up by the built-in microphone Records sound. Parts and functions used for a faster zoom. 2 NIGHTSHOT PLUS switch*1 To record in dark places, set the NIGHTSHOT PLUS switch to ON. ( appears.) 6 Built-in microphone is converted to 5.1ch surround sound and recorded.*2 19 Move the power zoom lever slightly for a slower zoom.
Move it further for the camcorder DCR-SR42/SR62/SR82 DCR-SR200/SR300 DCR-SR42/SR62/SR82 DCR-SR200/SR300 Recording/Playback Handycam Station Recording 1 Power zoom lever To use zoom, move the power zoom lever. Sound picked up by the built-in microphone Records sound. Parts and functions used for a faster zoom. 2 NIGHTSHOT PLUS switch*1 To record in dark places, set the NIGHTSHOT PLUS switch to ON. ( appears.) 6 Built-in microphone is converted to 5.1ch surround sound and recorded.*2 19 Move the power zoom lever slightly for a slower zoom.
Operating Guide
Page 21
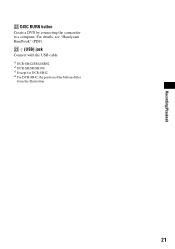
Recording/Playback ws DISC BURN button Create a DVD by connecting the camcorder to a computer. For details, see "Handycam Handbook" (PDF). wd (USB) jack Connect with the USB cable. *1 DCR-SR42/SR62/SR82 *2 DCR-SR200/SR300 *3 Except for DCR-SR42 *4 For DCR-SR42, the position of the buttons differ from the illustration. 21
Recording/Playback ws DISC BURN button Create a DVD by connecting the camcorder to a computer. For details, see "Handycam Handbook" (PDF). wd (USB) jack Connect with the USB cable. *1 DCR-SR42/SR62/SR82 *2 DCR-SR200/SR300 *3 Except for DCR-SR42 *4 For DCR-SR42, the position of the buttons differ from the illustration. 21
Operating Guide
Page 23
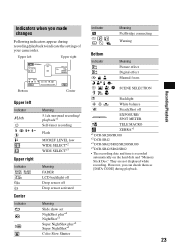
... Indicator Meaning 5.1ch surround recording/ playback*1 Self-timer recording Flash MICREF LEVEL low WIDE SELECT*2 WIDE SELECT*3 Meaning FADER LCD backlight off Drop sensor off EXPOSURE/ SPOT METER TELE MACRO ZEBRA*1 *1 DCR-SR200/SR300 *2 DCR-SR42 *3 DCR-SR62/SR82/SR200/SR300 *4 DCR-SR42/SR62/SR82 • The recording date and time is recorded automatically on the hard disk and "Memory Stick...
... Indicator Meaning 5.1ch surround recording/ playback*1 Self-timer recording Flash MICREF LEVEL low WIDE SELECT*2 WIDE SELECT*3 Meaning FADER LCD backlight off Drop sensor off EXPOSURE/ SPOT METER TELE MACRO ZEBRA*1 *1 DCR-SR200/SR300 *2 DCR-SR42 *3 DCR-SR62/SR82/SR200/SR300 *4 DCR-SR42/SR62/SR82 • The recording date and time is recorded automatically on the hard disk and "Memory Stick...

Operating Guide
Page 32
...digit code, which starts from "E." 101-0001 (Warning indicator pertaining to files) Slow flashing • The file is damaged. • The file is closed (DCR-SR42/ SR62/SR82). • When you can fix by yourself. Reconnect it and operate your camcorder again. • Turn on your Sony... dealer or local authorized Sony service facility. C:13:ss / C:32:ss • Remove the power source. For details, see "Handycam Handbook" (PDF). ...
...digit code, which starts from "E." 101-0001 (Warning indicator pertaining to files) Slow flashing • The file is damaged. • The file is closed (DCR-SR42/ SR62/SR82). • When you can fix by yourself. Reconnect it and operate your camcorder again. • Turn on your Sony... dealer or local authorized Sony service facility. C:13:ss / C:32:ss • Remove the power source. For details, see "Handycam Handbook" (PDF). ...
Operating Guide
Page 35
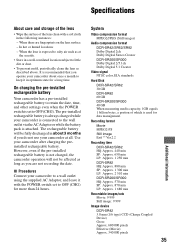
...rechargeable battery is recommended that you operate your camcorder about 3 months if you are fingerprints on the lens surface. - Recording format Movie MPEG2-PS Still image Exif *1 Ver.2.2 Recording time DCR-SR42/SR62 HQ: Approx. 440 min SP: ...Digital Stereo Creator DCR-SR200/SR300 Dolby Digital 2/5.1ch Dolby Digital 5.1 Creator Video signal NTSC color, EIA standards Hard Disk DCR-SR42/SR62 30 GB DCR-SR82 60 GB DCR-SR200/SR300 40 GB When measuring media capacity, 1GB equals 1 billion bytes, a portion of the lens clean with the POWER switch set to OFF (CHG). When there are not recording...
...rechargeable battery is recommended that you operate your camcorder about 3 months if you are fingerprints on the lens surface. - Recording format Movie MPEG2-PS Still image Exif *1 Ver.2.2 Recording time DCR-SR42/SR62 HQ: Approx. 440 min SP: ...Digital Stereo Creator DCR-SR200/SR300 Dolby Digital 2/5.1ch Dolby Digital 5.1 Creator Video signal NTSC color, EIA standards Hard Disk DCR-SR42/SR62 30 GB DCR-SR82 60 GB DCR-SR200/SR300 40 GB When measuring media capacity, 1GB equals 1 billion bytes, a portion of the lens clean with the POWER switch set to OFF (CHG). When there are not recording...
Operating Guide
Page 37
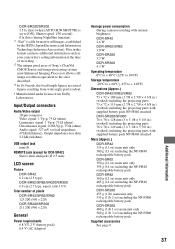
...) Audio signal: 327 mV (at the time of recording. *2 The unique pixel array of pixels DCR-SR42/SR62/SR82 123 200 (560 × 220) DCR-SR200/SR300 211 200 (960 × 220) General Power requirements 6.8 V/7.2 V (battery pack) 8.4 V (AC Adaptor) Average power consumption During camera recording with normal brightness. DCR-SR200/SR300 1.5 lx (lux) (when [AUTO SLW SHUTTR...
...) Audio signal: 327 mV (at the time of recording. *2 The unique pixel array of pixels DCR-SR42/SR62/SR82 123 200 (560 × 220) DCR-SR200/SR300 211 200 (960 × 220) General Power requirements 6.8 V/7.2 V (battery pack) 8.4 V (AC Adaptor) Average power consumption During camera recording with normal brightness. DCR-SR200/SR300 1.5 lx (lux) (when [AUTO SLW SHUTTR...
Handycam® Handbook
Page 3
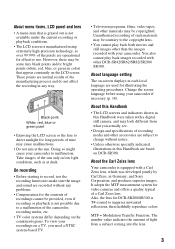
...play back images recorded with a Carl Zeiss lens, which was developed jointly by Carl Zeiss, in Germany, and Sony Corporation, and produces superior images. You also cannot play back both movies and still images other DCR-SR42/SR62/SR82/SR200/ SR300. About the Carl Zeiss lens Your camcorder is T -...the sun only in this Handbook are used for video cameras and offers a quality typical of time may be copyrighted. About language setting The on-screen displays in color) that is grayed out is not available under the current recording or playback conditions. • The LCD screen ...
...play back images recorded with a Carl Zeiss lens, which was developed jointly by Carl Zeiss, in Germany, and Sony Corporation, and produces superior images. You also cannot play back both movies and still images other DCR-SR42/SR62/SR82/SR200/ SR300. About the Carl Zeiss lens Your camcorder is T -...the sun only in this Handbook are used for video cameras and offers a quality typical of time may be copyrighted. About language setting The on-screen displays in color) that is grayed out is not available under the current recording or playback conditions. • The LCD screen ...
Handycam® Handbook
Page 12
... parentheses indicates the number of that you have the following items supplied with your camcorder. Rechargeable battery pack NP-FH40 (1) (p. 13, 112) (DCR-SR42/SR62/SR82) NP-FH60 (1) (p. 13, 112) (DCR-SR200/SR300) Handycam Station (1) (p. 13) A/V connecting cable (1) (p. 35, 45) CD-ROM "Handycam Application Software" (1) (p. 73) - Picture Motion Browser (Software) - AC Adaptor (1) (p. 13) Power cord (1) (p. 13...
... parentheses indicates the number of that you have the following items supplied with your camcorder. Rechargeable battery pack NP-FH40 (1) (p. 13, 112) (DCR-SR42/SR62/SR82) NP-FH60 (1) (p. 13, 112) (DCR-SR200/SR300) Handycam Station (1) (p. 13) A/V connecting cable (1) (p. 35, 45) CD-ROM "Handycam Application Software" (1) (p. 73) - Picture Motion Browser (Software) - AC Adaptor (1) (p. 13) Power cord (1) (p. 13...
Handycam® Handbook
Page 16
...recording/playback time • Times measured when using an NP-FH30, which you use your camcorder or the Handycam Station, even when the power cord is disconnected from the wall outlet. • When attaching an optional video light, it is recommended that you use an NP-FH70/FH100 battery pack (except for DCR-SR42). DCR-SR42...When the LCD backlight turns off and zooming. * Typical recording time shows the time when you repeat recording start/stop, turning the power on/off (except for DCR-SR42). • We do not recommend using the camcorder at 25 °C (77 °F) (10 &#...
...recording/playback time • Times measured when using an NP-FH30, which you use your camcorder or the Handycam Station, even when the power cord is disconnected from the wall outlet. • When attaching an optional video light, it is recommended that you use an NP-FH70/FH100 battery pack (except for DCR-SR42). DCR-SR42...When the LCD backlight turns off and zooming. * Typical recording time shows the time when you repeat recording start/stop, turning the power on/off (except for DCR-SR42). • We do not recommend using the camcorder at 25 °C (77 °F) (10 &#...

Handycam® Handbook
Page 19
... will not be affected by the setting. z Tips • If you open the LCD panel 90 degrees to the camcorder, then rotate it to the best angle to record or play (2). 290 degrees (max.) DISP/BATT INFO This setting is displayed or hidden (display y no display) each time you.... • The information is practical when you can close the lens cover. • For DCR-SR200/SR300, the lens cover opens and closes automatically. Getting Started Step 4: Preparing for recording Opening the lens cover manually (DCR-SR42/SR62/ SR82) Slide the lens cover switch to open or adjust the LCD panel.
... will not be affected by the setting. z Tips • If you open the LCD panel 90 degrees to the camcorder, then rotate it to the best angle to record or play (2). 290 degrees (max.) DISP/BATT INFO This setting is displayed or hidden (display y no display) each time you.... • The information is practical when you can close the lens cover. • For DCR-SR200/SR300, the lens cover opens and closes automatically. Getting Started Step 4: Preparing for recording Opening the lens cover manually (DCR-SR42/SR62/ SR82) Slide the lens cover switch to open or adjust the LCD panel.
Handycam® Handbook
Page 23
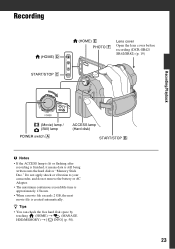
... E PHOTO F Lens cover Open the lens cover before recording (DCR-SR42/ SR62/SR82) (p. 19) Recording/Playback (Movie) lamp / (Still) lamp POWER switch A ACCESS lamp (Hard disk) START/STOP B b Notes • If the ACCESS lamp is lit or flashing after recording is finished, it means data is created automatically. z Tips...; You can check the free hard disk space by touching (HOME) t (MANAGE HDD/MEMORY) t [ INFO] (p. 50). 23 Do not apply shock or vibration to your camcorder, and do not remove the battery or AC Adaptor. • The maximum continuous recordable time is approximately 13 hours....
... E PHOTO F Lens cover Open the lens cover before recording (DCR-SR42/ SR62/SR82) (p. 19) Recording/Playback (Movie) lamp / (Still) lamp POWER switch A ACCESS lamp (Hard disk) START/STOP B b Notes • If the ACCESS lamp is lit or flashing after recording is finished, it means data is created automatically. z Tips...; You can check the free hard disk space by touching (HOME) t (MANAGE HDD/MEMORY) t [ INFO] (p. 50). 23 Do not apply shock or vibration to your camcorder, and do not remove the battery or AC Adaptor. • The maximum continuous recordable time is approximately 13 hours....
Handycam® Handbook
Page 25
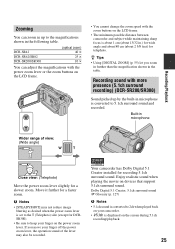
... the zoom speed with more presence (5.1ch surround recording) (DCR-SR200/SR300) Sound picked up to the magnifications shown in microphone is converted to 5.1ch surround sound and recorded. b Notes • [STEADYSHOT] may also be recorded. Dolby Digital 5.1 Creator, 5.1ch surround sound 1 Glossary ... zoom. Your camcorder has Dolby Digital 5.1 Creator installed for a faster zoom. Enjoy realistic sound when playing the movie on the screen during 5.1ch recording/playback. 25 If you zoom in further than the magnification shown in the table. DCR-SR42 DCR-SR62/SR82 DCR-SR200/SR300 (...
... the zoom speed with more presence (5.1ch surround recording) (DCR-SR200/SR300) Sound picked up to the magnifications shown in microphone is converted to 5.1ch surround sound and recorded. b Notes • [STEADYSHOT] may also be recorded. Dolby Digital 5.1 Creator, 5.1ch surround sound 1 Glossary ... zoom. Your camcorder has Dolby Digital 5.1 Creator installed for a faster zoom. Enjoy realistic sound when playing the movie on the screen during 5.1ch recording/playback. 25 If you zoom in further than the magnification shown in the table. DCR-SR42 DCR-SR62/SR82 DCR-SR200/SR300 (...
Handycam® Handbook
Page 27
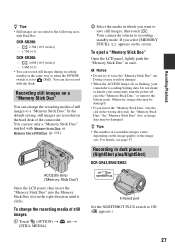
..., your camcorder, turn the power off, eject the "Memory Stick Duo," or remove the battery pack. Doing so may be damaged. • If you select [MEMORY STICK], appears on the screen. Recording in dark places (NightShot plus/NightShot) DCR-SR42/SR62/SR82... still images are recorded in once. DCR-SR200: - 2.3M (16:9 (wide)) - 1.7M (4:3) DCR-SR300: - 4.6M (16:9 (wide)) - 3.4M (4:3) • You can change the recording media of still images 1 Touch (OPTION) t [STILL MEDIA]. Recording/Playback z Tips • Still images are recorded on the hard disk of the camcorder.
..., your camcorder, turn the power off, eject the "Memory Stick Duo," or remove the battery pack. Doing so may be damaged. • If you select [MEMORY STICK], appears on the screen. Recording in dark places (NightShot plus/NightShot) DCR-SR42/SR62/SR82... still images are recorded in once. DCR-SR200: - 2.3M (16:9 (wide)) - 1.7M (4:3) DCR-SR300: - 4.6M (16:9 (wide)) - 3.4M (4:3) • You can change the recording media of still images 1 Touch (OPTION) t [STILL MEDIA]. Recording/Playback z Tips • Still images are recorded on the hard disk of the camcorder.

Handycam® Handbook
Page 28
.... z Tips • A mirror-image of the movies DCR-SR42: 1 Turn the POWER switch until the (Movie) lamp lights up. To cancel the back light function, press BACK LIGHT again. To record an image more faithfully to display .. Recording in mirror mode Infrared port Set the NIGHTSHOT switch to focus...Color Slow Shutter function (p. 70). 28 Open the LCD panel 90 degrees to the camcorder (1), then rotate it is hard to the lens side (2). Selecting the aspect ratio (16:9 or 4:3) of the recording image To select the aspect ratio of the subject appears on the LCD screen, but ...
.... z Tips • A mirror-image of the movies DCR-SR42: 1 Turn the POWER switch until the (Movie) lamp lights up. To cancel the back light function, press BACK LIGHT again. To record an image more faithfully to display .. Recording in mirror mode Infrared port Set the NIGHTSHOT switch to focus...Color Slow Shutter function (p. 70). 28 Open the LCD panel 90 degrees to the camcorder (1), then rotate it is hard to the lens side (2). Selecting the aspect ratio (16:9 or 4:3) of the recording image To select the aspect ratio of the subject appears on the LCD screen, but ...

Handycam® Handbook
Page 29
... TV (16:9/4:3) (p. 62). • When you view 16:9 (wide) images with [TV TYPE] set to [4:3], they may appear rough depending on the camcorder. 2 Press (HOME) A (or B) to turn on subjects. The aspect ratio changes to 4:3 automatically. 2 Press WIDE SELECT repeatedly to select the desired ...display the HOME MENU. 3 Touch (CAMERA). 4 Touch [SMTH SLW REC]. 29 Recording/Playback Recording the fast action in slow-motion (SMTH SLW REC) (DCR-SR200/SR300) Fast moving slow-motion for DCR-SR42) 1 Turn the POWER switch until the (Movie) lamp lights up . DCR-SR62/SR82/SR200/SR300: 1 Turn...
... TV (16:9/4:3) (p. 62). • When you view 16:9 (wide) images with [TV TYPE] set to [4:3], they may appear rough depending on the camcorder. 2 Press (HOME) A (or B) to turn on subjects. The aspect ratio changes to 4:3 automatically. 2 Press WIDE SELECT repeatedly to select the desired ...display the HOME MENU. 3 Touch (CAMERA). 4 Touch [SMTH SLW REC]. 29 Recording/Playback Recording the fast action in slow-motion (SMTH SLW REC) (DCR-SR200/SR300) Fast moving slow-motion for DCR-SR42) 1 Turn the POWER switch until the (Movie) lamp lights up . DCR-SR62/SR82/SR200/SR300: 1 Turn...


