Operating Instructions
Page 4
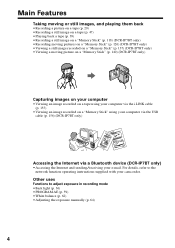
...a "Memory Stick" (p. 118) (DCR-IP7BT only) •Recording moving pictures on a "Memory Stick" (p. 126) (DCR-IP7BT only) •Viewing a still image recorded on a "Memory Stick" (p. 137) (DCR-IP7BT only) •Viewing a moving picture on a "Memory Stick" (p. 140) (DCR-IP7BT only) Capturing images on your ...a "Memory Stick" using your computer via the USB cable (p. 156) (DCR-IP7BT only) Accessing the Internet via a Bluetooth device (DCR-IP7BT only) •Accessing the Internet and sending/receiving your camcorder. For details, refer to adjust exposure in recording mode •Back light ...
...a "Memory Stick" (p. 118) (DCR-IP7BT only) •Recording moving pictures on a "Memory Stick" (p. 126) (DCR-IP7BT only) •Viewing a still image recorded on a "Memory Stick" (p. 137) (DCR-IP7BT only) •Viewing a moving picture on a "Memory Stick" (p. 140) (DCR-IP7BT only) Capturing images on your ...a "Memory Stick" using your computer via the USB cable (p. 156) (DCR-IP7BT only) Accessing the Internet via a Bluetooth device (DCR-IP7BT only) •Accessing the Internet and sending/receiving your camcorder. For details, refer to adjust exposure in recording mode •Back light ...

Operating Instructions
Page 6
... To supply power for the camcorder, see "Step 1 Preparing the power supply" on a "Memory Stick," or play back or edit an image recorded on a tape or "Memory Stick" (A "Memory Stick" can only be used to control and ways to operate the camcorder. MEMORY/NETWORK (DCR-IP7BT only) MEMORY: Use ...this mode when you record on , and then the camcorder turns to the supplied network function operating instructions. Each time you play back or edit an image in...
... To supply power for the camcorder, see "Step 1 Preparing the power supply" on a "Memory Stick," or play back or edit an image recorded on a tape or "Memory Stick" (A "Memory Stick" can only be used to control and ways to operate the camcorder. MEMORY/NETWORK (DCR-IP7BT only) MEMORY: Use ...this mode when you record on , and then the camcorder turns to the supplied network function operating instructions. Each time you play back or edit an image in...
Operating Instructions
Page 10
...a title 89 Making your own titles 95 The Micro Cassette Memory 98 Customizing Your Camcorder Changing the menu settings 102 "Memory Stick" Operations - MEMORY MIX 132 Copying still...a still image in a continuous loop - Title search 75 10 Searching a recording by title - DCR-IP7BT only Using a "Memory Stick" - Memory Photo recording ......... 118 Recording an image from ...picture - Memory photo playback .......... 137 Viewing a moving pictures on a "Memory Stick" - Digital effect ... 56 Using the PROGRAM AE function .... 59 Adjusting the white balance manually 62 ...
...a title 89 Making your own titles 95 The Micro Cassette Memory 98 Customizing Your Camcorder Changing the menu settings 102 "Memory Stick" Operations - MEMORY MIX 132 Copying still...a still image in a continuous loop - Title search 75 10 Searching a recording by title - DCR-IP7BT only Using a "Memory Stick" - Memory Photo recording ......... 118 Recording an image from ...picture - Memory photo playback .......... 137 Viewing a moving pictures on a "Memory Stick" - Digital effect ... 56 Using the PROGRAM AE function .... 59 Adjusting the white balance manually 62 ...
Operating Instructions
Page 11
...Information Compatible cassettes 173 About the "InfoLITHIUM" battery pack 174 About i.LINK 176 Using your computer - DCR-IP7BT only ...... 156 Network operation - DCR-IP7BT only Accessing the network 162 Troubleshooting Types of contents Connecting with a computer Viewing images recorded on... a tape using your computer 155 Viewing images recorded on a "Memory Stick" using your camcorder abroad .......... 178 Maintenance information...
...Information Compatible cassettes 173 About the "InfoLITHIUM" battery pack 174 About i.LINK 176 Using your computer - DCR-IP7BT only ...... 156 Network operation - DCR-IP7BT only Accessing the network 162 Troubleshooting Types of contents Connecting with a computer Viewing images recorded on... a tape using your computer 155 Viewing images recorded on a "Memory Stick" using your camcorder abroad .......... 178 Maintenance information...
Operating Instructions
Page 12
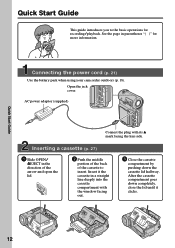
Connecting the power cord (p. 21) Use the battery pack when using your camcorder outdoors (p. 18). Insert it clicks. AC power adaptor (supplied) Connect the plug with the window facing out. 3 Close the cassette compartment by pushing down the ...
Connecting the power cord (p. 21) Use the battery pack when using your camcorder outdoors (p. 18). Insert it clicks. AC power adaptor (supplied) Connect the plug with the window facing out. 3 Close the cassette compartment by pushing down the ...
Operating Instructions
Page 13
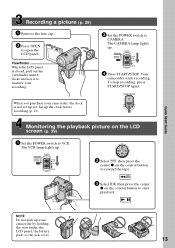
... clock is closed, pull out the viewfinder until it clicks and use it to monitor your camcorder by holding the viewfinder, the LCD panel, the battery pack, or the jack cover. 13 CAMERA MEMORY/ NETWORK VCR POWER (CHG) OFF ON MODE 2 Select , ... . The VCR lamp lights up your recording. START/STOP Monitoring the playback picture on the control button to VCR. NOTE Do not pick up . Your camcorder starts recording. To stop recording, press START/STOP again. Quick Start Guide Recording a picture (p. 29) 1 Remove the lens cap. 2 Press OPEN to CAMERA. Set up...
... clock is closed, pull out the viewfinder until it clicks and use it to monitor your camcorder by holding the viewfinder, the LCD panel, the battery pack, or the jack cover. 13 CAMERA MEMORY/ NETWORK VCR POWER (CHG) OFF ON MODE 2 Select , ... . The VCR lamp lights up your recording. START/STOP Monitoring the playback picture on the control button to VCR. NOTE Do not pick up . Your camcorder starts recording. To stop recording, press START/STOP again. Quick Start Guide Recording a picture (p. 29) 1 Remove the lens cap. 2 Press OPEN to CAMERA. Set up...
Operating Instructions
Page 14
... hear a beep or melody sound to CAMERA. z z Provided - The camcorder can only use MICROMV cassettes with equal quality when compared to the provision of your camcorder. •Records and plays back for DVD (digital video disc). Note on the POWER switch is provided with memory and network .... e.g. Note on the MICROMV format Your camcorder is indicated in operation are for example, "DCR-IP7BT only." You can access any scene easily using the memory (Multi-picture search function). •Adopts the MPEG2 format as "DCR-IP7" on the POWER switch) IP5 IP7BT - This format is ...
... hear a beep or melody sound to CAMERA. z z Provided - The camcorder can only use MICROMV cassettes with equal quality when compared to the provision of your camcorder. •Records and plays back for DVD (digital video disc). Note on the POWER switch is provided with memory and network .... e.g. Note on the MICROMV format Your camcorder is indicated in operation are for example, "DCR-IP7BT only." You can access any scene easily using the memory (Multi-picture search function). •Adopts the MPEG2 format as "DCR-IP7" on the POWER switch) IP5 IP7BT - This format is ...

Operating Instructions
Page 15
... in the sun or under direct sunlight [b]. •Be careful when placing the camcorder near a window or outdoors. Exposing the LCD screen, the finder or the lens to malfunction. Doing so ...might cause your camcorder to temperatures above 60°C (140°F), such as dusk [d]. [a] [b] [c] [d] 15 Getting started...99.99% of the sun in any way. •Do not let your camcorder away from rain and sea water. However, there may cause malfunctions [c]. •Do not directly shoot the sun...
... in the sun or under direct sunlight [b]. •Be careful when placing the camcorder near a window or outdoors. Exposing the LCD screen, the finder or the lens to malfunction. Doing so ...might cause your camcorder to temperatures above 60°C (140°F), such as dusk [d]. [a] [b] [c] [d] 15 Getting started...99.99% of the sun in any way. •Do not let your camcorder away from rain and sea water. However, there may cause malfunctions [c]. •Do not directly shoot the sun...

Operating Instructions
Page 16
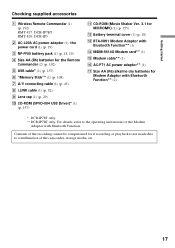
qa qs qd qf qg qh qj 16 Checking supplied accessories Make sure that the following accessories are supplied with your camcorder. 1 2 3 RMT-817 or RMT-818 4 5 6 7 8 9 q;
qa qs qd qf qg qh qj 16 Checking supplied accessories Make sure that the following accessories are supplied with your camcorder. 1 2 3 RMT-817 or RMT-818 4 5 6 7 8 9 q;
Operating Instructions
Page 17
...with Bluetooth Function. Getting started Checking supplied accessories 1 Wireless Remote Commander (1) (p. 192) RMT-817: DCR-IP7BT RMT-818: DCR-IP5 2 AC-L20A AC power adaptor (1), the power cord (1) (p. 19) 3 NP-FF50 battery pack ...9 Lens cap (1) (p. 29) 0 CD-ROM (SPVD-004 USB Driver)* (1) (p. 157) qa CD-ROM (Movie Shaker Ver. 3.1 for MICROMV) (1) (p. 155) qs Battery terminal cover (1) (p. 18) qd BTA-NW1 Modem Adaptor with Bluetooth Function** (1) qf MDM-5614G Modem card** ...* DCR-IP7BT only. ** DCR-IP7BT only. For details, refer to a malfunction of the camcorder, storage media, etc. 17
...with Bluetooth Function. Getting started Checking supplied accessories 1 Wireless Remote Commander (1) (p. 192) RMT-817: DCR-IP7BT RMT-818: DCR-IP5 2 AC-L20A AC power adaptor (1), the power cord (1) (p. 19) 3 NP-FF50 battery pack ...9 Lens cap (1) (p. 29) 0 CD-ROM (SPVD-004 USB Driver)* (1) (p. 157) qa CD-ROM (Movie Shaker Ver. 3.1 for MICROMV) (1) (p. 155) qs Battery terminal cover (1) (p. 18) qd BTA-NW1 Modem Adaptor with Bluetooth Function** (1) qf MDM-5614G Modem card** ...* DCR-IP7BT only. ** DCR-IP7BT only. For details, refer to a malfunction of the camcorder, storage media, etc. 17
Operating Instructions
Page 18
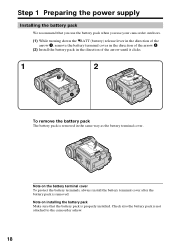
... same way as the battery terminal cover. Note on installing the battery pack Make sure that you use the battery pack when you use your camcorder outdoors. (1) While turning down the VBATT (battery) release lever in the direction of the arrow 1, remove the battery terminal cover in the direction of the... the battery pack in the direction of the arrow until it clicks. 1 2 2 1 To remove the battery pack The battery pack is not attached to the camcorder askew. 18
... same way as the battery terminal cover. Note on installing the battery pack Make sure that you use the battery pack when you use your camcorder outdoors. (1) While turning down the VBATT (battery) release lever in the direction of the arrow 1, remove the battery terminal cover in the direction of the... the battery pack in the direction of the arrow until it clicks. 1 2 2 1 To remove the battery pack The battery pack is not attached to the camcorder askew. 18

Operating Instructions
Page 19
... objects from the DC IN jack on the "InfoLITHIUM" battery pack. (1) Open the jack cover and connect the AC power adaptor supplied with your camcorder. Getting started Step 1 Preparing the power supply Charging the battery pack Use the battery pack after charging it for details on your... MODE 1 CHG lamp After charging the battery pack Disconnect the AC power adaptor from coming into contact with the "InfoLITHIUM" battery pack (F series). Your camcorder operates only with the metal parts of the DC plug of the AC power adaptor. The CHG lamp lights up when the charge begins. This...
... objects from the DC IN jack on the "InfoLITHIUM" battery pack. (1) Open the jack cover and connect the AC power adaptor supplied with your camcorder. Getting started Step 1 Preparing the power supply Charging the battery pack Use the battery pack after charging it for details on your... MODE 1 CHG lamp After charging the battery pack Disconnect the AC power adaptor from coming into contact with the "InfoLITHIUM" battery pack (F series). Your camcorder operates only with the metal parts of the DC plug of the AC power adaptor. The CHG lamp lights up when the charge begins. This...
Operating Instructions
Page 20
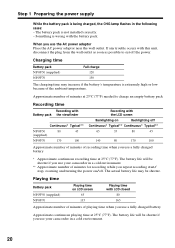
... increase if the battery's temperature is extremely high or low because of recording time when you use your camcorder in the following cases: - The battery life will be shorter if you use your camcorder in a cold environment. ** Approximate number of minutes for recording while you repeat recording start/ stop, zooming and turning...
... increase if the battery's temperature is extremely high or low because of recording time when you use your camcorder in the following cases: - The battery life will be shorter if you use your camcorder in a cold environment. ** Approximate number of minutes for recording while you repeat recording start/ stop, zooming and turning...

Operating Instructions
Page 21
Recommended charging temperature We recommend charging the battery pack in an ambient temperature of Sony Corporation. This unit is connected to the DC IN jack on your camcorder with the "InfoLITHIUM" battery. "InfoLITHIUM" F series battery packs have the mark. Getting started Step 1 Preparing the power ...power runs out quickly even though sufficient remaining battery time is a trademark of between 10 to 30°C (50 to use your camcorder for a long time, we recommend that the correct battery remaining time will be indicated. "InfoLITHIUM" is indicated Fully charge the ...
Recommended charging temperature We recommend charging the battery pack in an ambient temperature of Sony Corporation. This unit is connected to the DC IN jack on your camcorder with the "InfoLITHIUM" battery. "InfoLITHIUM" F series battery packs have the mark. Getting started Step 1 Preparing the power ...power runs out quickly even though sufficient remaining battery time is a trademark of between 10 to 30°C (50 to use your camcorder for a long time, we recommend that the correct battery remaining time will be indicated. "InfoLITHIUM" is indicated Fully charge the ...

Operating Instructions
Page 22
A car battery You cannot use car batteries with the camcorder. 22 Step 1 Preparing the power supply Notes •The AC power adaptor cannot supply power if the battery pack is not plugged into a wall outlet. This means that the battery pack cannot supply power when the power cord is connected to the DC IN jack, even when the power cord is attached to your camcorder. •The DC IN jack has "source priority."
A car battery You cannot use car batteries with the camcorder. 22 Step 1 Preparing the power supply Notes •The AC power adaptor cannot supply power if the battery pack is not plugged into a wall outlet. This means that the battery pack cannot supply power when the power cord is connected to the DC IN jack, even when the power cord is attached to your camcorder. •The DC IN jack has "source priority."
Operating Instructions
Page 23
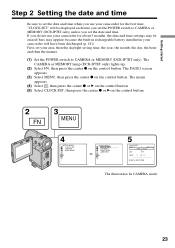
... the center z or B on the control button. First, set the date and time when you use your camcorder will be displayed each time you set the date and time. The CAMERA or MEMORY lamp (DCR-IP7BT only) lights up. (2) Select FN, then press the center z on the control button. "CLOCK SET" will... time, the year, the month, the day, the hour and then the minute. (1) Set the POWER switch to CAMERA or MEMORY (DCR-IP7BT only) unless you do not use your camcorder for about 3 months, the date and time settings may be erased (bars may appear) because the built-in rechargeable battery installed...
... the center z or B on the control button. First, set the date and time when you use your camcorder will be displayed each time you set the date and time. The CAMERA or MEMORY lamp (DCR-IP7BT only) lights up. (2) Select FN, then press the center z on the control button. "CLOCK SET" will... time, the year, the month, the day, the hour and then the minute. (1) Set the POWER switch to CAMERA or MEMORY (DCR-IP7BT only) unless you do not use your camcorder for about 3 months, the date and time settings may be erased (bars may appear) because the built-in rechargeable battery installed...

Operating Instructions
Page 25
... to the local time by time difference You can easily set the date and time and are recorded on the tape or the "Memory Stick" (DCR-IP7BT only) as the data code. Getting started Step 2 Setting the date and time Note Instead of DST SET, SUMMERTIME is displayed on the screen... for noon. Note on the time indicator The internal clock of your camcorder operates on a 12-hour cycle. - 12:00 AM stands for midnight. - 12:00 PM stands for some models.
... to the local time by time difference You can easily set the date and time and are recorded on the tape or the "Memory Stick" (DCR-IP7BT only) as the data code. Getting started Step 2 Setting the date and time Note Instead of DST SET, SUMMERTIME is displayed on the screen... for noon. Note on the time indicator The internal clock of your camcorder operates on a 12-hour cycle. - 12:00 AM stands for midnight. - 12:00 PM stands for some models.
Operating Instructions
Page 28
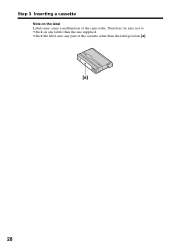
Step 3 Inserting a cassette Note on any labels than the one supplied. •Stick the label onto any part of the camcorder. Therefore, be sure not to: •Stick on the label Labels may cause a malfunction of the cassette other than the label position [a]. [a] 28
Step 3 Inserting a cassette Note on any labels than the one supplied. •Stick the label onto any part of the camcorder. Therefore, be sure not to: •Stick on the label Labels may cause a malfunction of the cassette other than the label position [a]. [a] 28

Operating Instructions
Page 29
... (1) Set the POWER switch to fix it. (2) Install the power source. The CAMERA lamp lights up and your camcorder lights up. The camera recording lamp located on the front of your camcorder is set to CAMERA. Recording - See "Step 3 Inserting a cassette" for you. (1) Remove the lens cap ...(CHG). (2) Close the LCD panel. (3) Eject the cassette. (4) Remove the power source. 29 Then, the REC indicator appears instead and the camcorder starts recording. Recording a picture Your camcorder automatically focuses for more information (p. 18). (3) Insert a cassette. Basics - Basics -
... (1) Set the POWER switch to fix it. (2) Install the power source. The CAMERA lamp lights up and your camcorder lights up. The camera recording lamp located on the front of your camcorder is set to CAMERA. Recording - See "Step 3 Inserting a cassette" for you. (1) Remove the lens cap ...(CHG). (2) Close the LCD panel. (3) Eject the cassette. (4) Remove the power source. 29 Then, the REC indicator appears instead and the camcorder starts recording. Recording a picture Your camcorder automatically focuses for more information (p. 18). (3) Insert a cassette. Basics - Basics -
Operating Instructions
Page 30
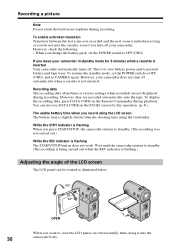
...You can be rotated as you do not eject the cassette, even if you press START/STOP, the camcorder returns to CAMERA again. The usable battery time when you leave your camcorder. While the STBY indicator is flashing When you turn off . Recording a picture Note Do not touch... recorded automatically onto the tape. However, check the following: - To resume the standby mode, set it horizontally, then swing it into the 30 camcorder body. However, they are not displayed during recording. To display the recording data, press DATA CODE on the PAGE3 screen for 5 minutes while ...
...You can be rotated as you do not eject the cassette, even if you press START/STOP, the camcorder returns to CAMERA again. The usable battery time when you leave your camcorder. While the STBY indicator is flashing When you turn off . Recording a picture Note Do not touch... recorded automatically onto the tape. However, check the following: - To resume the standby mode, set it horizontally, then swing it into the 30 camcorder body. However, they are not displayed during recording. To display the recording data, press DATA CODE on the PAGE3 screen for 5 minutes while ...


