
Operating Instructions
Page 2
...). Congratulations on your unwanted lithium ion batteries to come. You can use . "Memory Stick" (DCR-IP7BT only) This device complies with Canadian ICES-003. 2 For the Sony Service Center nearest you can enjoy for years to your Handycam, you call 416-499-SONY (Canada only). This Class B digital apparatus complies with Part 15 of lithium...
...). Congratulations on your unwanted lithium ion batteries to come. You can use . "Memory Stick" (DCR-IP7BT only) This device complies with Canadian ICES-003. 2 For the Sony Service Center nearest you can enjoy for years to your Handycam, you call 416-499-SONY (Canada only). This Class B digital apparatus complies with Part 15 of lithium...
Operating Instructions
Page 10
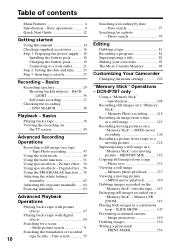
...battery pack 19 Connecting to a wall outlet 21 Step 2 Setting the date and time ........ 23 Step 3 Inserting a cassette 27 Recording - Basics Recording a picture 29 Shooting backlit subjects - BACK LIGHT 36 Self-timer recording 37 Checking the recording - Picture effect .. 54 Using special effects - Digital... 84 Superimposing a title 89 Making your own titles 95 The Micro Cassette Memory 98 Customizing Your Camcorder Changing the menu settings 102 "Memory Stick" Operations - DCR-IP7BT only Using a "Memory Stick" - introduction 108 Recording still images on a moving picture -
...battery pack 19 Connecting to a wall outlet 21 Step 2 Setting the date and time ........ 23 Step 3 Inserting a cassette 27 Recording - Basics Recording a picture 29 Shooting backlit subjects - BACK LIGHT 36 Self-timer recording 37 Checking the recording - Picture effect .. 54 Using special effects - Digital... 84 Superimposing a title 89 Making your own titles 95 The Micro Cassette Memory 98 Customizing Your Camcorder Changing the menu settings 102 "Memory Stick" Operations - DCR-IP7BT only Using a "Memory Stick" - introduction 108 Recording still images on a moving picture -
Operating Instructions
Page 11
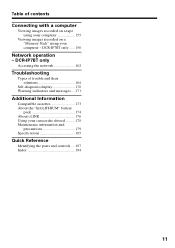
... 170 Warning indicators and messages .... 171 Additional Information Compatible cassettes 173 About the "InfoLITHIUM" battery pack 174 About i.LINK 176 Using your computer - DCR-IP7BT only Accessing the network 162 Troubleshooting Types of contents Connecting with a computer Viewing images ...recorded on a tape using your computer 155 Viewing images recorded on a "Memory Stick" using your camcorder abroad .......... 178 Maintenance information...
... 170 Warning indicators and messages .... 171 Additional Information Compatible cassettes 173 About the "InfoLITHIUM" battery pack 174 About i.LINK 176 Using your computer - DCR-IP7BT only Accessing the network 162 Troubleshooting Types of contents Connecting with a computer Viewing images ...recorded on a tape using your computer 155 Viewing images recorded on a "Memory Stick" using your camcorder abroad .......... 178 Maintenance information...
Operating Instructions
Page 12
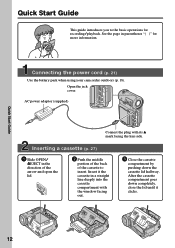
Connecting the power cord (p. 21) Use the battery pack when using your camcorder outdoors (p. 18). Insert it clicks. Open the jack cover. AC power adaptor (supplied) Connect the plug with the window facing out. 3 Close the cassette compartment ...
Connecting the power cord (p. 21) Use the battery pack when using your camcorder outdoors (p. 18). Insert it clicks. Open the jack cover. AC power adaptor (supplied) Connect the plug with the window facing out. 3 Close the cassette compartment ...
Operating Instructions
Page 13
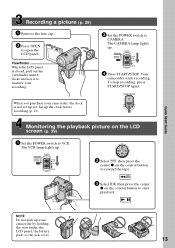
... is closed, pull out the viewfinder until it clicks and use it to monitor your camcorder by holding the viewfinder, the LCD panel, the battery pack, or the jack cover. 13 NOTE Do not pick up yet. Your camcorder starts recording. CAMERA MEMORY/ NETWORK VCR POWER (CHG) OFF ON MODE 2 Select , then press...
... is closed, pull out the viewfinder until it clicks and use it to monitor your camcorder by holding the viewfinder, the LCD panel, the battery pack, or the jack cover. 13 NOTE Do not pick up yet. Your camcorder starts recording. CAMERA MEMORY/ NETWORK VCR POWER (CHG) OFF ON MODE 2 Select , then press...
Operating Instructions
Page 17
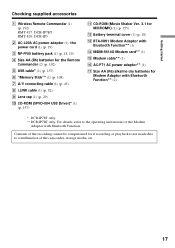
...DCR-IP7BT only. ** DCR-IP7BT only. For details, refer to a malfunction of the camcorder, storage media, etc. 17 Getting started Checking supplied accessories 1 Wireless Remote Commander (1) (p. 192) RMT-817: DCR-IP7BT RMT-818: DCR-IP5 2 AC-L20A AC power adaptor (1), the power cord (1) (p. 19) 3 NP-FF50 battery...82) 9 Lens cap (1) (p. 29) 0 CD-ROM (SPVD-004 USB Driver)* (1) (p. 157) qa CD-ROM (Movie Shaker Ver. 3.1 for MICROMV) (1) (p. 155) qs Battery terminal cover (1) (p. 18) qd BTA-NW1 Modem Adaptor with Bluetooth Function** (1) qf MDM-5614G Modem card** (1) qg Modem cable** (1) qh AC...
...DCR-IP7BT only. ** DCR-IP7BT only. For details, refer to a malfunction of the camcorder, storage media, etc. 17 Getting started Checking supplied accessories 1 Wireless Remote Commander (1) (p. 192) RMT-817: DCR-IP7BT RMT-818: DCR-IP5 2 AC-L20A AC power adaptor (1), the power cord (1) (p. 19) 3 NP-FF50 battery...82) 9 Lens cap (1) (p. 29) 0 CD-ROM (SPVD-004 USB Driver)* (1) (p. 157) qa CD-ROM (Movie Shaker Ver. 3.1 for MICROMV) (1) (p. 155) qs Battery terminal cover (1) (p. 18) qd BTA-NW1 Modem Adaptor with Bluetooth Function** (1) qf MDM-5614G Modem card** (1) qg Modem cable** (1) qh AC...
Operating Instructions
Page 18
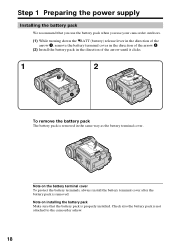
... it clicks. 1 2 2 1 To remove the battery pack The battery pack is properly installed. Note on the battery terminal cover To protect the battery terminals, always install the battery terminal cover after the battery pack is not attached to the camcorder askew. 18 Check also the battery pack is removed. Note on installing the battery pack Make sure that you...
... it clicks. 1 2 2 1 To remove the battery pack The battery pack is properly installed. Note on the battery terminal cover To protect the battery terminals, always install the battery terminal cover after the battery pack is not attached to the camcorder askew. 18 Check also the battery pack is removed. Note on installing the battery pack Make sure that you...

Operating Instructions
Page 19
Getting started Step 1 Preparing the power supply Charging the battery pack Use the battery pack after charging it for details on your camcorder. The CHG lamp lights up when the charge begins. This may cause a short-circuit, damaging the AC power adaptor. 19 After the charge is completed, ... DC IN jack with the metal parts of the DC plug of the AC power adaptor. See page 174 for your camcorder to OFF (CHG). Note Prevent metallic objects from the DC IN jack on the "InfoLITHIUM" battery pack. (1) Open the jack cover and connect the AC power adaptor supplied with your...
Getting started Step 1 Preparing the power supply Charging the battery pack Use the battery pack after charging it for details on your camcorder. The CHG lamp lights up when the charge begins. This may cause a short-circuit, damaging the AC power adaptor. 19 After the charge is completed, ... DC IN jack with the metal parts of the DC plug of the AC power adaptor. See page 174 for your camcorder to OFF (CHG). Note Prevent metallic objects from the DC IN jack on the "InfoLITHIUM" battery pack. (1) Open the jack cover and connect the AC power adaptor supplied with your...
Operating Instructions
Page 20
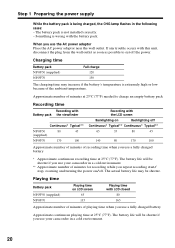
... 65 135 Playing time with the LCD screen Backlighting on /off. The battery life will be shorter if you use your camcorder in a cold environment. ** Approximate number of recording time when you use a fully charged battery * Approximate continuous recording time at 25°C (77°F). If any...AC power adaptor Place the AC power adaptor near the wall outlet. The battery life will be shorter if you use your camcorder in a cold environment. 20 The actual battery life may increase if the battery's temperature is wrong with this unit, disconnect the plug from the wall ...
... 65 135 Playing time with the LCD screen Backlighting on /off. The battery life will be shorter if you use your camcorder in a cold environment. ** Approximate number of recording time when you use a fully charged battery * Approximate continuous recording time at 25°C (77°F). If any...AC power adaptor Place the AC power adaptor near the wall outlet. The battery life will be shorter if you use your camcorder in a cold environment. 20 The actual battery life may increase if the battery's temperature is wrong with this unit, disconnect the plug from the wall ...

Operating Instructions
Page 21
Recommended charging temperature We recommend charging the battery pack in an ambient temperature of Sony Corporation. Your camcorder operates only with the "InfoLITHIUM" battery pack (F series). What is indicated Fully charge the battery pack so that you power it from a wall outlet using the AC power adaptor. (1) Open the jack cover and connect the AC power...
Recommended charging temperature We recommend charging the battery pack in an ambient temperature of Sony Corporation. Your camcorder operates only with the "InfoLITHIUM" battery pack (F series). What is indicated Fully charge the battery pack so that you power it from a wall outlet using the AC power adaptor. (1) Open the jack cover and connect the AC power...

Operating Instructions
Page 22
Step 1 Preparing the power supply Notes •The AC power adaptor cannot supply power if the battery pack is not plugged into a wall outlet. This means that the battery pack cannot supply power when the power cord is connected to the DC IN jack, even when the power cord is attached to your camcorder. •The DC IN jack has "source priority." A car battery You cannot use car batteries with the camcorder. 22
Step 1 Preparing the power supply Notes •The AC power adaptor cannot supply power if the battery pack is not plugged into a wall outlet. This means that the battery pack cannot supply power when the power cord is connected to the DC IN jack, even when the power cord is attached to your camcorder. •The DC IN jack has "source priority." A car battery You cannot use car batteries with the camcorder. 22
Operating Instructions
Page 23
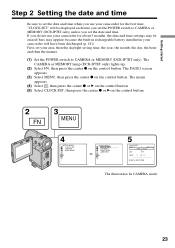
... CLOCK SET AREA 1 GMT +0.0 Lisbon, London DST OFF DATE Y M D [EXEC] : NEXT ITEM The illustration: In CAMERA mode 23 First, set your camcorder will be displayed each time you set the POWER switch to CAMERA or MEMORY (DCR-IP7BT only) unless you set the date and time when you do not use your... camcorder for about 3 months, the date and time settings may be erased (bars may appear) because the built-in rechargeable battery installed in your area, then the daylight ...
... CLOCK SET AREA 1 GMT +0.0 Lisbon, London DST OFF DATE Y M D [EXEC] : NEXT ITEM The illustration: In CAMERA mode 23 First, set your camcorder will be displayed each time you set the POWER switch to CAMERA or MEMORY (DCR-IP7BT only) unless you set the date and time when you do not use your... camcorder for about 3 months, the date and time settings may be erased (bars may appear) because the built-in rechargeable battery installed in your area, then the daylight ...

Operating Instructions
Page 27
... or plugs of the cables may be sure to disconnect the A/V connecting cable, i.LINK cable, and USB cable (DCR-IP7BT only). Insert the cassette in step 3. Getting started Step 3 Inserting a cassette (1) Install the battery pack, or connect the AC power adaptor for the power supply (p. 18 to 22). (2) Slide OPEN/ZEJECT in...
... or plugs of the cables may be sure to disconnect the A/V connecting cable, i.LINK cable, and USB cable (DCR-IP7BT only). Insert the cassette in step 3. Getting started Step 3 Inserting a cassette (1) Install the battery pack, or connect the AC power adaptor for the power supply (p. 18 to 22). (2) Slide OPEN/ZEJECT in...
Operating Instructions
Page 30
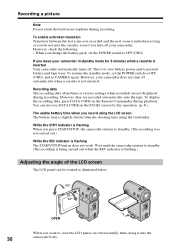
...automatically onto the tape. You can be rotated as you do not eject the cassette, even if you change the battery pack, set it horizontally, then swing it into the 30 camcorder body. To display the recording data, press DATA CODE on the PAGE3 screen for 5 minutes while a cassette is...use DATA CODE on the Remote Commander during playback. However, check the following: - Wait until the camcorder returns to standby. (The recording is being carried out while the REC indicator is to save battery power and to OFF (CHG). Recording a picture Note Do not touch the built-in standby mode...
...automatically onto the tape. You can be rotated as you do not eject the cassette, even if you change the battery pack, set it horizontally, then swing it into the 30 camcorder body. To display the recording data, press DATA CODE on the PAGE3 screen for 5 minutes while a cassette is...use DATA CODE on the Remote Commander during playback. However, check the following: - Wait until the camcorder returns to standby. (The recording is being carried out while the REC indicator is to save battery power and to OFF (CHG). Recording a picture Note Do not touch the built-in standby mode...

Operating Instructions
Page 33
... backlight The recorded picture will not be affected. 33 Adjusting the viewfinder If you adjust the screen using the battery pack. Recording - Adjust the viewfinder lens to your eyesight so that the indicators in the menu settings (p. 102... out the viewfinder and move the viewfinder lens adjustment lever. Viewfinder backlight You can adjust it using the battery pack, set it to ON. item in bright conditions using the LCD COLOR item in the viewfinder come into...will not be affected. Set up the VF B.L. Even if you use the camcorder in the menu settings (p. 102).
... backlight The recorded picture will not be affected. 33 Adjusting the viewfinder If you adjust the screen using the battery pack. Recording - Adjust the viewfinder lens to your eyesight so that the indicators in the menu settings (p. 102... out the viewfinder and move the viewfinder lens adjustment lever. Viewfinder backlight You can adjust it using the battery pack, set it to ON. item in bright conditions using the LCD COLOR item in the viewfinder come into...will not be affected. Set up the VF B.L. Even if you use the camcorder in the menu settings (p. 102).

Operating Instructions
Page 35
...turned on the screen. The indicator may not be displayed. Basics Recording a picture Notes on digital zoom •Digital zoom allows you to set to 20× or 120×. •The picture quality ...deteriorates as you are not recorded on . Remaining tape indicator The indicator may not be reset using COUNT RESET on the tape. 35 Remaining battery time indicator The remaining battery... power is set values up to MEMORY (DCR-IP7BT only) You cannot use the digital zoom. Recording -
...turned on the screen. The indicator may not be displayed. Basics Recording a picture Notes on digital zoom •Digital zoom allows you to set to 20× or 120×. •The picture quality ...deteriorates as you are not recorded on . Remaining tape indicator The indicator may not be reset using COUNT RESET on the tape. 35 Remaining battery time indicator The remaining battery... power is set values up to MEMORY (DCR-IP7BT only) You cannot use the digital zoom. Recording -

Operating Instructions
Page 40
... you leave the power on the control button. However, this is not a malfunction. The battery pack may accidentally detached from the camcorder. 40 Playing back a tape To return to touch the VBATT lever while you are playing...on the LCD screen You can turn the LCD panel over and move it to the camcorder body with the LCD screen facing out. To stop playback Select , then press the center z on for a long... time Your camcorder gets warm. When monitoring on the control button. When you open or close the LCD panel Before...
... you leave the power on the control button. However, this is not a malfunction. The battery pack may accidentally detached from the camcorder. 40 Playing back a tape To return to touch the VBATT lever while you are playing...on the LCD screen You can turn the LCD panel over and move it to the camcorder body with the LCD screen facing out. To stop playback Select , then press the center z on for a long... time Your camcorder gets warm. When monitoring on the control button. When you open or close the LCD panel Before...

Operating Instructions
Page 43
Various playback modes To operate the video control buttons, set the POWER switch to display the correct remaining battery time. To resume normal playback, select , then press the center z on the control button again. •Press PAUSE on the control button while ... playback) Press SLOW on the Remote Commander during playback. To pause playback, press PAUSE on the Remote Commander. 43 Basics Playing back a tape Remaining battery time indicator during playback. The indicator may not be correct, depending on the control button when the tape is not being played back. To resume...
Various playback modes To operate the video control buttons, set the POWER switch to display the correct remaining battery time. To resume normal playback, select , then press the center z on the control button again. •Press PAUSE on the control button while ... playback) Press SLOW on the Remote Commander during playback. To pause playback, press PAUSE on the Remote Commander. 43 Basics Playing back a tape Remaining battery time indicator during playback. The indicator may not be correct, depending on the control button when the tape is not being played back. To resume...
Operating Instructions
Page 63
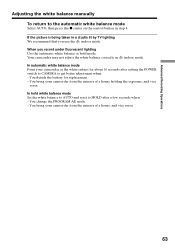
In automatic white balance mode Point your camcorder at the white subject for replacement. - You bring your camcorder from the interior of a house, and vice versa. 63 If the picture is being taken in a studio lit by TV lighting We recommend that ...control button in n indoor mode. When you use the n indoor mode. Your camcorder may not adjust the white balance correctly in step 4. You bring your camcorder from the interior of a house holding the exposure, and vice versa. You detach the battery for about 10 seconds after a few seconds when: - In hold mode. Advanced...
In automatic white balance mode Point your camcorder at the white subject for replacement. - You bring your camcorder from the interior of a house, and vice versa. 63 If the picture is being taken in a studio lit by TV lighting We recommend that ...control button in n indoor mode. When you use the n indoor mode. Your camcorder may not adjust the white balance correctly in step 4. You bring your camcorder from the interior of a house holding the exposure, and vice versa. You detach the battery for about 10 seconds after a few seconds when: - In hold mode. Advanced...

Operating Instructions
Page 104
... images in the fine image quality mode. If you use a power source other than the battery pack VF B.L. BRIGHT To brighten the viewfinder screen. MEMORY MEMORY VCR 104 * DCR-IP7BT only Notes on the viewfinder screen to BRIGHT. Changing the menu settings Icon/item STEADYSHOT... Mode z ON OFF VIDEOINPUT z VIDEO S VIDEO LCD COLOR -- To adjust the color on VF B.L. Your camcorder prevents excessive compensation for camera-shake...
... images in the fine image quality mode. If you use a power source other than the battery pack VF B.L. BRIGHT To brighten the viewfinder screen. MEMORY MEMORY VCR 104 * DCR-IP7BT only Notes on the viewfinder screen to BRIGHT. Changing the menu settings Icon/item STEADYSHOT... Mode z ON OFF VIDEOINPUT z VIDEO S VIDEO LCD COLOR -- To adjust the color on VF B.L. Your camcorder prevents excessive compensation for camera-shake...


