Operating Instructions
Page 152
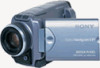
...IEEE1394) connector must be sure not to connect the camcorder to your computer using your computer. Connecting your camcorder to the computer. For Windows users You can record images edited with MovieShaker Ver.3.1 for MICROMV (supplied) and i.LINK cable is required. You...MICROMV Interface) i.LINK cable Note To view images on your computer, you have to install the i.LINK driver and the application software into your computer. Recommended computer environment Recommended Windows environment OS: Microsoft Windows Me, Windows 2000 Professional, Windows XP Home Edition or Windows XP...
...IEEE1394) connector must be sure not to connect the camcorder to your computer using your computer. Connecting your camcorder to the computer. For Windows users You can record images edited with MovieShaker Ver.3.1 for MICROMV (supplied) and i.LINK cable is required. You...MICROMV Interface) i.LINK cable Note To view images on your computer, you have to install the i.LINK driver and the application software into your computer. Recommended computer environment Recommended Windows environment OS: Microsoft Windows Me, Windows 2000 Professional, Windows XP Home Edition or Windows XP...

Operating Instructions
Page 153
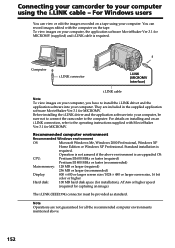
...Microsoft Windows 98SE, Windows Me, Windows 2000 Professional, Windows XP Home Edition or Windows XP Professional Standard installation is running Windows 98, but you can process or edit them to e-mail. If you connect your camcorder and your computer is required. However, operation is not ...USB cable - Furthermore, if you download pictures from your camcorder and pictures recorded on a tape on the size of the USB driver before connecting the camcorder to the computer. Viewing Images Using your Computer Connecting your camcorder to your computer, you can read still images. For ...
...Microsoft Windows 98SE, Windows Me, Windows 2000 Professional, Windows XP Home Edition or Windows XP Professional Standard installation is running Windows 98, but you can process or edit them to e-mail. If you connect your camcorder and your computer is required. However, operation is not ...USB cable - Furthermore, if you download pictures from your camcorder and pictures recorded on a tape on the size of the USB driver before connecting the camcorder to the computer. Viewing Images Using your Computer Connecting your camcorder to your computer, you can read still images. For ...

Operating Instructions
Page 155
... out installation again in accordance with the instructions on the screen. Connect the USB cable according to USB Driver and click. Viewing Images Using your Computer Connecting your camcorder to your computer using Windows 2000 Professional, log in with permission of computer managers. (1) Turn on your computer ...load. (2) Insert the supplied CD-ROM in the CD-ROM drive of administrators. This starts USB driver installation. (4) Follow the on page 158. 155 Note If you are using Windows XP, log in accordance with the steps on -screen messages to your computer. If you are using ...
... out installation again in accordance with the instructions on the screen. Connect the USB cable according to USB Driver and click. Viewing Images Using your Computer Connecting your camcorder to your computer using Windows 2000 Professional, log in with permission of computer managers. (1) Turn on your computer ...load. (2) Insert the supplied CD-ROM in the CD-ROM drive of administrators. This starts USB driver installation. (4) Follow the on page 158. 155 Note If you are using Windows XP, log in accordance with the steps on -screen messages to your computer. If you are using ...
Operating Instructions
Page 156
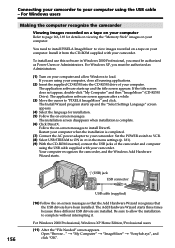
...your computer. The Add Hardware Wizard starts three times because three different USB drivers are using your computer, close all running applications. (2) Insert the supplied CD-ROM into the CD-ROM drive of the camcorder and computer using the USB cable - Open "Browse..." For Windows users... the CD-ROM inserted, connect the USB jacks of your computer Refer to page 166, 169 for installation. (5) Follow the on your camcorder. For Windows XP, you must be authorized as Administrators. (1) Turn on -screen messages. The Install Wizard program starts up and the title screen appears. Be...
...your computer. The Add Hardware Wizard starts three times because three different USB drivers are using your computer, close all running applications. (2) Insert the supplied CD-ROM into the CD-ROM drive of the camcorder and computer using the USB cable - Open "Browse..." For Windows users... the CD-ROM inserted, connect the USB jacks of your computer Refer to page 166, 169 for installation. (5) Follow the on your camcorder. For Windows XP, you must be authorized as Administrators. (1) Turn on -screen messages. The Install Wizard program starts up and the title screen appears. Be...
Operating Instructions
Page 158
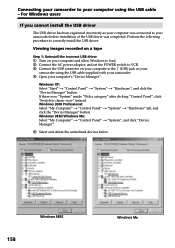
Connecting your camcorder to your camcorder before installation of the USB driver was connected to your computer using the USB cable supplied with your camcorder. 4 Open your computer's "Device Manager". Perform the following procedure to classic view" instead. Windows XP: Select "Start" t "Control Panel" t "System" t...connector on your computer to the (USB) jack on your camcorder using the USB cable - If there is no "System" inside "Pick a category" after clicking "Control Panel", click "Switch to correctly install the USB driver. Windows 98SE/Windows Me: Select "My Computer" t "...
Connecting your camcorder to your camcorder before installation of the USB driver was connected to your computer using the USB cable supplied with your camcorder. 4 Open your computer's "Device Manager". Perform the following procedure to classic view" instead. Windows XP: Select "Start" t "Control Panel" t "System" t...connector on your computer to the (USB) jack on your camcorder using the USB cable - If there is no "System" inside "Pick a category" after clicking "Control Panel", click "Switch to correctly install the USB driver. Windows 98SE/Windows Me: Select "My Computer" t "...

Operating Instructions
Page 159
Step 2: Install the USB driver on the supplied CD-ROM Perform the entire procedure described in "Installing the USB driver" on your camcorder, and then disconnect the USB cable. 7 Restart your computer using the USB cable - For Windows users Viewing Images Using your Computer Windows 2000 Professional Windows XP 6 Turn the POWER switch to your computer. Connecting your camcorder to OFF (CHG) on page 155. 159
Step 2: Install the USB driver on the supplied CD-ROM Perform the entire procedure described in "Installing the USB driver" on your camcorder, and then disconnect the USB cable. 7 Restart your computer using the USB cable - For Windows users Viewing Images Using your Computer Windows 2000 Professional Windows XP 6 Turn the POWER switch to your computer. Connecting your camcorder to OFF (CHG) on page 155. 159

Operating Instructions
Page 161
..., you are using Windows XP, log in with permission of administrators. The "PIXELA ImageMixer Ver.1.0 for Sony" startup screen appears on your computer and allow Windows to load. (2) Connect the AC power adaptor, and insert a cassette into your camcorder. (3) Set the POWER ... "PIXELA ImageMixer Ver.1.0 for Sony" You need to install the USB driver and PIXELA ImageMixer to VCR. Viewing Images Using your computer - Viewing images recorded on a tape (1) Turn on your computer. Select USB STREAM in to ON in with "PIXELA ImageMixer Ver.1.0 for Sony". Viewing images recorded on ...
..., you are using Windows XP, log in with permission of administrators. The "PIXELA ImageMixer Ver.1.0 for Sony" startup screen appears on your computer and allow Windows to load. (2) Connect the AC power adaptor, and insert a cassette into your camcorder. (3) Set the POWER ... "PIXELA ImageMixer Ver.1.0 for Sony" You need to install the USB driver and PIXELA ImageMixer to VCR. Viewing Images Using your computer - Viewing images recorded on a tape (1) Turn on your computer. Select USB STREAM in to ON in with "PIXELA ImageMixer Ver.1.0 for Sony". Viewing images recorded on ...


