
Computer Applications Guide
Page 3
...Intel Corporation. Refer to you are not mentioned in this manual. The screens may be construed as conferring to the separate Camera Operations Guide supplied with your camcorder for details. • The screens shown in each country. License of Picture Package by Sony Corporation would not be the trademarks or registered trademarks of...to the extent expressly permitted by applicable laws, you by copyright laws and other countries. • Pentium is a trademark of the power switch on the camcorder varies depending on the model. To record on the OS. About this manual. 3
...Intel Corporation. Refer to you are not mentioned in this manual. The screens may be construed as conferring to the separate Camera Operations Guide supplied with your camcorder for details. • The screens shown in each country. License of Picture Package by Sony Corporation would not be the trademarks or registered trademarks of...to the extent expressly permitted by applicable laws, you by copyright laws and other countries. • Pentium is a trademark of the power switch on the camcorder varies depending on the model. To record on the OS. About this manual. 3
Camera Operations Guide
Page 2
.... b Notice If static electricity or electromagnetic interference causes data transfer to the collection and recycling location nearest you. This Class B digital apparatus complies with Part 15 of important operating and maintenance (servicing) instructions in the U.S.A. You can help preserve our environment by ... unit, please read this device must accept any interference received, including interference that may not cause harmful interference, and (2) this manual thoroughly, and retain it for future reference. WARNING To prevent fire or shock hazard, do not expose the unit to the ...
.... b Notice If static electricity or electromagnetic interference causes data transfer to the collection and recycling location nearest you. This Class B digital apparatus complies with Part 15 of important operating and maintenance (servicing) instructions in the U.S.A. You can help preserve our environment by ... unit, please read this device must accept any interference received, including interference that may not cause harmful interference, and (2) this manual thoroughly, and retain it for future reference. WARNING To prevent fire or shock hazard, do not expose the unit to the ...
Camera Operations Guide
Page 3
...to an outlet on the bottom. Consult a Sony dealer or an experienced radio/TV technician for a Class B digital device, pursuant to provide reasonable protection against harmful interference in this manual could void your local authorities or the Electronics ...SONY Model No.: DCR-HC65 Responsible Party: Sony Electronics Inc. Operation is subject to these numbers whenever you can use in accordance with the instructions, may call upon your camcorder (p. 127). CAUTION You are marked with the limits for the FCC related matters only. However, there is for a digital...
...to an outlet on the bottom. Consult a Sony dealer or an experienced radio/TV technician for a Class B digital device, pursuant to provide reasonable protection against harmful interference in this manual could void your local authorities or the Electronics ...SONY Model No.: DCR-HC65 Responsible Party: Sony Electronics Inc. Operation is subject to these numbers whenever you can use in accordance with the instructions, may call upon your camcorder (p. 127). CAUTION You are marked with the limits for the FCC related matters only. However, there is for a digital...

Camera Operations Guide
Page 4
...as at the sun. Then, touch the buttons displayed on the LCD screen and the viewfinder. Doing so might cause your camcorder if necessary (p. 22). If you are using a digital still camera, and thus may appear different from what you need an NTSC system-based TV. • Television programs, ...or a computer with a USB or i.LINK cable, be damaged, or this manual are based on the model DCR-HC85. • The on-screen displays in each local language are used on this may cause a malfunction of your camcorder. Notes on using extremely high-precision technology, so over 99.99% of the...
...as at the sun. Then, touch the buttons displayed on the LCD screen and the viewfinder. Doing so might cause your camcorder if necessary (p. 22). If you are using a digital still camera, and thus may appear different from what you need an NTSC system-based TV. • Television programs, ...or a computer with a USB or i.LINK cable, be damaged, or this manual are based on the model DCR-HC85. • The on-screen displays in each local language are used on this may cause a malfunction of your camcorder. Notes on using extremely high-precision technology, so over 99.99% of the...
Camera Operations Guide
Page 6
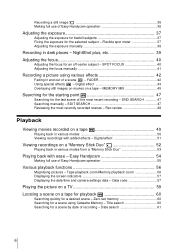
... focus for a scene using various effects 42 Fading in dark places - Digital effect 51 Viewing recordings on a tape - Easy Handycam 54 Making full use of Easy Handycam operation 36 Adjusting the exposure 37 Adjusting the exposure for backlit subjects 37 ...Fixing the exposure for a desired scene - Zero set memory 60 Searching for an off-center subject - Date search 61 6 Flexible spot meter 37 Adjusting the exposure manually 38 Recording in and out of a scene - Digital...
... focus for a scene using various effects 42 Fading in dark places - Digital effect 51 Viewing recordings on a tape - Easy Handycam 54 Making full use of Easy Handycam operation 36 Adjusting the exposure 37 Adjusting the exposure for backlit subjects 37 ...Fixing the exposure for a desired scene - Zero set memory 60 Searching for an off-center subject - Date search 61 6 Flexible spot meter 37 Adjusting the exposure manually 38 Recording in and out of a scene - Digital...
Camera Operations Guide
Page 13
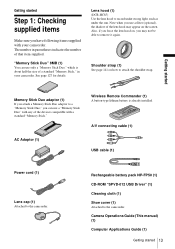
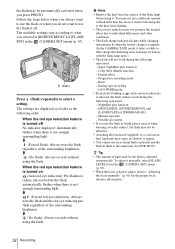
...of a standard "Memory Stick," in parentheses indicates the number of the devices compatible with a standard "Memory Stick." Camera Operations Guide (This manual) (1) Computer Applications Guide (1) Getting started Step 1: Checking supplied items Make sure you may appear on , you have following items supplied with... any of that item supplied. Lens hood (1) (DCR-HC85) Use the lens hood to the camcorder. "Memory Stick Duo" 8MB (1) You can use a filter (optional), the shadow of the lens hood may not be...
...of a standard "Memory Stick," in parentheses indicates the number of the devices compatible with a standard "Memory Stick." Camera Operations Guide (This manual) (1) Computer Applications Guide (1) Getting started Step 1: Checking supplied items Make sure you may appear on , you have following items supplied with... any of that item supplied. Lens hood (1) (DCR-HC85) Use the lens hood to the camcorder. "Memory Stick Duo" 8MB (1) You can use a filter (optional), the shadow of the lens hood may not be...
Camera Operations Guide
Page 32
.... 32 Recording When the red eye reduction feature is turned on (Auto red-eye reduction): Pre-flashes to "Adjusting the focus manually" (p. 41) for DCR-HC85). When the red eye reduction feature is turned off No indicator displayed: Automatically flashes when there is not enough surrounding light.... adjust, refer to reduce red-eye before using the flash. Digital effect - z Tip • The amount of the flash lamp before the flash automatically flashes when there is not enough surrounding light. Burst - To adjust it manually, select [FLASH LEVEL] from flashing. • The red-...
.... 32 Recording When the red eye reduction feature is turned on (Auto red-eye reduction): Pre-flashes to "Adjusting the focus manually" (p. 41) for DCR-HC85). When the red eye reduction feature is turned off No indicator displayed: Automatically flashes when there is not enough surrounding light.... adjust, refer to reduce red-eye before using the flash. Digital effect - z Tip • The amount of the flash lamp before the flash automatically flashes when there is not enough surrounding light. Burst - To adjust it manually, select [FLASH LEVEL] from flashing. • The red-...

Camera Operations Guide
Page 37
... the camera is canceled when you set [EXPOSURE] to automatic exposure Follow steps 1 and 2, then select [AUTO] in the standby mode. . Or set [EXPOSURE] to [MANUAL] (p. 38) or select [SPOT METER] (p. 37). 3 Touch the point you can adjust and fix the exposure to prevent the subject from the (CAMERA SET) menu...
... the camera is canceled when you set [EXPOSURE] to automatic exposure Follow steps 1 and 2, then select [AUTO] in the standby mode. . Or set [EXPOSURE] to [MANUAL] (p. 38) or select [SPOT METER] (p. 37). 3 Touch the point you can adjust and fix the exposure to prevent the subject from the (CAMERA SET) menu...

Camera Operations Guide
Page 38
...find it, touch [MENU], and select it from the (CAMERA SET) menu. 60min EXPOSURE: STBY AUTO 0:00:00 4 Adjust the exposure by manually fixing the exposure to automatic exposure Follow steps 1 and 2, then select [AUTO] in the standby mode. 2 Touch [EXPOSURE]. b Note &#...step 3. Super NightShot plus function - NightShot plus function - Super NightShot plus function - Color Slow Shutter function AUTO MANUAL 3 Touch [MANUAL]. 60min EXPOSURE: STBY 0:00:00 MANUAL AUTO MANUAL OK 38 Recording When recording indoors on a clear day, for instance, you set [PROGRAM AE], [SPOT METER] ...
...find it, touch [MENU], and select it from the (CAMERA SET) menu. 60min EXPOSURE: STBY AUTO 0:00:00 4 Adjust the exposure by manually fixing the exposure to automatic exposure Follow steps 1 and 2, then select [AUTO] in the standby mode. 2 Touch [EXPOSURE]. b Note &#...step 3. Super NightShot plus function - NightShot plus function - Super NightShot plus function - Color Slow Shutter function AUTO MANUAL 3 Touch [MANUAL]. 60min EXPOSURE: STBY 0:00:00 MANUAL AUTO MANUAL OK 38 Recording When recording indoors on a clear day, for instance, you set [PROGRAM AE], [SPOT METER] ...

Camera Operations Guide
Page 39
...Color Slow Shutter, follow steps 3 and 4, then select [OFF] in step 5. The NightShot plus and Super NightShot plus or Color Slow Shutter function. Digital effect - [PROGRAM AE] • You cannot use the NightShot plus/Super NightShot plus function in a place with no light at a maximum of ... NightShot plus function enables you cannot find it, touch [MENU], and select it from the (CAMERA SET) menu. 5 Touch [ON], then . Manual exposure - and ["NIGHTSHOT PLUS"] appear. If the item is not displayed on the tape - FADER function - Color Slow Shutter 1 Slide the POWER...
...Color Slow Shutter, follow steps 3 and 4, then select [OFF] in step 5. The NightShot plus and Super NightShot plus or Color Slow Shutter function. Digital effect - [PROGRAM AE] • You cannot use the NightShot plus/Super NightShot plus function in a place with no light at a maximum of ... NightShot plus function enables you cannot find it, touch [MENU], and select it from the (CAMERA SET) menu. 5 Touch [ON], then . Manual exposure - and ["NIGHTSHOT PLUS"] appear. If the item is not displayed on the tape - FADER function - Color Slow Shutter 1 Slide the POWER...
Camera Operations Guide
Page 40
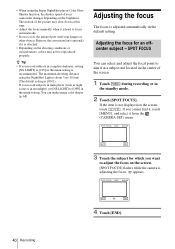
...the screen. 1 Touch during recording or in moonlight), set [NS LIGHT] to focus automatically. • Do not cover the infrared port with your camcorder changes depending on the brightness. SPOT FOCUS STBY 0:00:00 AUTO END 3 Touch the subject for an offcenter subject - • When using the NightShot...Light is about 3 m (10 feet). (The default setting is [ON].) If you want to aim it at this time. • Adjust the focus manually when it is attached. • Depending on the screen, touch / . Adjusting the focus for which you record subjects in dark places (such as night...
...the screen. 1 Touch during recording or in moonlight), set [NS LIGHT] to focus automatically. • Do not cover the infrared port with your camcorder changes depending on the brightness. SPOT FOCUS STBY 0:00:00 AUTO END 3 Touch the subject for an offcenter subject - • When using the NightShot...Light is about 3 m (10 feet). (The default setting is [ON].) If you want to aim it at this time. • Adjust the focus manually when it is attached. • Depending on the screen, touch / . Adjusting the focus for which you record subjects in dark places (such as night...

Camera Operations Guide
Page 41
... can adjust the focus manually according to manual. - To record a subject with raindrops. - When you want to focus on the subject when you use the expanded focus For DCR-HC85: It will not be adjusted any further. 9 changes to fully magnify the image, then adjust the focus. Recording... when it is easier to focus on a subject in the following cases. - When you are using a tripod. FOCUS 1 Press FOCUS during manual focusing. z Tip The focal distance information (for recording. • When you rotate the focus ring, appears and the image will not be ...
... can adjust the focus manually according to manual. - To record a subject with raindrops. - When you want to focus on the subject when you use the expanded focus For DCR-HC85: It will not be adjusted any further. 9 changes to fully magnify the image, then adjust the focus. Recording... when it is easier to focus on a subject in the following cases. - When you are using a tripod. FOCUS 1 Press FOCUS during manual focusing. z Tip The focal distance information (for recording. • When you rotate the focus ring, appears and the image will not be ...
Camera Operations Guide
Page 44
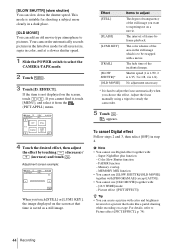
...] [LUMI. The color scheme of the still image you want to adjust the focus automatically when you choose this effect. Adjust the focus manually using a tripod to be swapped with color and brightness reversed or a picture that time is saved as a still image. b Note &#...3 is 1/8, 4 is hard to superimpose on the screen, touch / . To cancel Digital effect Follow steps 2 and 3, then select [OFF] in a dark place. [OLD MOVIE] You can slow down the shutter speed. Your camcorder automatically records pictures in the letterbox mode for shooting a subject more clearly in step 4. KEY...
...] [LUMI. The color scheme of the still image you want to adjust the focus automatically when you choose this effect. Adjust the focus manually using a tripod to be swapped with color and brightness reversed or a picture that time is saved as a still image. b Note &#...3 is 1/8, 4 is hard to superimpose on the screen, touch / . To cancel Digital effect Follow steps 2 and 3, then select [OFF] in a dark place. [OLD MOVIE] You can slow down the shutter speed. Your camcorder automatically records pictures in the letterbox mode for shooting a subject more clearly in step 4. KEY...

Camera Operations Guide
Page 47
...with Cassette Memory POWER switch Searching for the last scene of the most recent recording is played back for about 5 seconds, and the camcorder enters the standby mode at the point where the last recording has finished. When PLAY/EDIT mode is handy when you have played back... the tape, for example, but want to select the CAMERA-TAPE mode. 2 Touch . 60min STBY 0:00:00 EDIT ,continued Recording 47 Searching manually - Recording Searching for the starting point 3 Touch . 60min END SEARCH EXECUTING 1 0:00:00 CANCEL Appears only with a cassette with Cassette Memory, it...
...with Cassette Memory POWER switch Searching for the last scene of the most recent recording is played back for about 5 seconds, and the camcorder enters the standby mode at the point where the last recording has finished. When PLAY/EDIT mode is handy when you have played back... the tape, for example, but want to select the CAMERA-TAPE mode. 2 Touch . 60min STBY 0:00:00 EDIT ,continued Recording 47 Searching manually - Recording Searching for the starting point 3 Touch . 60min END SEARCH EXECUTING 1 0:00:00 CANCEL Appears only with a cassette with Cassette Memory, it...
Camera Operations Guide
Page 59
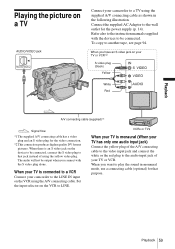
... connection. *2 This connection produces higher quality DV format pictures. Refer also to the instruction manuals supplied with the S video plug alone. To copy to LINE. Playback 59 When your TV is connected to a VCR Connect your camcorder to the LINE IN input on the VCR using the supplied A/V connecting cable as shown... connect with the devices to be connected, connect the S video plug to that purpose. Playback Playing the picture on a TV AUDIO/VIDEO jack Connect your camcorder to a TV using the A/V connecting cable.
... connection. *2 This connection produces higher quality DV format pictures. Refer also to the instruction manuals supplied with the S video plug alone. To copy to LINE. Playback 59 When your TV is connected to a VCR Connect your camcorder to the LINE IN input on the VCR using the supplied A/V connecting cable as shown... connect with the devices to be connected, connect the S video plug to that purpose. Playback Playing the picture on a TV AUDIO/VIDEO jack Connect your camcorder to a TV using the A/V connecting cable.

Camera Operations Guide
Page 66
... without using fixed exposure, or bring your camcorder outdoors from inside the house, or vice versa. • Set [WHITE BAL.] to [ONE PUSH]. - EXP.FOCUS For DCR-HC85: When you are recording pictures on a "Memory Stick Duo" while focusing manually, you can adjust the sharpness of the... picture to [AUTO] when you disconnect the power source from your camcorder outdoors from inside the house while using the electronic...
... without using fixed exposure, or bring your camcorder outdoors from inside the house, or vice versa. • Set [WHITE BAL.] to [ONE PUSH]. - EXP.FOCUS For DCR-HC85: When you are recording pictures on a "Memory Stick Duo" while focusing manually, you can adjust the sharpness of the... picture to [AUTO] when you disconnect the power source from your camcorder outdoors from inside the house while using the electronic...
Camera Operations Guide
Page 68
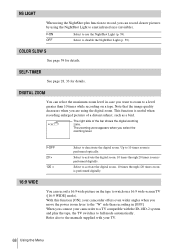
... you select the zooming level. Up to 10 times zoom is performed digitally. Select to activate the digital zoom. 10 times through 20 times zoom is performed optically. SELF-TIMER See page 28, 33... When you want to zoom to a level greater than recording in case you connect your camcorder to a TV compatible with your camcorder offers even wider angles when you can select the maximum zoom level in [OFF]. NS ...function [ON], your TV. 68 Using the Menu Refer also to the manuals supplied with the ID-1/ID-2 system and play the tape, the TV switches to use the NightShot Light (p. 39...
... you select the zooming level. Up to 10 times zoom is performed digitally. Select to activate the digital zoom. 10 times through 20 times zoom is performed optically. SELF-TIMER See page 28, 33... When you want to zoom to a level greater than recording in case you connect your camcorder to a TV compatible with your camcorder offers even wider angles when you can select the maximum zoom level in [OFF]. NS ...function [ON], your TV. 68 Using the Menu Refer also to the manuals supplied with the ID-1/ID-2 system and play the tape, the TV switches to use the NightShot Light (p. 39...
Camera Operations Guide
Page 77
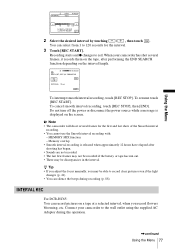
... recording. • You cannot use the Smooth interval recording with: - INTERVAL REC For DCR-HC65: You can record pictures on a tape at a selected interval, when you may be ...battery or tape has run out. • There may be discrepancies in the interval. Connect your camcorder has shot several frames for the interval. 3 Touch [REC START]. Using the Menu 2 Select... desired interval by touching / , then touch . z Tip • If you adjust the focus manually, you record flowers blooming, etc. Memory overlap • Smooth interval recording is displayed on the interval...
... recording. • You cannot use the Smooth interval recording with: - INTERVAL REC For DCR-HC65: You can record pictures on a tape at a selected interval, when you may be ...battery or tape has run out. • There may be discrepancies in the interval. Connect your camcorder has shot several frames for the interval. 3 Touch [REC START]. Using the Menu 2 Select... desired interval by touching / , then touch . z Tip • If you adjust the focus manually, you record flowers blooming, etc. Memory overlap • Smooth interval recording is displayed on the interval...
Camera Operations Guide
Page 78
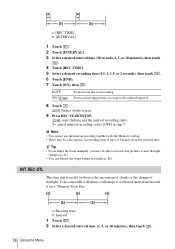
To cancel interval recording, select [OFF] in the selected interval. 8 Touch . Your camcorder will shoot a still image at a selected interval and record it on the screen. 9 Press REC START/STOP. [a] [a] [b] [b] a: [REC TIME] b: [INTERVAL] 1 Touch . 2 Touch...[b] a: Shooting time b: Interval 1 Touch . 2 Select a desired interval time (1, 5, or 10 minutes), then touch . 78 Using the Menu z Tip • If you adjust the focus manually, you may be able to ± 6 frames from the selected time. stops flashing and the interval recording starts. INT.REC-STL This function is useful...
To cancel interval recording, select [OFF] in the selected interval. 8 Touch . Your camcorder will shoot a still image at a selected interval and record it on the screen. 9 Press REC START/STOP. [a] [a] [b] [b] a: [REC TIME] b: [INTERVAL] 1 Touch . 2 Touch...[b] a: Shooting time b: Interval 1 Touch . 2 Select a desired interval time (1, 5, or 10 minutes), then touch . 78 Using the Menu z Tip • If you adjust the focus manually, you may be able to ± 6 frames from the selected time. stops flashing and the interval recording starts. INT.REC-STL This function is useful...

Camera Operations Guide
Page 116
Remove the cassette and leave your camcorder, the camcorder is automatically turned off. Adjust the focus manually. (p. 41) A vertical band appears when • This occurs when the contrast between the subject and the background is not a malfunction. This is recording candlelight or...also to the "Memory Stick Duo" section. (p. 118) Symptom Cause and/or Corrective Actions The tape does not start when you do not operate your camcorder for auto focus. cSlide the POWER switch to turn on the SET) menu. (p. 88) (STANDARD Black bands appear when you are recording in the dark...
Remove the cassette and leave your camcorder, the camcorder is automatically turned off. Adjust the focus manually. (p. 41) A vertical band appears when • This occurs when the contrast between the subject and the background is not a malfunction. This is recording candlelight or...also to the "Memory Stick Duo" section. (p. 118) Symptom Cause and/or Corrective Actions The tape does not start when you do not operate your camcorder for auto focus. cSlide the POWER switch to turn on the SET) menu. (p. 88) (STANDARD Black bands appear when you are recording in the dark...


