
Camera Operations Guide
Page 6
... effects 42 Fading in dark places - Recording a still image 35 Making full use of Easy Handycam operation 55 Various playback functions 56 Magnifying pictures - EDIT SEARCH 47 Reviewing the most recent recording - Flexible spot meter 37 Adjusting the exposure manually 38 Recording in and... out of a scene - FADER 42 Using special effects - Digital effect 43 Overlaying still images on movies on ...
... effects 42 Fading in dark places - Recording a still image 35 Making full use of Easy Handycam operation 55 Various playback functions 56 Magnifying pictures - EDIT SEARCH 47 Reviewing the most recent recording - Flexible spot meter 37 Adjusting the exposure manually 38 Recording in and... out of a scene - FADER 42 Using special effects - Digital effect 43 Overlaying still images on movies on ...
Camera Operations Guide
Page 24
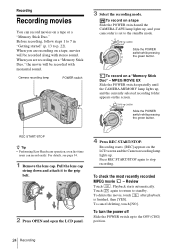
...To delete the movie, touch after playback is set to p. 22). To turn the power off Slide the POWER switch up , and your camcorder is finished, then [YES]. When you are recording on the screen. To record on a "Memory Stick Duo," the movie will be recorded .... Before recording, follow steps 1 to 7 in "Getting started" (p. 13 to the standby mode. Review Touch . For details, see page 34. 1 Remove the lens cap. REC START/STOP z Tip • Performing Easy Handycam operation, even first time users can record movies on a "Memory Stick Duo" - Playback starts automatically....
...To delete the movie, touch after playback is set to p. 22). To turn the power off Slide the POWER switch up , and your camcorder is finished, then [YES]. When you are recording on the screen. To record on a "Memory Stick Duo," the movie will be recorded .... Before recording, follow steps 1 to 7 in "Getting started" (p. 13 to the standby mode. Review Touch . For details, see page 34. 1 Remove the lens cap. REC START/STOP z Tip • Performing Easy Handycam operation, even first time users can record movies on a "Memory Stick Duo" - Playback starts automatically....
Camera Operations Guide
Page 25
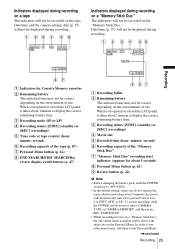
...the battery pack, slide the POWER switch up to OFF (CHG). • In the default setting, when you do not operate the camcorder for Cassette Memory cassettes B Remaining battery The indicated time may not be correct depending on the Personal Menu. Indicators displayed during recording on ...not be those with short cuts on the environment of the tape (p. 87) G Personal Menu button (p. 62) H END SEARCH/EDIT SEARCH/Rec review display switch button (p. 47) A Recording folder B Remaining battery The indicated time may not be correct depending on the "Memory Stick Duo." Indicators ...
...the battery pack, slide the POWER switch up to OFF (CHG). • In the default setting, when you do not operate the camcorder for Cassette Memory cassettes B Remaining battery The indicated time may not be correct depending on the Personal Menu. Indicators displayed during recording on ...not be those with short cuts on the environment of the tape (p. 87) G Personal Menu button (p. 62) H END SEARCH/EDIT SEARCH/Rec review display switch button (p. 47) A Recording folder B Remaining battery The indicated time may not be correct depending on the "Memory Stick Duo." Indicators ...
Camera Operations Guide
Page 30
..., touch [NO]. 60min 101 1600 FINE P-MENU A Recording folder B Image size For DCR-HC65: (1152 × 864) or For DCR-HC85: 1600 (1600 × 1200) or C Quality (640 × 480) (640 × 480) ([FINE]) or ([STANDARD]) D Personal Menu button (p. 62) E Review button (p. 30) z Tip • When you press PHOTO on your Remote Commander, the...
..., touch [NO]. 60min 101 1600 FINE P-MENU A Recording folder B Image size For DCR-HC65: (1152 × 864) or For DCR-HC85: 1600 (1600 × 1200) or C Quality (640 × 480) (640 × 480) ([FINE]) or ([STANDARD]) D Personal Menu button (p. 62) E Review button (p. 30) z Tip • When you press PHOTO on your Remote Commander, the...
Camera Operations Guide
Page 48
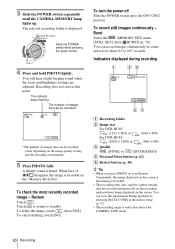
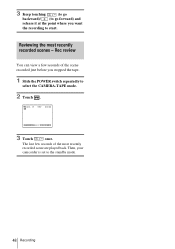
The last few seconds of the most recently recorded scenes - Then, your camcorder is set to select the CAMERA-TAPE mode. 2 Touch . 60min STBY 0:00:00 EDIT 3 Touch once. Rec review You can view a few seconds of the scene recorded just before you want the recording to start. 3 Keep touching (to go backward)/ (to go forward) and release it at the point where you stopped the tape. 1 Slide the POWER switch repeatedly to the standby mode. 48 Recording Reviewing the most recently recorded scene are played back.
The last few seconds of the most recently recorded scenes - Then, your camcorder is set to select the CAMERA-TAPE mode. 2 Touch . 60min STBY 0:00:00 EDIT 3 Touch once. Rec review You can view a few seconds of the scene recorded just before you want the recording to start. 3 Keep touching (to go backward)/ (to go forward) and release it at the point where you stopped the tape. 1 Slide the POWER switch repeatedly to the standby mode. 48 Recording Reviewing the most recently recorded scene are played back.
Camera Operations Guide
Page 49
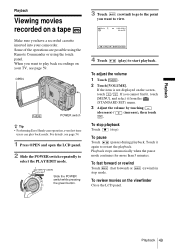
... select the PLAY/EDIT mode. To stop playback Touch (stop mode. (rewind) in To review movies on the screen, touch / . OPEN POWER switch z Tip • Performing Easy Handycam operation, even first time users can play back recordings on your camcorder. Playback Playback Viewing movies recorded on a tape Make sure you have a recorded cassette...
... select the PLAY/EDIT mode. To stop playback Touch (stop mode. (rewind) in To review movies on the screen, touch / . OPEN POWER switch z Tip • Performing Easy Handycam operation, even first time users can play back recordings on your camcorder. Playback Playback Viewing movies recorded on a tape Make sure you have a recorded cassette...
Camera Operations Guide
Page 147
...(Long Play) See Recording mode (REC MODE) Luminance key (LUMI. EDIT 80 Progressive recording mode (PROGRE REC)......... 28 R REC FOLDER 73 Rec review 48 REC START/STOP .... 24, 50 Recording capacity Display 25 REMAINING ....... 71, 87 Recording lamp (REC LED 87 Recording mode (REC MODE)....... ...25, 84 Recording time 16, 26 Red-eye reduction (REDEYE REDUC)... 67 Remote Commander ....... 142 REMOTE CTRL ........ 87 Remote sensor 139 RESET 138 Review 24, 30 S S video 59, 93 Self-diagnosis display ..... 121 Self-timer recording (SELF-TIMER) .... 28, 33 SHARPNESS 66 Skip scan 50 ...
...(Long Play) See Recording mode (REC MODE) Luminance key (LUMI. EDIT 80 Progressive recording mode (PROGRE REC)......... 28 R REC FOLDER 73 Rec review 48 REC START/STOP .... 24, 50 Recording capacity Display 25 REMAINING ....... 71, 87 Recording lamp (REC LED 87 Recording mode (REC MODE)....... ...25, 84 Recording time 16, 26 Red-eye reduction (REDEYE REDUC)... 67 Remote Commander ....... 142 REMOTE CTRL ........ 87 Remote sensor 139 RESET 138 Review 24, 30 S S video 59, 93 Self-diagnosis display ..... 121 Self-timer recording (SELF-TIMER) .... 28, 33 SHARPNESS 66 Skip scan 50 ...
Marketing Specifications
Page 1
...DCR-HC65 Digital Handycam® Camcorder With the DCR-HC65, you to record uninterrupted to the capacity of Sony's NightShot® Infrared system that extreme digital zooming is displayed in minutes on either the LCD screen or in low-light conditions, but without degradation of video like some people, so with a press of the Easy Handycam... Sony's rechargeable Lithium-Ion batteries are "locked out" leaving only the buttons essential for up to digital video via the i.LINK® interface in focusing and reviewing your analog footage. Easy Handycam Button Using a camcorder ...
...DCR-HC65 Digital Handycam® Camcorder With the DCR-HC65, you to record uninterrupted to the capacity of Sony's NightShot® Infrared system that extreme digital zooming is displayed in minutes on either the LCD screen or in low-light conditions, but without degradation of video like some people, so with a press of the Easy Handycam... Sony's rechargeable Lithium-Ion batteries are "locked out" leaving only the buttons essential for up to digital video via the i.LINK® interface in focusing and reviewing your analog footage. Easy Handycam Button Using a camcorder ...


