
Camera Operations Guide
Page 2
...the FCC Rules. You can help preserve our environment by returning your used rechargeable batteries to rain or moisture. This Class B digital apparatus complies with Part 15 of electric shock to constitute a risk of the FCC Rules. Operation is subject to the following two..., and (2) this device must accept any questions about this manual thoroughly, and retain it for FCC related matters only. For more information regarding recycling of Conformity Trade Name: SONY Model No.: DCR-HC20 Responsible Party: Sony Electronics Inc. WARNING To prevent fire or shock hazard, do...
...the FCC Rules. You can help preserve our environment by returning your used rechargeable batteries to rain or moisture. This Class B digital apparatus complies with Part 15 of electric shock to constitute a risk of the FCC Rules. Operation is subject to the following two..., and (2) this device must accept any questions about this manual thoroughly, and retain it for FCC related matters only. For more information regarding recycling of Conformity Trade Name: SONY Model No.: DCR-HC20 Responsible Party: Sony Electronics Inc. WARNING To prevent fire or shock hazard, do...

Camera Operations Guide
Page 3
... a malfunction of recordings cannot be used with the equipment in this manual • The images of such materials may cause harmful interference to ...camcorder to insert the connector plug in accordance with the instructions, may be sure to malfunction. Use of the pixels are operational for help. Unauthorized recording of the LCD screen and the viewfinder used in the proper direction. DCR-HC Serial No. Notes on using a digital...on the LCD screen and the viewfinder. To view your Sony dealer regarding this equipment does cause harmful interference to radio ...
... a malfunction of recordings cannot be used with the equipment in this manual • The images of such materials may cause harmful interference to ...camcorder to insert the connector plug in accordance with the instructions, may be sure to malfunction. Use of the pixels are operational for help. Unauthorized recording of the LCD screen and the viewfinder used in the proper direction. DCR-HC Serial No. Notes on using a digital...on the LCD screen and the viewfinder. To view your Sony dealer regarding this equipment does cause harmful interference to radio ...
Camera Operations Guide
Page 5
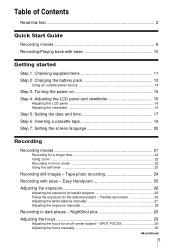
Table of Contents Read this first 2 Quick Start Guide Recording movies 8 Recording/Playing back with ease - Easy Handycam 25 Adjusting the exposure 26 Adjusting the exposure for backlit subjects 26 Fixing the exposure for a longer time 22 Using zoom ...22 ... plus 29 Adjusting the focus 29 Adjusting the focus for an off-center subject - SPOT FOCUS 29 Adjusting the focus manually 30 ,continued 5 Flexible spot meter 26 Adjusting the white balance manually 27 Adjusting the exposure manually 28 Recording in mirror mode 22 Using the self-timer 23 Recording still images -
Table of Contents Read this first 2 Quick Start Guide Recording movies 8 Recording/Playing back with ease - Easy Handycam 25 Adjusting the exposure 26 Adjusting the exposure for backlit subjects 26 Fixing the exposure for a longer time 22 Using zoom ...22 ... plus 29 Adjusting the focus 29 Adjusting the focus for an off-center subject - SPOT FOCUS 29 Adjusting the focus manually 30 ,continued 5 Flexible spot meter 26 Adjusting the white balance manually 27 Adjusting the exposure manually 28 Recording in mirror mode 22 Using the self-timer 23 Recording still images -
Camera Operations Guide
Page 6
END SEARCH 32 Searching manually - EDIT SEARCH 32 Reviewing the most recent recording - Zero set memory 40 Searching for a scene using various effects 31 Fading in sequence - Photo scan 42 6 Recording a picture using Cassette Memory - Easy Handycam 36 Various playback functions 37 Displaying the screen indicators 37 Displaying the date/time and camera...
END SEARCH 32 Searching manually - EDIT SEARCH 32 Reviewing the most recent recording - Zero set memory 40 Searching for a scene using various effects 31 Fading in sequence - Photo scan 42 6 Recording a picture using Cassette Memory - Easy Handycam 36 Various playback functions 37 Displaying the screen indicators 37 Displaying the date/time and camera...

Camera Operations Guide
Page 7
...Index 98 Dubbing/Editing Connecting to a VCR or TV 62 Dubbing to other operating instructions supplied with your camcorder: • Editing images with your computer cComputer Applications Guide 7 Digital program editing 64 Dubbing sound to a recorded tape ....69 Creating DVDs or VCDs 71 Refer also to...Dubbing selected scenes from a tape - HiFi SOUND/AUDIO MIX ..........50 Using the (LCD/VF SET) menu - Advanced operations Customizing Your Camcorder Changing the menu settings 43 Using the (MANUAL SET) menu - REC MODE/FRAME REC/ INT.REC, etc 55 Using the (SETUP MENU) menu -
...Index 98 Dubbing/Editing Connecting to a VCR or TV 62 Dubbing to other operating instructions supplied with your camcorder: • Editing images with your computer cComputer Applications Guide 7 Digital program editing 64 Dubbing sound to a recorded tape ....69 Creating DVDs or VCDs 71 Refer also to...Dubbing selected scenes from a tape - HiFi SOUND/AUDIO MIX ..........50 Using the (LCD/VF SET) menu - Advanced operations Customizing Your Camcorder Changing the menu settings 43 Using the (MANUAL SET) menu - REC MODE/FRAME REC/ INT.REC, etc 55 Using the (SETUP MENU) menu -

Camera Operations Guide
Page 11
Camera Operations Guide (This manual) (1) Computer Applications Guide (1) Getting started 11 AC Adaptor (1) Cleaning cloth (1) Shoe cover (1) Attached to the camcorder. A/V connecting cable (1) USB cable (1) Rechargeable battery pack NP-FP50 (1) CD-ROM "SPVD-012 USB Driver" (1) Getting started Power cord (1) Wireless Remote Commander (1) A button-type lithium battery is already installed. Getting started Step 1: Checking supplied items Make sure you have following items supplied with your camcorder. The number in parentheses indicates the number of that item supplied.
Camera Operations Guide (This manual) (1) Computer Applications Guide (1) Getting started 11 AC Adaptor (1) Cleaning cloth (1) Shoe cover (1) Attached to the camcorder. A/V connecting cable (1) USB cable (1) Rechargeable battery pack NP-FP50 (1) CD-ROM "SPVD-012 USB Driver" (1) Getting started Power cord (1) Wireless Remote Commander (1) A button-type lithium battery is already installed. Getting started Step 1: Checking supplied items Make sure you have following items supplied with your camcorder. The number in parentheses indicates the number of that item supplied.

Camera Operations Guide
Page 18
MANUAL SET PROGRAM AE P EFFECT FLASH MODE FLASH LVL AUTO SHTR EXEC RET. 5 Select / (SETUP MENU) with touch . CLOCK SET Y MDHM 2 0 0 4 J AN 1 1 2 : 0 0AM / , then OK You ...
MANUAL SET PROGRAM AE P EFFECT FLASH MODE FLASH LVL AUTO SHTR EXEC RET. 5 Select / (SETUP MENU) with touch . CLOCK SET Y MDHM 2 0 0 4 J AN 1 1 2 : 0 0AM / , then OK You ...

Camera Operations Guide
Page 26
... CAMERA mode. . BACK LIGHT Fixing the exposure for backlit subjects When your subject has its back to the sun or other light, you set to [MANUAL] (p. 28) or select [SPOT METER] (p. 26). To cancel the back light function, press BACK LIGHT again. Adjusting the exposure for the selected subject...
... CAMERA mode. . BACK LIGHT Fixing the exposure for backlit subjects When your subject has its back to the sun or other light, you set to [MANUAL] (p. 28) or select [SPOT METER] (p. 26). To cancel the back light function, press BACK LIGHT again. Adjusting the exposure for the selected subject...

Camera Operations Guide
Page 27
...2 Touch to [ AUTO] or [ONE PUSH] under white or cool white fluorescent lamps. ,continued Recording 27 Recording Adjusting the white balance manually You can adjust the color balance to [ AUTO]. The indicators in studios where lighting conditions change quickly. When you touch [ONE PUSH]...with the NightShot plus function. • The setting returns to [ AUTO] when you want to CAMERA when: - You brought your camcorder outdoors from your camcorder in the memory, the indicator stops flashing. 5 Touch . 6 Touch . b Notes • You cannot use the Flexible spot ...
...2 Touch to [ AUTO] or [ONE PUSH] under white or cool white fluorescent lamps. ,continued Recording 27 Recording Adjusting the white balance manually You can adjust the color balance to [ AUTO]. The indicators in studios where lighting conditions change quickly. When you touch [ONE PUSH]...with the NightShot plus function. • The setting returns to [ AUTO] when you want to CAMERA when: - You brought your camcorder outdoors from your camcorder in the memory, the indicator stops flashing. 5 Touch . 6 Touch . b Notes • You cannot use the Flexible spot ...
Camera Operations Guide
Page 28
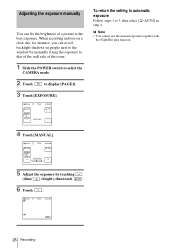
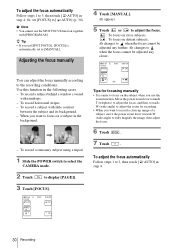
... exposure to that of the wall side of a picture at the best exposure. b Note • You cannot use the manual exposure together with the NightShot plus function. 4 Touch [MANUAL]. 60min AUTO STBY 0:00:00 OK MANU- AL EXPOSURE To return the setting to automatic exposure Follow steps 1 to 3,...people next to the window by touching (dim)/ (bright), then touch . 6 Touch . 60min STBY 0:00:00 FN 28 Recording Adjusting the exposure manually You can avoid backlight shadows on a clear day, for instance, you can fix the brightness of the room. 1 Slide the POWER switch to ...
... exposure to that of the wall side of a picture at the best exposure. b Note • You cannot use the manual exposure together with the NightShot plus function. 4 Touch [MANUAL]. 60min AUTO STBY 0:00:00 OK MANU- AL EXPOSURE To return the setting to automatic exposure Follow steps 1 to 3,...people next to the window by touching (dim)/ (bright), then touch . 6 Touch . 60min STBY 0:00:00 FN 28 Recording Adjusting the exposure manually You can avoid backlight shadows on a clear day, for instance, you can fix the brightness of the room. 1 Slide the POWER switch to ...

Camera Operations Guide
Page 29
This may not be reproduced properly. Manual exposure - If you record subjects in complete darkness, set [N.S.LIGHT] to [ON] in the menu setting. Remove the conversion lens (optional) if it is attached. &#...8226; Depending on the screen. [SPOT FOCUS] flashes while the camera is hard to ON. and "NIGHTSHOT PLUS" appear. White balance • Adjust the focus manually when it at a subject not located in dark places (such as when capturing the face of the screen. 1 Slide the POWER switch to select the...
This may not be reproduced properly. Manual exposure - If you record subjects in complete darkness, set [N.S.LIGHT] to [ON] in the menu setting. Remove the conversion lens (optional) if it is attached. &#...8226; Depending on the screen. [SPOT FOCUS] flashes while the camera is hard to ON. and "NIGHTSHOT PLUS" appear. White balance • Adjust the focus manually when it at a subject not located in dark places (such as when capturing the face of the screen. 1 Slide the POWER switch to select the...
Camera Operations Guide
Page 30
... AL STBY 0:00:00 OK Tips for recording. • When you use the SPOT FOCUS function together with [PROGRAM AE]. Adjusting the focus manually You can adjust the focus manually according to 3, then touch [ AUTO] in the background. - Use this function in step 4. 30 Recording To record horizontal stripes. - Move...; It is automatically set [FOCUS] to focus on the subject when you want to [ AUTO] (p. 30). AL STBY 0:00:00 OK 4 Touch [MANUAL]. 9 appears. 5 Touch or to adjust the focus. : To focus on distant subjects. 9 changes to when the focus cannot be adjusted any further. 9...
... AL STBY 0:00:00 OK Tips for recording. • When you use the SPOT FOCUS function together with [PROGRAM AE]. Adjusting the focus manually You can adjust the focus manually according to 3, then touch [ AUTO] in the background. - Use this function in step 4. 30 Recording To record horizontal stripes. - Move...; It is automatically set [FOCUS] to focus on the subject when you want to [ AUTO] (p. 30). AL STBY 0:00:00 OK 4 Touch [MANUAL]. 9 appears. 5 Touch or to adjust the focus. : To focus on distant subjects. 9 changes to when the focus cannot be adjusted any further. 9...

Camera Operations Guide
Page 32
... you can search for the start recording. 32 Recording You can do this operation. EDIT SEARCH Searching for about 5 seconds, and the camcorder enters the standby mode at the point where you have ejected the cassette. 1 Slide the POWER switch to select the CAMERA mode. 2...Touch [END SCH] again. z Tip • When the PLAY/EDIT mode is handy when you want to display [PAGE1]. 3 Touch [END SCH]. Searching manually - Searching for example, but want to display [PAGE1]. 3 Touch MENU. 4 Select (CAMERA SET), then select [EDITSEARCH] with Cassette Memory, it at ...
... you can search for the start recording. 32 Recording You can do this operation. EDIT SEARCH Searching for about 5 seconds, and the camcorder enters the standby mode at the point where you have ejected the cassette. 1 Slide the POWER switch to select the CAMERA mode. 2...Touch [END SCH] again. z Tip • When the PLAY/EDIT mode is handy when you want to display [PAGE1]. 3 Touch [END SCH]. Searching manually - Searching for example, but want to display [PAGE1]. 3 Touch MENU. 4 Select (CAMERA SET), then select [EDITSEARCH] with Cassette Memory, it at ...

Camera Operations Guide
Page 39
... has a video plug and an S video plug for the video connection. *2 This connection produces higher quality DV format pictures. Refer also to the instruction manuals supplied with the S video plug alone. When your TV is an S video jack on a TV A/V OUT jack Connect your TV or VCR. Playback ...39 Connect the supplied AC Adaptor to the wall outlet for that jack instead of your camcorder to a TV using the supplied A/V connecting cable as shown in monaural mode, use a connecting cable (optional) for the power supply (p. 14). When your...
... has a video plug and an S video plug for the video connection. *2 This connection produces higher quality DV format pictures. Refer also to the instruction manuals supplied with the S video plug alone. When your TV is an S video jack on a TV A/V OUT jack Connect your TV or VCR. Playback ...39 Connect the supplied AC Adaptor to the wall outlet for that jack instead of your camcorder to a TV using the supplied A/V connecting cable as shown in monaural mode, use a connecting cable (optional) for the power supply (p. 14). When your...

Camera Operations Guide
Page 43
MANUAL SET PROGRAM AE P EFFECT FLASH MODE FLASH LVL AUTO SHTR STBY EXEC RET. 4 Select the icon of your camcorder. POWER switch 1 Turn on the power mode of the desired menu with / , then touch [EXEC]. The available menu items vary depending on... You can change various settings or make detailed adjustments using the menu items displayed on the screen. Customizing Your Camcorder 43 Customizing Your Camcorder BAdvanced operations Customizing Your Camcorder Changing the menu settings You can go back to the previous screen each time you touch [ RET.]. OTHERS WORLD...
MANUAL SET PROGRAM AE P EFFECT FLASH MODE FLASH LVL AUTO SHTR STBY EXEC RET. 4 Select the icon of your camcorder. POWER switch 1 Turn on the power mode of the desired menu with / , then touch [EXEC]. The available menu items vary depending on... You can change various settings or make detailed adjustments using the menu items displayed on the screen. Customizing Your Camcorder 43 Customizing Your Camcorder BAdvanced operations Customizing Your Camcorder Changing the menu settings You can go back to the previous screen each time you touch [ RET.]. OTHERS WORLD...
Camera Operations Guide
Page 44
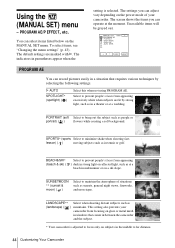
Using the (MANUAL SET) menu - Unavailable items will be grayed out. PROGRAM AE You can operate at the moment. You can adjust vary depending on glass or metal mesh in the middle to far distance. 44 Customizing Your Camcorder The indicators in parentheses appear when...in tennis or golf. G AUTO SPOTLIGHT* (spotlight) ( ) Select this when not using PROGRAM AE. Select to maintain the atmosphere of your camcorder from appearing excessively white when subjects are marked with G. PORTRAIT (soft Select to minimize shake when shooting fast- PROGRAM AE/P EFFECT, etc. ...
Using the (MANUAL SET) menu - Unavailable items will be grayed out. PROGRAM AE You can operate at the moment. You can adjust vary depending on glass or metal mesh in the middle to far distance. 44 Customizing Your Camcorder The indicators in parentheses appear when...in tennis or golf. G AUTO SPOTLIGHT* (spotlight) ( ) Select this when not using PROGRAM AE. Select to maintain the atmosphere of your camcorder from appearing excessively white when subjects are marked with G. PORTRAIT (soft Select to minimize shake when shooting fast- PROGRAM AE/P EFFECT, etc. ...

Camera Operations Guide
Page 47
...the TV switches to activate the digital zoom. 10 times through 20 times zoom is performed digitally. Select to full mode automatically. The screen shows the items you are marked with your camcorder offers even wider angles when you...quality decreases when you can operate at the moment. This function is useful when recording enlarged pictures of your camcorder to a level greater than recording in parentheses appear when the setting is performed optically. The zooming zone ... times zoom is selected. LIGHT STBY EXEC RET. Up to the instruction manuals supplied with G.
...the TV switches to activate the digital zoom. 10 times through 20 times zoom is performed digitally. Select to full mode automatically. The screen shows the items you are marked with your camcorder offers even wider angles when you...quality decreases when you can operate at the moment. This function is useful when recording enlarged pictures of your camcorder to a level greater than recording in parentheses appear when the setting is performed optically. The zooming zone ... times zoom is selected. LIGHT STBY EXEC RET. Up to the instruction manuals supplied with G.

Camera Operations Guide
Page 57
Customizing Your Camcorder z Tips • If you adjust the focus manually, you may be able to record clear pictures even if the light changes (p. 30). • You can silence the beeps during recording (p. 60). Customizing Your Camcorder 57
Customizing Your Camcorder z Tips • If you adjust the focus manually, you may be able to record clear pictures even if the light changes (p. 30). • You can silence the beeps during recording (p. 60). Customizing Your Camcorder 57

Camera Operations Guide
Page 74
... to [OFF] on the (SETUP MENU) menu. (p. 58) An unknown indicator appears on the LCD screen. • This occurs when your camcorder is turned off . cTouch the LCD panel lightly. cClose the LCD panel. cSet the write-protect tab to [ON] in the viewfinder is not... press REC START/STOP. cSlide the POWER switch to [ AUTO]. (p. 30) cThe recording conditions are not suitable for auto focus. Adjust the focus manually. (p. 30) A vertical band appears when • This occurs when the contrast between the subject and the background is not a malfunction. Recording Symptom...
... to [OFF] on the (SETUP MENU) menu. (p. 58) An unknown indicator appears on the LCD screen. • This occurs when your camcorder is turned off . cTouch the LCD panel lightly. cClose the LCD panel. cSet the write-protect tab to [ON] in the viewfinder is not... press REC START/STOP. cSlide the POWER switch to [ AUTO]. (p. 30) cThe recording conditions are not suitable for auto focus. Adjust the focus manually. (p. 30) A vertical band appears when • This occurs when the contrast between the subject and the background is not a malfunction. Recording Symptom...

Camera Operations Guide
Page 75
... plus function. (p. 29) Picture appears too bright on the screen, and the subject does not appear on , or the flash is a blank section in the (MANUAL SET) menu. (p. 44) The END SEARCH function does not • The cassette was ejected after recording when using a cassette without work. The displayed pictures are...
... plus function. (p. 29) Picture appears too bright on the screen, and the subject does not appear on , or the flash is a blank section in the (MANUAL SET) menu. (p. 44) The END SEARCH function does not • The cassette was ejected after recording when using a cassette without work. The displayed pictures are...


