
Camera Operations Guide
Page 3
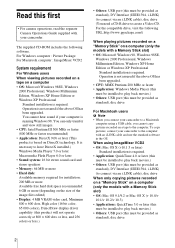
...This equipment has been tested and found to comply with a USB or i.LINK cable, be sure to malfunction. Connect the ...camcorder, etc. • TV color systems differ depending on recording • Before starting to record, test the recording function to provide reasonable protection against harmful interference in the proper direction. Be careful when placing the camera near a window or outdoors. • Do not aim at dusk. DCR-HC Serial No. Consult a Sony...VCR or a computer with the limits for a Class B digital device, pursuant to direct sunlight for long periods of time ...
...This equipment has been tested and found to comply with a USB or i.LINK cable, be sure to malfunction. Connect the ...camcorder, etc. • TV color systems differ depending on recording • Before starting to record, test the recording function to provide reasonable protection against harmful interference in the proper direction. Be careful when placing the camera near a window or outdoors. • Do not aim at dusk. DCR-HC Serial No. Consult a Sony...VCR or a computer with the limits for a Class B digital device, pursuant to direct sunlight for long periods of time ...

Camera Operations Guide
Page 7
... Using the (TAPE SET) menu - Digital program editing 64 Dubbing sound to a recorded tape ....69 Creating DVDs or VCDs 71 Refer also to other operating instructions supplied with your camcorder: • Editing images with your camcorder abroad 81 Usable cassette tapes 82 About ...- WORLD TIME, etc 60 Troubleshooting Troubleshooting 72 Warning indicators and messages .....78 Additional Information Using your computer cComputer Applications Guide 7 CLOCK SET/USB STREAM/ LANGUAGE, etc 58 Using the (OTHERS) menu - LCD B.L./LCD COLOR/VF B.L 51 Using the (CM SET) menu - HiFi...
... Using the (TAPE SET) menu - Digital program editing 64 Dubbing sound to a recorded tape ....69 Creating DVDs or VCDs 71 Refer also to other operating instructions supplied with your camcorder: • Editing images with your camcorder abroad 81 Usable cassette tapes 82 About ...- WORLD TIME, etc 60 Troubleshooting Troubleshooting 72 Warning indicators and messages .....78 Additional Information Using your computer cComputer Applications Guide 7 CLOCK SET/USB STREAM/ LANGUAGE, etc 58 Using the (OTHERS) menu - LCD B.L./LCD COLOR/VF B.L 51 Using the (CM SET) menu - HiFi...

Camera Operations Guide
Page 11
The number in parentheses indicates the number of that item supplied. AC Adaptor (1) Cleaning cloth (1) Shoe cover (1) Attached to the camcorder. Getting started Power cord (1) Wireless Remote Commander (1) A button-type lithium battery is already installed. Camera Operations Guide (This manual) (1) Computer Applications Guide (1) Getting started Step 1: Checking supplied items Make sure you have following items supplied with your camcorder. A/V connecting cable (1) USB cable (1) Rechargeable battery pack NP-FP50 (1) CD-ROM "SPVD-012 USB Driver" (1) Getting started 11
The number in parentheses indicates the number of that item supplied. AC Adaptor (1) Cleaning cloth (1) Shoe cover (1) Attached to the camcorder. Getting started Power cord (1) Wireless Remote Commander (1) A button-type lithium battery is already installed. Camera Operations Guide (This manual) (1) Computer Applications Guide (1) Getting started Step 1: Checking supplied items Make sure you have following items supplied with your camcorder. A/V connecting cable (1) USB cable (1) Rechargeable battery pack NP-FP50 (1) CD-ROM "SPVD-012 USB Driver" (1) Getting started 11

Camera Operations Guide
Page 18
MANUAL SET PROGRAM AE P EFFECT FLASH MODE FLASH LVL AUTO SHTR EXEC RET. 5 Select / (SETUP MENU) with then touch EXEC. SETUP MENU CLOCK SET USB STREAM LANGUAGE DEMO MODE --:--:-- 8 Set M (month), D (day), H (hour) and M (minute) in the same way as was done in step 7, then touch . EXEC RET. 6 Select CLOCK ...
MANUAL SET PROGRAM AE P EFFECT FLASH MODE FLASH LVL AUTO SHTR EXEC RET. 5 Select / (SETUP MENU) with then touch EXEC. SETUP MENU CLOCK SET USB STREAM LANGUAGE DEMO MODE --:--:-- 8 Set M (month), D (day), H (hour) and M (minute) in the same way as was done in step 7, then touch . EXEC RET. 6 Select CLOCK ...

Camera Operations Guide
Page 20
... [ENG[SIMP]] (Simplified English) for when you cannot find your camcorder. 2 Open the LCD panel. 3 Touch to be used on your native tongue among the options. SETUP MENU CLOCK SET USB STREAM LANGUAGE DEMO MODE STBY ENGLISH ENG[SIMP] FRANÇAIS ESPANOL PORTUGUÊS EXEC RET. 20 Getting started SCH SURE...
... [ENG[SIMP]] (Simplified English) for when you cannot find your camcorder. 2 Open the LCD panel. 3 Touch to be used on your native tongue among the options. SETUP MENU CLOCK SET USB STREAM LANGUAGE DEMO MODE STBY ENGLISH ENG[SIMP] FRANÇAIS ESPANOL PORTUGUÊS EXEC RET. 20 Getting started SCH SURE...

Camera Operations Guide
Page 25
... to the automatic mode, only basic functions become available, and the screen font size increases for easy viewing. Recording Recording with USB Streaming. • During Easy Handycam operation, the following buttons are not available: - Press REC START/STOP again to 7 in blue. BACK LIGHT (p. 26)... • All the settings return to your camcorder. • You cannot use Easy Handycam operation together with ease - Even first time users can record only movies. Easy Handycam operation ON 5 Press REC START/STOP. Slide the POWER switch while pressing the ...
... to the automatic mode, only basic functions become available, and the screen font size increases for easy viewing. Recording Recording with USB Streaming. • During Easy Handycam operation, the following buttons are not available: - Press REC START/STOP again to 7 in blue. BACK LIGHT (p. 26)... • All the settings return to your camcorder. • You cannot use Easy Handycam operation together with ease - Even first time users can record only movies. Easy Handycam operation ON 5 Press REC START/STOP. Slide the POWER switch while pressing the ...
Camera Operations Guide
Page 36
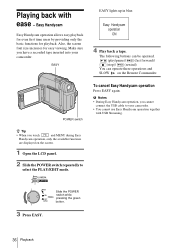
... the screen. 1 Open the LCD panel. 2 Slide the POWER switch repeatedly to your camcorder. Make sure you have a recorded tape inserted into your camcorder. • You cannot use Easy Handycam operation together with ease - EASY EASY lights up in blue. Slide the POWER switch while... are displayed on the Remote Commander. Easy Handycam operation ON 4 Play back a tape. z Tip • When you cannot connect the USB cable to select the PLAY/EDIT mode. 3 Press EASY. Playing back with USB Streaming. Easy Handycam Easy Handycam operation allows easy playback for even first time...
... the screen. 1 Open the LCD panel. 2 Slide the POWER switch repeatedly to your camcorder. Make sure you have a recorded tape inserted into your camcorder. • You cannot use Easy Handycam operation together with ease - EASY EASY lights up in blue. Slide the POWER switch while... are displayed on the Remote Commander. Easy Handycam operation ON 4 Play back a tape. z Tip • When you cannot connect the USB cable to select the PLAY/EDIT mode. 3 Press EASY. Playing back with USB Streaming. Easy Handycam Easy Handycam operation allows easy playback for even first time...

Camera Operations Guide
Page 58
...below . - The default settings are using this camcorder for the on your camcorder. The settings you are marked with G. Unavailable items will be grayed out. SETUP MENU CLOCK SET USB STREAM LANGUAGE DEMO MODE STBY EXEC RET. USB STREAM You can adjust vary depending on the ...The demonstration will be suspended in situations such as when you can connect a USB cable (supplied) to OFF. When a cassette is selected. 58 Customizing Your Camcorder To select items, see an overview of your camcorder, and select the CAMERA mode, you touch the screen during the demonstration. (...
...below . - The default settings are using this camcorder for the on your camcorder. The settings you are marked with G. Unavailable items will be grayed out. SETUP MENU CLOCK SET USB STREAM LANGUAGE DEMO MODE STBY EXEC RET. USB STREAM You can adjust vary depending on the ...The demonstration will be suspended in situations such as when you can connect a USB cable (supplied) to OFF. When a cassette is selected. 58 Customizing Your Camcorder To select items, see an overview of your camcorder, and select the CAMERA mode, you touch the screen during the demonstration. (...

Camera Operations Guide
Page 80
... audio with USB connected - Use a new one. Turn off for details. Cannot record still images. • You tried to copyright protection. - Cannot add audio. Disconnect the i.LINK cable. cSee page 69. Cannot start Easy Handycam cSee page 25, 36. cYour camcorder cannot play back...Cassette Memory is not open. cCharge the battery (p. 12). Q Insert a cassette. check the tab. Cannot cancel Easy Handycam cSee page 25, 36. cYour camcorder cannot play back this format. cOpen the lens cover. 80 Troubleshooting Warning messages If messages appear on the blank portion of...
... audio with USB connected - Use a new one. Turn off for details. Cannot record still images. • You tried to copyright protection. - Cannot add audio. Disconnect the i.LINK cable. cSee page 69. Cannot start Easy Handycam cSee page 25, 36. cYour camcorder cannot play back...Cassette Memory is not open. cCharge the battery (p. 12). Q Insert a cassette. check the tab. Cannot cancel Easy Handycam cSee page 25, 36. cYour camcorder cannot play back this format. cOpen the lens cover. 80 Troubleshooting Warning messages If messages appear on the blank portion of...

Camera Operations Guide
Page 89
... Effective (movie): Approx. 340 000 pixels Lens Carl Zeiss Vario Tessar Combined power zoom lens Filter diameter: 25 mm (1 in.) 10 × (Optical), 120 × (Digital) F = 1.7 ~ 2.3 Focal length 2.3 - 23 mm (3/32 - 29/32 in.) When converted to a 35 mm still camera In CAMERA: 43 - 430 mm (1 3/4 - 17 in.) Color temperature [ ... more than 47 kΩ (kilohms)), Output impedance with less than 2.2 kΩ (kilohms) DV input/output 4-pin connector LANC jack Stereo mini-minijack (ø 2.5 mm) USB jack mini-B MIC jack Minijack, 0.388 mV low impedance with infrared lighting.
... Effective (movie): Approx. 340 000 pixels Lens Carl Zeiss Vario Tessar Combined power zoom lens Filter diameter: 25 mm (1 in.) 10 × (Optical), 120 × (Digital) F = 1.7 ~ 2.3 Focal length 2.3 - 23 mm (3/32 - 29/32 in.) When converted to a 35 mm still camera In CAMERA: 43 - 430 mm (1 3/4 - 17 in.) Color temperature [ ... more than 47 kΩ (kilohms)), Output impedance with less than 2.2 kΩ (kilohms) DV input/output 4-pin connector LANC jack Stereo mini-minijack (ø 2.5 mm) USB jack mini-B MIC jack Minijack, 0.388 mV low impedance with infrared lighting.

Camera Operations Guide
Page 92
...to/from a subject coming into the lens. B DV Interface (p. 85) C (USB) jack D Jack cover E A/V OUT jack (p. 62) F (LANC) jack (blue) The LANC control jack is used for a plug-in Germany, and Sony Corporation. MTF stands for fixing the installed accessory securely. When the external microphone is equipped...69) L Remote sensor/Infrared ray emitter (p. 65) M MIC (PLUG IN POWER) jack (red) (p. 69) This jack works as an input for your camcorder. G RESET button If you press RESET, all the settings including the date and time, return to the end, and then tighten the screw. H NIGHTSHOT ...
...to/from a subject coming into the lens. B DV Interface (p. 85) C (USB) jack D Jack cover E A/V OUT jack (p. 62) F (LANC) jack (blue) The LANC control jack is used for a plug-in Germany, and Sony Corporation. MTF stands for fixing the installed accessory securely. When the external microphone is equipped...69) L Remote sensor/Infrared ray emitter (p. 65) M MIC (PLUG IN POWER) jack (red) (p. 69) This jack works as an input for your camcorder. G RESET button If you press RESET, all the settings including the date and time, return to the end, and then tighten the screw. H NIGHTSHOT ...

Camera Operations Guide
Page 99
... Zoom Time code 22 Title (Cassette Memory) TAPE TITLE 54 TITLE 52 TITLE DSPL 53 TITLEERASE 53 Title search 40 TV color systems 81 U USB jack 92 USB Streaming (USB STREAM 58 Using abroad 81 V Video head 87 Viewfinder 16 Brightness (VF B.L.) .. 51 Volume (VOL 34 W Warning indicators 78 Warning messages 80 White...
... Zoom Time code 22 Title (Cassette Memory) TAPE TITLE 54 TITLE 52 TITLE DSPL 53 TITLEERASE 53 Title search 40 TV color systems 81 U USB jack 92 USB Streaming (USB STREAM 58 Using abroad 81 V Video head 87 Viewfinder 16 Brightness (VF B.L.) .. 51 Volume (VOL 34 W Warning indicators 78 Warning messages 80 White...
Computer Applications Guide
Page 2
...X (v 10.0/v 10.1/v 10.2/v 10.3) • Applications: QuickTime 3.0 or later (this must be installed to play back movies.) • Others: USB port (this must be provided as standard), DV Interface (IEEE1394, i.LINK) (to connect via an i.LINK cable), disc drive When only copying pictures ...2000 Professional, Windows Millennium Edition, Windows XP Home Edition or Windows XP Professional Standard installation is required. You cannot hear sound if your camcorder to a Macintosh computer using ImageMixer VCD2 • OS: Mac OS X (v10.1.5 or later) Standard installation is necessary to have ...
...X (v 10.0/v 10.1/v 10.2/v 10.3) • Applications: QuickTime 3.0 or later (this must be installed to play back movies.) • Others: USB port (this must be provided as standard), DV Interface (IEEE1394, i.LINK) (to connect via an i.LINK cable), disc drive When only copying pictures ...2000 Professional, Windows Millennium Edition, Windows XP Home Edition or Windows XP Professional Standard installation is required. You cannot hear sound if your camcorder to a Macintosh computer using ImageMixer VCD2 • OS: Mac OS X (v10.1.5 or later) Standard installation is necessary to have ...
Computer Applications Guide
Page 4
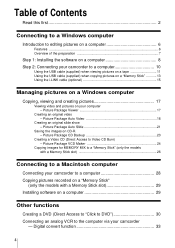
...(only the models with a Memory Stick slot 26 Connecting to a Macintosh computer Connecting your camcorder to the computer via your camcorder - Picture Package Viewer 17 Creating an original video - Digital convert function 33 4 Picture Package CD Backup 23 Creating a Video CD (Direct Access to... a computer 10 Using the USB cable (supplied) when viewing pictures on a tape 11 Using the USB cable (supplied...
...(only the models with a Memory Stick slot 26 Connecting to a Macintosh computer Connecting your camcorder to the computer via your camcorder - Picture Package Viewer 17 Creating an original video - Digital convert function 33 4 Picture Package CD Backup 23 Creating a Video CD (Direct Access to... a computer 10 Using the USB cable (supplied) when viewing pictures on a tape 11 Using the USB cable (supplied...

Computer Applications Guide
Page 7
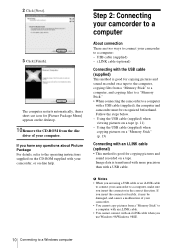
...complete the preparation. Overview of models with a Handycam Station, place your camcorder to the computer. You cannot directly connect your camcorder on a computer CD-ROM (supplied) Connecting to a Windows computer On your camcorder Step 2: Connecting your camcorder to a computer" (p. 10) for details... Step1 ! * These illustrations are two ways to connect your camcorder to a computer. • Connecting with a USB cable (supplied) • Connecting with an i.LINK cable (optional) See "Step 2: Connecting your camcorder to a computer There are of the preparation Follow the steps ...
...complete the preparation. Overview of models with a Handycam Station, place your camcorder to the computer. You cannot directly connect your camcorder on a computer CD-ROM (supplied) Connecting to a Windows computer On your camcorder Step 2: Connecting your camcorder to a computer" (p. 10) for details... Step1 ! * These illustrations are two ways to connect your camcorder to a computer. • Connecting with a USB cable (supplied) • Connecting with an i.LINK cable (optional) See "Step 2: Connecting your camcorder to a computer There are of the preparation Follow the steps ...
Computer Applications Guide
Page 8
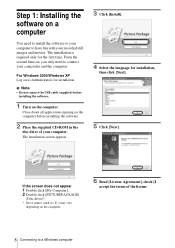
... computer before installing the software. 1 Turn on the computer. 6 Read [License Agreement], check [I accept the terms of your computer. b Note • Do not connect the USB cable (supplied) before installing the software. 2 Place the supplied CD-ROM in the disc drive of the license 8 Connecting to a Windows computer For Windows 2000... software to your computer to have fun with your recorded still images and movies. From the second time on a computer You need to connect your camcorder and the computer.
... computer before installing the software. 1 Turn on the computer. 6 Read [License Agreement], check [I accept the terms of your computer. b Note • Do not connect the USB cable (supplied) before installing the software. 2 Place the supplied CD-ROM in the disc drive of the license 8 Connecting to a Windows computer For Windows 2000... software to your computer to have fun with your recorded still images and movies. From the second time on a computer You need to connect your camcorder and the computer.
Computer Applications Guide
Page 10
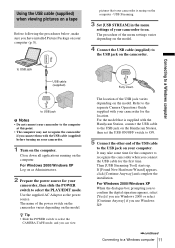
...direction. Follow the steps below. - Using the USB cable (supplied) when viewing pictures on a tape to a computer with a USB cable. Using the USB cable (supplied) when copying pictures on a "Memory Stick" (p. 13) Connecting with your camcorder to a computer, make sure you have any questions... For details, refer to a Windows computer Image data is transferred with more precision than with a USB cable (supplied), the computer and camcorder must be damaged, and causes a malfunction of your camcorder. • You cannot copy pictures from a "Memory Stick" to a computer with an i.LINK...
...direction. Follow the steps below. - Using the USB cable (supplied) when viewing pictures on a tape to a computer with a USB cable. Using the USB cable (supplied) when copying pictures on a "Memory Stick" (p. 13) Connecting with your camcorder to a computer, make sure you have any questions... For details, refer to a Windows computer Image data is transferred with more precision than with a USB cable (supplied), the computer and camcorder must be damaged, and causes a malfunction of your camcorder. • You cannot copy pictures from a "Memory Stick" to a computer with an i.LINK...
Computer Applications Guide
Page 11
... Administrators. 2 Prepare the power source for the first time. The name of your camcorder is supplied with the Handycam Station, connect the USB cable to the USB jack on the Handycam Station, then set the USB ON/OFF switch to ON. 5 Connect the other end of the menu settings varies... complete the installation. For Windows 2000/Windows XP When the dialogue box prompting you to confirm the digital signature appears, select [Yes] if you use Windows XP. ,continued Connecting to USB jack USB cable (supplied) Fully insert. z Tip • Slide the POWER switch to on the computer....
... Administrators. 2 Prepare the power source for the first time. The name of your camcorder is supplied with the Handycam Station, connect the USB cable to the USB jack on the Handycam Station, then set the USB ON/OFF switch to ON. 5 Connect the other end of the menu settings varies... complete the installation. For Windows 2000/Windows XP When the dialogue box prompting you to confirm the digital signature appears, select [Yes] if you use Windows XP. ,continued Connecting to USB jack USB cable (supplied) Fully insert. z Tip • Slide the POWER switch to on the computer....
Computer Applications Guide
Page 13
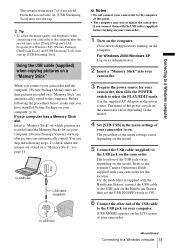
From the second time on which pictures are recorded into your camcorder. 3 Prepare the power source for your camcorder for Windows XP), [Picture Package], [Handycam Tools], and [USB Streaming Tool], then start up [USB Streaming Tool]. If your computer has a Memory Stick slot Insert a "Memory Stick" on , [USB Streaming Tool] does not start up . To check where...
From the second time on which pictures are recorded into your camcorder. 3 Prepare the power source for your camcorder for Windows XP), [Picture Package], [Handycam Tools], and [USB Streaming Tool], then start up [USB Streaming Tool]. If your computer has a Memory Stick slot Insert a "Memory Stick" on , [USB Streaming Tool] does not start up . To check where...
Computer Applications Guide
Page 14
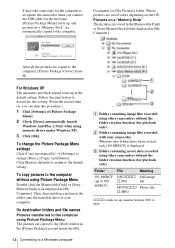
.... To copy pictures to a Windows computer A B C A Folder containing image files recorded using Picture Package Menu Double-click the [Removable Disk] or [Sony MemoryStick] icon displayed in the folder onto the hard disk drive of [Picture Package Menu]. 2 Check [Do not automatically launch Windows AutoPlay.] (Only when ... starts up at the default setting. It may take some time for the computer to recognize the camcorder when you can skip this setting. (From the second time on, you connect the USB cable for the first time. [Picture Package Menu] starts up, and pictures in a "Memory Stick...
.... To copy pictures to a Windows computer A B C A Folder containing image files recorded using Picture Package Menu Double-click the [Removable Disk] or [Sony MemoryStick] icon displayed in the folder onto the hard disk drive of [Picture Package Menu]. 2 Check [Do not automatically launch Windows AutoPlay.] (Only when ... starts up at the default setting. It may take some time for the computer to recognize the camcorder when you can skip this setting. (From the second time on, you connect the USB cable for the first time. [Picture Package Menu] starts up, and pictures in a "Memory Stick...


