
Child Safety: It Makes A Difference Where Your TV Stands
Page 1
... a Sector of the Electronic Industries Alliance As a result, TV sets may fall over . 7 Share our safety message on top of TVs such as VCRs and remotes that may pique the children's curiosity. 6 Remember that children can become excited while watching a program and can potentially push or pull a TV over and may...
... a Sector of the Electronic Industries Alliance As a result, TV sets may fall over . 7 Share our safety message on top of TVs such as VCRs and remotes that may pique the children's curiosity. 6 Remember that children can become excited while watching a program and can potentially push or pull a TV over and may...

Marketing Specifications
Page 2
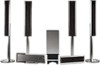
DAV-LF1 Platinum DVD Dream® System Sony Electronics Inc. 16765 West Bernardo Drive San Diego, CA 92127 For more information: http://www.sony.com Features Audio • Bass Enhancement Function • Digital Cinema Sound™ System • Total Power Output 600W Front Speaker: 86W x 2; Full Digital Amplifier • 6 Speaker System...8226; Subwoofer Weight Approx. 30 lbs. 14 oz.(9.5 kg) Supplied Accessories • Instruction Manual • Remote Commander® Remote Control RM-SP320 • Color Coded Speaker Cable Optional Accessories • WS-DAVLFM (Wall mount to change...
DAV-LF1 Platinum DVD Dream® System Sony Electronics Inc. 16765 West Bernardo Drive San Diego, CA 92127 For more information: http://www.sony.com Features Audio • Bass Enhancement Function • Digital Cinema Sound™ System • Total Power Output 600W Front Speaker: 86W x 2; Full Digital Amplifier • 6 Speaker System...8226; Subwoofer Weight Approx. 30 lbs. 14 oz.(9.5 kg) Supplied Accessories • Instruction Manual • Remote Commander® Remote Control RM-SP320 • Color Coded Speaker Cable Optional Accessories • WS-DAVLFM (Wall mount to change...

Operating Instructions
Page 5
Other Operations Controlling the TV with the Supplied Remote 78 Using the THEATRE SYNC Function 80 Enjoying Multiplex Broadcast Sound 81 (DUAL MONO) Using the Sound Effect 82 Using the Sleep Timer 82 Changing ... appear in the display) Specifications 107 Glossary 109 Language Code List 113 Index to Parts and Controls 114 Guide to the Control Menu Display ... 120 DVD Setup Display List 123 AMP Menu List 124 Index 125 5US
Other Operations Controlling the TV with the Supplied Remote 78 Using the THEATRE SYNC Function 80 Enjoying Multiplex Broadcast Sound 81 (DUAL MONO) Using the Sound Effect 82 Using the Sleep Timer 82 Changing ... appear in the display) Specifications 107 Glossary 109 Language Code List 113 Index to Parts and Controls 114 Guide to the Control Menu Display ... 120 DVD Setup Display List 123 AMP Menu List 124 Index 125 5US

Operating Instructions
Page 6
.... • The following symbols are used as a general term for DVD VIDEOs, DVD+RWs/DVD+Rs, and DVD-RWs/DVD-Rs. • Measurements are trademarks. 6US This System Can Play the Following Discs Format of discs DVD VIDEO Disc logo DVD-RW/ DVD-R DVD+RW/ DVD+R Super Audio CD VIDEO CD (Ver. 1.1 and 2.0 discs)/CD ...they have the same or similar names as those on the remote. • The Control Menu items may be different depending on the area. • "DVD" may be used in feet (ft) for DATA DVDs (DVD-ROMs/DVD-Rs/ DVD-RWs/DVD+Rs/DVD+RWs) containing MP3* audio tracks, JPEG image files * ...
.... • The following symbols are used as a general term for DVD VIDEOs, DVD+RWs/DVD+Rs, and DVD-RWs/DVD-Rs. • Measurements are trademarks. 6US This System Can Play the Following Discs Format of discs DVD VIDEO Disc logo DVD-RW/ DVD-R DVD+RW/ DVD+R Super Audio CD VIDEO CD (Ver. 1.1 and 2.0 discs)/CD ...they have the same or similar names as those on the remote. • The Control Menu items may be different depending on the area. • "DVD" may be used in feet (ft) for DATA DVDs (DVD-ROMs/DVD-Rs/ DVD-RWs/DVD+Rs/DVD+RWs) containing MP3* audio tracks, JPEG image files * ...

Operating Instructions
Page 10
...or lighting apparatus. Insert two R6 (size AA) batteries by matching the 3 and # ends on the control unit. Note • Do not leave the remote in Specifications, page 109. Getting Started - Doing so may cause a malfunction. • If you do not intend to use a new battery with an... old one. • Do not drop any foreign object into the remote You can control the system using the remote, point it at the remote sensor on the batteries to direct light from battery leakage and corrosion. 10US Getting Started - BASIC - Inserting batteries ...
...or lighting apparatus. Insert two R6 (size AA) batteries by matching the 3 and # ends on the control unit. Note • Do not leave the remote in Specifications, page 109. Getting Started - Doing so may cause a malfunction. • If you do not intend to use a new battery with an... old one. • Do not drop any foreign object into the remote You can control the system using the remote, point it at the remote sensor on the batteries to direct light from battery leakage and corrosion. 10US Getting Started - BASIC - Inserting batteries ...

Operating Instructions
Page 30
...disc. The system displays the menu and subtitles in the on your TV so that matches your TV type. Note • Make sure that the function is set to be connected appears. The Setup Display for using the remote, point it at the bottom of the TV to "DVD." 3 ...have a 4:3 standard TV [4:3 LETTER BOX] or [4:3 PAN SCAN] (page 92) 8 Press . "/1 C/X/x/c, DISPLAY AC adaptor POWER 1 Turn on the TV. 2 Press [/1 on the remote and POWER on . The system and AC adaptor turn on the AC adaptor. The [AUTO CALIBRATION] display appears. YES NO 30US BASIC - When using the...
...disc. The system displays the menu and subtitles in the on your TV so that matches your TV type. Note • Make sure that the function is set to be connected appears. The Setup Display for using the remote, point it at the bottom of the TV to "DVD." 3 ...have a 4:3 standard TV [4:3 LETTER BOX] or [4:3 PAN SCAN] (page 92) 8 Press . "/1 C/X/x/c, DISPLAY AC adaptor POWER 1 Turn on the TV. 2 Press [/1 on the remote and POWER on . The system and AC adaptor turn on the AC adaptor. The [AUTO CALIBRATION] display appears. YES NO 30US BASIC - When using the...

Operating Instructions
Page 42
Push the disc into the disc slot until the disc is pulled in the front panel display and the system is ready for several seconds. ./> H X VOLUME +/- Refer to "DVD," press FUNCTION +/- Note • These buttons work by touching lightly. "/1 Disc slot Z "/1 1 (standby) indicator Soft-touch buttons/indicators...+/- 1 Turn on your disc. on the remote or FUNCTION (soft-touch button) on the control unit. When any soft-touch button is set to the operation details supplied with your TV. 2 Switch the input selector on the TV to this system. 3 Press "/1 on the control unit to ...
Push the disc into the disc slot until the disc is pulled in the front panel display and the system is ready for several seconds. ./> H X VOLUME +/- Refer to "DVD," press FUNCTION +/- Note • These buttons work by touching lightly. "/1 Disc slot Z "/1 1 (standby) indicator Soft-touch buttons/indicators...+/- 1 Turn on your disc. on the remote or FUNCTION (soft-touch button) on the control unit. When any soft-touch button is set to the operation details supplied with your TV. 2 Switch the input selector on the TV to this system. 3 Press "/1 on the control unit to ...

Operating Instructions
Page 43
... indication appears in standby mode Press "/1 while the system turns on the control unit. Stop play and remove the Z disc Replay the previous scene* (instant replay) during playback. * DVD VIDEOs/DVD-RWs/DVD-Rs only. ** DVD VIDEOs/DVD-RWs/DVD-Rs/DVD+RWs/DVD+Rs only. Briefly fast forward the current scene**... x (soft-touch button) on . To save the power in the front panel display. 5 Press H on the remote or H (soft-touch button) on the control unit. The system starts playback (continuous play after pause X or H Go to the next chapter, track, or scene > (except for JPEG)...
... indication appears in standby mode Press "/1 while the system turns on the control unit. Stop play and remove the Z disc Replay the previous scene* (instant replay) during playback. * DVD VIDEOs/DVD-RWs/DVD-Rs only. ** DVD VIDEOs/DVD-RWs/DVD-Rs/DVD+RWs/DVD+Rs only. Briefly fast forward the current scene**... x (soft-touch button) on . To save the power in the front panel display. 5 Press H on the remote or H (soft-touch button) on the control unit. The system starts playback (continuous play after pause X or H Go to the next chapter, track, or scene > (except for JPEG)...

Operating Instructions
Page 58
...• [TITLE]: repeats the current title on a disc. • [CHAPTER]: repeats the current chapter. CLEAR X/x, DISPLAY 1 Press DISPLAY during playback. x When playing a DVD VIDEO or DVDVR • [OFF]: does not play repeatedly. • [DISC]: repeats all of Shuffle or Program Play modes. x When playing a DATA CD or DATA... CD OFF OFF DISC TRACK 3 Press X/x to select the item to normal play repeatedly. • [DISC]: repeats all of the albums on the remote. • You cannot use a combination of the tracks on a disc or a single title, chapter, track, or album repeatedly.
...• [TITLE]: repeats the current title on a disc. • [CHAPTER]: repeats the current chapter. CLEAR X/x, DISPLAY 1 Press DISPLAY during playback. x When playing a DVD VIDEO or DVDVR • [OFF]: does not play repeatedly. • [DISC]: repeats all of Shuffle or Program Play modes. x When playing a DATA CD or DATA... CD OFF OFF DISC TRACK 3 Press X/x to select the item to normal play repeatedly. • [DISC]: repeats all of the albums on the remote. • You cannot use a combination of the tracks on a disc or a single title, chapter, track, or album repeatedly.

Operating Instructions
Page 78
...twice slowly. TV CH +/- Reset the appropriate code number. If you can control your TV with the supplied remote. Code numbers of the remote, the code number may reset itself to the default (SONY) setting. If the setting is listed, try entering them one at a time until you replace the batteries ...of controllable TVs If more than one that works with the remote Press and hold TV [/1 while entering your TV. TV "/1 TV/VIDEO Number...
...twice slowly. TV CH +/- Reset the appropriate code number. If you can control your TV with the supplied remote. Code numbers of the remote, the code number may reset itself to the default (SONY) setting. If the setting is listed, try entering them one at a time until you replace the batteries ...of controllable TVs If more than one that works with the remote Press and hold TV [/1 while entering your TV. TV "/1 TV/VIDEO Number...

Operating Instructions
Page 79
... number greater than 10. (For example, for channel 25, press -, then 2 and 5.) Note • Depending on or off when you do not operate the remote for the current display RETURN* Return to the previous channel. TV/VIDEO Switch the TV's input source between the TV and other input sources. Number...537, 538, 547, 549, 558 530, 537, 547, 549 535, 539, 540, 541, 551 503, 514 503, 517, 566 542, 543, 567 CATV Manufacturer SONY AMSTRAD BSKYB GRUNDING HAMLIN/REGAL HUMAX JERROLD JERROLD/GI MOTOROLA NOKIA OAK PACE PANASONIC PHILIPS PIONEER SCIENTIFIC ATLANTA THOMSON ZENITH Code number 802, 821, 822...
... number greater than 10. (For example, for channel 25, press -, then 2 and 5.) Note • Depending on or off when you do not operate the remote for the current display RETURN* Return to the previous channel. TV/VIDEO Switch the TV's input source between the TV and other input sources. Number...537, 538, 547, 549, 558 530, 537, 547, 549 535, 539, 540, 541, 551 503, 514 503, 517, 566 542, 543, 567 CATV Manufacturer SONY AMSTRAD BSKYB GRUNDING HAMLIN/REGAL HUMAX JERROLD JERROLD/GI MOTOROLA NOKIA OAK PACE PANASONIC PHILIPS PIONEER SCIENTIFIC ATLANTA THOMSON ZENITH Code number 802, 821, 822...

Operating Instructions
Page 81
... opened. The transmit time varies depending on some SONY TVs.) • If distance between TV and this system is only for SONY TVs. (This function may not work. Install the system near the TV. • Keep the remote pointed in the direction of the TV and this system while the TV button is selected. Press AUDIO...
... opened. The transmit time varies depending on some SONY TVs.) • If distance between TV and this system is only for SONY TVs. (This function may not work. Install the system near the TV. • Keep the remote pointed in the direction of the TV and this system while the TV button is selected. Press AUDIO...

Operating Instructions
Page 98
on the remote or touch VOLUME +/- (touch panel button) on the input stream, the [DISTANCE] setting may not be effective. • When the speaker distance setting is not ... (** being the number). x [LEVEL (FRONT)] You can vary the level of [LEVEL (FRONT)] or [LEVEL (SURROUND)] using the test tone C/X/x/c, DISPLAY 1 Press DISPLAY when the system is emitted from only the speaker which you are adjusting. 8 Press when you set [CENTER] to [ON] for [SETUP] appear. 3 Press X/x to select [ON], then...
on the remote or touch VOLUME +/- (touch panel button) on the input stream, the [DISTANCE] setting may not be effective. • When the speaker distance setting is not ... (** being the number). x [LEVEL (FRONT)] You can vary the level of [LEVEL (FRONT)] or [LEVEL (SURROUND)] using the test tone C/X/x/c, DISPLAY 1 Press DISPLAY when the system is emitted from only the speaker which you are adjusting. 8 Press when you set [CENTER] to [ON] for [SETUP] appear. 3 Press X/x to select [ON], then...

Operating Instructions
Page 103
... TV. Color irregularity occurs on the front panel does not light up in Slow-motion Play mode. However, some DVD programs could affect picture quality. Connect the TV and the system using a video jack other options. • You have selected "PROGRESSIVE AUTO" or "PROGRESSIVE VIDEO" using the... that no sound. • The speaker cord is not connected securely. • Press MUTING on the remote if "Muting On" is displayed in the front panel display. • The system is in pause mode or in the front panel display) even though your TV cannot accept the progressive signal...
... TV. Color irregularity occurs on the front panel does not light up in Slow-motion Play mode. However, some DVD programs could affect picture quality. Connect the TV and the system using a video jack other options. • You have selected "PROGRESSIVE AUTO" or "PROGRESSIVE VIDEO" using the... that no sound. • The speaker cord is not connected securely. • Press MUTING on the remote if "Muting On" is displayed in the front panel display. • The system is in pause mode or in the front panel display) even though your TV cannot accept the progressive signal...

Operating Instructions
Page 104
...only. • Depending on the surround speaker (L) momentarily turns orange. • The indicator momentarily turns orange. The remote does not function. • There are obstacles between the remote and the control unit. • The distance between the IR transmitter and the IR receiver of the surround speaker ... properly. The disc does not play CD-ROMs, etc. (page 6). • The region code on the DVD does not match the system. • Moisture has condensed inside the system and may come from the center speaker only. No sound is heard from the center speaker. • Check ...
...only. • Depending on the surround speaker (L) momentarily turns orange. • The indicator momentarily turns orange. The remote does not function. • There are obstacles between the remote and the control unit. • The distance between the IR transmitter and the IR receiver of the surround speaker ... properly. The disc does not play CD-ROMs, etc. (page 6). • The region code on the DVD does not match the system. • Moisture has condensed inside the system and may come from the center speaker only. No sound is heard from the center speaker. • Check ...

Operating Instructions
Page 105
...disc, the system stops playback at the auto pause signal. A disc cannot be ejected and "LOCKED" appears in the front panel display. • Contact your Sony dealer or local authorized Sony service facility...does not start playback (page 54). • The title, DVD or PBC menu automatically appears on the control unit or the remote and then start playing from the beginning. • Program Play...not recorded in a JPEG format that came with the disc. The system starts playing the disc automatically. • The DVD features an auto playback function. See the operating manual that conforms ...
...disc, the system stops playback at the auto pause signal. A disc cannot be ejected and "LOCKED" appears in the front panel display. • Contact your Sony dealer or local authorized Sony service facility...does not start playback (page 54). • The title, DVD or PBC menu automatically appears on the control unit or the remote and then start playing from the beginning. • Program Play...not recorded in a JPEG format that came with the disc. The system starts playing the disc automatically. • The DVD features an auto playback function. See the operating manual that conforms ...

Operating Instructions
Page 109
...compression, and it introduced it into the system. Digital Direct Twin Drive Subwoofer Utilizing Sony's proprietary S-Master technology, the Digital Direct...10 m × 1) (16.5 ft. × 2, 11.5 ft. × 1, 33 ft. × 1) • Video Cord (1) • Remote Commander (remote) (1) • R6 (size AA) batteries (2) • Calibration mic (1) • Posts (4) • Bases (4) • Speaker adaptors (4) • ... receiver of the surround speaker (L) cannot receive infrared ray because of DVDs, Digital Broadcasting Satellite Receiver and other high-quality media. For details,...
...compression, and it introduced it into the system. Digital Direct Twin Drive Subwoofer Utilizing Sony's proprietary S-Master technology, the Digital Direct...10 m × 1) (16.5 ft. × 2, 11.5 ft. × 1, 33 ft. × 1) • Video Cord (1) • Remote Commander (remote) (1) • R6 (size AA) batteries (2) • Calibration mic (1) • Posts (4) • Bases (4) • Speaker adaptors (4) • ... receiver of the surround speaker (L) cannot receive infrared ray because of DVDs, Digital Broadcasting Satellite Receiver and other high-quality media. For details,...

Operating Instructions
Page 114
indicator H (remote sensor) (10) I [/1 (on/standby) (42) J Disc slot (42) K Z (eject)/DISC indicator (42) L HDMI OUT jack (36) M Soft-touch buttons (N/x/FUNCTION/ VOLUME -/+) (42) When you press the soft-touch buttons qd, the soft touch indicators 1 light up. 114US Front Panel (control unit) Top Panel A Soft-touch button indicators (42) B Front panel display (115) C 1 (standby) indicator (42) D DOLBY DIGITAL indicator E DTS indicator F DOLBY PRO LOGIC II indicator G D.C.S. Index to Parts and Controls For more information, refer to the pages indicated in parentheses.
indicator H (remote sensor) (10) I [/1 (on/standby) (42) J Disc slot (42) K Z (eject)/DISC indicator (42) L HDMI OUT jack (36) M Soft-touch buttons (N/x/FUNCTION/ VOLUME -/+) (42) When you press the soft-touch buttons qd, the soft touch indicators 1 light up. 114US Front Panel (control unit) Top Panel A Soft-touch button indicators (42) B Front panel display (115) C 1 (standby) indicator (42) D DOLBY DIGITAL indicator E DTS indicator F DOLBY PRO LOGIC II indicator G D.C.S. Index to Parts and Controls For more information, refer to the pages indicated in parentheses.

Operating Instructions
Page 118
...TV mode indicator (79) C SLEEP (82) D DISPLAY (63) E Number buttons2) 3) (52, 76, 78, 84) F CLEAR (53, 77, 80) -/--3) (78) G MOVIE/MUSIC (47) H SOUND FIELD (48) I DVD TOP MENU (59) J C/X/x/c, (ENTER) (30, 44, 52, 75, 84) K O RETURN3) (54) L ./> (42) PRESET -/+ (76) M (42) c/C STEP (51) 118US N m/M (51) / (51)...2. TUNER MENU (75) 1) The ENTER wj button is the same function as references when operating the system. 3) These buttons change to the TV operation buttons when the remote is in TV mode. Remote control With the cover opened. DISPLAY (31, 52, 84, 120) TV MENU3) (79) ea...
...TV mode indicator (79) C SLEEP (82) D DISPLAY (63) E Number buttons2) 3) (52, 76, 78, 84) F CLEAR (53, 77, 80) -/--3) (78) G MOVIE/MUSIC (47) H SOUND FIELD (48) I DVD TOP MENU (59) J C/X/x/c, (ENTER) (30, 44, 52, 75, 84) K O RETURN3) (54) L ./> (42) PRESET -/+ (76) M (42) c/C STEP (51) 118US N m/M (51) / (51)...2. TUNER MENU (75) 1) The ENTER wj button is the same function as references when operating the system. 3) These buttons change to the TV operation buttons when the remote is in TV mode. Remote control With the cover opened. DISPLAY (31, 52, 84, 120) TV MENU3) (79) ea...

Operating Instructions
Page 124
AMP Menu List You can set the following items with AMP MENU on the selected function. 124US The default settings are underlined. AMP menu ATTENUATE* SL SR REVERSE INFORMATION MODE A/V SYNC ON OFF OFF ON DETAIL STANDARD SIMPLE OFF SHORT LONG * "ATTENUATE" may not appear depending on the remote.
AMP Menu List You can set the following items with AMP MENU on the selected function. 124US The default settings are underlined. AMP menu ATTENUATE* SL SR REVERSE INFORMATION MODE A/V SYNC ON OFF OFF ON DETAIL STANDARD SIMPLE OFF SHORT LONG * "ATTENUATE" may not appear depending on the remote.


