
HDMI control guide
Page 2
... following explanation is active. We recommend that the signal from the system appears on the TV's remote, the system turns off automatically. The system turns on the remote while the HDMI CONTROL function is for DVD input mode automatically. - A component does not have a HDMI ... models only). By connecting Sony components that are compatible with the HDMI CONTROL function with HDMI CONTROL) by HDMI CEC (Consumer Electronics Control) for the HDMI CONTROL function To use the HDMI CONTROL function, make sure that this system to the operating instructions supplied with Sony's...
... following explanation is active. We recommend that the signal from the system appears on the TV's remote, the system turns off automatically. The system turns on the remote while the HDMI CONTROL function is for DVD input mode automatically. - A component does not have a HDMI ... models only). By connecting Sony components that are compatible with the HDMI CONTROL function with HDMI CONTROL) by HDMI CEC (Consumer Electronics Control) for the HDMI CONTROL function To use the HDMI CONTROL function, make sure that this system to the operating instructions supplied with Sony's...
HDMI control guide
Page 4
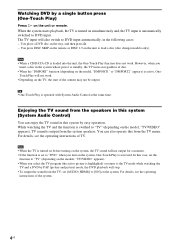
... the speakers in this system (System Audio Control) You can also operate this from the system speakers. For details, see the operating instructions of disc. • When the "DMPORT" function (depending on the model, "DMPORT1" or "DMPORT2" appears) is turned on the unit to "DVD" when you select the... TV program (the active picture is operated with System Audio Control at the same time. However, when you insert a disc in...
... the speakers in this system (System Audio Control) You can also operate this from the system speakers. For details, see the operating instructions of disc. • When the "DMPORT" function (depending on the model, "DMPORT1" or "DMPORT2" appears) is turned on the unit to "DVD" when you select the... TV program (the active picture is operated with System Audio Control at the same time. However, when you insert a disc in...

HDMI control guide
Page 5
...performing to the STB or digital satellite tuner. Video signal Sound signal TV to HDMI 2 (HDMI cord) to HDMI 1 (HDMI cord) GUSB DAV STB Sets the [STB SYNCHRO] to connect from the smallest number). Select the HDMI input of your TV connected to following connections and settings. The... connecting as the following illustration are examples. To Enjoy STB (Set Top Box) digital sound or digital satellite tuner sound from the system (Models with DIGITAL IN (COAXIAL or OPTICAL) jack only) You can enjoy digital sound of STB or a digital satellite tuner from speakers of this function ...
...performing to the STB or digital satellite tuner. Video signal Sound signal TV to HDMI 2 (HDMI cord) to HDMI 1 (HDMI cord) GUSB DAV STB Sets the [STB SYNCHRO] to connect from the smallest number). Select the HDMI input of your TV connected to following connections and settings. The... connecting as the following illustration are examples. To Enjoy STB (Set Top Box) digital sound or digital satellite tuner sound from the system (Models with DIGITAL IN (COAXIAL or OPTICAL) jack only) You can enjoy digital sound of STB or a digital satellite tuner from speakers of this function ...
Operating Instructions
Page 2
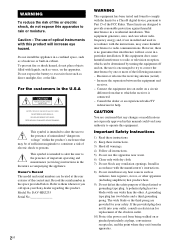
...number in the U.S.A This symbol is connected. - DAV-HDZ235 Serial No 2US WARNING This equipment has been tested and...built-in accordance with the limits for your outlet, consult an electrician for help. Owner's Record The model and serial numbers are provided for a Class B digital device, pursuant to radio communications. This equipment ...manufacturer's instructions. 8) Do not install near water. 6) Clean only with this manual could void your Sony dealer regarding this equipment. These limits are cautioned that interference will increase eye hazard. Increase the separation...
...number in the U.S.A This symbol is connected. - DAV-HDZ235 Serial No 2US WARNING This equipment has been tested and...built-in accordance with the limits for your outlet, consult an electrician for help. Owner's Record The model and serial numbers are provided for a Class B digital device, pursuant to radio communications. This equipment ...manufacturer's instructions. 8) Do not install near water. 6) Clean only with this manual could void your Sony dealer regarding this equipment. These limits are cautioned that interference will increase eye hazard. Increase the separation...
Operating Instructions
Page 6
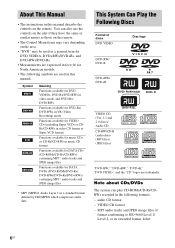
...Discs Format of format conforming to ISO 9660 Level 1/ Level 2, or its extended format, Joliet 6US VIDEO CD format - Note about CDs/DVDs The system can also use the controls on the unit if they have the same or similar names as those on the remote. • The Control...) for North American models. • The following formats: - About This Manual • The instructions in music CD format Functions available for DATA CDs (CD-ROMs/CD-Rs/CD-RWs) containing MP3* audio tracks and JPEG image files Functions available for DATA DVDs (DVD-ROMs/DVD-Rs/ DVD-RWs/DVD+Rs/DVD+RWs) containing MP3...
...Discs Format of format conforming to ISO 9660 Level 1/ Level 2, or its extended format, Joliet 6US VIDEO CD format - Note about CDs/DVDs The system can also use the controls on the unit if they have the same or similar names as those on the remote. • The Control...) for North American models. • The following formats: - About This Manual • The instructions in music CD format Functions available for DATA CDs (CD-ROMs/CD-Rs/CD-RWs) containing MP3* audio tracks and JPEG image files Functions available for DATA DVDs (DVD-ROMs/DVD-Rs/ DVD-RWs/DVD+Rs/DVD+RWs) containing MP3...

Operating Instructions
Page 52
... the AM tuning interval, first tune in the front panel display. 3 Press SYSTEM MENU. 4 Press X/x repeatedly until the auto scanning starts. If you want. "TUNED" and "ST" (for Russian and Middle Eastern models) The AM tuning interval can be erased. To change the interval, AM preset... to minimum. 1 Press FUNCTION repeatedly until "TUNER FM" or "TUNER AM" appears in the front panel display. 5 Press or c. The system menu turns off the system by pressing the number buttons. 7 Press . Before tuning, make sure to turn on the power. While holding down the volume to store other...
... the AM tuning interval, first tune in the front panel display. 3 Press SYSTEM MENU. 4 Press X/x repeatedly until the auto scanning starts. If you want. "TUNED" and "ST" (for Russian and Middle Eastern models) The AM tuning interval can be erased. To change the interval, AM preset... to minimum. 1 Press FUNCTION repeatedly until "TUNER FM" or "TUNER AM" appears in the front panel display. 5 Press or c. The system menu turns off the system by pressing the number buttons. 7 Press . Before tuning, make sure to turn on the power. While holding down the volume to store other...

Operating Instructions
Page 55
... the system mode to "DVD," and then switches the TV's input source you may not be able to control your TV or to this system. For details, see the table) using following buttons. Preparing for North American models. By pressing Number TV INPUT 0 1 2 3 4 5 6 7 8 9* CLEAR* SYSTEM MENU* PICTURE NAVI* TV's input source No ... source between the TV and other input sources. Other Operations Other Operations Controlling the TV with the Supplied Remote You can control your TV (Sony only) with the remote You can TV [/1 Turn the TV on or off. Set your TV's input to the input you to the...
... the system mode to "DVD," and then switches the TV's input source you may not be able to control your TV or to this system. For details, see the table) using following buttons. Preparing for North American models. By pressing Number TV INPUT 0 1 2 3 4 5 6 7 8 9* CLEAR* SYSTEM MENU* PICTURE NAVI* TV's input source No ... source between the TV and other input sources. Other Operations Other Operations Controlling the TV with the Supplied Remote You can control your TV (Sony only) with the remote You can TV [/1 Turn the TV on or off. Set your TV's input to the input you to the...

Operating Instructions
Page 66
...for [SETUP] appear. 1 2 ( 2 7 ) 1 8 ( 3 4 ) T 0:00:02 DVD VIDEO QUICK QUICK CUSTOM RESET BNR 4 Press X/x to select [CUSTOM], then press . Using the Setup Display...you can make various adjustments to select [SETUP], then press . Displayed items vary depending on the country model. do not insert or eject a disc. - do not turn off the power. - For an...The options for [SUBWOOFER] is in the front panel display. 2 Press DISPLAY when the system is always [YES] since the system does not perform subwoofer calibration. Note • While the Auto Calibration function works: -...
...for [SETUP] appear. 1 2 ( 2 7 ) 1 8 ( 3 4 ) T 0:00:02 DVD VIDEO QUICK QUICK CUSTOM RESET BNR 4 Press X/x to select [CUSTOM], then press . Using the Setup Display...you can make various adjustments to select [SETUP], then press . Displayed items vary depending on the country model. do not insert or eject a disc. - do not turn off the power. - For an...The options for [SUBWOOFER] is in the front panel display. 2 Press DISPLAY when the system is always [YES] since the system does not perform subwoofer calibration. Note • While the Auto Calibration function works: -...

Operating Instructions
Page 72
...you perform the Quick Setup (page 15), the default settings are underlined. The default settings are changed. 2)0.0 to 6.9 meters for North American models. 3)0.9 to 6.9 meters for the speakers in relation to the listening position is shown below . Note • You cannot operate these setup... you closer to the listening position set [CENTER] to from your listening position. x [DISTANCE (SURROUND)] The default distance setting for North American models. When you set the distance using the Quick Setup (page 15), the settings is shown below . Select [SPEAKER SETUP] in the Setup Display...
...you perform the Quick Setup (page 15), the default settings are underlined. The default settings are changed. 2)0.0 to 6.9 meters for North American models. 3)0.9 to 6.9 meters for the speakers in relation to the listening position is shown below . Note • You cannot operate these setup... you closer to the listening position set [CENTER] to from your listening position. x [DISTANCE (SURROUND)] The default distance setting for North American models. When you set the distance using the Quick Setup (page 15), the settings is shown below . Select [SPEAKER SETUP] in the Setup Display...

Operating Instructions
Page 73
...meters for easy adjustment. [L/R] Set this between -6.0 dB and 0.0 dB +6.0 dB. (appears when you set the distance according to [ON] for North American models. Be sure to set [CENTER] to [YES] in the [CONNECTION] setting.) Set this between -6.0 dB and +6.0 dB. [SUBWOOFER] +3.0 dB Set this ... to select [CUSTOM], then press . Advanced Settings and Adjustments Adjusting the speaker level by using the test tone 1 Press DISPLAY when the system is emitted from the front speaker [YES] in the distance. [CONNECTION] setting.) 1)When you perform the Quick Setup (page 15), the...
...meters for easy adjustment. [L/R] Set this between -6.0 dB and 0.0 dB +6.0 dB. (appears when you set the distance according to [ON] for North American models. Be sure to set [CENTER] to [YES] in the [CONNECTION] setting.) Set this between -6.0 dB and +6.0 dB. [SUBWOOFER] +3.0 dB Set this ... to select [CUSTOM], then press . Advanced Settings and Adjustments Adjusting the speaker level by using the test tone 1 Press DISPLAY when the system is emitted from the front speaker [YES] in the distance. [CONNECTION] setting.) 1)When you perform the Quick Setup (page 15), the...

Operating Instructions
Page 81
...000 Hz; DVD system Laser Signal format system Semiconductor laser (DVD: λ = 650 nm) (CD: λ = 790 nm) Emission duration: continuous NTSC Tuner section System PLL quartz-locked digital synthesizer FM tuner section Tuning range North American models: 87.5-108.0 MHz (100 kHz step) Other models: 87.5-108... Y: 1 Vp-p 75 ohms PB/CB, PR/CR: 0.7 Vp-p 75 ohms HDMI OUT: Type A (19 pin) Speakers Front (SS-TS72) Speaker system Speaker unit Rated impedance Dimensions (approx.) Mass (approx.) Bass reflex, magnetically shielded 65 mm (2 5/8 inches) dia, cone type 3.0 ohms 93 × ...
...000 Hz; DVD system Laser Signal format system Semiconductor laser (DVD: λ = 650 nm) (CD: λ = 790 nm) Emission duration: continuous NTSC Tuner section System PLL quartz-locked digital synthesizer FM tuner section Tuning range North American models: 87.5-108.0 MHz (100 kHz step) Other models: 87.5-108... Y: 1 Vp-p 75 ohms PB/CB, PR/CR: 0.7 Vp-p 75 ohms HDMI OUT: Type A (19 pin) Speakers Front (SS-TS72) Speaker system Speaker unit Rated impedance Dimensions (approx.) Mass (approx.) Bass reflex, magnetically shielded 65 mm (2 5/8 inches) dia, cone type 3.0 ohms 93 × ...

Operating Instructions
Page 89
.... (20) B Lights up when the time information of a title or chapter appears in the front panel display. (DVD only) (41) C Lights up when the color system is set to NTSC. (Asian, Australian, and Middle Eastern models only) D Lights up when a station is received. (Radio only) (52) E Stereo/Monaural effect (Radio only) (53) F Lights...
.... (20) B Lights up when the time information of a title or chapter appears in the front panel display. (DVD only) (41) C Lights up when the color system is set to NTSC. (Asian, Australian, and Middle Eastern models only) D Lights up when a station is received. (Radio only) (52) E Stereo/Monaural effect (Radio only) (53) F Lights...

Operating Instructions
Page 99
...94) THEATRE SYNC w; (56) TUNING +/- 0 qs (52) TV e; (55) TV CH +/- Use the tactile dots as references when operating the system. wa (55) TV INPUT qk (55) TV VOL +/- Z PICTURE NAVI 6 (34, 55) PRESET +/- O ANGLE 5 (43) AUDIO 4... (39) CLEAR ef (33, 55, 67) D.TUNING wf (53) DISC SKIP* eg DISPLAY 2 (41, 54) DVD MENU wh (39, 55) DVD TOP MENU qf (39) DYNAMIC BASS wd (56) ENTER wg (55) FUNCTION ws (22, 26, 27, 34, 52, 62...34) -/-- ef (55) * The DISC SKIP button is not available for this model. ** The H, number 5, and VOLUME + buttons have tactile dots. Remote control ALPHABETICAL ORDER A -
...94) THEATRE SYNC w; (56) TUNING +/- 0 qs (52) TV e; (55) TV CH +/- Use the tactile dots as references when operating the system. wa (55) TV INPUT qk (55) TV VOL +/- Z PICTURE NAVI 6 (34, 55) PRESET +/- O ANGLE 5 (43) AUDIO 4... (39) CLEAR ef (33, 55, 67) D.TUNING wf (53) DISC SKIP* eg DISPLAY 2 (41, 54) DVD MENU wh (39, 55) DVD TOP MENU qf (39) DYNAMIC BASS wd (56) ENTER wg (55) FUNCTION ws (22, 26, 27, 34, 52, 62...34) -/-- ef (55) * The DISC SKIP button is not available for this model. ** The H, number 5, and VOLUME + buttons have tactile dots. Remote control ALPHABETICAL ORDER A -

