Operating Instructions
Page 5
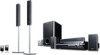
Other Operations Controlling the TV with the Supplied Remote 72 Using the THEATRE SYNC Function 73 Using the Sound Effect 75 Using the Sleep Timer 75 Changing the Brightness of the Front Panel Display 76 Using the DIGITAL ... appear in the display) Specifications 101 Glossary 103 Language Code List 107 Index to Parts and Controls 108 Guide to the Control Menu Display ... 111 DVD Setup Display List 114 System Menu List 115 Index 116 5US
Other Operations Controlling the TV with the Supplied Remote 72 Using the THEATRE SYNC Function 73 Using the Sound Effect 75 Using the Sleep Timer 75 Changing the Brightness of the Front Panel Display 76 Using the DIGITAL ... appear in the display) Specifications 101 Glossary 103 Language Code List 107 Index to Parts and Controls 108 Guide to the Control Menu Display ... 111 DVD Setup Display List 114 System Menu List 115 Index 116 5US
Operating Instructions
Page 6
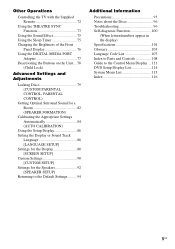
... Discs Format of format conforming to ISO 9660 Level 1/ Level 2, or its extended format, Joliet Note about CDs/DVDs The system can also use the controls on the remote. • The instructions in music CD format Functions available for DATA CDs (CD-ROMs/CD-Rs/CD-RWs) ...VCD format) Functions available for DAVHDX500 and DAV-HDX501W. MP3 audio tracks and JPEG image files of discs DVD VIDEO Disc logo DVD-RW/ DVD-R DVD+RW/ DVD+R VIDEO CD (Ver. 1.1 and 2.0 discs)/ Audio CD CD-RW/CD-R (audio data) (MP3 files) (JPEG files) "DVD-RW," "DVD+RW," "DVD+R," "DVD VIDEO," and the "CD" logos are...
... Discs Format of format conforming to ISO 9660 Level 1/ Level 2, or its extended format, Joliet Note about CDs/DVDs The system can also use the controls on the remote. • The instructions in music CD format Functions available for DATA CDs (CD-ROMs/CD-Rs/CD-RWs) ...VCD format) Functions available for DAVHDX500 and DAV-HDX501W. MP3 audio tracks and JPEG image files of discs DVD VIDEO Disc logo DVD-RW/ DVD-R DVD+RW/ DVD+R VIDEO CD (Ver. 1.1 and 2.0 discs)/ Audio CD CD-RW/CD-R (audio data) (MP3 files) (JPEG files) "DVD-RW," "DVD+RW," "DVD+R," "DVD VIDEO," and the "CD" logos are...

Operating Instructions
Page 9
... • Do not drop any foreign object into the remote You can control the system using the supplied remote. Note • Do not leave the remote in Specifications, page 101. BASIC - BASIC - Inserting batteries into the remote casing, particularly when replacing the batteries. • Do ...not expose the remote sensor to avoid possible damage from slipping....
... • Do not drop any foreign object into the remote You can control the system using the supplied remote. Note • Do not leave the remote in Specifications, page 101. BASIC - BASIC - Inserting batteries into the remote casing, particularly when replacing the batteries. • Do ...not expose the remote sensor to avoid possible damage from slipping....

Operating Instructions
Page 27
..., then press or c. 3 Press X/x to on the remote. Otherwise, to stop the demonstration, you need to set the demonstration mode to off, then press "/1 on /off 1 Press SYSTEM MENU. 2 Press X/x repeatedly until "DEMO" appears in the system menu to on, the demonstration does not turn off. &#... power in the front panel display. after performing "COLD RESET" (page 94)), you press "/1 on the remote. When you can turn off the Demonstration "/1 X/x/c, SYSTEM MENU Setting the demonstration mode to "DEMO OFF." 27US The setting is at its factory default settings (ex. Getting Started -...
..., then press or c. 3 Press X/x to on the remote. Otherwise, to stop the demonstration, you need to set the demonstration mode to off, then press "/1 on /off 1 Press SYSTEM MENU. 2 Press X/x repeatedly until "DEMO" appears in the system menu to on, the demonstration does not turn off. &#... power in the front panel display. after performing "COLD RESET" (page 94)), you press "/1 on the remote. When you can turn off the Demonstration "/1 X/x/c, SYSTEM MENU Setting the demonstration mode to "DEMO OFF." 27US The setting is at its factory default settings (ex. Getting Started -...
Operating Instructions
Page 37
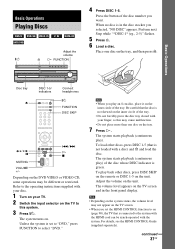
... indicators Connect headphones "/1 FUNCTION DISC SKIP / X ./> H x MUTING VOLUME +/- Place one disc on the TV to the system with the HDMI cord can be different or restricted. continued 37US Depending on the DVD VIDEO or VIDEO CD, some operations may be synch-operated with your TV. 2 Switch the input selector on... the tray. 7 Press H. To load other discs, press DISC SKIP on the remote or DISC 1-5 on the TV screen and in the disc stocker you set to "DVD," press FUNCTION to on (page 90), the TV that the disc is green. Adjust the volume on ....
... indicators Connect headphones "/1 FUNCTION DISC SKIP / X ./> H x MUTING VOLUME +/- Place one disc on the TV to the system with the HDMI cord can be different or restricted. continued 37US Depending on the DVD VIDEO or VIDEO CD, some operations may be synch-operated with your TV. 2 Switch the input selector on... the tray. 7 Press H. To load other discs, press DISC SKIP on the remote or DISC 1-5 on the TV screen and in the disc stocker you set to "DVD," press FUNCTION to on (page 90), the TV that the disc is green. Adjust the volume on ....
Operating Instructions
Page 38
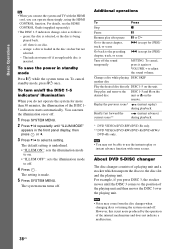
... DISC 1-5 and A on the unit or Z on . However, this is being played back. - The setting is loaded in standby mode Press "/1 while the system turns on the remote. About DVD 5-DISC changer The disc changer consists of the internal mechanisms and does not indicate a malfunction. 38US Note • You may come from the...
... DISC 1-5 and A on the unit or Z on . However, this is being played back. - The setting is loaded in standby mode Press "/1 while the system turns on the remote. About DVD 5-DISC changer The disc changer consists of the internal mechanisms and does not indicate a malfunction. 38US Note • You may come from the...

Operating Instructions
Page 72
... on or off. Select the TV channel. Return to the default (SONY) setting. Switch the TV's input source between the TV and other input sources. Other Operations Controlling the TV with the Supplied Remote By adjusting the remote signal, you can Turn the TV on the menu of the TV.... TV Manufacturer Code number SONY/AIWA 501 (default) DAEWOO 503, 506, 515, 544 FISHER 508, 545 GRUNDIG 533...
... on or off. Select the TV channel. Return to the default (SONY) setting. Switch the TV's input source between the TV and other input sources. Other Operations Controlling the TV with the Supplied Remote By adjusting the remote signal, you can Turn the TV on the menu of the TV.... TV Manufacturer Code number SONY/AIWA 501 (default) DAEWOO 503, 506, 515, 544 FISHER 508, 545 GRUNDIG 533...
Operating Instructions
Page 73
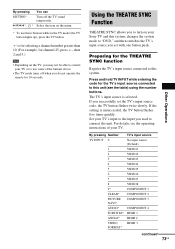
...DVD," and then switches the TV's input source you successfully set with one button push. Using the THEATRE SYNC Function THEATRE SYNC allows you to turn on your TV's input to the input you do not operate the remote for the THEATRE SYNC function Other Operations Register the TV's input source connected to this system..., changes the system mode to connect the unit. Set your Sony TV and this system. Preparing for 10 seconds. If you ...
...DVD," and then switches the TV's input source you successfully set with one button push. Using the THEATRE SYNC Function THEATRE SYNC allows you to turn on your TV's input to the input you do not operate the remote for the THEATRE SYNC function Other Operations Register the TV's input source connected to this system..., changes the system mode to connect the unit. Set your Sony TV and this system. Preparing for 10 seconds. If you ...

Operating Instructions
Page 74
...By pressing Number TV CH + 1 2 3 4 5 6 7 8 Transmit time 0.5 (Default) 1 1.5 2 3 4 5 6 Note • This function is only for Sony TVs. (This function may not work. Operating the THEATRE SYNC function Point the remote to the direction of the TV and this function does not work on the TV. If this unit while... entering the code. 74US The transmit time varies depending on some Sony TVs.) • If distance between ...
...By pressing Number TV CH + 1 2 3 4 5 6 7 8 Transmit time 0.5 (Default) 1 1.5 2 3 4 5 6 Note • This function is only for Sony TVs. (This function may not work. Operating the THEATRE SYNC function Point the remote to the direction of the TV and this function does not work on the TV. If this unit while... entering the code. 74US The transmit time varies depending on some Sony TVs.) • If distance between ...
Operating Instructions
Page 77
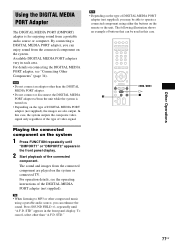
...To cancel, select other than "A.F.D. repeatedly until "DMPORT1" or "DMPORT2" appears in each area. STD" appears in this case, the system outputs the composite video signal only regardless of the type of video signal. The following illustration shows an example of buttons that can be... able to MP3 or other compressed music using either the buttons on the remote or the unit. Playing the connected component on the system 1 Press FUNCTION repeatedly until "A.F.D. Tip • When listening to operate a connected component using a portable audio...
...To cancel, select other than "A.F.D. repeatedly until "DMPORT1" or "DMPORT2" appears in each area. STD" appears in this case, the system outputs the composite video signal only regardless of the type of video signal. The following illustration shows an example of buttons that can be... able to MP3 or other compressed music using either the buttons on the remote or the unit. Playing the connected component on the system 1 Press FUNCTION repeatedly until "A.F.D. Tip • When listening to operate a connected component using a portable audio...
Operating Instructions
Page 78
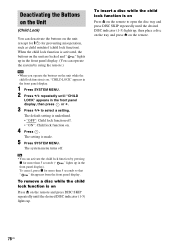
...operate the system by pressing x for preventing misoperation, such as child mischief (child lock function). To remove a disc while the child lock function is on the unit (except for "/1) for more than 5 seconds (" " lights up , then place a disc on the tray and press Z on the remote to ...open the disc tray and press DISC SKIP repeatedly until the desired DISC indicator (1-5) lights up. The default setting is on Press Z on the remote. 78US To insert a disc while the child lock function is underlined. • "OFF": Child lock function off . When the child lock function...
...operate the system by pressing x for preventing misoperation, such as child mischief (child lock function). To remove a disc while the child lock function is on the unit (except for "/1) for more than 5 seconds (" " lights up , then place a disc on the tray and press Z on the remote to ...open the disc tray and press DISC SKIP repeatedly until the desired DISC indicator (1-5) lights up. The default setting is on Press Z on the remote. 78US To insert a disc while the child lock function is underlined. • "OFF": Child lock function off . When the child lock function...
Operating Instructions
Page 93
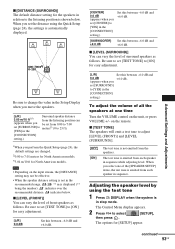
... this between -6.0 dB and +6.0 dB. [CENTER] 0.0 dB (appears when you select one of all the speakers at one time Turn the VOLUME control on the remote. When you set [SURROUND] to [YES] in the [CONNECTION] setting.) Set this between -6.0 dB and +6.0 dB. The Control Menu display appears. 2 Press X/x to change the... Be sure to select [SETUP], then press . indicates over the recommended distance. When you set the distance using the test tone 1 Press DISPLAY when the system is displayed (** being the number).
... this between -6.0 dB and +6.0 dB. [CENTER] 0.0 dB (appears when you select one of all the speakers at one time Turn the VOLUME control on the remote. When you set [SURROUND] to [YES] in the [CONNECTION] setting.) Set this between -6.0 dB and +6.0 dB. The Control Menu display appears. 2 Press X/x to change the... Be sure to select [SETUP], then press . indicates over the recommended distance. When you set the distance using the test tone 1 Press DISPLAY when the system is displayed (** being the number).
Operating Instructions
Page 97
... the unit using a video jack other options. • You have selected "PROGRESSIVE" using the VIDEO FORMAT button on the remote if "MUTING ON" is displayed in the front panel display. • The system is no magnetic object (magnetic latch on the front panel does not light up in the front panel display... and on again. 2 Turn the connected equipment off the TV set the aspect ratio in [CUSTOM SETUP] to "A.F.D. However, some DVD programs could affect picture quality. Even though you set once, then turn off and on -screen displays. If this case, disconnect the HDMI cord from ...
... the unit using a video jack other options. • You have selected "PROGRESSIVE" using the VIDEO FORMAT button on the remote if "MUTING ON" is displayed in the front panel display. • The system is no magnetic object (magnetic latch on the front panel does not light up in the front panel display... and on again. 2 Turn the connected equipment off the TV set the aspect ratio in [CUSTOM SETUP] to "A.F.D. However, some DVD programs could affect picture quality. Even though you set once, then turn off and on -screen displays. If this case, disconnect the HDMI cord from ...
Operating Instructions
Page 98
...MP3 format that the frequency appears in a JPEG format that conforms to ISO 9660 Level 1/Level 2, or Joliet. • The DATA DVD is not MPEG1 Audio Layer 3 data. • The system cannot play . • There is no sound from the center speaker only. It may be played. • The DATA CD ...or only a very low-level sound is heard from the center speaker only. • Depending on the DVD does not match the system. • Moisture has condensed inside the unit and may be tuned in the remote are playing a Dolby Digital, DTS, or MPEG audio sound track. • Make sure the sound field...
...MP3 format that the frequency appears in a JPEG format that conforms to ISO 9660 Level 1/Level 2, or Joliet. • The DATA DVD is not MPEG1 Audio Layer 3 data. • The system cannot play . • There is no sound from the center speaker only. It may be played. • The DATA CD ...or only a very low-level sound is heard from the center speaker only. • Depending on the DVD does not match the system. • Moisture has condensed inside the unit and may be tuned in the remote are playing a Dolby Digital, DTS, or MPEG audio sound track. • Make sure the sound field...
Operating Instructions
Page 99
...Sony service facility. [Data error] appears on the TV screen when playing a DATA CD or DATA DVD. • The MP3 audio track/JPEG image file you want . • In the Setup Display, select the desired language for the HDMI CONTROL function. The titles of the alphabets. While playing such a disc, the system... • [AUTO] has been selected in [MODE (MP3, JPEG)] (page 62). During stop, press x on the unit or the remote and then start playing from the wall outlet (mains), then reconnect after several minutes. See the operating instructions of the connected component is connected ...
...Sony service facility. [Data error] appears on the TV screen when playing a DATA CD or DATA DVD. • The MP3 audio track/JPEG image file you want . • In the Setup Display, select the desired language for the HDMI CONTROL function. The titles of the alphabets. While playing such a disc, the system... • [AUTO] has been selected in [MODE (MP3, JPEG)] (page 62). During stop, press x on the unit or the remote and then start playing from the wall outlet (mains), then reconnect after several minutes. See the operating instructions of the connected component is connected ...
Operating Instructions
Page 103
...DVD. All six channels in this format, the surround speakers output stereo sound with washer) (8) • Screws (small, silver) (4) • Screws (small, black) (2) • WAHT-SD1 (1) (DAV-HDX501W... chapters. Digital Cinema Auto Calibration Digital Cinema Auto Calibration was developed by Sony to automatically measure and adjusts the speaker settings to adjust frequency levels. ... (1) • Speaker cords (6, red/white/green/gray/blue/purple) • Video Cord (1) • Remote Commander (remote) (1) • R6 (size AA) batteries (2) • Calibration mic (1) • Foot pads (1...
...DVD. All six channels in this format, the surround speakers output stereo sound with washer) (8) • Screws (small, silver) (4) • Screws (small, black) (2) • WAHT-SD1 (1) (DAV-HDX501W... chapters. Digital Cinema Auto Calibration Digital Cinema Auto Calibration was developed by Sony to automatically measure and adjusts the speaker settings to adjust frequency levels. ... (1) • Speaker cords (6, red/white/green/gray/blue/purple) • Video Cord (1) • Remote Commander (remote) (1) • R6 (size AA) batteries (2) • Calibration mic (1) • Foot pads (1...

Operating Instructions
Page 108
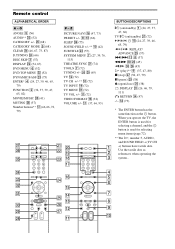
Index to Parts and Controls For more information, refer to the pages indicated in parentheses. Front panel A "/1 (on/standby) (37) B A (open/close) (37) C Disc operation (37) D FUNCTION (37) E Front panel display (110) F (remote sensor) (9) G PHONES jack (37) H VOLUME control (37) I AUDIO IN/A.CAL MIC jack (24, 34) J DISC 1-5 buttons/indicators (37) K Disc tray (37) 108US
Index to Parts and Controls For more information, refer to the pages indicated in parentheses. Front panel A "/1 (on/standby) (37) B A (open/close) (37) C Disc operation (37) D FUNCTION (37) E Front panel display (110) F (remote sensor) (9) G PHONES jack (37) H VOLUME control (37) I AUDIO IN/A.CAL MIC jack (24, 34) J DISC 1-5 buttons/indicators (37) K Disc tray (37) 108US

Operating Instructions
Page 115
... on the selected function. 5)Appears when the wireless kit WAHT-SD1 is installed. Additional Information 115US System menu MEMORY1) FM MODE2) NAME IN3) SLEEP DIMMER ILLUM MODE DEMO ATTENUATE4) SL SR REV5) CHILD LOCK MEMORY 1-20 (FM), MEMORY 1-10 (AM), MEMORY 1-30 (...," "TUNER AM," or "XM" only. 2)Appears during "TUNER FM" only. 3)Appears during "TUNER FM" or "TUNER AM" only. 4)"ATTENUATE" may not appear, depending on the remote.
... on the selected function. 5)Appears when the wireless kit WAHT-SD1 is installed. Additional Information 115US System menu MEMORY1) FM MODE2) NAME IN3) SLEEP DIMMER ILLUM MODE DEMO ATTENUATE4) SL SR REV5) CHILD LOCK MEMORY 1-20 (FM), MEMORY 1-10 (AM), MEMORY 1-30 (...," "TUNER AM," or "XM" only. 2)Appears during "TUNER FM" only. 3)Appears during "TUNER FM" or "TUNER AM" only. 4)"ATTENUATE" may not appear, depending on the remote.

Operating Instructions
Page 117
R Radio 66 Radio Stations 65 Rear Panel 109 Region Code 8, 105 Remote 9, 72 Repeat Play 51 RESET 87 Resume Play 47 S S VIDEO 31 Scan 45 SCENE 46 Scene 105 SCREEN SAVER 89 SCREEN SETUP 88 Searching 45 ... FORMATION 82 SPEAKER SETUP 92 CONNECTION 92 DISTANCE 92, 93 LEVEL 93 STB SYNCHRO 90 SUBTITLE 57, 88 SYSTEM MENU 27, 38, 39, 66, 75, 76, 78 System menu list 115 T TEST TONE 93 THEATRE SYNC 73 TIME/TEXT 46 TITLE 46 Title 105 TRACK 46 Track 105 TRACK SELECTION 91 Troubleshooting 96...
R Radio 66 Radio Stations 65 Rear Panel 109 Region Code 8, 105 Remote 9, 72 Repeat Play 51 RESET 87 Resume Play 47 S S VIDEO 31 Scan 45 SCENE 46 Scene 105 SCREEN SAVER 89 SCREEN SETUP 88 Searching 45 ... FORMATION 82 SPEAKER SETUP 92 CONNECTION 92 DISTANCE 92, 93 LEVEL 93 STB SYNCHRO 90 SUBTITLE 57, 88 SYSTEM MENU 27, 38, 39, 66, 75, 76, 78 System menu list 115 T TEST TONE 93 THEATRE SYNC 73 TIME/TEXT 46 TITLE 46 Title 105 TRACK 46 Track 105 TRACK SELECTION 91 Troubleshooting 96...
Operating Instructions
Page 119
...52) CATEGORY +/- wg (68) CATEGORY MODE 5 (68) CLEAR ef (46, 67, 73, 87) D.TUNING wf (66) DISC SKIP 3 (37) DISPLAY ws (54, 67) DVD MENU 6 (52) DVD TOP MENU es (52) DYNAMIC BASS wd (75) ENTER* 4 (24, 27, 39, 46, 65, 79) FUNCTION 2 (32, 37, 39, 47, 65, 82) MOVIE/... +/- Z PICTURE NAVI qh (47, 73) PRESET +/- 8 qd (66) SLEEP eh (75) SOUND FIELD +/-** 0 (42) SUBTITLE wf (57) SYSTEM MENU 7 (27, 39, 76, 115) THEATRE SYNC wa (74) TOOLS 7 (72) TUNING +/- Remote control ALPHABETICAL ORDER A - wh (45) / e; Use the tactile dots as the button. qa (37, 66, 93) BUTTON DESCRIPTIONS [/1 (on/standby...
...52) CATEGORY +/- wg (68) CATEGORY MODE 5 (68) CLEAR ef (46, 67, 73, 87) D.TUNING wf (66) DISC SKIP 3 (37) DISPLAY ws (54, 67) DVD MENU 6 (52) DVD TOP MENU es (52) DYNAMIC BASS wd (75) ENTER* 4 (24, 27, 39, 46, 65, 79) FUNCTION 2 (32, 37, 39, 47, 65, 82) MOVIE/... +/- Z PICTURE NAVI qh (47, 73) PRESET +/- 8 qd (66) SLEEP eh (75) SOUND FIELD +/-** 0 (42) SUBTITLE wf (57) SYSTEM MENU 7 (27, 39, 76, 115) THEATRE SYNC wa (74) TOOLS 7 (72) TUNING +/- Remote control ALPHABETICAL ORDER A - wh (45) / e; Use the tactile dots as the button. qa (37, 66, 93) BUTTON DESCRIPTIONS [/1 (on/standby...


