
Child Safety: It Makes A Difference Where Your TV Stands
Page 1
...manufacturer's instructions and product safety notices. 4 Don't allow children to climb on or play with your home. Child Safety: It Makes A Difference Where Your TV Stands The Issue If you are like most ...speakers, chests or carts. Tune Into Safety 1 One size does NOT fit all. Thank you have a television in fact, have more than one television. The Consumer Electronics Association formed the Home Entertainment Support Safety Committee comprised of television and consumer electronics furniture manufacturers to making home entertainment enjoyable and safe. The home theater...
...manufacturer's instructions and product safety notices. 4 Don't allow children to climb on or play with your home. Child Safety: It Makes A Difference Where Your TV Stands The Issue If you are like most ...speakers, chests or carts. Tune Into Safety 1 One size does NOT fit all. Thank you have a television in fact, have more than one television. The Consumer Electronics Association formed the Home Entertainment Support Safety Committee comprised of television and consumer electronics furniture manufacturers to making home entertainment enjoyable and safe. The home theater...
HDMI Control Guide
Page 2
...button on the TV's remote, the system turns off automatically. For details on the remote while the HDMI CONTROL function is set for DVD input mode automatically. - System Power Off: When you turn [HDMI... operating instructions supplied with Sony's HDMI CONTROL function. - HDMI CONTROL is a mutual control function standard used by the HDMI cord (not supplied), you connect this system to products featuring 'BRAVIA...input selector on your TV (which is connected to your TV so that this system's speakers. - Note • Displayed items vary depending on the connected component, the...
...button on the TV's remote, the system turns off automatically. For details on the remote while the HDMI CONTROL function is set for DVD input mode automatically. - System Power Off: When you turn [HDMI... operating instructions supplied with Sony's HDMI CONTROL function. - HDMI CONTROL is a mutual control function standard used by the HDMI cord (not supplied), you connect this system to products featuring 'BRAVIA...input selector on your TV (which is connected to your TV so that this system's speakers. - Note • Displayed items vary depending on the connected component, the...
HDMI Control Guide
Page 4
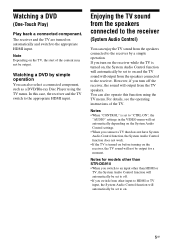
... picture is highlighted) or return to the TV mode while watching the TV and a DVD by PAP (picture and picture) mode, the DVD playback will stop. • To output the sound from the system speakers. You place a DVD disc on the model, "TV/VIDEO" appears), TV sound is output from the TV, set... to "DVD" when you insert a disc in the system whose power is standby, the TV turns on regardless of the system. 4US However, when you turn on the ...
... picture is highlighted) or return to the TV mode while watching the TV and a DVD by PAP (picture and picture) mode, the DVD playback will stop. • To output the sound from the system speakers. You place a DVD disc on the model, "TV/VIDEO" appears), TV sound is output from the TV, set... to "DVD" when you insert a disc in the system whose power is standby, the TV turns on regardless of the system. 4US However, when you turn on the ...
HDMI Control Guide
Page 5
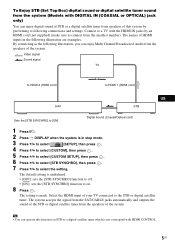
... the signal from the SAT/CABLE jacks automatically and outputs the sound of the STB or digital satellite tuner from the speakers of the system. Select the HDMI input of your TV connected to on STB or a digital satellite tuner which is made. The names of HDMI inputs in... SYNCHRO], then press . 7 Press X/x to connect from the smallest number). Video signal Sound signal TV to HDMI 2 (HDMI cord) to HDMI 1 (HDMI cord) GUSB DAV STB Sets the [STB SYNCHRO] to following illustration are examples. To Enjoy STB (Set Top Box) digital sound or digital satellite tuner sound from the...
... the signal from the SAT/CABLE jacks automatically and outputs the sound of the STB or digital satellite tuner from the speakers of the system. Select the HDMI input of your TV connected to on STB or a digital satellite tuner which is made. The names of HDMI inputs in... SYNCHRO], then press . 7 Press X/x to connect from the smallest number). Video signal Sound signal TV to HDMI 2 (HDMI cord) to HDMI 1 (HDMI cord) GUSB DAV STB Sets the [STB SYNCHRO] to following illustration are examples. To Enjoy STB (Set Top Box) digital sound or digital satellite tuner sound from the...
HDMI Control Guide
Page 2
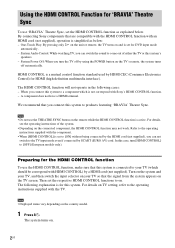
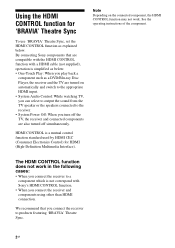
... CONTROL function for HDMI (High-Definition Multimedia Interface). By connecting Sony components that you play back a component such as explained below : • One-Touch Play: When you connect the receiver to the receiver. • System Power Off: When you turn off simultaneously. The HDMI CONTROL ... function as a DVD/Blu-ray Disc Player, the receiver and the TV are turned on automatically and switch to the appropriate HDMI input. • System Audio Control: While watching TV, you can select to output the sound from the TV speaker or the speakers connected to products featuring...
... CONTROL function for HDMI (High-Definition Multimedia Interface). By connecting Sony components that you play back a component such as explained below : • One-Touch Play: When you connect the receiver to the receiver. • System Power Off: When you turn off simultaneously. The HDMI CONTROL ... function as a DVD/Blu-ray Disc Player, the receiver and the TV are turned on automatically and switch to the appropriate HDMI input. • System Audio Control: While watching TV, you can select to output the sound from the TV speaker or the speakers connected to products featuring...
HDMI Control Guide
Page 3
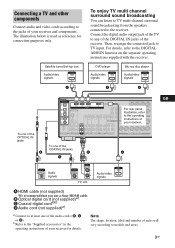
...TV input. Then, reassign the connected jack to the "Supplied accessories" in the operating instructions of your receiver for connection purposes only. DVD player Blu-ray disc player Audio/video signals Audio/video signals A A To one of the OPTICAL IN jacks B DIGITAL (ASSIGNABLE) SAT IN VIDEO 2/ BD...CD-R TV R R R AUDIO IN AUDIO IN AUDIO OUT AUDIO IN AUDIO OUT AUDIO IN AUDIO OUT SAT DVD VIDEO 2/BD VIDEO 1 SUB WOOFER CENTER R SURROUND BACK SPEAKERS R SURROUND To one of DVD IN VIDEO 1 IN MONITOR OUT L L your receiver and components. Audio/video signals A HDMI cable (not ...
...TV input. Then, reassign the connected jack to the "Supplied accessories" in the operating instructions of your receiver for connection purposes only. DVD player Blu-ray disc player Audio/video signals Audio/video signals A A To one of the OPTICAL IN jacks B DIGITAL (ASSIGNABLE) SAT IN VIDEO 2/ BD...CD-R TV R R R AUDIO IN AUDIO IN AUDIO OUT AUDIO IN AUDIO OUT AUDIO IN AUDIO OUT SAT DVD VIDEO 2/BD VIDEO 1 SUB WOOFER CENTER R SURROUND BACK SPEAKERS R SURROUND To one of DVD IN VIDEO 1 IN MONITOR OUT L L your receiver and components. Audio/video signals A HDMI cable (not ...
HDMI Control Guide
Page 5
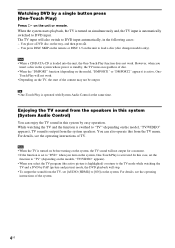
... also select a connected component, such as a DVD/Blu-ray Disc Player using the TV menu. Notes for a moment. In this function using the TV menu. If you turn off . • If you connect a TV that does not have System Audio Control function, the System Audio Control function does not work. •... may not be set to on the TV, the start of the TV. Watching a DVD (One-Touch Play) Play back a connected component. Enjoying the TV sound from the speakers connected to the receiver (System Audio Control) You can enjoy the TV sound from other than STR-DG910 • When...
... also select a connected component, such as a DVD/Blu-ray Disc Player using the TV menu. Notes for a moment. In this function using the TV menu. If you turn off . • If you connect a TV that does not have System Audio Control function, the System Audio Control function does not work. •... may not be set to on the TV, the start of the TV. Watching a DVD (One-Touch Play) Play back a connected component. Enjoying the TV sound from the speakers connected to the receiver (System Audio Control) You can enjoy the TV sound from other than STR-DG910 • When...
HDMI Control Guide
Page 7
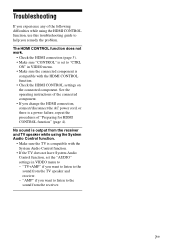
... help you remedy the problem. "AMP" if you want to listen to "CTRL ON" in VIDEO menu to the sound from the TV speaker and receiver. - See the operating instructions of the connected component. • If you change the HDMI connection, connect/disconnect the AC power cord... failure, repeat the procedures of "Preparing for HDMI CONTROL function" (page 4). Troubleshooting If you experience any of the following difficulties while using the System Audio Control function. • Make sure the TV is compatible with the HDMI CONTROL function. • Check the HDMI CONTROL settings on the...
... help you remedy the problem. "AMP" if you want to listen to "CTRL ON" in VIDEO menu to the sound from the TV speaker and receiver. - See the operating instructions of the connected component. • If you change the HDMI connection, connect/disconnect the AC power cord... failure, repeat the procedures of "Preparing for HDMI CONTROL function" (page 4). Troubleshooting If you experience any of the following difficulties while using the System Audio Control function. • Make sure the TV is compatible with the HDMI CONTROL function. • Check the HDMI CONTROL settings on the...
Operating Instructions (DAV-HDX500/HDX501W)
Page 4
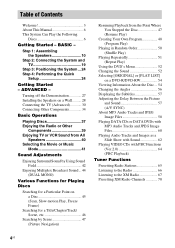
...Contents Welcome 3 About This Manual 6 This System Can Play the Following Discs 6 Getting Started - Turning off the Demonstration 27 Installing the Speakers on a Wall.......... 28 Connecting the TV (Advanced 30 Connecting Other Components 34 Basic Operations Playing Discs 37 Enjoying the Radio or Other Components ... 50 (Shuffle Play) Playing Repeatedly 51 (Repeat Play) Using the DVD's Menu 52 Changing the Sound 52 Selecting [ORIGINAL] or [PLAY LIST] on a DVD-R/DVD-RW 54 Viewing Information About the Disc ... 54 Changing the Angles 56 Displaying the Subtitles 57 Adjusting the ...
...Contents Welcome 3 About This Manual 6 This System Can Play the Following Discs 6 Getting Started - Turning off the Demonstration 27 Installing the Speakers on a Wall.......... 28 Connecting the TV (Advanced 30 Connecting Other Components 34 Basic Operations Playing Discs 37 Enjoying the Radio or Other Components ... 50 (Shuffle Play) Playing Repeatedly 51 (Repeat Play) Using the DVD's Menu 52 Changing the Sound 52 Selecting [ORIGINAL] or [PLAY LIST] on a DVD-R/DVD-RW 54 Viewing Information About the Disc ... 54 Changing the Angles 56 Displaying the Subtitles 57 Adjusting the ...
Operating Instructions (DAV-HDX500/HDX501W)
Page 5
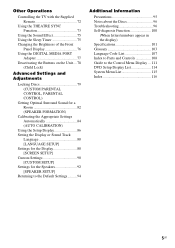
... the Display 88 [SCREEN SETUP] Custom Settings 90 [CUSTOM SETUP] Settings for the Speakers 92 [SPEAKER SETUP] Returning to the Default Settings.......... 94 Additional Information Precautions 95 Notes about the Discs 96 Troubleshooting 96 Self-diagnosis Function 100 (When letters/numbers appear in the display)... Specifications 101 Glossary 103 Language Code List 107 Index to Parts and Controls 108 Guide to the Control Menu Display ... 111 DVD Setup Display List 114 System Menu...
... the Display 88 [SCREEN SETUP] Custom Settings 90 [CUSTOM SETUP] Settings for the Speakers 92 [SPEAKER SETUP] Returning to the Default Settings.......... 94 Additional Information Precautions 95 Notes about the Discs 96 Troubleshooting 96 Self-diagnosis Function 100 (When letters/numbers appear in the display)... Specifications 101 Glossary 103 Language Code List 107 Index to Parts and Controls 108 Guide to the Control Menu Display ... 111 DVD Setup Display List 114 System Menu...
Operating Instructions (DAV-HDX500/HDX501W)
Page 10
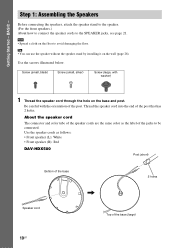
... the base and post. Use the screws illustrated below. About the speaker cord The connector and color tube of the speaker cords are the same color as follows: • Front speaker (L): White • Front speaker (R): Red DAV-HDX500 Post (short) Bottom of the base 2 holes Speaker cord , Top of the jacks to avoid damaging the floor...
... the base and post. Use the screws illustrated below. About the speaker cord The connector and color tube of the speaker cords are the same color as follows: • Front speaker (L): White • Front speaker (R): Red DAV-HDX500 Post (short) Bottom of the base 2 holes Speaker cord , Top of the jacks to avoid damaging the floor...

Operating Instructions (DAV-HDX500/HDX501W)
Page 11
Thread the speaker cord through the hole of the post Post cover , Screw (small, black) continued 11US Speaker cord , Hole Upper part of the post cover. Orient the slot toward you, attach the post cover so that the slot of the post engages with the tab of the post. BASIC - Getting Started - DAV-HDX501W Post (long) Bottom of the base 2 holes , Speaker cord Top of the base (small) 2 Attach the post cover to the other end of the post cover, then secure with the screw.
Thread the speaker cord through the hole of the post Post cover , Screw (small, black) continued 11US Speaker cord , Hole Upper part of the post cover. Orient the slot toward you, attach the post cover so that the slot of the post engages with the tab of the post. BASIC - Getting Started - DAV-HDX501W Post (long) Bottom of the base 2 holes , Speaker cord Top of the base (small) 2 Attach the post cover to the other end of the post cover, then secure with the screw.

Operating Instructions (DAV-HDX500/HDX501W)
Page 12
...Secure 2 screws (large, with washer) in criss-cross pattern. Rear of the speaker , DAV-HDX501W Post cover Be careful the orientation of the speaker cord. Select the speaker whose color of the jack on the rear panel of speaker matches the color tube of the post cover when placing the post. Mounting plate Secure...screws (large, with washer) in the slot of the speaker, slide the post to the end of the slot, then secure the post with the mounting plate and screws. DAV-HDX500 Post cover Be careful the orientation of the speaker , Mounting plate 12US Rear of the post cover when...
...Secure 2 screws (large, with washer) in criss-cross pattern. Rear of the speaker , DAV-HDX501W Post cover Be careful the orientation of the speaker cord. Select the speaker whose color of the jack on the rear panel of speaker matches the color tube of the post cover when placing the post. Mounting plate Secure...screws (large, with washer) in the slot of the speaker, slide the post to the end of the slot, then secure the post with the mounting plate and screws. DAV-HDX500 Post cover Be careful the orientation of the speaker , Mounting plate 12US Rear of the post cover when...

Operating Instructions (DAV-HDX500/HDX501W)
Page 13
When securing the mounting plate, position the mounting plate depending on the desired height of the speaker. continued 13US DAV-HDX500 Low position High position DAV-HDX501W Low position High position After attaching the post to the base, you can adjust the height of the speaker. BASIC - Getting Started -
When securing the mounting plate, position the mounting plate depending on the desired height of the speaker. continued 13US DAV-HDX500 Low position High position DAV-HDX501W Low position High position After attaching the post to the base, you can adjust the height of the speaker. BASIC - Getting Started -
Operating Instructions (DAV-HDX500/HDX501W)
Page 14
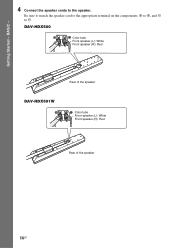
Getting Started - DAV-HDX500 Color tube Front speaker (L): White Front speaker (R): Red Rear of the speaker DAV-HDX501W Color tube Front speaker (L): White Front speaker (R): Red Rear of the speaker 14US Be sure to match the speaker cord to the appropriate terminal on the components: 3 to 3, and # to the speaker. BASIC - 4 Connect the speaker cords to #.
Getting Started - DAV-HDX500 Color tube Front speaker (L): White Front speaker (R): Red Rear of the speaker DAV-HDX501W Color tube Front speaker (L): White Front speaker (R): Red Rear of the speaker 14US Be sure to match the speaker cord to the appropriate terminal on the components: 3 to 3, and # to the speaker. BASIC - 4 Connect the speaker cords to #.
Operating Instructions (DAV-HDX500/HDX501W)
Page 16
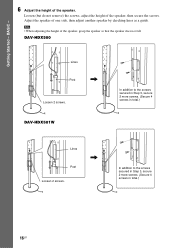
DAV-HDX501W In addition to the screws secured in Step 3, secure 2 more screws. (Secure 4 screws in total.) Lines Post Loosen 2 screws. , In addition to the screws secured in Step 3, secure 2 more screws. (Secure 4 screws in total.) 16US BASIC - 6 Adjust the height of the speaker, then... the screws, adjust the height of the speaker. Adjust the speaker of the speaker, grasp the speaker so that the speaker does not fall. Note • When adjusting the height of one side, then adjust another speaker by checking lines as a guide. DAV-HDX500 Lines Post , Loosen 2 screws. Getting...
DAV-HDX501W In addition to the screws secured in Step 3, secure 2 more screws. (Secure 4 screws in total.) Lines Post Loosen 2 screws. , In addition to the screws secured in Step 3, secure 2 more screws. (Secure 4 screws in total.) 16US BASIC - 6 Adjust the height of the speaker, then... the screws, adjust the height of the speaker. Adjust the speaker of the speaker, grasp the speaker so that the speaker does not fall. Note • When adjusting the height of one side, then adjust another speaker by checking lines as a guide. DAV-HDX500 Lines Post , Loosen 2 screws. Getting...

Operating Instructions (DAV-HDX500/HDX501W)
Page 17
Bottom of the base Adjust the length of the cord. Adjust the length of the cord. continued 17US DAV-HDX501W Take up slack in the speaker cord by running it through the slot. BASIC - 7 Take up slack in the cord clamp. Cord clamp , Secure the speaker cord by pulling from the bottom of the base. Secure the speaker cord by pulling from the bottom of the base and hook the speaker cord in the speaker cord by running it through the slot. DAV-HDX500 Take up any speaker cord slack. Getting Started -
Bottom of the base Adjust the length of the cord. Adjust the length of the cord. continued 17US DAV-HDX501W Take up slack in the speaker cord by running it through the slot. BASIC - 7 Take up slack in the cord clamp. Cord clamp , Secure the speaker cord by pulling from the bottom of the base. Secure the speaker cord by pulling from the bottom of the base and hook the speaker cord in the speaker cord by running it through the slot. DAV-HDX500 Take up any speaker cord slack. Getting Started -
Operating Instructions (DAV-HDX500/HDX501W)
Page 18
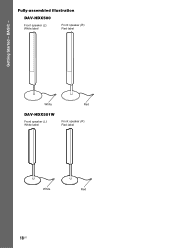
BASIC - White Red DAV-HDX501W Front speaker (L): White label Front speaker (R): Red label White Red 18US Fully-assembled illustration DAV-HDX500 Front speaker (L): White label Front speaker (R): Red label Getting Started -
BASIC - White Red DAV-HDX501W Front speaker (L): White label Front speaker (R): Red label White Red 18US Fully-assembled illustration DAV-HDX500 Front speaker (L): White label Front speaker (R): Red label Getting Started -

Operating Instructions (DAV-HDX500/HDX501W)
Page 19
... TV. To accept progressive signals, see page 30. DAV-HDX500 Front speaker (R) Front speaker (L) Center speaker CENTER WOOFER SPEAKER AC power cord (mains lead) Subwoofer FM wire antenna (aerial) AM loop antenna (aerial) FRONT R FRONT L SUR R SPEAKER SUR L DIR-TC1 COAXIAL OPTICAL DIGITAL IN SAT/CABLE OUT (DVD ONLY) COMPONENT VIDEO IN Y PB/CB PR/CR AM...
... TV. To accept progressive signals, see page 30. DAV-HDX500 Front speaker (R) Front speaker (L) Center speaker CENTER WOOFER SPEAKER AC power cord (mains lead) Subwoofer FM wire antenna (aerial) AM loop antenna (aerial) FRONT R FRONT L SUR R SPEAKER SUR L DIR-TC1 COAXIAL OPTICAL DIGITAL IN SAT/CABLE OUT (DVD ONLY) COMPONENT VIDEO IN Y PB/CB PR/CR AM...

Operating Instructions (DAV-HDX500/HDX501W)
Page 20
... 34) and the operating instructions of the WAHT-SD1. 20US DAV-HDX501W Front speaker (R) Center speaker Front speaker (L) CENTER WOOFER SPEAKER AC power cord (mains lead) FM wire antenna (aerial) AM loop antenna (aerial) FRONT R FRONT L SUR R SPEAKER SUR L DIR-TC1 COAXIAL OPTICAL DIGITAL IN SAT/CABLE OUT (DVD ONLY) COMPONENT VIDEO IN Y PB/CB PR/CR AM...
... 34) and the operating instructions of the WAHT-SD1. 20US DAV-HDX501W Front speaker (R) Center speaker Front speaker (L) CENTER WOOFER SPEAKER AC power cord (mains lead) FM wire antenna (aerial) AM loop antenna (aerial) FRONT R FRONT L SUR R SPEAKER SUR L DIR-TC1 COAXIAL OPTICAL DIGITAL IN SAT/CABLE OUT (DVD ONLY) COMPONENT VIDEO IN Y PB/CB PR/CR AM...


