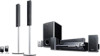
HDMI Control Guide
Page 5
... made. The setting is in the following illustration, you can enjoy Multi Channel Broadcasted Audio from the speakers of the system. The system accepts the signal from the SAT/CABLE jacks automatically and outputs the sound of the STB or digital satellite tuner from the speakers of your ...TV connected to the STB or digital satellite tuner. Video signal Sound signal TV to HDMI 2 (HDMI cord) to HDMI 1 (HDMI cord) GUSB DAV STB Sets...
Operating Instructions (DAV-HDX500/HDX501W)
Page 1
2-895-962-11(2) DVD Home Theatre System Operating Instructions DAV-HDX500/HDX501W ©2007 Sony Corporation
Operating Instructions (DAV-HDX500/HDX501W)
Page 2
..., such as radiators, heat registers, stoves, or other . To prevent fire or shock hazard, do not expose this product. DAV-HDX500/DAV-HDX501W Serial No 2US WARNING This equipment has been tested and found to comply with one or more of the following measures: - If...product's enclosure that any changes or modifications not expressly approved in this manual could void your outlet, consult an electrician for your Sony dealer regarding this apparatus to the presence of important operating and maintenance (servicing) instructions in a particular installation. Do not install ...
Operating Instructions (DAV-HDX500/HDX501W)
Page 6
... CDs/DVDs The system can also use the controls on the unit if they have the same or similar names as a general term for DVD VIDEOs, DVD+RWs/DVD+Rs, and DVD-RWs/DVD-Rs. • Measurements are for DAVHDX500 and DAV-HDX501W. audio CD format - MP3 audio tracks and JPEG image files of discs DVD VIDEO Disc logo DVD-RW/ DVD-R DVD+RW/ DVD+R VIDEO...
Operating Instructions (DAV-HDX500/HDX501W)
Page 10
... speaker cord The connector and color tube of the speaker cords are the same color as follows: • Front speaker (L): White • Front speaker (R): Red DAV-HDX500 Post (short) Bottom of the base 2 holes Speaker cord , Top of the post that has 2 holes. Step 1: Assembling the Speakers Before connecting the speakers...
Operating Instructions (DAV-HDX500/HDX501W)
Page 11
Thread the speaker cord through the hole of the post Post cover , Screw (small, black) continued 11US Speaker cord , Hole Upper part of the post cover. DAV-HDX501W Post (long) Bottom of the base 2 holes , Speaker cord Top of the base (small) 2 Attach the post cover to the other end of the post cover, then secure with the tab of the post. Getting Started - BASIC - Orient the slot toward you, attach the post cover so that the slot of the post engages with the screw.
Operating Instructions (DAV-HDX500/HDX501W)
Page 12
... rear panel of speaker matches the color tube of the speaker , Mounting plate 12US Rear of the speaker , DAV-HDX501W Post cover Be careful the orientation of the post cover when placing the post. DAV-HDX500 Post cover Be careful the orientation of the post cover when placing the post. Getting Started - BASIC...
Operating Instructions (DAV-HDX500/HDX501W)
Page 13
DAV-HDX500 Low position High position DAV-HDX501W Low position High position After attaching the post to the base, you can adjust the height of the speaker. continued 13US BASIC - When securing the mounting plate, position the mounting plate depending on the desired height of the speaker. Getting Started -
Operating Instructions (DAV-HDX500/HDX501W)
Page 14
BASIC - 4 Connect the speaker cords to #. DAV-HDX500 Color tube Front speaker (L): White Front speaker (R): Red Rear of the speaker DAV-HDX501W Color tube Front speaker (L): White Front speaker (R): Red Rear of the speaker 14US Getting Started - Be sure to match the speaker cord to the appropriate terminal on the components: 3 to 3, and # to the speaker.
Operating Instructions (DAV-HDX500/HDX501W)
Page 15
Insert the post so that the slot on the lower part of the post aligns with the projection of the base, then secure the post with the projection of the base by rotating the post slightly. DAV-HDX500 Getting Started - BASIC - Post Slit Projection Base DAV-HDX501W , Screws (small, silver) Post Slit Projection Base , Screws (small, silver) Note • Make sure that the slit on the post aligns with the 2 screws. 5 Attach the post to the base. continued 15US
Operating Instructions (DAV-HDX500/HDX501W)
Page 16
... by checking lines as a guide. Getting Started - Adjust the speaker of the speaker, grasp the speaker so that the speaker does not fall. DAV-HDX500 Lines Post , Loosen 2 screws. DAV-HDX501W In addition to the screws secured in Step 3, secure 2 more screws. (Secure 4 screws in total.) Lines Post Loosen 2 screws. , In addition to...
Operating Instructions (DAV-HDX500/HDX501W)
Page 17
Cord clamp , Secure the speaker cord by pulling from the bottom of the base and hook the speaker cord in the cord clamp. Adjust the length of the cord. DAV-HDX500 Take up slack in the speaker cord by running it through the slot. Bottom of the base Adjust the length of the cord. BASIC - 7 Take up slack in the speaker cord by running it through the slot. Secure the speaker cord by pulling from the bottom of the base. DAV-HDX501W Take up any speaker cord slack. continued 17US Getting Started -
Operating Instructions (DAV-HDX500/HDX501W)
Page 18
White Red DAV-HDX501W Front speaker (L): White label Front speaker (R): Red label White Red 18US Fully-assembled illustration DAV-HDX500 Front speaker (L): White label Front speaker (R): Red label Getting Started - BASIC -
Operating Instructions (DAV-HDX500/HDX501W)
Page 19
Step 2: Connecting the System and TV The following pages. To accept progressive signals, see page 34. For other TV connections, see page 30. DAV-HDX500 Front speaker (R) Front speaker (L) Center speaker CENTER WOOFER SPEAKER AC power cord (mains lead) Subwoofer FM wire antenna ...(aerial) AM loop antenna (aerial) FRONT R FRONT L SUR R SPEAKER SUR L DIR-TC1 COAXIAL OPTICAL DIGITAL IN SAT/CABLE OUT (DVD ONLY) COMPONENT ...
Operating Instructions (DAV-HDX500/HDX501W)
Page 20
For details, see "Connecting Other Components" (page 34) and the operating instructions of the WAHT-SD1. 20US Getting Started - DAV-HDX501W Front speaker (R) Center speaker Front speaker (L) CENTER WOOFER SPEAKER AC power cord (mains lead) FM wire antenna (aerial) AM loop antenna (...DVD ONLY) Y PB/CB PR/CR COMPONENT VIDEO OUT VIDEO MONITOR OUT R AUDIO IN L TV XM DMPORT1 FM 75 COAXIAL ANTENNA DMPORT2 Subwoofer AB VIDEO IN AUDIO OUT L R TV Surround speaker (R) :Signal flow Surround speaker (L) Tip • When you install the wireless kit WAHT-SD1 (supplied with DAV-HDX501W...
Operating Instructions (DAV-HDX500/HDX501W)
Page 25
... [YES]. AUDIO IN / A.CAL MIC Calibration mic STANDARD continued 25US x If you have a wide-screen TV or a 4:3 standard TV with DAV-HDX501W only) is installed, [STANDARD (WIRELESS)] appears instead. 10 Press . 11 Connect the calibration mic to the A.CAL MIC jack on the front ... AUDIO: SUBTITLE: ENGLISH ENGLISH FRENCH SPANISH PORTUGUESE 5 Press X/x to select the speaker formation image as the speakers are actually positioned. The system displays the menu and subtitles in the selected language. 6 Press . For details, see "Getting Optimal Surround Sound for selecting the speaker ...
Operating Instructions (DAV-HDX500/HDX501W)
Page 28
... (13/32 inch) 28US Rear of speaker For the center speaker 265 mm (10 7/16 inches) 6 to 9 mm (1/4 to 3/8 inch) For the front speakers of DAV-HDX500 6 to 9 mm (1/4 to 3/8 inch) 170 mm (6 23/32 inches) For the front speakers of DAVHDX501W 6 to 9 mm (1/4 to 3/8 inch) 100 mm (3 15/16 inches...
Operating Instructions (DAV-HDX500/HDX501W)
Page 36
Note • Be sure to make connections securely to avoid hum and noise. • When you connect another component with DAV-HDX501W only) in the DIR-TC1 slot, you install the WAHT-SD1 (supplied with a volume control, turn up the volume of the other components to the ...appropriate jacks on the components. Green Blue Red Wireless system option When you can enjoy wireless performance by transmission of the sound to a level where sound is not distorted. 36US To connect the COMPONENT VIDEO...
Operating Instructions (DAV-HDX500/HDX501W)
Page 83
Note • When the wireless kit WAHT-SD1 (supplied with DAV-HDX501W only) is the same as that of the front and surround speakers. Note • Speaker sound in front of the listening position. 5 Press C/c to select a ...
Operating Instructions (DAV-HDX500/HDX501W)
Page 84
...The setting is made. 7 Press X/x to children and neighbor. 1 Press FUNCTION repeatedly until "DVD" appears in the front panel display. 2 Press DISPLAY when the system is output when [AUTO CALIBRATION] starts. It does not indicate the speakers which output sound. ... then press . 1 ( 4 4 ) 3 ( 2 8 ) T 0:03:04 SPEAKER FORMATION SPEAKER FORMATION AUTO CALIBRATION DVD VIDEO 4 Press X/x to [STANDARD]. Tip • When the wireless kit WAHT-SD1 (supplied with DAV-HDX501W only) is recommended you set [SPEAKER FORMATION], and then set [AUTO CALIBRATION]. • To set the appropriate surround...