
Child Safety: It Makes A Difference Where Your TV Stands
Page 1
... such as VCRs and remotes that may cause unnecessary injury. Thank you have more than one television. The industry is committed to advocate children's safety and educate customers and their families about television safety. Many homes, in fact, have a television in your family and friends. The Industry Cares! The home theater entertainment experience is...
... such as VCRs and remotes that may cause unnecessary injury. Thank you have more than one television. The industry is committed to advocate children's safety and educate customers and their families about television safety. Many homes, in fact, have a television in your family and friends. The Industry Cares! The home theater entertainment experience is...

Operating Instructions
Page 4
... Play the Following Discs 6 Guide to the Control Menu Display........ 9 Getting Started Unpacking 12 Inserting Batteries into the Remote....... 12 Hookup Overview 13 Step 1: Speaker System Hookup........... 14 Step 2: Antenna (Aerial) Hookup ......... 18 Step 3: TV Hookup 19 Step 4: Other Component Hookup........ 24 Step 5: ... 25 Step 7: Performing the Quick Setup ..... 26 Speaker Setup 28 Playing Discs Playing Discs 29 Using the DVD's Menu 33 Selecting [ORIGINAL] or [PLAY LIST] on a DVD-RW 34 Playing VIDEO CDs with PBC Functions (Ver.2.0 34 (PBC Playback) About MP3 Audio Tracks and ...
... Play the Following Discs 6 Guide to the Control Menu Display........ 9 Getting Started Unpacking 12 Inserting Batteries into the Remote....... 12 Hookup Overview 13 Step 1: Speaker System Hookup........... 14 Step 2: Antenna (Aerial) Hookup ......... 18 Step 3: TV Hookup 19 Step 4: Other Component Hookup........ 24 Step 5: ... 25 Step 7: Performing the Quick Setup ..... 26 Speaker Setup 28 Playing Discs Playing Discs 29 Using the DVD's Menu 33 Selecting [ORIGINAL] or [PLAY LIST] on a DVD-RW 34 Playing VIDEO CDs with PBC Functions (Ver.2.0 34 (PBC Playback) About MP3 Audio Tracks and ...

Operating Instructions
Page 6
audio CD format - video CD format - Note about CDs The system can also use the controls on the system if they have the same or similar names as a general term for DVD VIDEOs, DVD+RWs/DVD+Rs, and DVD-RWs/DVD-Rs. • Measurements are expressed in feet (ft) for DATA CDs (CD-ROMs/...format, Joliet Example of discs that the system cannot play The system cannot play CD-ROMs/CD-Rs/CDRWs recorded in the formats listed on the remote. Symbol Meaning Functions available for DVD VIDEOs, DVD-Rs/DVD-RWs in video mode, and DVD+Rs/ DVD+RWs Functions available for DVD-RWs in VR (Video Recording) mode...
audio CD format - video CD format - Note about CDs The system can also use the controls on the system if they have the same or similar names as a general term for DVD VIDEOs, DVD+RWs/DVD+Rs, and DVD-RWs/DVD-Rs. • Measurements are expressed in feet (ft) for DATA CDs (CD-ROMs/...format, Joliet Example of discs that the system cannot play The system cannot play CD-ROMs/CD-Rs/CDRWs recorded in the formats listed on the remote. Symbol Meaning Functions available for DVD VIDEOs, DVD-Rs/DVD-RWs in video mode, and DVD+Rs/ DVD+RWs Functions available for DVD-RWs in VR (Video Recording) mode...

Operating Instructions
Page 12
...of time, remove the batteries to avoid possible damage from the sun or lighting apparatus. When using the supplied remote. Insert two Size AA (R6) batteries by matching the 3 and # ends on the system. Getting Started Unpacking Check that you do not intend to use a new battery with an old one. ...• Do not drop any foreign object into the Remote You can control the system using the remote, point it at the remote sensor on the batteries to the markings...
...of time, remove the batteries to avoid possible damage from the sun or lighting apparatus. When using the supplied remote. Insert two Size AA (R6) batteries by matching the 3 and # ends on the system. Getting Started Unpacking Check that you do not intend to use a new battery with an old one. ...• Do not drop any foreign object into the Remote You can control the system using the remote, point it at the remote sensor on the batteries to the markings...
Operating Instructions
Page 25
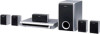
...Power Cord (Mains Lead) Before connecting the AC power cord (mains lead) of this system to a wall outlet (mains), connect the speakers to off, then press "/1 on the remote. When you press "/1 on the system Press "/1. After connecting the AC power cord (mains lead), the demonstration appears in ...DEMO" appears in the front panel display, then press ENTER or c. 3 Press X/x to on, the demonstration does not turn on the remote, the demonstration turns off the system, first press x to stop playback and then press "/1. While playing a disc, do not turn off . Doing so may cancel the menu...
...Power Cord (Mains Lead) Before connecting the AC power cord (mains lead) of this system to a wall outlet (mains), connect the speakers to off, then press "/1 on the remote. When you press "/1 on the system Press "/1. After connecting the AC power cord (mains lead), the demonstration appears in ...DEMO" appears in the front panel display, then press ENTER or c. 3 Press X/x to on, the demonstration does not turn on the remote, the demonstration turns off the system, first press x to stop playback and then press "/1. While playing a disc, do not turn off . Doing so may cancel the menu...
Operating Instructions
Page 59
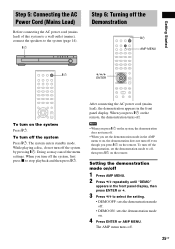
... pressing the TV button Adjust the TV volume. To select the TV channels, press the number buttons, then ENTER. TV CH -/+ Controlling TVs with the remote To control the TV You can control your TV or to use some of the buttons above. while pressing the TV button 59GB Other Operations... +/- TV VOL +/- TV ?/1 TV/VIDEO You can TV [/1 Turn the TV on the TV, you may not be able to control your TV (SONY only) with the Supplied Remote You can control the TV by using following buttons. while Select the TV channel. pressing the TV button Number buttons Select the TV...
... pressing the TV button Adjust the TV volume. To select the TV channels, press the number buttons, then ENTER. TV CH -/+ Controlling TVs with the remote To control the TV You can control your TV or to use some of the buttons above. while pressing the TV button 59GB Other Operations... +/- TV VOL +/- TV ?/1 TV/VIDEO You can TV [/1 Turn the TV on the TV, you may not be able to control your TV (SONY only) with the Supplied Remote You can control the TV by using following buttons. while Select the TV channel. pressing the TV button Number buttons Select the TV...
Operating Instructions
Page 60
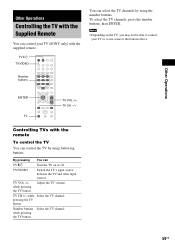
...TV CH + Preparing for the THEATRE SYNC function Point the remote to the direction of your TV. The TV's input source is selected. The transmit time varies depending on your TV's input to the input you used to connect the system. Operating for the THEATRE SYNC function Register the TV's ...input source connected to this system, changes the system mode to "DVD," and then switches the TV's input source you set with one button push. Set your SONY TV and this system. Press and hold TV CH + while entering the code for transmit time (...
...TV CH + Preparing for the THEATRE SYNC function Point the remote to the direction of your TV. The TV's input source is selected. The transmit time varies depending on your TV's input to the input you used to connect the system. Operating for the THEATRE SYNC function Register the TV's ...input source connected to this system, changes the system mode to "DVD," and then switches the TV's input source you set with one button push. Set your SONY TV and this system. Press and hold TV CH + while entering the code for transmit time (...

Operating Instructions
Page 61
... the connected component You can use a VCR or other components connected to "ATT ON." DVD t TUNER FM t TUNER AM t VIDEO t DVD t ... For details on some SONY TVs.) • If distance between TV and this system is set to the VIDEO/SAT jacks on the operation. Press FUNCTION repeatedly until "VIDEO".... DVD t TUNER FM t TUNER AM t SAT t DVD t ... When "ATTENUATE" is too far, this system while entering the code. Refer to "ATT OFF." Each time you press FUNCTION, the mode of the TV and this function may not work . Install the system near the TV. • Keep the remote pointed...
... the connected component You can use a VCR or other components connected to "ATT ON." DVD t TUNER FM t TUNER AM t VIDEO t DVD t ... For details on some SONY TVs.) • If distance between TV and this system is set to the VIDEO/SAT jacks on the operation. Press FUNCTION repeatedly until "VIDEO".... DVD t TUNER FM t TUNER AM t SAT t DVD t ... When "ATTENUATE" is too far, this system while entering the code. Refer to "ATT OFF." Each time you press FUNCTION, the mode of the TV and this function may not work . Install the system near the TV. • Keep the remote pointed...
Operating Instructions
Page 72
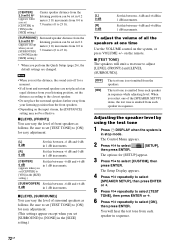
... to the closest speaker. • Do not place the surround speakers farther away from your listening position than the front speakers. • Depending on the remote. Set this between -6 dB and +6 dB in sequence. x [LEVEL (FRONT)] You can vary the level of surround speakers as follows. x [LEVEL .... When you select one of all front and surround speakers are changed. Adjusting the speaker level by using the test tone 1 Press DISPLAY when the system is emitted from each speaker in 1 dB increments. Be sure to set [TEST TONE] to [ON] for [SETUP] appear. 3 Press X/x to...
... to the closest speaker. • Do not place the surround speakers farther away from your listening position than the front speakers. • Depending on the remote. Set this between -6 dB and +6 dB in sequence. x [LEVEL (FRONT)] You can vary the level of surround speakers as follows. x [LEVEL .... When you select one of all front and surround speakers are changed. Adjusting the speaker level by using the test tone 1 Press DISPLAY when the system is emitted from each speaker in 1 dB increments. Be sure to set [TEST TONE] to [ON] for [SETUP] appear. 3 Press X/x to...
Operating Instructions
Page 76
... motor, and at the remote sensor on the DVD, the output signal may come from the audio components. • The plugs and jacks are obstacles between the remote and the system. • The distance between the remote and the system is too far. • The remote is performed. The remote does not function. •... settings. • Make sure the sound field function is on (page 51). • Depending on the DVD does not match the system. • Moisture has condensed inside the system and may be less noticeable. Insert the disc with the playback side facing down . Remove the disc If ...
... motor, and at the remote sensor on the DVD, the output signal may come from the audio components. • The plugs and jacks are obstacles between the remote and the system. • The distance between the remote and the system is too far. • The remote is performed. The remote does not function. •... settings. • Make sure the sound field function is on (page 51). • Depending on the DVD does not match the system. • Moisture has condensed inside the system and may be less noticeable. Insert the disc with the playback side facing down . Remove the disc If ...

Operating Instructions
Page 77
... (page 67). A disc cannot be turned off. • The DVD prohibits turning off , then on. While playing such a disc, the system stops playback at the auto pause signal. The language for the on the system or the remote and then start playing from the beginning. • Program play is broken...may contain an auto pause signal. During stop, press x on -screen display in the front panel display. • Contact your Sony dealer or local authorized Sony service facility. [Data error] appears on the TV screen. See the operating manual that conforms to ISO 9660 Level 1/Level 2 or...
... (page 67). A disc cannot be turned off. • The DVD prohibits turning off , then on. While playing such a disc, the system stops playback at the auto pause signal. The language for the on the system or the remote and then start playing from the beginning. • Program play is broken...may contain an auto pause signal. During stop, press x on -screen display in the front panel display. • Contact your Sony dealer or local authorized Sony service facility. [Data error] appears on the TV screen. See the operating manual that conforms to ISO 9660 Level 1/Level 2 or...
Operating Instructions
Page 84
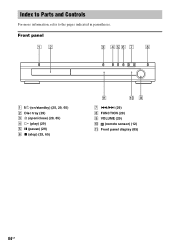
Front panel A "/1 (on/standby) (25, 29, 65) B Disc tray (29) C A (open/close) (29, 65) D H (play) (29) E X (pause) (29) F x (stop) (29, 65) G ./> (29) H FUNCTION (29) I VOLUME (29) J (remote sensor) (12) K Front panel display (85) 84GB Index to Parts and Controls For more information, refer to the pages indicated in parentheses.
Front panel A "/1 (on/standby) (25, 29, 65) B Disc tray (29) C A (open/close) (29, 65) D H (play) (29) E X (pause) (29) F x (stop) (29, 65) G ./> (29) H FUNCTION (29) I VOLUME (29) J (remote sensor) (12) K Front panel display (85) 84GB Index to Parts and Controls For more information, refer to the pages indicated in parentheses.

Operating Instructions
Page 87
... ADVANCE, STEP (29) eh M/ SLOW, TUNING + (42, 62) ej x (stop) (29, 55, 63) ek X (pause) (29) * Use the tactile dot as a reference when operating the system. 87GB Remote A TV [/1 (on /standby) (25, 29, 63) T AMP MENU (25, 61, 65) U DSGX (53) V FUNCTION (20, 29, 53, 61) W SOUND FIELD (51) X DISPLAY (63) Y PICTURE...
... ADVANCE, STEP (29) eh M/ SLOW, TUNING + (42, 62) ej x (stop) (29, 55, 63) ek X (pause) (29) * Use the tactile dot as a reference when operating the system. 87GB Remote A TV [/1 (on /standby) (25, 29, 63) T AMP MENU (25, 61, 65) U DSGX (53) V FUNCTION (20, 29, 53, 61) W SOUND FIELD (51) X DISPLAY (63) Y PICTURE...
Operating Instructions
Page 90
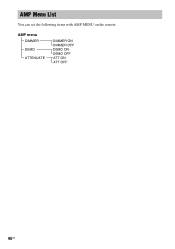
AMP menu DIMMER DEMO ATTENUATE DIMMER ON DIMMER OFF DEMO ON DEMO OFF ATT ON ATT OFF 90GB AMP Menu List You can set the following items with AMP MENU on the remote.
AMP menu DIMMER DEMO ATTENUATE DIMMER ON DIMMER OFF DEMO ON DEMO OFF ATT ON ATT OFF 90GB AMP Menu List You can set the following items with AMP MENU on the remote.
Operating Instructions
Page 91
...70 B BACKGROUND 69 Batteries 12 BLACK LEVEL 69 BLACK LEVEL (COMPONENT OUT) 69 C CHAPTER 43 Chapter 80 COLOR SYSTEM 68 COMPONENT VIDEO OUT 20 Connecting the AC power cord (mains lead) 25 Continuous play 29 Control Menu 9 Controlling...Digital 80 Dolby Pro Logic II 80 Dolby Surround Pro Logic 80 DSGX 53 DTS 49, 81 DVD 81 DVD+RW 81 DVD's menu 33 DVD-RW 34, 81 E EFFECT 41 F Fast forward 42 Fast reverse 42 FILE 43 File 81... PROGRESSIVE VIDEO 21 Q Quick Setup 26 R Radio 63 Rear Panel 86 Region Code 7, 82 Remote 12, 59, 87 Repeat Play 32 RESET 67 Resume Play 30 S S VIDEO 19 Scan 42 SCENE 43 Scene 82...
...70 B BACKGROUND 69 Batteries 12 BLACK LEVEL 69 BLACK LEVEL (COMPONENT OUT) 69 C CHAPTER 43 Chapter 80 COLOR SYSTEM 68 COMPONENT VIDEO OUT 20 Connecting the AC power cord (mains lead) 25 Continuous play 29 Control Menu 9 Controlling...Digital 80 Dolby Pro Logic II 80 Dolby Surround Pro Logic 80 DSGX 53 DTS 49, 81 DVD 81 DVD+RW 81 DVD's menu 33 DVD-RW 34, 81 E EFFECT 41 F Fast forward 42 Fast reverse 42 FILE 43 File 81... PROGRESSIVE VIDEO 21 Q Quick Setup 26 R Radio 63 Rear Panel 86 Region Code 7, 82 Remote 12, 59, 87 Repeat Play 32 RESET 67 Resume Play 30 S S VIDEO 19 Scan 42 SCENE 43 Scene 82...


