
Child Safety: It Makes A Difference Where Your TV Stands
Page 1
...of television and consumer electronics furniture manufacturers to making home entertainment enjoyable and safe. The Consumer Electronics Association formed the Home Entertainment Support Safety Committee comprised of the home with your home. Sometimes televisions are not always supported on the proper...'s safety and educate customers and their families about television safety. The Industry Cares! The home theater entertainment experience is a Sector of the Electronic Industries Alliance Many homes, in fact, have a television in your family and friends. Tune Into Safety 1 One...
...of television and consumer electronics furniture manufacturers to making home entertainment enjoyable and safe. The Consumer Electronics Association formed the Home Entertainment Support Safety Committee comprised of the home with your home. Sometimes televisions are not always supported on the proper...'s safety and educate customers and their families about television safety. The Industry Cares! The home theater entertainment experience is a Sector of the Electronic Industries Alliance Many homes, in fact, have a television in your family and friends. Tune Into Safety 1 One...

Limited Warranty (US Only)
Page 1
...assistance or resolution of incidental or consequential damages, or allow limitations on how long an implied warranty lasts does not apply to any Sony authorized service facility. This warranty does not cover customer instruction, installation, set up adjustments or signal reception problems. This warranty does... Inc. 4-557-172-02 General Stereo/Hifi Components/Tape Decks ® CD Players/Mini Disc Players/Audio Systems Hifi Audio LIMITED WARRANTY Sony Electronics Inc. ("Sony") warrants this Product is within 90 days of the date of sale, the limitation on how long an implied ...
...assistance or resolution of incidental or consequential damages, or allow limitations on how long an implied warranty lasts does not apply to any Sony authorized service facility. This warranty does not cover customer instruction, installation, set up adjustments or signal reception problems. This warranty does... Inc. 4-557-172-02 General Stereo/Hifi Components/Tape Decks ® CD Players/Mini Disc Players/Audio Systems Hifi Audio LIMITED WARRANTY Sony Electronics Inc. ("Sony") warrants this Product is within 90 days of the date of sale, the limitation on how long an implied ...

Operating Instructions
Page 1
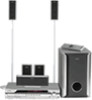
2-661-597-13(1) DVD Home Theatre System Operating Instructions DAV-DX355/DX375 ©2006 Sony Corporation
2-661-597-13(1) DVD Home Theatre System Operating Instructions DAV-DX355/DX375 ©2006 Sony Corporation
Operating Instructions
Page 2
... cover the ventilation of the apparatus with the limits for help. Note to CATV system installer: This reminder is intended to alert the user to the presence of important ...operating and maintenance (servicing) instructions in this manual could void your Sony dealer regarding this equipment. And don't place lighted candles on the apparatus. Refer... or air ducts, or in a particular installation. For the customers in a residential installation. DAV-DX355/DAV-DX375 Serial No WARNING This equipment has been tested and found to comply with news papers, table...
... cover the ventilation of the apparatus with the limits for help. Note to CATV system installer: This reminder is intended to alert the user to the presence of important ...operating and maintenance (servicing) instructions in this manual could void your Sony dealer regarding this equipment. And don't place lighted candles on the apparatus. Refer... or air ducts, or in a particular installation. For the customers in a residential installation. DAV-DX355/DAV-DX375 Serial No WARNING This equipment has been tested and found to comply with news papers, table...

Operating Instructions
Page 3
When you first install the unit, or when you for purchasing Sony DVD Home Theatre System. • Do not install the unit in a horizontal position only. • Keep the unit and discs away from equipment with strong magnets, such as microwave ... before operating the unit. Thank you move it for future reference. 3US It is designed to be operated in an inclined position. Before operating this system, please read this manual thoroughly and retain it from a cold to a warm location, moisture may condense inside the DVD...
When you first install the unit, or when you for purchasing Sony DVD Home Theatre System. • Do not install the unit in a horizontal position only. • Keep the unit and discs away from equipment with strong magnets, such as microwave ... before operating the unit. Thank you move it for future reference. 3US It is designed to be operated in an inclined position. Before operating this system, please read this manual thoroughly and retain it from a cold to a warm location, moisture may condense inside the DVD...
Operating Instructions
Page 4
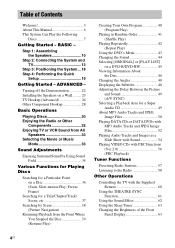
... Using the Sleep Timer 63 Changing the Brightness of Contents Welcome 3 About This Manual 6 This System Can Play the Following Discs 7 Getting Started - Step 1: Assembling the Speakers 10 Step 2: Connecting the System and TV 13 Step 3: Positioning the System ...18 Step 4: Performing the Quick Setup 19 Getting Started - BASIC - ADVANCED - Table of the...
... Using the Sleep Timer 63 Changing the Brightness of Contents Welcome 3 About This Manual 6 This System Can Play the Following Discs 7 Getting Started - Step 1: Assembling the Speakers 10 Step 2: Connecting the System and TV 13 Step 3: Positioning the System ...18 Step 4: Performing the Quick Setup 19 Getting Started - BASIC - ADVANCED - Table of the...
Operating Instructions
Page 5
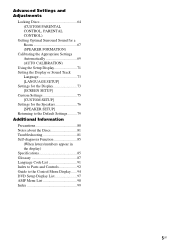
Advanced Settings and Adjustments Locking Discs 64 (CUSTOM PARENTAL CONTROL, PARENTAL CONTROL) Getting Optimal Surround Sound for a Room 67 (SPEAKER FORMATION) Calibrating the Appropriate Settings Automatically 69 (AUTO CALIBRATION) Using the Setup Display 71 Setting the Display or Sound Track Language 73 [LANGUAGE SETUP] Settings for the Display 73 [SCREEN SETUP] Custom Settings 75 [CUSTOM SETUP] Settings for the Speakers 76 [SPEAKER SETUP] Returning to the Default Settings.......... 79 Additional Information Precautions 80 Notes about the Discs 81 Troubleshooting 81 Self-diagnosis...
Advanced Settings and Adjustments Locking Discs 64 (CUSTOM PARENTAL CONTROL, PARENTAL CONTROL) Getting Optimal Surround Sound for a Room 67 (SPEAKER FORMATION) Calibrating the Appropriate Settings Automatically 69 (AUTO CALIBRATION) Using the Setup Display 71 Setting the Display or Sound Track Language 73 [LANGUAGE SETUP] Settings for the Display 73 [SCREEN SETUP] Custom Settings 75 [CUSTOM SETUP] Settings for the Speakers 76 [SPEAKER SETUP] Returning to the Default Settings.......... 79 Additional Information Precautions 80 Notes about the Discs 81 Troubleshooting 81 Self-diagnosis...
Operating Instructions
Page 6
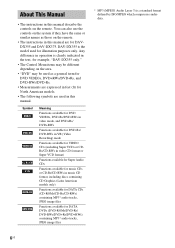
...the area. • "DVD" may be used as those on the remote. • The instructions in this manual are used for illustration purposes only. DAV-DX355 is a standard format defined by ISO/MPEG which compresses audio data. 6US Symbol Meaning Functions available for DVD VIDEOs, DVD-Rs/DVD-RWs in...this manual describe the controls on the system if they have the same or similar names as a general term for DVD VIDEOs, DVD+RWs/DVD+Rs, and DVD-RWs/DVD-Rs. • Measurements are expressed in feet (ft) for North American models. • The following symbols are for DAVDX355 and DAV-DX375.
...the area. • "DVD" may be used as those on the remote. • The instructions in this manual are used for illustration purposes only. DAV-DX355 is a standard format defined by ISO/MPEG which compresses audio data. 6US Symbol Meaning Functions available for DVD VIDEOs, DVD-Rs/DVD-RWs in...this manual describe the controls on the system if they have the same or similar names as a general term for DVD VIDEOs, DVD+RWs/DVD+Rs, and DVD-RWs/DVD-Rs. • Measurements are expressed in feet (ft) for North American models. • The following symbols are for DAVDX355 and DAV-DX375.
Operating Instructions
Page 7
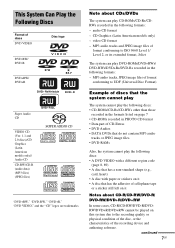
...device and authoring software. MP3 audio tracks, JPEG image files of format conforming to UDF (Universal Disc Format) Example of discs that the system cannot play The system cannot play the following discs: • CD-ROMs/CD-Rs/CD-RWs other than those recorded in the formats listed on page 7... of CD-Extras • DVD Audios • DATA DVDs that do not contain MP3 audio tracks or JPEG image files. • DVD-RAMs Also, the system cannot play the following discs: • A DVD VIDEO with a different region code (page 8, 89) • A disc that has a non-standard shape (e.g., card, heart) &#...
...device and authoring software. MP3 audio tracks, JPEG image files of format conforming to UDF (Universal Disc Format) Example of discs that the system cannot play The system cannot play the following discs: • CD-ROMs/CD-Rs/CD-RWs other than those recorded in the formats listed on page 7... of CD-Extras • DVD Audios • DATA DVDs that do not contain MP3 audio tracks or JPEG image files. • DVD-RAMs Also, the system cannot play the following discs: • A DVD VIDEO with a different region code (page 8, 89) • A disc that has a non-standard shape (e.g., card, heart) &#...
Operating Instructions
Page 8
...that some playback functions may be played back. 8US Region code Your system has a region code printed on the rear of Digital Theater Systems, Inc. The disc will not play on this system. Music discs encoded with some record companies. Note that do not conform... to the CD standard and may be played back. • This system can also be intentionally set by normal playback. For more information, see the operating instructions for home...
...that some playback functions may be played back. 8US Region code Your system has a region code printed on the rear of Digital Theater Systems, Inc. The disc will not play on this system. Music discs encoded with some record companies. Note that do not conform... to the CD standard and may be played back. • This system can also be intentionally set by normal playback. For more information, see the operating instructions for home...
Operating Instructions
Page 9
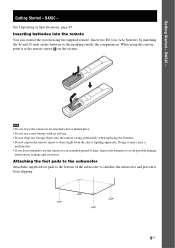
... R6 (size AA) batteries by matching the 3 and # ends on the batteries to stabilize the subwoofer and prevent it at the remote sensor on the system. When using the supplied remote. Doing so may cause a malfunction. • If you do not intend to use a new battery with an old one. •...; Do not drop any foreign object into the remote You can control the system using the remote, point it from slipping. 9US BASIC - Attaching the foot pads to the subwoofer Attach the supplied foot pads to the bottom of...
... R6 (size AA) batteries by matching the 3 and # ends on the batteries to stabilize the subwoofer and prevent it at the remote sensor on the system. When using the supplied remote. Doing so may cause a malfunction. • If you do not intend to use a new battery with an old one. •...; Do not drop any foreign object into the remote You can control the system using the remote, point it from slipping. 9US BASIC - Attaching the foot pads to the subwoofer Attach the supplied foot pads to the bottom of...

Operating Instructions
Page 10
Getting Started - Bottom of DAV-DX375 only.) Note • Spread a cloth on the wall (page 23). 1 Secure the post to the speaker. (For the front speakers of the base , Speaker cord 10US Step 1: Assembling the Speakers Before connecting the speakers, attach the speaker stand to the base. BASIC - Post Base 2 Draw the speaker cord through the hole on the base, then stand it on the floor to avoid damaging the floor. Tip • You can use the speaker without the speaker stand by installing it up.
Getting Started - Bottom of DAV-DX375 only.) Note • Spread a cloth on the wall (page 23). 1 Secure the post to the speaker. (For the front speakers of the base , Speaker cord 10US Step 1: Assembling the Speakers Before connecting the speakers, attach the speaker stand to the base. BASIC - Post Base 2 Draw the speaker cord through the hole on the base, then stand it on the floor to avoid damaging the floor. Tip • You can use the speaker without the speaker stand by installing it up.

Operating Instructions
Page 11
BASIC - 3 Secure the pedestal to the speaker, then run them through the slots (A, B, C, and D) all the way. Securing the pedestal forcibly may ruin the screw threads. 4 Connect the speaker cords to the post. A B C D continued 11US Getting Started - Note • If it is hard to secure the pedestal, remove and secure it again.
BASIC - 3 Secure the pedestal to the speaker, then run them through the slots (A, B, C, and D) all the way. Securing the pedestal forcibly may ruin the screw threads. 4 Connect the speaker cords to the post. A B C D continued 11US Getting Started - Note • If it is hard to secure the pedestal, remove and secure it again.

Operating Instructions
Page 12
Adjust the length of the speaker cord. Note • Do not catch the speaker cord between the speaker and the pedestal. • Do not drop the speaker when mounting. 6 Secure the speaker with the screws in order 1 to 2. 1 2 Screws (2) (supplied) 12US Getting Started - BASIC - 5 Slide the speaker down slowly onto the pedestal.
Adjust the length of the speaker cord. Note • Do not catch the speaker cord between the speaker and the pedestal. • Do not drop the speaker when mounting. 6 Secure the speaker with the screws in order 1 to 2. 1 2 Screws (2) (supplied) 12US Getting Started - BASIC - 5 Slide the speaker down slowly onto the pedestal.
Operating Instructions
Page 13
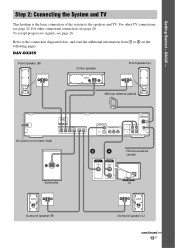
BASIC - DAV-DX355 Front speaker (R) Center speaker Front speaker (L) AM loop antenna (aerial) AC power cord (mains lead) (DVD ONLY) OUT SPEAKER FRONT R FRONT L CENTER WOOFER SUR R ..., see page 24. For other component connection, see page 28. For other TV connections, see page 26. Step 2: Connecting the System and TV This hookup is the basic connection of the system to 4 on the following pages. Refer to the connection diagram below, and read the additional information from 1 to the speakers...
BASIC - DAV-DX355 Front speaker (R) Center speaker Front speaker (L) AM loop antenna (aerial) AC power cord (mains lead) (DVD ONLY) OUT SPEAKER FRONT R FRONT L CENTER WOOFER SUR R ..., see page 24. For other component connection, see page 28. For other TV connections, see page 26. Step 2: Connecting the System and TV This hookup is the basic connection of the system to 4 on the following pages. Refer to the connection diagram below, and read the additional information from 1 to the speakers...
Operating Instructions
Page 14
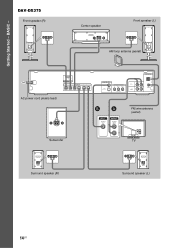
BASIC - DAV-DX375 Front speaker (R) Center speaker Front speaker (L) AM loop antenna (aerial) AC power cord (mains lead) (DVD ONLY) OUT SPEAKER FRONT R FRONT L CENTER WOOFER SUR R SUR L MONITOR OUT VIDEO S VIDEO (DVD ONLY) COMPONENT VIDEO OUT Y PB/CB PR/CR (DVD ONLY) ANTENNA R AUDIO IN L TV VCR R AUDIO IN L AM COAXIAL FM75 BA FM wire antenna (aerial) Subwoofer VIDEO IN AUDIO OUT L R TV Surround speaker (R) Surround speaker (L) 14US Getting Started -
BASIC - DAV-DX375 Front speaker (R) Center speaker Front speaker (L) AM loop antenna (aerial) AC power cord (mains lead) (DVD ONLY) OUT SPEAKER FRONT R FRONT L CENTER WOOFER SUR R SUR L MONITOR OUT VIDEO S VIDEO (DVD ONLY) COMPONENT VIDEO OUT Y PB/CB PR/CR (DVD ONLY) ANTENNA R AUDIO IN L TV VCR R AUDIO IN L AM COAXIAL FM75 BA FM wire antenna (aerial) Subwoofer VIDEO IN AUDIO OUT L R TV Surround speaker (R) Surround speaker (L) 14US Getting Started -
Operating Instructions
Page 15
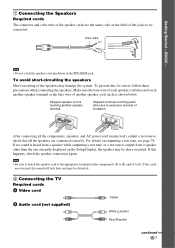
... short-circuited. Stripped speaker cord is output from a speaker other due to #. Stripped cords are reversed, the sound will lack bass and may damage the system. To prevent this happens, check the speaker connection again. If no sound is heard from a speaker while outputting a test tone, or a test tone is touching...
... short-circuited. Stripped speaker cord is output from a speaker other due to #. Stripped cords are reversed, the sound will lack bass and may damage the system. To prevent this happens, check the speaker connection again. If no sound is heard from a speaker while outputting a test tone, or a test tone is touching...
Operating Instructions
Page 16
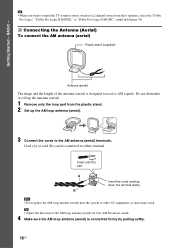
.... 4 Make sure the AM loop antenna (aerial) is designed to receive AM signals. Note • Do not place the AM loop antenna (aerial) near the system or other AV equipment, as noise may result. Insert until this part.
.... 4 Make sure the AM loop antenna (aerial) is designed to receive AM signals. Note • Do not place the AM loop antenna (aerial) near the system or other AV equipment, as noise may result. Insert until this part.
Operating Instructions
Page 17
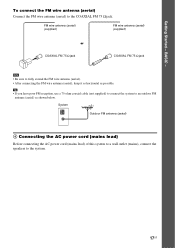
... outdoor FM antenna (aerial) as possible. Tip • If you have poor FM reception, use a 75-ohm coaxial cable (not supplied) to connect the system to the COAXIAL FM 75 Ω jack. Getting Started - FM wire antenna (aerial) (supplied) FM wire antenna (aerial) (supplied) or COAXIAL FM 75... Ω jack COAXIAL FM 75 Ω jack Note • Be sure to the system. 17US BASIC - System Outdoor FM antenna (aerial) 4 Connecting the AC power cord (mains lead) Before connecting the AC power cord (mains lead) of this...
... outdoor FM antenna (aerial) as possible. Tip • If you have poor FM reception, use a 75-ohm coaxial cable (not supplied) to connect the system to the COAXIAL FM 75 Ω jack. Getting Started - FM wire antenna (aerial) (supplied) FM wire antenna (aerial) (supplied) or COAXIAL FM 75... Ω jack COAXIAL FM 75 Ω jack Note • Be sure to the system. 17US BASIC - System Outdoor FM antenna (aerial) 4 Connecting the AC power cord (mains lead) Before connecting the AC power cord (mains lead) of this...

Operating Instructions
Page 18
...closer (B) and the surround speakers up to 5.0 meters (16 ft) closer (C) to vibrations - Subject to the listening position. However, this system allows you change the positions of abrasive pad, scouring powder, or solvent such as alcohol or benzine. 18US For details, see "Getting Optimal ... or discoloration may fall down. Extremely hot or cold - Subject to 23 ft) (A) from the listening position (A). Step 3: Positioning the System Positioning the speakers For the best possible surround sound, all the speakers other than the subwoofer should be placed from 1.0 to 7.0 meters (3...
...closer (B) and the surround speakers up to 5.0 meters (16 ft) closer (C) to vibrations - Subject to the listening position. However, this system allows you change the positions of abrasive pad, scouring powder, or solvent such as alcohol or benzine. 18US For details, see "Getting Optimal ... or discoloration may fall down. Extremely hot or cold - Subject to 23 ft) (A) from the listening position (A). Step 3: Positioning the System Positioning the speakers For the best possible surround sound, all the speakers other than the subwoofer should be placed from 1.0 to 7.0 meters (3...
