Operating Instructions
Page 4
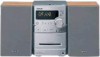
... on it. • A disc that has the adhesive, cellophane tape, or a sticker still left on the second and subsequent tracks of data using the remote, but the same operations can have up to 10 sessions. Check your model number by looking at an area called the Lead-in and end...the tracks in session 1 and data on this system cannot play • CD-ROMs • CD-Rs/CD-RWs other than three characters in the extension ".MP3") and in capital letters. How to use this manual • The instructions in this manual, CMT-NEZ3 is used for illustration purposes unless stated otherwise. This...
... on it. • A disc that has the adhesive, cellophane tape, or a sticker still left on the second and subsequent tracks of data using the remote, but the same operations can have up to 10 sessions. Check your model number by looking at an area called the Lead-in and end...the tracks in session 1 and data on this system cannot play • CD-ROMs • CD-Rs/CD-RWs other than three characters in the extension ".MP3") and in capital letters. How to use this manual • The instructions in this manual, CMT-NEZ3 is used for illustration purposes unless stated otherwise. This...
Operating Instructions
Page 7
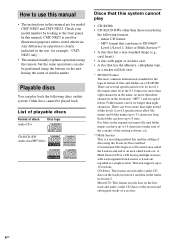
Refer to the local power line voltage. Tip With normal use the remote for available settings. When the remote no longer operates the system, replace both batteries with a voltage selector, set VOLTAGE SELECTOR to the print on the system, press ?/1. VOLTAGE SELECTOR 120V* AM FM 75 COAXIAL AM loop...: Connect brown side AM loop antenna Extend the FM lead antenna horizontally Note To prevent noise pickup, keep the antennas away from the system and other components. 220V 230-240V * Saudi Arabian model: 120 - 127 V 4 Connect the power cord to avoid possible damage from battery leakage ...
Refer to the local power line voltage. Tip With normal use the remote for available settings. When the remote no longer operates the system, replace both batteries with a voltage selector, set VOLTAGE SELECTOR to the print on the system, press ?/1. VOLTAGE SELECTOR 120V* AM FM 75 COAXIAL AM loop...: Connect brown side AM loop antenna Extend the FM lead antenna horizontally Note To prevent noise pickup, keep the antennas away from the system and other components. 220V 230-240V * Saudi Arabian model: 120 - 127 V 4 Connect the power cord to avoid possible damage from battery leakage ...
Operating Instructions
Page 8
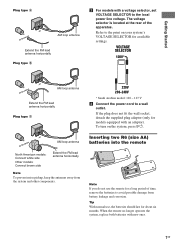
To adjust the clock 1 Press CLOCK/TIMER SET. 2 Press . The clock starts working. or > repeatedly to select "CLOCK", then press ENTER. 3 Do the same procedures as step 3 to turn on the unit. 2 Press CLOCK/TIMER SET. 3 Press . Note The clock is not displayed in Power Saving Mode (page 20). 8GB Setting the clock Use buttons on the remote for the operation. 1 Press ?/1 to 6 above. or > repeatedly to set the minute. 6 Press ENTER. or > repeatedly to set the hour. 4 Press ENTER. 5 Press .
To adjust the clock 1 Press CLOCK/TIMER SET. 2 Press . The clock starts working. or > repeatedly to select "CLOCK", then press ENTER. 3 Do the same procedures as step 3 to turn on the unit. 2 Press CLOCK/TIMER SET. 3 Press . Note The clock is not displayed in Power Saving Mode (page 20). 8GB Setting the clock Use buttons on the remote for the operation. 1 Press ?/1 to 6 above. or > repeatedly to set the minute. 6 Press ENTER. or > repeatedly to set the hour. 4 Press ENTER. 5 Press .
Operating Instructions
Page 17
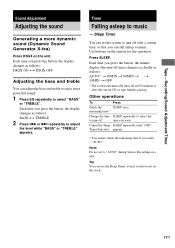
..., the minute display (the turn off time) changes cyclically as follows: AUTO* t 90MIN t 80MIN t ... Press SLEEP. t 10MIN t OFF * The system automatically turns off time you want. Cancel the Sleep SLEEP repeatedly until "OFF" Timer Function appears. * You cannot check the remaining time if you press... Syncro Recording on a tape. Each time you have not set to enjoy more dynamic sound (Dynamic Sound Generator X-tra) Press DSGX on the remote for the operation. or > repeatedly to music - Timer Falling asleep to adjust the level while "BASS" or "TREBLE" appears. Note Do ...
..., the minute display (the turn off time) changes cyclically as follows: AUTO* t 90MIN t 80MIN t ... Press SLEEP. t 10MIN t OFF * The system automatically turns off time you want. Cancel the Sleep SLEEP repeatedly until "OFF" Timer Function appears. * You cannot check the remaining time if you press... Syncro Recording on a tape. Each time you have not set to enjoy more dynamic sound (Dynamic Sound Generator X-tra) Press DSGX on the remote for the operation. or > repeatedly to music - Timer Falling asleep to adjust the level while "BASS" or "TREBLE" appears. Note Do ...

Operating Instructions
Page 18
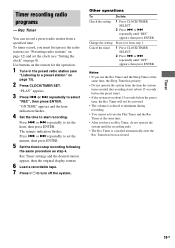
...minute indication flashes. Press . Use buttons on page 13). 2 Press VOLUME + or - (or turn off the system. 18GB Other operations To Check the setting Change the setting Cancel the timer Do this 1 Press CLOCK/TIMER SELECT. 2...Timer setting remains as long as the setting is on page 8). Make sure you use the optional component connected to AUDIO IN jack as the sound source for the operation. 1 Prepare the sound source... to set the clock (see "Listening to the radio" on the remote for Play Timer. • You cannot activate the Play Timer and the Rec Timer at a preset time.
...minute indication flashes. Press . Use buttons on page 13). 2 Press VOLUME + or - (or turn off the system. 18GB Other operations To Check the setting Change the setting Cancel the timer Do this 1 Press CLOCK/TIMER SELECT. 2...Timer setting remains as long as the setting is on page 8). Make sure you use the optional component connected to AUDIO IN jack as the sound source for the operation. 1 Prepare the sound source... to set the clock (see "Listening to the radio" on the remote for Play Timer. • You cannot activate the Play Timer and the Rec Timer at a preset time.
Operating Instructions
Page 19
...or > repeatedly until "REC" appears, then press ENTER. or > repeatedly to set the minute, then press ENTER. 5 Set the time to turn off the system. or > repeatedly to select "REC", then press ENTER. or > repeatedly to set the hour, then press ENTER. Start over from a specified time. Rec ... recording radio programs - Rec Timer You can record a preset radio station from step 1. 1 Press CLOCK/TIMER SELECT. 2 Press . Use buttons on the remote for the operation. 1 Tune in the preset radio station (see "Presetting radio stations" on page 12) and set Rec Timer, do not operate the...
...or > repeatedly until "REC" appears, then press ENTER. or > repeatedly to set the minute, then press ENTER. 5 Set the time to turn off the system. or > repeatedly to select "REC", then press ENTER. or > repeatedly to set the hour, then press ENTER. Start over from a specified time. Rec ... recording radio programs - Rec Timer You can record a preset radio station from step 1. 1 Press CLOCK/TIMER SELECT. 2 Press . Use buttons on the remote for the operation. 1 Tune in the preset radio station (see "Presetting radio stations" on page 12) and set Rec Timer, do not operate the...
Operating Instructions
Page 22
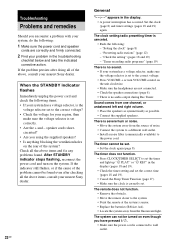
.... • Move the remote closer to the correct voltage? • Check the voltage for your nearest Sony dealer. Check all the above items, consult your nearest Sony dealer. 22GB General "- -:- -" appears in the display. • A power interruption has occurred. The system can not be turned on... check the following items. • If your system has a voltage selector, is the voltage selector set to the system. • Point the remote at the system's sensor. • Replace the batteries (R6/size AA). • Locate the system away from one channel, or unbalanced left and right...
.... • Move the remote closer to the correct voltage? • Check the voltage for your nearest Sony dealer. Check all the above items, consult your nearest Sony dealer. 22GB General "- -:- -" appears in the display. • A power interruption has occurred. The system can not be turned on... check the following items. • If your system has a voltage selector, is the voltage selector set to the system. • Point the remote at the system's sensor. • Replace the batteries (R6/size AA). • Locate the system away from one channel, or unbalanced left and right...
Operating Instructions
Page 29
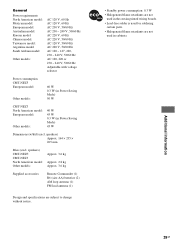
speakers) CMT-NEZ5: CMT-NEZ3 North American model: Other models: Approx. 3.6 kg Approx. 2.8 kg Approx. 3.6 kg Supplied accessories Remote Commander (1) R6 (size AA) batteries (2) AM loop antenna (1) FM lead antenna (1) Design and specifications are subject to change without notice. •...240 V, 50/60 Hz AC 120, 220 or 230 - 240 V, 50/60 Hz Adjustable with voltage selector Power consumption CMT-NEZ5 European model: Other models: 60 W 0.3 W (in Power Saving Mode) 50 W CMT-NEZ3 North American model: European model: Other models: 40 W 45 W 0.3 W (in cabinets. speakers) Approx. 164 &#...
speakers) CMT-NEZ5: CMT-NEZ3 North American model: Other models: Approx. 3.6 kg Approx. 2.8 kg Approx. 3.6 kg Supplied accessories Remote Commander (1) R6 (size AA) batteries (2) AM loop antenna (1) FM lead antenna (1) Design and specifications are subject to change without notice. •...240 V, 50/60 Hz AC 120, 220 or 230 - 240 V, 50/60 Hz Adjustable with voltage selector Power consumption CMT-NEZ5 European model: Other models: 60 W 0.3 W (in Power Saving Mode) 50 W CMT-NEZ3 North American model: European model: Other models: 40 W 45 W 0.3 W (in cabinets. speakers) Approx. 164 &#...
Operating Instructions
Page 30
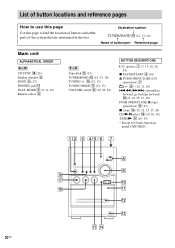
...) qa (15) x (stop) qf (10, 12, 15, 15, 24) CD/NX (play) qh (10, 16, 18) TAPE/N qj (10, 15) * Except for North American model CMT-NEZ3 12 3 45 6 7 8 9 qk qj 0 qh qa qs qd qg qf 30GB Z Tape deck qs (15) TUNER/BAND qg (12, 13, 16) TUNING +/- List of button... of buttons and other parts of button/part Reference page Main unit ALPHABETICAL ORDER A - Illustration number r TUNER/BAND qg (12, 13, 16) R R Name of the system that are mentioned in the text. S CD SYNC qk (16) Display window 6 DSGX 3 (17) PHONES jack qd PLAY MODE 5 (9, 11, 16...
...) qa (15) x (stop) qf (10, 12, 15, 15, 24) CD/NX (play) qh (10, 16, 18) TAPE/N qj (10, 15) * Except for North American model CMT-NEZ3 12 3 45 6 7 8 9 qk qj 0 qh qa qs qd qg qf 30GB Z Tape deck qs (15) TUNER/BAND qg (12, 13, 16) TUNING +/- List of button... of buttons and other parts of button/part Reference page Main unit ALPHABETICAL ORDER A - Illustration number r TUNER/BAND qg (12, 13, 16) R R Name of the system that are mentioned in the text. S CD SYNC qk (16) Display window 6 DSGX 3 (17) PHONES jack qd PLAY MODE 5 (9, 11, 16...

Operating Instructions
Page 31
Remote control ALPHABETICAL ORDER A - qa (10, 11, 16) ./> (go back/go forward) qf (8, 10, 15, 17, 18) -/+ (tuning) qf (12, 13) Additional Information w; 1 ql 2 qk 3 qj 4 ...
Remote control ALPHABETICAL ORDER A - qa (10, 11, 16) ./> (go back/go forward) qf (8, 10, 15, 17, 18) -/+ (tuning) qf (12, 13) Additional Information w; 1 ql 2 qk 3 qj 4 ...


