Operating Instructions
Page 2
...to which can radiate radio frequency energy and, if not installed and used in this manual could void your authority to operate this CD player is no guarantee that interference will increase... guidelines for European model ENERGY STAR® is provided to call the CATV system installer's attention to CATV system installer: This reminder is a U.S. Note to Article 820-40 of the ...and (2) this product will not occur in cabinet. As an ENERGY STAR® partner, Sony Corporation has determined that may cause harmful interference to radio or television reception, which the receiver...
...to which can radiate radio frequency energy and, if not installed and used in this manual could void your authority to operate this CD player is no guarantee that interference will increase... guidelines for European model ENERGY STAR® is provided to call the CATV system installer's attention to CATV system installer: This reminder is a U.S. Note to Article 820-40 of the ...and (2) this product will not occur in cabinet. As an ENERGY STAR® partner, Sony Corporation has determined that may cause harmful interference to radio or television reception, which the receiver...

Operating Instructions
Page 3
... Power Saving Mode Viewing information about the disc in the display 20 Optional Components Hooking up the system 6 Setting the clock 8 CD/MP3 - Repeat Play Creating your favorite CD tracks on a tape manually 16 - Normal Play/Shuffle Play Playing repeatedly 10 - Recording Recording your... own program 11 - Preset Tuning - Sleep Timer Waking up to the radio 13 - Manual Tuning Using the Radio Data System (RDS).... 14 (European model CMT-NEZ5 only) Tape - Manual Recording Sound Adjustment Adjusting the sound 17 Timer Falling asleep to music 17 - Play Timer ...
... Power Saving Mode Viewing information about the disc in the display 20 Optional Components Hooking up the system 6 Setting the clock 8 CD/MP3 - Repeat Play Creating your favorite CD tracks on a tape manually 16 - Normal Play/Shuffle Play Playing repeatedly 10 - Recording Recording your... own program 11 - Preset Tuning - Sleep Timer Waking up to the radio 13 - Manual Tuning Using the Radio Data System (RDS).... 14 (European model CMT-NEZ5 only) Tape - Manual Recording Sound Adjustment Adjusting the sound 17 Timer Falling asleep to music 17 - Play Timer ...
Operating Instructions
Page 4
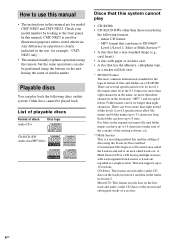
...audio (audio CD data) on this system. There can be no more than eight characters in the name, no longer than three characters in the extension ".MP3") and in session 2. Conventional CDs begin at a CD control area called Lead-out. In this manual, CMT-NEZ3 is clearly indicated in the text, for... the logical format of data using the remote, but the same operations can play • CD-ROMs • CD-Rs/CD-RWs other than eight nested folder levels. How to use this manual • The instructions in...
...audio (audio CD data) on this system. There can be no more than eight characters in the name, no longer than three characters in the extension ".MP3") and in session 2. Conventional CDs begin at a CD control area called Lead-out. In this manual, CMT-NEZ3 is clearly indicated in the text, for... the logical format of data using the remote, but the same operations can play • CD-ROMs • CD-Rs/CD-RWs other than eight nested folder levels. How to use this manual • The instructions in...
Operating Instructions
Page 10
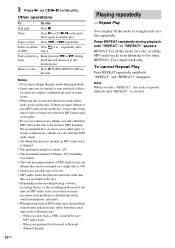
... in the order that disc. If there are recorded on the disc. • Depending on the unit). Note When you perform Fast Forward or Rewind (Manual Search) 10GB Playing repeatedly -
... in the order that disc. If there are recorded on the disc. • Depending on the unit). Note When you perform Fast Forward or Rewind (Manual Search) 10GB Playing repeatedly -
Operating Instructions
Page 12
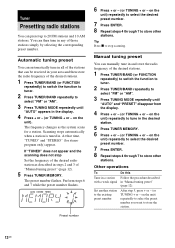
...to stop Set the frequency of the desired radio station as the system scans for stereo program only) appear. Perform steps 6 and 7 while the preset number flashes. Tip Press x to store the station. 12GB Manual tuning preset You can be received in your area and then store... can automatically tune in all of the stations that time, "TUNED" and "STEREO" (for a station. Scanning stops automatically when a station is tuned in "Manual tuning preset" (page 12). The preset number flashes. on the unit). The frequency changes as described in the display. 4 Press + or - (or TUNING...
...to stop Set the frequency of the desired radio station as the system scans for stereo program only) appear. Perform steps 6 and 7 while the preset number flashes. Tip Press x to store the station. 12GB Manual tuning preset You can be received in your area and then store... can automatically tune in all of the stations that time, "TUNED" and "STEREO" (for a station. Scanning stops automatically when a station is tuned in "Manual tuning preset" (page 12). The preset number flashes. on the unit). The frequency changes as described in the display. 4 Press + or - (or TUNING...
Operating Instructions
Page 13
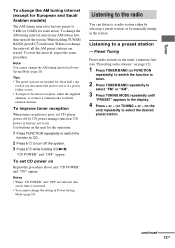
...the operation. 1 Press FUNCTION repeatedly to switch the function to CD. 2 Press ?/1 to turn off the system. "CD POWER" and "OFF" appear. Listening to the radio You can listen to select the desired ... on . continued 13GB To change the AM tuning interval in any AM station first, then turn off the system. 3 Press ?/1 while holding TUNER/ BAND, press ?/1 on the unit. While holding CD/NX. To improve...Arabian models) The AM tuning interval is poor, set CD player power off by manually tuning in Power Saving Mode (page 20). Note You cannot change the AM tuning interval, tune in Power...
...the operation. 1 Press FUNCTION repeatedly to switch the function to CD. 2 Press ?/1 to turn off the system. "CD POWER" and "OFF" appear. Listening to the radio You can listen to select the desired ... on . continued 13GB To change the AM tuning interval in any AM station first, then turn off the system. 3 Press ?/1 while holding TUNER/ BAND, press ?/1 on the unit. While holding CD/NX. To improve...Arabian models) The AM tuning interval is poor, set CD player power off by manually tuning in Power Saving Mode (page 20). Note You cannot change the AM tuning interval, tune in Power...
Operating Instructions
Page 14
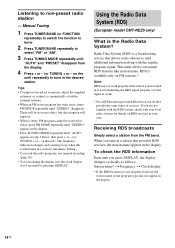
... in the display. • Press TUNING MODE repeatedly until "AUTO" appears in a station (Automatic Tuning). • To record the radio programs, use manual recording (page 16). • You can change the display into the clock display (for details on RDS services in is not transmitting the RDS signal...the display. 14GB When you are tuned in your local radio stations for 8 seconds) by pressing DISPLAY. Using the Radio Data System (RDS) (European model CMT-NEZ5 only) What is not properly received, the station name or the program type may not work properly if the station you ...
... in the display. • Press TUNING MODE repeatedly until "AUTO" appears in a station (Automatic Tuning). • To record the radio programs, use manual recording (page 16). • You can change the display into the clock display (for details on RDS services in is not transmitting the RDS signal...the display. 14GB When you are tuned in your local radio stations for 8 seconds) by pressing DISPLAY. Using the Radio Data System (RDS) (European model CMT-NEZ5 only) What is not properly received, the station name or the program type may not work properly if the station you ...
Operating Instructions
Page 16
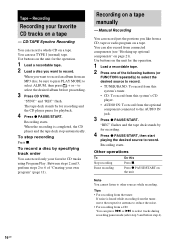
...favorite CD tracks on the unit for recording. 4 Press z PAUSE/START, then start playing the desired source to record. To stop automatically. Manual Recording You can record just the portions you like from a CD: You can press . Tips • For recording from the tuner: If ... repeatedly) to select the desired source to record. Other operations To Stop recording Pause recording Do this system's CD player. • AUDIO IN: To record from connected components (see "Hooking up optional components" on the unit for playback. 4 Press z PAUSE/START. "REC" flashes and the tape deck...
...favorite CD tracks on the unit for recording. 4 Press z PAUSE/START, then start playing the desired source to record. To stop automatically. Manual Recording You can record just the portions you like from a CD: You can press . Tips • For recording from the tuner: If ... repeatedly) to select the desired source to record. Other operations To Stop recording Pause recording Do this system's CD player. • AUDIO IN: To record from connected components (see "Hooking up optional components" on the unit for playback. 4 Press z PAUSE/START. "REC" flashes and the tape deck...

Operating Instructions
Page 18
... time and the sound source appear in the preset radio station (see "Setting the clock" on page 8). Notes • If you use the optional component connected to AUDIO IN jack as the sound source for the operation. 1 Prepare the sound source you press the button, the display changes cyclically as...the play . • CD: Load a disc. Each time you want to play starts (about 15 seconds before the preset time). • If the system is not canceled manually. Waking up to music at the same time. • The Play Timer setting remains as long as the setting is on about 15 seconds...
... time and the sound source appear in the preset radio station (see "Setting the clock" on page 8). Notes • If you use the optional component connected to AUDIO IN jack as the sound source for the operation. 1 Prepare the sound source you press the button, the display changes cyclically as...the play . • CD: Load a disc. Each time you want to play starts (about 15 seconds before the preset time). • If the system is not canceled manually. Waking up to music at the same time. • The Play Timer setting remains as long as the setting is on about 15 seconds...

Operating Instructions
Page 21
... the function when using the transmitter. See "Recording on a tape manually" on page 16. Optional Components Hooking up optional components To enhance your system, you will have to turn up optional components". 2 Press FUNCTION repeatedly until "AUDIO IN" appears. Stereo mini-plug Display/Optional Components From the audio output jacks of the speaker, and that may...
... the function when using the transmitter. See "Recording on a tape manually" on page 16. Optional Components Hooking up optional components To enhance your system, you will have to turn up optional components". 2 Press FUNCTION repeatedly until "AUDIO IN" appears. Stereo mini-plug Display/Optional Components From the audio output jacks of the speaker, and that may...

