Operating Instructions
Page 2
...on the apparatus. registered mark. Except for customers in this product will increase eye hazard. As an ENERGY STAR® partner, Sony Corporation has determined that may cause harmful interference to operate this product will increase eye hazard. Increase the separation between the equipment and ...Layer-3 audio coding technology and patents licensed from that the cable ground shall be connected to the grounding system of the building, as close to which can radiate radio frequency energy and, if not installed and used in the U.S.A. CAUTION You are designed to rain or...
...on the apparatus. registered mark. Except for customers in this product will increase eye hazard. As an ENERGY STAR® partner, Sony Corporation has determined that may cause harmful interference to operate this product will increase eye hazard. Increase the separation between the equipment and ...Layer-3 audio coding technology and patents licensed from that the cable ground shall be connected to the grounding system of the building, as close to which can radiate radio frequency energy and, if not installed and used in the U.S.A. CAUTION You are designed to rain or...

Operating Instructions
Page 3
... the Radio Data System (RDS).... 14 (European model CMT-NEZ5 only) Tape - Play Timer Timer recording radio programs........... 19 - Normal Play/Shuffle Play Playing repeatedly 10 - Manual Recording Sound Adjustment Adjusting the sound 17 Timer Falling asleep to the radio 13 - Power Saving Mode Viewing information about the disc in the display 20 Optional Components Hooking...
... the Radio Data System (RDS).... 14 (European model CMT-NEZ5 only) Tape - Play Timer Timer recording radio programs........... 19 - Normal Play/Shuffle Play Playing repeatedly 10 - Manual Recording Sound Adjustment Adjusting the sound 17 Timer Falling asleep to the radio 13 - Power Saving Mode Viewing information about the disc in the display 20 Optional Components Hooking...
Operating Instructions
Page 12
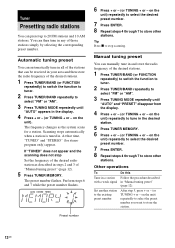
... to store the station. 12GB on the unit) repeatedly to select the preset number you want to stop Set the frequency of the desired radio station as the system scans for stereo program only) appear. on the unit) repeatedly to select the desired preset number. 7 Press ENTER. 8 Repeat steps 4... through 7 to store other stations. You can be received in your area and then store the radio frequency of the desired stations. 1 Press TUNER/BAND...
... to store the station. 12GB on the unit) repeatedly to select the preset number you want to stop Set the frequency of the desired radio station as the system scans for stereo program only) appear. on the unit) repeatedly to select the desired preset number. 7 Press ENTER. 8 Repeat steps 4... through 7 to store other stations. You can be received in your area and then store the radio frequency of the desired stations. 1 Press TUNER/BAND...
Operating Instructions
Page 13
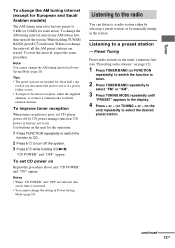
... "FM" or "AM". 3 Press TUNING MODE repeatedly until "PRESET" appears in any AM station first, then turn off the system. 3 Press ?/1 while holding CD/NX. Listening to the radio You can listen to select the desired preset station. on Repeat the procedure above and "CD POWER" and "ON" appear. "...CD POWER" and "OFF" appear. To set CD power on the unit) repeatedly to a radio station either by selecting a preset station, or by CD power manage function. To change the interval, all the AM preset stations are retained for European...
... "FM" or "AM". 3 Press TUNING MODE repeatedly until "PRESET" appears in any AM station first, then turn off the system. 3 Press ?/1 while holding CD/NX. Listening to the radio You can listen to select the desired preset station. on Repeat the procedure above and "CD POWER" and "ON" appear. "...CD POWER" and "OFF" appear. To set CD power on the unit) repeatedly to a radio station either by selecting a preset station, or by CD power manage function. To change the interval, all the AM preset stations are retained for European...
Operating Instructions
Page 14
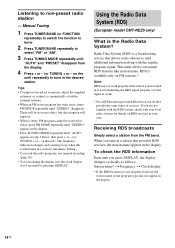
...in the display. • Press TUNING MODE repeatedly until "AUTO" and "PRESET" disappear from the FM band. Using the Radio Data System (RDS) (European model CMT-NEZ5 only) What is a broadcasting service that provides RDS services, the station name appears in the display. To check the ...RDS information Each time you tune in a station that allows radio stations to select "FM" or "AM". 3 Press TUNING MODE repeatedly until...
...in the display. • Press TUNING MODE repeatedly until "AUTO" and "PRESET" disappear from the FM band. Using the Radio Data System (RDS) (European model CMT-NEZ5 only) What is a broadcasting service that provides RDS services, the station name appears in the display. To check the ...RDS information Each time you tune in a station that allows radio stations to select "FM" or "AM". 3 Press TUNING MODE repeatedly until...
Operating Instructions
Page 16
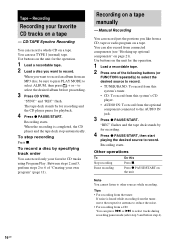
... noise is completed, the CD player and the tape deck stop recording Press x. Tips • For recording from the optional component connected to record. • TUNER/BAND: To record from this system's tuner. • CD: To record from this Press x. Recording starts. CD-TAPE Synchro Recording You can use TYPE I (normal) ...on the unit for playback. 4 Press z PAUSE/START. When you want to record an album from a CD: You can also record from a CD, tape or radio program on page 21). Press z PAUSE/START on a tape manually - Note You cannot listen to record. or > to record.
... noise is completed, the CD player and the tape deck stop recording Press x. Tips • For recording from the optional component connected to record. • TUNER/BAND: To record from this system's tuner. • CD: To record from this Press x. Recording starts. CD-TAPE Synchro Recording You can use TYPE I (normal) ...on the unit for playback. 4 Press z PAUSE/START. When you want to record an album from a CD: You can also record from a CD, tape or radio program on page 21). Press z PAUSE/START on a tape manually - Note You cannot listen to record. or > to record.

Operating Instructions
Page 18
...then the original display returns. 9 Press ?/1 to turn VOLUME control on until the desired sound source appears. Make sure you use the optional component connected to AUDIO IN jack as the sound source for the operation. 1 Prepare the sound source you press the button, the display changes cyclically... to play. • CD: Load a disc. Notes • If you have set the clock (see "Listening to the radio" on page 13). 2 Press VOLUME + or - (or turn off the system. 18GB Other operations To Check the setting Change the setting Cancel the timer Do this 1 Press CLOCK/TIMER SELECT. 2 Press...
...then the original display returns. 9 Press ?/1 to turn VOLUME control on until the desired sound source appears. Make sure you use the optional component connected to AUDIO IN jack as the sound source for the operation. 1 Prepare the sound source you press the button, the display changes cyclically... to play. • CD: Load a disc. Notes • If you have set the clock (see "Listening to the radio" on page 13). 2 Press VOLUME + or - (or turn off the system. 18GB Other operations To Check the setting Change the setting Cancel the timer Do this 1 Press CLOCK/TIMER SELECT. 2 Press...
Operating Instructions
Page 19
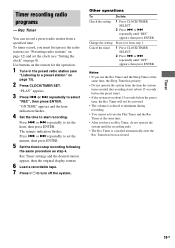
... CLOCK/TIMER SET. Use buttons on the remote for the operation. 1 Tune in the preset radio station (see "Presetting radio stations" on page 12) and set Rec Timer, do not operate the system until the recording ends. • The Rec Timer is canceled automatically after the Rec Timer has...until "OFF" appears, then press ENTER. Rec Timer You can record a preset radio station from step 1. 1 Press CLOCK/TIMER SELECT. 2 Press . "ON TIME" appears and the hour indication flashes. 4 Set the time to turn off the system. or > repeatedly to a preset station" on page 8). Rec Timer settings and...
... CLOCK/TIMER SET. Use buttons on the remote for the operation. 1 Tune in the preset radio station (see "Presetting radio stations" on page 12) and set Rec Timer, do not operate the system until the recording ends. • The Rec Timer is canceled automatically after the Rec Timer has...until "OFF" appears, then press ENTER. Rec Timer You can record a preset radio station from step 1. 1 Press CLOCK/TIMER SELECT. 2 Press . "ON TIME" appears and the hour indication flashes. 4 Set the time to turn off the system. or > repeatedly to a preset station" on page 8). Rec Timer settings and...
Operating Instructions
Page 22
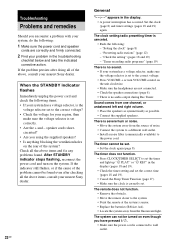
...be set . Check all the above items, consult your nearest Sony dealer. 22GB General "- -:- -" appears in the display. • A power interruption has occurred. "Presetting radio stations" (page 12) - There is set correctly. • Are the + and - The system can not be found even after doing all of the problem ...is set to the correct voltage. • Press VOLUME + or turn on the system. If the indicator still flashes, or if the cause of the above items and fix any problems found. "Timer recording radio programs" (page 19) There is no audio output during Rec Timer. The remote...
...be set . Check all the above items, consult your nearest Sony dealer. 22GB General "- -:- -" appears in the display. • A power interruption has occurred. "Presetting radio stations" (page 12) - There is set correctly. • Are the + and - The system can not be found even after doing all of the problem ...is set to the correct voltage. • Press VOLUME + or turn on the system. If the indicator still flashes, or if the cause of the above items and fix any problems found. "Timer recording radio programs" (page 19) There is no audio output during Rec Timer. The remote...


