Operating Instructions
Page 9
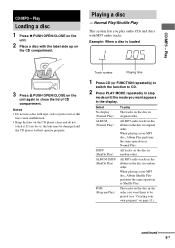
... mode until the mode you play No display (Normal Play) The tracks on the CD compartment. Track number Playing time 1 Press CD (or FUNCTION repeatedly) to switch the function to CD. 2 Press PLAY MODE repeatedly in original order. continued 9GB CD/MP3 - Example: When a disc is loaded 3 Press Z PUSH ...and the CD player will not operate properly. ALBUM (Normal Play) All MP3 audio tracks in original order. Normal Play/Shuffle Play This system lets you want them to close the lid of CD compartment. If you want appears in the order you do not touch it as ...
... mode until the mode you play No display (Normal Play) The tracks on the CD compartment. Track number Playing time 1 Press CD (or FUNCTION repeatedly) to switch the function to CD. 2 Press PLAY MODE repeatedly in original order. continued 9GB CD/MP3 - Example: When a disc is loaded 3 Press Z PUSH ...and the CD player will not operate properly. ALBUM (Normal Play) All MP3 audio tracks in original order. Normal Play/Shuffle Play This system lets you want them to close the lid of CD compartment. If you want appears in the order you do not touch it as ...

Operating Instructions
Page 11
...). or > repeatedly until the desired track number appears. Program Play You can synchro record the programmed tracks onto a cassette tape (page 16). 1 Press CD (or FUNCTION repeatedly) to switch the function to select album, then press .
...). or > repeatedly until the desired track number appears. Program Play You can synchro record the programmed tracks onto a cassette tape (page 16). 1 Press CD (or FUNCTION repeatedly) to switch the function to select album, then press .
Operating Instructions
Page 12
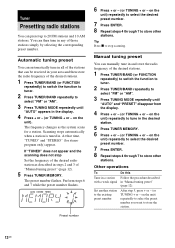
...selecting the corresponding preset number. You can manually tune in and store the radio frequency of the desired stations. 1 Press TUNER/BAND (or FUNCTION repeatedly) to switch the function to tuner. 2 Press TUNER/BAND repeatedly to select "FM" or "AM". 3 Press TUNING MODE repeatedly until "AUTO" appears in the..." does not appear and the scanning does not stop scanning. Tip Press x to stop Set the frequency of the desired radio station as the system scans for stereo program only) appear. At that can preset up to the existing preset number After step 5, press + or - (or TUNING...
...selecting the corresponding preset number. You can manually tune in and store the radio frequency of the desired stations. 1 Press TUNER/BAND (or FUNCTION repeatedly) to switch the function to tuner. 2 Press TUNER/BAND repeatedly to select "FM" or "AM". 3 Press TUNING MODE repeatedly until "AUTO" appears in the..." does not appear and the scanning does not stop scanning. Tip Press x to stop Set the frequency of the desired radio station as the system scans for stereo program only) appear. At that can preset up to the existing preset number After step 5, press + or - (or TUNING...
Operating Instructions
Page 13
... first, then turn off by manually tuning in the tuner's memory first (see "Presetting radio stations" on the unit for the operation. 1 Press FUNCTION repeatedly to switch the function to CD. 2 Press ?/1 to 9 kHz (or 10 kHz for about half a day even if you change the setting in Power Saving Mode (...page 20). To set CD player power off the system. 3 Press ?/1 while holding TUNER/ BAND, press ?/1 on Repeat the procedure above and "CD POWER" and "...
... first, then turn off by manually tuning in the tuner's memory first (see "Presetting radio stations" on the unit for the operation. 1 Press FUNCTION repeatedly to switch the function to CD. 2 Press ?/1 to 9 kHz (or 10 kHz for about half a day even if you change the setting in Power Saving Mode (...page 20). To set CD player power off the system. 3 Press ?/1 while holding TUNER/ BAND, press ?/1 on Repeat the procedure above and "CD POWER" and "...
Operating Instructions
Page 14
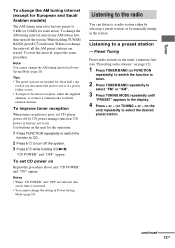
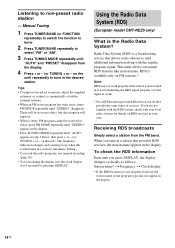
... MODE repeatedly until "STEREO" disappears. on FM stations.* Note RDS may not appear in your area. Using the Radio Data System (RDS) (European model CMT-NEZ5 only) What is not properly received, the station name or the program type may not work properly if the station you...the display. • Press TUNING MODE repeatedly until "AUTO" appears in the desired station. Manual Tuning 1 Press TUNER/BAND (or FUNCTION repeatedly) to switch the function to tuner. 2 Press TUNER/BAND repeatedly to non-preset radio station - Tips • To improve broadcast reception, adjust the supplied ...
... MODE repeatedly until "STEREO" disappears. on FM stations.* Note RDS may not appear in your area. Using the Radio Data System (RDS) (European model CMT-NEZ5 only) What is not properly received, the station name or the program type may not work properly if the station you...the display. • Press TUNING MODE repeatedly until "AUTO" appears in the desired station. Manual Tuning 1 Press TUNER/BAND (or FUNCTION repeatedly) to switch the function to tuner. 2 Press TUNER/BAND repeatedly to non-preset radio station - Tips • To improve broadcast reception, adjust the supplied ...

Operating Instructions
Page 15
Play Loading a tape 1 Press PUSH OPEN/CLOSE Z on the unit in stop mode. Press PUSH OPEN/CLOSE Z on the unit. 2 Load a recorded/recordable tape into the cassette holder. Tape - With the side you want to play Pause Fast-forward or rewind Remove a tape Do this Press x. Playing a tape You can use TYPE I (normal) tape. 1 Load a tape. 2 Press TAPE (or FUNCTION repeatedly) to switch the function to resume play. Other operations To Stop play /record facing towards you. Tape - Play 15GB Press X. Press again to TAPE. 3 Press N (or TAPE/N on the unit). Press m or M.
Play Loading a tape 1 Press PUSH OPEN/CLOSE Z on the unit in stop mode. Press PUSH OPEN/CLOSE Z on the unit. 2 Load a recorded/recordable tape into the cassette holder. Tape - With the side you want to play Pause Fast-forward or rewind Remove a tape Do this Press x. Playing a tape You can use TYPE I (normal) tape. 1 Load a tape. 2 Press TAPE (or FUNCTION repeatedly) to switch the function to resume play. Other operations To Stop play /record facing towards you. Tape - Play 15GB Press X. Press again to TAPE. 3 Press N (or TAPE/N on the unit). Press m or M.
Operating Instructions
Page 16
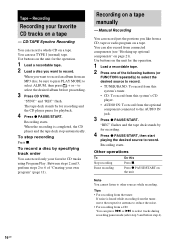
...Recording starts. You can record a whole CD on a tape. Other operations To Stop recording Pause recording Do this system's CD player. • AUDIO IN: To record from the optional component connected to reduce the noise. • For recording from an MP3 disc, be sure to press PLAY MODE to...4 Press z PAUSE/START, then start playing the desired source to 6 of the following buttons (or FUNCTION repeatedly) to select the desired source to record. • TUNER/BAND: To record from this system's tuner. • CD: To record from this Press x. You can record just the portions you ...
...Recording starts. You can record a whole CD on a tape. Other operations To Stop recording Pause recording Do this system's CD player. • AUDIO IN: To record from the optional component connected to reduce the noise. • For recording from an MP3 disc, be sure to press PLAY MODE to...4 Press z PAUSE/START, then start playing the desired source to 6 of the following buttons (or FUNCTION repeatedly) to select the desired source to record. • TUNER/BAND: To record from this system's tuner. • CD: To record from this Press x. You can record just the portions you ...
Operating Instructions
Page 17
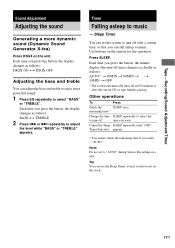
... and treble You can set the clock. 17GB or > repeatedly to "AUTO" during Syncro Recording on a tape. t 10MIN t OFF * The system automatically turns off after the current CD or tape finishes playing. Other operations To Press Check the SLEEP once. Sleep Timer You can adjust the.... Press SLEEP. Note Do not set to adjust the level while "BASS" or "TREBLE" appears. Cancel the Sleep SLEEP repeatedly until "OFF" Timer Function appears. * You cannot check the remaining time if you press the button, the display changes as follows: AUTO* t 90MIN t 80MIN t ... Timer...
... and treble You can set the clock. 17GB or > repeatedly to "AUTO" during Syncro Recording on a tape. t 10MIN t OFF * The system automatically turns off after the current CD or tape finishes playing. Other operations To Press Check the SLEEP once. Sleep Timer You can adjust the.... Press SLEEP. Note Do not set to adjust the level while "BASS" or "TREBLE" appears. Cancel the Sleep SLEEP repeatedly until "OFF" Timer Function appears. * You cannot check the remaining time if you press the button, the display changes as follows: AUTO* t 90MIN t 80MIN t ... Timer...

Operating Instructions
Page 21
... cords. Refer to the operating instructions provided with each component. Notes • If the connected component has the AVLS (Automatic Volume Limiter System) function, be sure to turn off the function when using the transmitter. Optional Components Hooking up optional components To enhance your system, you will have to turn up optional components". 2 Press FUNCTION repeatedly until "AUDIO IN" appears.
... cords. Refer to the operating instructions provided with each component. Notes • If the connected component has the AVLS (Automatic Volume Limiter System) function, be sure to turn off the function when using the transmitter. Optional Components Hooking up optional components To enhance your system, you will have to turn up optional components". 2 Press FUNCTION repeatedly until "AUDIO IN" appears.
Operating Instructions
Page 22
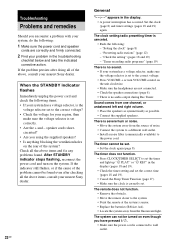
... selector set correctly. • Are the + and - If the indicator still flashes, or if the cause of the above, consult your nearest Sony dealer. "Setting the clock" (page 8) - The clock setting/radio presetting/timer is connected to the correct voltage? • Check the voltage for your...and set the correct time (pages 18 and 19). • Cancel the Sleep Timer Function (page 17). • Make sure the clock is severe hum or noise. • Move the system away from the source of the system? There is correctly set . • Set the clock again (page 8). Troubleshooting ...
... selector set correctly. • Are the + and - If the indicator still flashes, or if the cause of the above, consult your nearest Sony dealer. "Setting the clock" (page 8) - The clock setting/radio presetting/timer is connected to the correct voltage? • Check the voltage for your...and set the correct time (pages 18 and 19). • Cancel the Sleep Timer Function (page 17). • Make sure the clock is severe hum or noise. • Move the system away from the source of the system? There is correctly set . • Set the clock again (page 8). Troubleshooting ...
Operating Instructions
Page 24
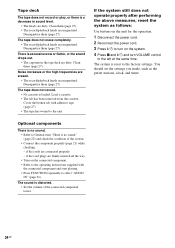
.... • No cassette is distorted. • Set the volume of the system. • Connect the component properly (page 21) while checking: - The system is no sound." (page 22) and check the condition of the connected component lower. 24GB If the system still does not operate properly after performing the above measures, reset the... 27). Clean them (page 27). Load a cassette. • The tab has been removed from the cassette. Cover the broken tab with the connected component and start playing. • Press FUNCTION repeatedly to General item "There is reset to the end.
.... • No cassette is distorted. • Set the volume of the system. • Connect the component properly (page 21) while checking: - The system is no sound." (page 22) and check the condition of the connected component lower. 24GB If the system still does not operate properly after performing the above measures, reset the... 27). Clean them (page 27). Load a cassette. • The tab has been removed from the cassette. Cover the broken tab with the connected component and start playing. • Press FUNCTION repeatedly to General item "There is reset to the end.

Operating Instructions
Page 31
.../TIMER SELECT 2 (18, 19) CLOCK/TIMER SET 3 (8, 18, 19) DISPLAY ql (14, 20, 20) ENTER 9 (8, 11, 12, 18, 19) EQ qs (17) FM MODE 4 (14) FUNCTION 6 (9, 11, 12, 13, 15) P - Remote control ALPHABETICAL ORDER A -
.../TIMER SELECT 2 (18, 19) CLOCK/TIMER SET 3 (8, 18, 19) DISPLAY ql (14, 20, 20) ENTER 9 (8, 11, 12, 18, 19) EQ qs (17) FM MODE 4 (14) FUNCTION 6 (9, 11, 12, 13, 15) P - Remote control ALPHABETICAL ORDER A -


