Operating Instructions
Page 1
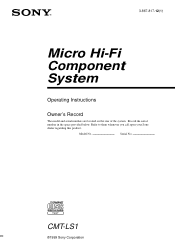
Model No. Serial No. CMT-LS1 ©1999 Sony Corporation Refer to them whenever you call upon your Sony dealer regarding this product. 3-867-817-12(1) Micro Hi-Fi Component System Operating Instructions Owner's Record The model and serial numbers are located on the rear of the system. Record the serial number in the space provided below.
Model No. Serial No. CMT-LS1 ©1999 Sony Corporation Refer to them whenever you call upon your Sony dealer regarding this product. 3-867-817-12(1) Micro Hi-Fi Component System Operating Instructions Owner's Record The model and serial numbers are located on the rear of the system. Record the serial number in the space provided below.
Operating Instructions
Page 2
... of electric shock to CATV system installer: This reminder is connected. - CAUTION The use of the FCC Rules. INFORMATION This equipment has been tested and found to rain or moisture. The shielded interface cable recommended in a particular installation. Reorient or relocate the receiving antenna. - Note to persons. NOTICE FOR THE CUSTOMERS IN THE U.S.A. If this manual must be of sufficient...
... of electric shock to CATV system installer: This reminder is connected. - CAUTION The use of the FCC Rules. INFORMATION This equipment has been tested and found to rain or moisture. The shielded interface cable recommended in a particular installation. Reorient or relocate the receiving antenna. - Note to persons. NOTICE FOR THE CUSTOMERS IN THE U.S.A. If this manual must be of sufficient...
Operating Instructions
Page 3
... display 18 The Radio Using the Radio Data System (RDS) (European model only 20 Timer Falling asleep to the radio 14 The CD Player Playing the CD tracks in random order - Daily Timer 23 Optional Components Connecting audio components 24 Listening to the sound of Contents Getting Started Step 1: Hooking up to music - Sleep Timer 22 Waking up the system 4 Step 2: Setting the time 9 Step 3: Presetting radio stations 10 Opening the front panel...
... display 18 The Radio Using the Radio Data System (RDS) (European model only 20 Timer Falling asleep to the radio 14 The CD Player Playing the CD tracks in random order - Daily Timer 23 Optional Components Connecting audio components 24 Listening to the sound of Contents Getting Started Step 1: Hooking up to music - Sleep Timer 22 Waking up the system 4 Step 2: Setting the time 9 Step 3: Presetting radio stations 10 Opening the front panel...
Operating Instructions
Page 6
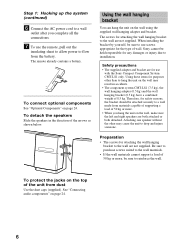
... on the wall, make sure the left and right speakers are not supplied. Using the wall hanging bracket You can hang the unit on page 24. 6 The screws for use with the Sony Compact Component System CMT-LS1 only. To protect the jacks on page 24. Step 1: Hooking up the system (continued) 6 Connect the AC power cord to a wall outlet after you hang the unit on...
... on the wall, make sure the left and right speakers are not supplied. Using the wall hanging bracket You can hang the unit on page 24. 6 The screws for use with the Sony Compact Component System CMT-LS1 only. To protect the jacks on page 24. Step 1: Hooking up the system (continued) 6 Connect the AC power cord to a wall outlet after you hang the unit on...
Operating Instructions
Page 10
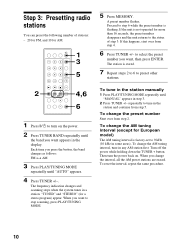
..., and 10 for a stereo program) appear. Turn off the power while holding down the TUNER + button. "TUNED" and "STEREO" (for AM. 1 1 2 3 3 4 5 6 7 8 9 10/0 >10 + 5 NX x - 2 -+ .> mM 4,6 + - 6 1 Press ?/1 to 9 kHz (10 kHz in the station manually 1 Press PLAY/TUNING MODE repeatedly until "AUTO" appears. 4 Press TUNER +/-. If the unit is not operated for European model) The AM tuning interval is factory-set to turn the power back on the power. 2 Press TUNER BAND repeatedly until the...
..., and 10 for a stereo program) appear. Turn off the power while holding down the TUNER + button. "TUNED" and "STEREO" (for AM. 1 1 2 3 3 4 5 6 7 8 9 10/0 >10 + 5 NX x - 2 -+ .> mM 4,6 + - 6 1 Press ?/1 to 9 kHz (10 kHz in the station manually 1 Press PLAY/TUNING MODE repeatedly until "AUTO" appears. 4 Press TUNER +/-. If the unit is not operated for European model) The AM tuning interval is factory-set to turn the power back on the power. 2 Press TUNER BAND repeatedly until the...
Operating Instructions
Page 11
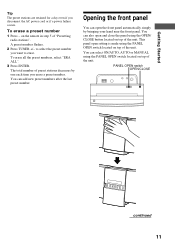
You can select ON/AUTO, AUTO or MANUAL using the PANEL OPEN switch located on top of the unit. You can also open and close the panel using the OPEN/ CLOSE button located on top of "Presetting radio stations". PANEL OPEN switch OPEN/CLOSE continued 11 to erase. A preset number flashes. 2 Press TUNER +/- You can open setting is made using the PANEL OPEN switch located on the remote in step 5 of the unit. on top...
You can select ON/AUTO, AUTO or MANUAL using the PANEL OPEN switch located on top of the unit. You can also open and close the panel using the OPEN/ CLOSE button located on top of "Presetting radio stations". PANEL OPEN switch OPEN/CLOSE continued 11 to erase. A preset number flashes. 2 Press TUNER +/- You can open setting is made using the PANEL OPEN switch located on the remote in step 5 of the unit. on top...
Operating Instructions
Page 12
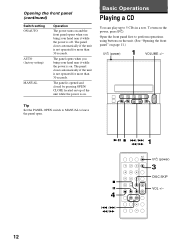
Basic Operations Playing a CD You can play up to leave the panel open. 12 1 NX x ./> m/M x X 4 ./> m/M 123 456 7 8 9 10/0 >10 + NX x - -+ .> mM + - ?/1 (power) 3 DISC SKIP VOL +/- Tip Set the PANEL OPEN switch to MANUAL to 5 CDs in a row. The panel closes automatically if the unit is not operated for more than 30 seconds. Open the front panel first to perform operations using buttons on the unit. (See "Opening...
Basic Operations Playing a CD You can play up to leave the panel open. 12 1 NX x ./> m/M x X 4 ./> m/M 123 456 7 8 9 10/0 >10 + NX x - -+ .> mM + - ?/1 (power) 3 DISC SKIP VOL +/- Tip Set the PANEL OPEN switch to MANUAL to 5 CDs in a row. The panel closes automatically if the unit is not operated for more than 30 seconds. Open the front panel first to perform operations using buttons on the unit. (See "Opening...
Operating Instructions
Page 14
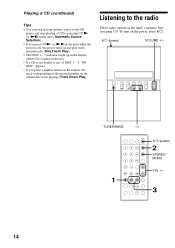
..., the power turns on and play starts automatically (One Touch Play). • The DISC 1 - 5 indicators light up in the tuner's memory first (see page 10). To turn on the current disc starts playing (Track Direct Play). Listening to the radio Preset radio stations in the display when CD is loaded on the tray. • If a CD is not loaded to the pressed number on the power, press ?/1. ?/1 (power) VOLUME +/- 14 TUNER/BAND -/+ 1 2 3 4 5 6 7 8 9 ?/1 (power) 2 STEREO...
..., the power turns on and play starts automatically (One Touch Play). • The DISC 1 - 5 indicators light up in the tuner's memory first (see page 10). To turn on the current disc starts playing (Track Direct Play). Listening to the radio Preset radio stations in the display when CD is loaded on the tray. • If a CD is not loaded to the pressed number on the power, press ?/1. ?/1 (power) VOLUME +/- 14 TUNER/BAND -/+ 1 2 3 4 5 6 7 8 9 ?/1 (power) 2 STEREO...

Operating Instructions
Page 15
... reception, reorient the supplied antenna or connect an optional external antenna (FM antenna only). • When an FM program has static noise, press STEREO/MONO until "MONO" appears. Each time you press the button, the band changes as follows: FM y AM 2 Press PLAY/TUNING MODE repeatedly until the band you want appears. repeatedly to non-preset radio stations • Press PLAY/TUNING MODE repeatedly until "AUTO" appears in step...
... reception, reorient the supplied antenna or connect an optional external antenna (FM antenna only). • When an FM program has static noise, press STEREO/MONO until "MONO" appears. Each time you press the button, the band changes as follows: FM y AM 2 Press PLAY/TUNING MODE repeatedly until the band you want appears. repeatedly to non-preset radio stations • Press PLAY/TUNING MODE repeatedly until "AUTO" appears in step...
Operating Instructions
Page 17
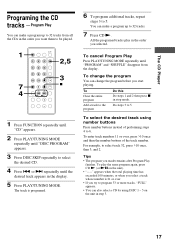
... the total playing time has exceeded 100 minutes, or when you want them to select the desired CD. 4 Press . Tips • The program you try to 32 tracks from the display. The CD Player Programing the CD tracks - You can make a program up to 32 tracks. 7 Press CD N. To change the program You can also select a CD by using number buttons Press number buttons instead of...
... the total playing time has exceeded 100 minutes, or when you want them to select the desired CD. 4 Press . Tips • The program you try to 32 tracks from the display. The CD Player Programing the CD tracks - You can make a program up to 32 tracks. 7 Press CD N. To change the program You can also select a CD by using number buttons Press number buttons instead of...

Operating Instructions
Page 20
... services. Sound Adjustment Adjusting the sound You can adjust from the FM band. Note RDS may not appear in your local radio stations for details on RDS services in the display. When you have tuned in the display. ENTER Adjusting the bass 1 Press BASS. 2 Press +/- You can adjust from -3 to +3. 3 Press ENTER. 20 You can adjust bass and treble. Receiving RDS broadcasts Simply select a station from -3 to +3. 3 Press ENTER. repeatedly until the level...
... services. Sound Adjustment Adjusting the sound You can adjust from the FM band. Note RDS may not appear in your local radio stations for details on RDS services in the display. When you have tuned in the display. ENTER Adjusting the bass 1 Press BASS. 2 Press +/- You can adjust from -3 to +3. 3 Press ENTER. 20 You can adjust bass and treble. Receiving RDS broadcasts Simply select a station from -3 to +3. 3 Press ENTER. repeatedly until the level...

Operating Instructions
Page 22
... timer indicator light up to music - You can use Daily Timer. , Press SLEEP repeatedly to select a desired time. To check the remaining time Press SLEEP once. Tip You can set the system to turn off after the current CD finishes playing (up in 100 minutes. 22 When the function is used, you select "AUTO", the system automatically turns off in the display. * When you cannot use Sleep Timer...
... timer indicator light up to music - You can use Daily Timer. , Press SLEEP repeatedly to select a desired time. To check the remaining time Press SLEEP once. Tip You can set the system to turn off after the current CD finishes playing (up in 100 minutes. 22 When the function is used, you select "AUTO", the system automatically turns off in the display. * When you cannot use Sleep Timer...

Operating Instructions
Page 23
... time to set the hour, then press ENTER. The indication changes as follows: TUNER y CD PLAY 8 Press ENTER. repeatedly until the music source you have set the clock (see page 14). 2 Press VOL +/- To start from a specific track, make a program (see page 17). • Radio: Tune in the display. 9 Press ?/1 to music - Press +/- The minute indication flashes. 4-7 123 456 7 8 9 10/0 >10 + NX x - -+ .> mM + - 9 2 CLOCK/ TIMER SELECT...
... time to set the hour, then press ENTER. The indication changes as follows: TUNER y CD PLAY 8 Press ENTER. repeatedly until the music source you have set the clock (see page 14). 2 Press VOL +/- To start from a specific track, make a program (see page 17). • Radio: Tune in the display. 9 Press ?/1 to music - Press +/- The minute indication flashes. 4-7 123 456 7 8 9 10/0 >10 + NX x - -+ .> mM + - 9 2 CLOCK/ TIMER SELECT...
Operating Instructions
Page 24
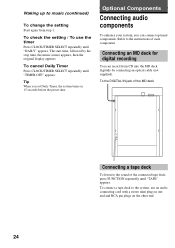
... check the setting / To use an audio connecting cord with a stereo mini plug on one end and RCA pin plugs on 15 seconds before the preset time. Optional Components Connecting audio components To enhance your system, you set Daily Timer, the system turns on the other end. 24 To connect a tape deck to the sound of each component. The start time, followed by connecting an optical cable (not supplied). To cancel Daily Timer Press CLOCK/TIMER SELECT repeatedly until...
... check the setting / To use an audio connecting cord with a stereo mini plug on one end and RCA pin plugs on 15 seconds before the preset time. Optional Components Connecting audio components To enhance your system, you set Daily Timer, the system turns on the other end. 24 To connect a tape deck to the sound of each component. The start time, followed by connecting an optical cable (not supplied). To cancel Daily Timer Press CLOCK/TIMER SELECT repeatedly until...

Operating Instructions
Page 26
... the instructions of each component. Connecting external antennas Connect an external antenna to the instructions of each component. 2 4 123 456 7 8 9 10/0 >10 + NX x - -+ .> mM + - Jack type A 75-ohm coaxial cable (not supplied) 1 Prepare the recording component for recording. 2 Press FUNCTION repeatedly until "CD" appears. 3 Start recording on the connected component For the operations of the connected components, refer to improve the reception. Recording a CD on the MD deck or the tape deck...
... the instructions of each component. Connecting external antennas Connect an external antenna to the instructions of each component. 2 4 123 456 7 8 9 10/0 >10 + NX x - -+ .> mM + - Jack type A 75-ohm coaxial cable (not supplied) 1 Prepare the recording component for recording. 2 Press FUNCTION repeatedly until "CD" appears. 3 Start recording on the connected component For the operations of the connected components, refer to improve the reception. Recording a CD on the MD deck or the tape deck...
Operating Instructions
Page 27
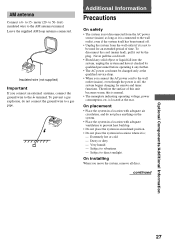
... qualified service shop. • When you connect the AC power cord to the wall outlet (mains), even though the power is off . • Unplug the system from the AC power source (mains) as long as it checked by the plug. meter (20- Dusty or dirty - AM antenna Connect a 6- On installing When you connect an external antenna, connect the ground wire to be changed only at the rear. Subject...
... qualified service shop. • When you connect the AC power cord to the wall outlet (mains), even though the power is off . • Unplug the system from the AC power source (mains) as long as it checked by the plug. meter (20- Dusty or dirty - AM antenna Connect a 6- On installing When you connect an external antenna, connect the ground wire to be changed only at the rear. Subject...
Operating Instructions
Page 28
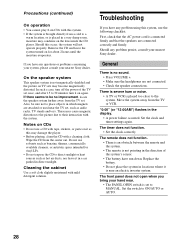
..., turn it on the lens inside the CD player. Troubleshooting If you have any problem using this system, use solvents such as benzine, thinner, commercially available cleaners, or antistatic spray intended for about 2 hours until the moisture evaporates. "0:00" (or "12:00AM") flashes in the direction of the TV set to MANUAL. The timer does not function. • Set the clock correctly. Replace the...
..., turn it on the lens inside the CD player. Troubleshooting If you have any problem using this system, use solvents such as benzine, thinner, commercially available cleaners, or antistatic spray intended for about 2 hours until the moisture evaporates. "0:00" (or "12:00AM") flashes in the direction of the TV set to MANUAL. The timer does not function. • Set the clock correctly. Replace the...
Operating Instructions
Page 29
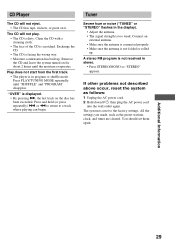
... PLAY/TUNING MODE repeatedly until the moisture evaporates. Tuner Severe hum or noise ("TUNED" or "STEREO" flashes in the display). • Adjust the antenna. • The signal strength is not received in program or shuffle mode. A stereo FM program is too weak. Additional Information 29 CD Player The CD will not play. • The CD is in stereo. • Press STEREO/MONO so "STEREO" appears. or m to return to the factory settings. The system...
... PLAY/TUNING MODE repeatedly until the moisture evaporates. Tuner Severe hum or noise ("TUNED" or "STEREO" flashes in the display). • Adjust the antenna. • The signal strength is not received in program or shuffle mode. A stereo FM program is too weak. Additional Information 29 CD Player The CD will not play. • The CD is in stereo. • Press STEREO/MONO so "STEREO" appears. or m to return to the factory settings. The system...
Operating Instructions
Page 30
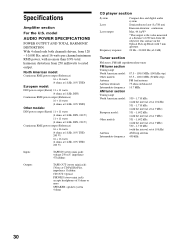
... + 11 watts (4 ohms at 1 kHz, DIN, 220 V) Continuous RMS power output (Reference) 16 + 16 watts (4 ohms at 1 kHz, 10% THD, 240 V) 16 + 16 watts (4 ohms at 1 kHz, 10% THD, 220 V) Inputs TAPE IN (stereo mini jack): voltage 250 mV, impedance 47 kilohms Outputs TAPE OUT (stereo mini jack): 1Vrms at CD Full Bit Play, impedance 1 kilohm CD OUT: Optical PHONES (stereo mini jack): accepts headphones of 8 ohms or more SPEAKER: speaker system 4 ohms CD player section System Laser Laser output Frequency response Compact disc and digital audio system Semiconductor...
... + 11 watts (4 ohms at 1 kHz, DIN, 220 V) Continuous RMS power output (Reference) 16 + 16 watts (4 ohms at 1 kHz, 10% THD, 240 V) 16 + 16 watts (4 ohms at 1 kHz, 10% THD, 220 V) Inputs TAPE IN (stereo mini jack): voltage 250 mV, impedance 47 kilohms Outputs TAPE OUT (stereo mini jack): 1Vrms at CD Full Bit Play, impedance 1 kilohm CD OUT: Optical PHONES (stereo mini jack): accepts headphones of 8 ohms or more SPEAKER: speaker system 4 ohms CD player section System Laser Laser output Frequency response Compact disc and digital audio system Semiconductor...
Operating Instructions
Page 32
... A Adjusting the sound 20 the volume 13, 15 Antennas 5, 26 Automatic Source Selection 14, 15 Automatic Tuning 10, 15 B Battery 6, 8 C CD player 16 Clock setting 9 Connecting. See Hooking up D, E, F, G Daily Timer 23 Desktop stand 4 Display 18 DSG (Dynamic Sound Generator) 21 H, I, J, K Hanging the unit on the wall 6 Hooking up optional components 24 the antennas 5, 26 the speaker 5 L Listening to the radio 14 the sound of connected components 25 M Manual Tuning 10, 15 N Normal Play...
... A Adjusting the sound 20 the volume 13, 15 Antennas 5, 26 Automatic Source Selection 14, 15 Automatic Tuning 10, 15 B Battery 6, 8 C CD player 16 Clock setting 9 Connecting. See Hooking up D, E, F, G Daily Timer 23 Desktop stand 4 Display 18 DSG (Dynamic Sound Generator) 21 H, I, J, K Hanging the unit on the wall 6 Hooking up optional components 24 the antennas 5, 26 the speaker 5 L Listening to the radio 14 the sound of connected components 25 M Manual Tuning 10, 15 N Normal Play...


