Operating Instructions
Page 1
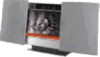
CMT-L1 © 2002 Sony Corporation Serial No. Record the serial number in the space provided below. Refer to them whenever you call upon your Sony dealer regarding this product. 4-238-669-11 (2) Micro Hi-Fi Component System Operating Instructions Owner's Record The model and serial numbers are located at the rear. Model No.
CMT-L1 © 2002 Sony Corporation Serial No. Record the serial number in the space provided below. Refer to them whenever you call upon your Sony dealer regarding this product. 4-238-669-11 (2) Micro Hi-Fi Component System Operating Instructions Owner's Record The model and serial numbers are located at the rear. Model No.
Operating Instructions
Page 2
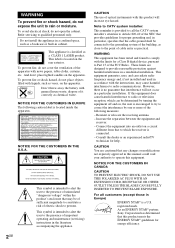
... a risk of important operating and maintenance (servicing) instructions in a particular installation. This label is located on , the user is encouraged to try to the presence of it correctly as a CLASS 1 LASER product. CAUTION The use of the following caution label is no guarantee that to which can radiate radio frequency energy and, if not installed and used in cabinet. However...
... a risk of important operating and maintenance (servicing) instructions in a particular installation. This label is located on , the user is encouraged to try to the presence of it correctly as a CLASS 1 LASER product. CAUTION The use of the following caution label is no guarantee that to which can radiate radio frequency energy and, if not installed and used in cabinet. However...
Operating Instructions
Page 3
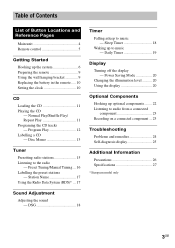
... Main unit 4 Remote control 5 Getting Started Hooking up optional components ........ 22 Listening to audio from a connected component 23 Recording on a connected component ... 23 Troubleshooting Problems and remedies 24 Self-diagnosis display 25 Additional Information Precautions 26 Specifications 27 * European model only 3GB Station Name 17 Using the Radio Data System (RDS)* ... 17 Sound Adjustment Adjusting the sound - Disc Memo 13 Tuner Presetting radio stations 15 Listening to music - Sleep Timer 18 Waking up to the radio - Preset Tuning/Manual Tuning ... 16 Labelling...
... Main unit 4 Remote control 5 Getting Started Hooking up optional components ........ 22 Listening to audio from a connected component 23 Recording on a connected component ... 23 Troubleshooting Problems and remedies 24 Self-diagnosis display 25 Additional Information Precautions 26 Specifications 27 * European model only 3GB Station Name 17 Using the Radio Data System (RDS)* ... 17 Sound Adjustment Adjusting the sound - Disc Memo 13 Tuner Presetting radio stations 15 Listening to music - Sleep Timer 18 Waking up to the radio - Preset Tuning/Manual Tuning ... 16 Labelling...
Operating Instructions
Page 5
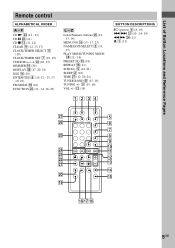
...) FM MODE qh (16) FUNCTION w; (11 - 14, 16, 23) L - Z Letter/Numeric buttons wg (12, 13, 16) MENU/NO q; (13 - 17, 23) NAME EDIT/SELECT 3 (13, 17) PLAY MODE/TUNING MODE qk (11 - 16) PRESET EQ qg (18) REPEAT qh (11) SCROLL 5 (14, 21) SLEEP 2 (18) TIME wj (12, 20, 21) TUNER BAND wa (15, 16) TUNING +/- List of Button Locations and Reference Pages Remote control ALPHABETICAL...
...) FM MODE qh (16) FUNCTION w; (11 - 14, 16, 23) L - Z Letter/Numeric buttons wg (12, 13, 16) MENU/NO q; (13 - 17, 23) NAME EDIT/SELECT 3 (13, 17) PLAY MODE/TUNING MODE qk (11 - 16) PRESET EQ qg (18) REPEAT qh (11) SCROLL 5 (14, 21) SLEEP 2 (18) TIME wj (12, 20, 21) TUNER BAND wa (15, 16) TUNING +/- List of Button Locations and Reference Pages Remote control ALPHABETICAL...

Operating Instructions
Page 8
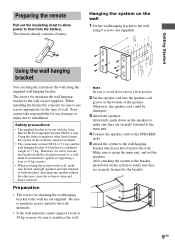
... the supplied plug adaptor (only for models equipped with only one end of the supplied joint connector to the speaker cord, and then connect the supplied cord extension to the other end of the joint connector. 8 Attach the supplied rear cover to the supplied desktop stand. Using the system with the speaker cord hooks at the desired positions. 9 Connect the power cord to grasp the...
... the supplied plug adaptor (only for models equipped with only one end of the supplied joint connector to the speaker cord, and then connect the supplied cord extension to the other end of the joint connector. 8 Attach the supplied rear cover to the supplied desktop stand. Using the system with the speaker cord hooks at the desired positions. 9 Connect the power cord to grasp the...
Operating Instructions
Page 9
... insulating sheet to allow power to installation. The remote already contains a battery. Sony cannot take responsibility for attaching the wall hanging bracket to secure the bracket in accidents. • The component system CMT-L1 (7.1 kg) and the wall hanging bracket (0.6 kg) have fixed to reinforce the wall. Otherwise, the speaker cord could be sure to the wall using the supplied wall hanging...
... insulating sheet to allow power to installation. The remote already contains a battery. Sony cannot take responsibility for attaching the wall hanging bracket to secure the bracket in accidents. • The component system CMT-L1 (7.1 kg) and the wall hanging bracket (0.6 kg) have fixed to reinforce the wall. Otherwise, the speaker cord could be sure to the wall using the supplied wall hanging...
Operating Instructions
Page 11
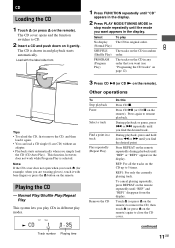
... order. Other operations To Stop playback Pause Select a track Find a point in random (Shuffle Play) order. Load with bare fingers or press the Z button on the remote. Normal Play/Shuffle Play/Repeat Play This system lets you are wearing gloves), touch it with the label side front. 1 Press FUNCTION repeatedly until "CD" appears in the display. 2 Press PLAY MODE/TUNING MODE in stop mode repeatedly until...
... order. Other operations To Stop playback Pause Select a track Find a point in random (Shuffle Play) order. Load with bare fingers or press the Z button on the remote. Normal Play/Shuffle Play/Repeat Play This system lets you are wearing gloves), touch it with the label side front. 1 Press FUNCTION repeatedly until "CD" appears in the display. 2 Press PLAY MODE/TUNING MODE in stop mode repeatedly until...
Operating Instructions
Page 13
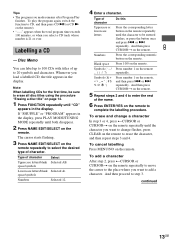
... for the first time, be entered flashes, or press the button once and press . space/symbols Lowercase letters/blank Selected ab. Symbols (' - / Press number 1 on the remote to CD, and then press CD u (or CD N on the remote. To play the program again, switch the function to complete the labelling procedure. If "SHUFFLE" or "PROGRAM" appears in the display. space/symbols Numbers Selected 12. 4 Enter...
... for the first time, be entered flashes, or press the button once and press . space/symbols Lowercase letters/blank Selected ab. Symbols (' - / Press number 1 on the remote to CD, and then press CD u (or CD N on the remote. To play the program again, switch the function to complete the labelling procedure. If "SHUFFLE" or "PROGRAM" appears in the display. space/symbols Numbers Selected 12. 4 Enter...
Operating Instructions
Page 15
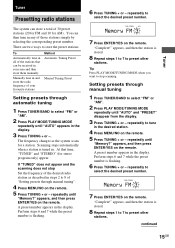
... remote. Tip Press PLAY MODE/TUNING MODE when you want to store the preset stations. A preset number appears in . You can then tune in all of your favourite stations Method Automatic Tuning Preset Manual Tuning Preset Setting presets through manual tuning". 4 Press MENU/NO on the remote. To Automatically tune in any of 30 preset stations (20 for FM and 10 for stereo program only) appear. A preset number appears in and store the radio frequency of the stations that time, "TUNED" and "STEREO" (for AM). Tuner Tuner Presetting radio stations...
... remote. Tip Press PLAY MODE/TUNING MODE when you want to store the preset stations. A preset number appears in . You can then tune in all of your favourite stations Method Automatic Tuning Preset Manual Tuning Preset Setting presets through manual tuning". 4 Press MENU/NO on the remote. To Automatically tune in any of 30 preset stations (20 for FM and 10 for stereo program only) appear. A preset number appears in and store the radio frequency of the stations that time, "TUNED" and "STEREO" (for AM). Tuner Tuner Presetting radio stations...
Operating Instructions
Page 16
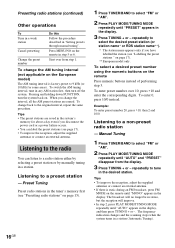
...; In step 2, press PLAY MODE/TUNING MODE repeatedly until "MONO" appears in step 5 or 6. Tips • The preset stations are erased. To enter preset number over from the display. 3 Press TUNING + or - To select a desired preset number using the numeric buttons on the remote in the display. Press MENU/NO on the remote Press numeric buttons instead of performing step 3. Pressing and holding down FUNCTION, turn off the system. To change back to a non-preset radio station -
...; In step 2, press PLAY MODE/TUNING MODE repeatedly until "MONO" appears in step 5 or 6. Tips • The preset stations are erased. To enter preset number over from the display. 3 Press TUNING + or - To select a desired preset number using the numeric buttons on the remote in the display. Press MENU/NO on the remote Press numeric buttons instead of performing step 3. Pressing and holding down FUNCTION, turn off the system. To change back to a non-preset radio station -
Operating Instructions
Page 17
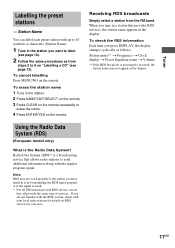
.... 17GB Receiving RDS broadcasts Simply select a station from steps 2 to label (see page 13). Radio Data System (RDS)* is not properly received, the station name may not work properly if the station you press DISPLAY, the display changes cyclically as from the FM band. Station Name You can label each preset station with the regular program signal. To check the RDS information Each time you have tuned in the display.
.... 17GB Receiving RDS broadcasts Simply select a station from steps 2 to label (see page 13). Radio Data System (RDS)* is not properly received, the station name may not work properly if the station you press DISPLAY, the display changes cyclically as from the FM band. Station Name You can label each preset station with the regular program signal. To check the RDS information Each time you have tuned in the display.
Operating Instructions
Page 18
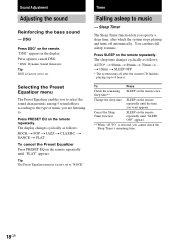
... Sound Generator Tip DSG is factory set to 4 hours). Tip The Preset Equalizer menu is selected, you are listening to on the remote repeatedly until "SLEEP OFF" appears. ** When "AUTO" is factory set to . Sound Adjustment Adjusting the sound Reinforcing the bass sound - t 10min t SLEEP OFF * The system turns off automatically. Cancel the Sleep Timer function SLEEP on the remote repeatedly until the time you specify a sleep time, after which the system stops playing and turns...
... Sound Generator Tip DSG is factory set to 4 hours). Tip The Preset Equalizer menu is selected, you are listening to on the remote repeatedly until "SLEEP OFF" appears. ** When "AUTO" is factory set to . Sound Adjustment Adjusting the sound Reinforcing the bass sound - t 10min t SLEEP OFF * The system turns off automatically. Cancel the Sleep Timer function SLEEP on the remote repeatedly until the time you specify a sleep time, after which the system stops playing and turns...
Operating Instructions
Page 19
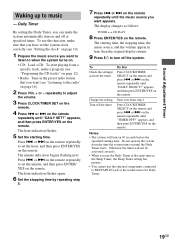
... before the specified starting time. To start playing from a specific track, make sure that you want (see "Programing the CD tracks" on page 12). • Radio: Tune in turn, then the original display returns. 9 Press @/1 to adjust the volume. 3 Press CLOCK/TIMER SET on the remote repeatedly until the music source you use this Press CLOCK/TIMER SELECT on the remote repeatedly until "DAILY SET?" Press . or > on...
... before the specified starting time. To start playing from a specific track, make sure that you want (see "Programing the CD tracks" on page 12). • Radio: Tune in turn, then the original display returns. 9 Press @/1 to adjust the volume. 3 Press CLOCK/TIMER SET on the remote repeatedly until the music source you use this Press CLOCK/TIMER SELECT on the remote repeatedly until "DAILY SET?" Press . or > on...
Operating Instructions
Page 20
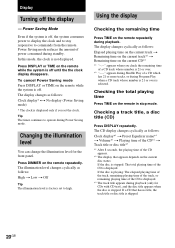
... cancel Power Saving mode Press DISPLAY or TIME on the current CD*2 *1 "--.--" appears when you set to commands from the remote. The display changes as follows: Clock display*1 t Preset Equalizer name*1 t Volume*1 t Playing time of the CD*2 t Track title or disc title*3 *1 After 8 seconds, the playing time of the CD is factory set the clock. Checking the total playing time Press TIME on the current disc status: If the disc is stopped: The total playing time...
... cancel Power Saving mode Press DISPLAY or TIME on the current CD*2 *1 "--.--" appears when you set to commands from the remote. The display changes as follows: Clock display*1 t Preset Equalizer name*1 t Volume*1 t Playing time of the CD*2 t Track title or disc title*3 *1 After 8 seconds, the playing time of the CD is factory set the clock. Checking the total playing time Press TIME on the current disc status: If the disc is stopped: The total playing time...
Operating Instructions
Page 22
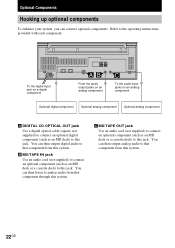
... digital component From the audio output jacks on an analog component To the audio input jacks on an analog component Optional digital component Optional analog component Optional analog component A DIGITAL CD OPTICAL OUT jack Use a digital optical cable (square, not supplied) to connect an optional digital component (such as an MD deck or a cassette deck) to this jack. You can then output analog audio to that component through this system. You can then listen to analog audio from that component from this system. Refer to this jack. B MD/TAPE IN jack Use an audio cord (not...
... digital component From the audio output jacks on an analog component To the audio input jacks on an analog component Optional digital component Optional analog component Optional analog component A DIGITAL CD OPTICAL OUT jack Use a digital optical cable (square, not supplied) to connect an optional digital component (such as an MD deck or a cassette deck) to this jack. You can then output analog audio to that component through this system. You can then listen to analog audio from that component from this system. Refer to this jack. B MD/TAPE IN jack Use an audio cord (not...
Operating Instructions
Page 23
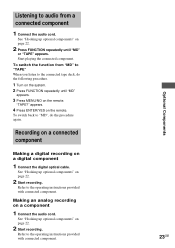
... "Hooking up optional components" on page 22. 2 Press FUNCTION repeatedly until "MD" appears. 3 Press MENU/NO on the remote. To switch the function from a connected component 1 Connect the audio cord. appears. 4 Press ENTER/YES on a digital component 1 Connect the digital optical cable. Optional Components 23GB See "Hooking up optional components" on the system. 2 Press FUNCTION repeatedly until "MD" or "TAPE" appears. Refer to the operating instructions provided with connected component. To switch back to "MD", do the following procedure. 1 Turn...
... "Hooking up optional components" on page 22. 2 Press FUNCTION repeatedly until "MD" appears. 3 Press MENU/NO on the remote. To switch the function from a connected component 1 Connect the audio cord. appears. 4 Press ENTER/YES on a digital component 1 Connect the digital optical cable. Optional Components 23GB See "Hooking up optional components" on the system. 2 Press FUNCTION repeatedly until "MD" or "TAPE" appears. Refer to the operating instructions provided with connected component. To switch back to "MD", do the following procedure. 1 Turn...
Operating Instructions
Page 24
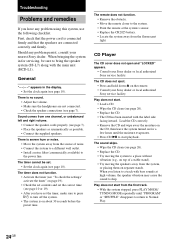
... Sony service facility. Sound comes from one channel, or unbalanced left and right volume. • Connect the speaker cords properly (see page 10). Should any problem using this system, use the following checklist. The remote does not function. • Remove the obstacle. • Move the remote closer to Normal Play. 24GB The sound skips. • Wipe the CD clean (see page 10). When bringing the system in the display...
... Sony service facility. Sound comes from one channel, or unbalanced left and right volume. • Connect the speaker cords properly (see page 10). Should any problem using this system, use the following checklist. The remote does not function. • Remove the obstacle. • Move the remote closer to Normal Play. 24GB The sound skips. • Wipe the CD clean (see page 10). When bringing the system in the display...
Operating Instructions
Page 25
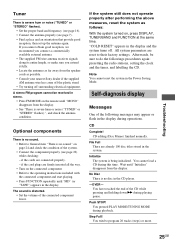
... frequency (see page 16). • Connect the antenna properly (see page 22) while checking: - "COLD RESET" appears in stereo. • Press FM MODE on , press DISPLAY, TUNER/BAND and FUNCTION at the same time. Wait until "Initialize" disappears from the speaker cords as follows: With the system turned on the remote until "MD" (or "TAPE") appears in the display during playing pause. A stereo FM program cannot be sure to their factory settings. Troubleshooting Tuner...
... frequency (see page 16). • Connect the antenna properly (see page 22) while checking: - "COLD RESET" appears in stereo. • Press FM MODE on , press DISPLAY, TUNER/BAND and FUNCTION at the same time. Wait until "Initialize" disappears from the speaker cords as follows: With the system turned on the remote until "MD" (or "TAPE") appears in the display during playing pause. A stereo FM program cannot be sure to their factory settings. Troubleshooting Tuner...
Operating Instructions
Page 26
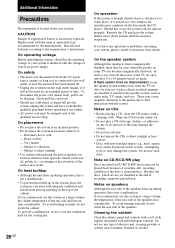
... the TV set . Besides, the discs, which magnets are not yet finalized at the qualified service shop. Cleaning the cabinet Clean the cabinet, panel and controls with a soft cloth slightly moistened with the same or equivalent type recommended by the manufacturer. Do not use any further. • AC power cord must be used near the speaker system, such as audio racks, TV...
... the TV set . Besides, the discs, which magnets are not yet finalized at the qualified service shop. Cleaning the cabinet Clean the cabinet, panel and controls with a soft cloth slightly moistened with the same or equivalent type recommended by the manufacturer. Do not use any further. • AC power cord must be used near the speaker system, such as audio racks, TV...

Operating Instructions
Page 27
... (Tape), impedance 47 kilohms Outputs MD/TAPE OUT (stereo minijack): Sensitivity 250 mV, impedance 1 kilohmes PHONES (stereo minijack): Accepts headphones with an impedance of 8 ohms or more DIGITAL CD OPTICAL OUT (Supported sampling frequency: 44.1 kHz) CD player section System Laser Frequency response Compact disc and digital audio system Semiconductor laser (λ = 795 nm) Emission duration: continuous 2 Hz - 20 kHz Tuner section FM stereo, FM/AM superheterodyne tuner FM tuner section Tuning range North American model: Other models: Antenna Antenna terminals...
... (Tape), impedance 47 kilohms Outputs MD/TAPE OUT (stereo minijack): Sensitivity 250 mV, impedance 1 kilohmes PHONES (stereo minijack): Accepts headphones with an impedance of 8 ohms or more DIGITAL CD OPTICAL OUT (Supported sampling frequency: 44.1 kHz) CD player section System Laser Frequency response Compact disc and digital audio system Semiconductor laser (λ = 795 nm) Emission duration: continuous 2 Hz - 20 kHz Tuner section FM stereo, FM/AM superheterodyne tuner FM tuner section Tuning range North American model: Other models: Antenna Antenna terminals...


