SonicStage Ver. 2.3
Page 2
• Copyright laws prohibit reproducing the software or the manual accompanying it . is a trademark of Sony Corporation. • Microsoft, Windows, Windows NT and Windows Media are registered trademarks of Gracenote. Gracenote and CDDB are trademarks or registered trademarks...#6,061,680; #6,154,773, #6,161,132, #6,230,192, #6,230,207, #6,240,459, #6,330,593, and other countries. • Pentium is compatible with this manual. • CD and music-related data from Gracenote, Inc., copyright © 2000-2003 Gracenote. We do not guarantee all the languages will be able to...
• Copyright laws prohibit reproducing the software or the manual accompanying it . is a trademark of Sony Corporation. • Microsoft, Windows, Windows NT and Windows Media are registered trademarks of Gracenote. Gracenote and CDDB are trademarks or registered trademarks...#6,061,680; #6,154,773, #6,161,132, #6,230,192, #6,230,207, #6,240,459, #6,330,593, and other countries. • Pentium is compatible with this manual. • CD and music-related data from Gracenote, Inc., copyright © 2000-2003 Gracenote. We do not guarantee all the languages will be able to...
SonicStage Ver. 2.3
Page 3
...19 • The displayed items in the illustrations that appear in this manual may differ from the actual items displayed by the software. • Explanations in this manual assume familiarity with basic Windows operations. For details on the computer 14 ... software cannot be installed onto your computer and the operating system, please refer to the respective manuals. 3 What you can do with SonicStage 4 Basic operational flow using a CD player 4 Installing 5 Providing the required system environment 5 System requirements 5 Installing the software onto your computer 6 Using ...
...19 • The displayed items in the illustrations that appear in this manual may differ from the actual items displayed by the software. • Explanations in this manual assume familiarity with basic Windows operations. For details on the computer 14 ... software cannot be installed onto your computer and the operating system, please refer to the respective manuals. 3 What you can do with SonicStage 4 Basic operational flow using a CD player 4 Installing 5 Providing the required system environment 5 System requirements 5 Installing the software onto your computer 6 Using ...
Operating Instructions
Page 2
...Operation is intended to alert the user to provide reasonable protection against harmful interference in the literature accompanying the appliance. Note to CATV system installer: This reminder is intended to alert the user to the presence of uninsulated "dangerous voltage" within the product's enclosure that ...) instructions in a residential installation. Do not install the appliance in a confined space, such as a bookcase or built-in this manual could void your authority to radio or television reception, which the receiver is no guarantee that the cable ground shall be of sufficient ...
...Operation is intended to alert the user to provide reasonable protection against harmful interference in the literature accompanying the appliance. Note to CATV system installer: This reminder is intended to alert the user to the presence of uninsulated "dangerous voltage" within the product's enclosure that ...) instructions in a residential installation. Do not install the appliance in a confined space, such as a bookcase or built-in this manual could void your authority to radio or television reception, which the receiver is no guarantee that the cable ground shall be of sufficient ...

Operating Instructions
Page 3
... potential negative consequences for energy efficiency. SonicStage and SonicStage logo are trademarks of Sony Corporation. This is disposed of correctly, you purchased the product. How to use this system. By ensuring this product is due to use this manual • This manual mainly explains operations using the remote, but the same operations can also...
... potential negative consequences for energy efficiency. SonicStage and SonicStage logo are trademarks of Sony Corporation. This is disposed of correctly, you purchased the product. How to use this system. By ensuring this product is due to use this manual • This manual mainly explains operations using the remote, but the same operations can also...
Operating Instructions
Page 4
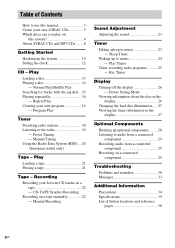
...27 Viewing the tuner information in the display 27 Optional Components Hooking up optional components......... 28 Listening to audio from a connected component 29 Recording audio from a connected component 29 Recording on a connected component 29 Troubleshooting Problems and remedies 30 Messages 33 Additional Information ... tracks with the jog dial ... 15 Playing repeatedly 16 - Manual Recording Sound Adjustment Adjusting the sound 23 Timer Falling asleep to the radio 19 - CD-TAPE Synchro Recording Recording on this system 6 About ATRAC CDs and MP3 CDs ........ 8 Getting Started ...
...27 Viewing the tuner information in the display 27 Optional Components Hooking up optional components......... 28 Listening to audio from a connected component 29 Recording audio from a connected component 29 Recording on a connected component 29 Troubleshooting Problems and remedies 30 Messages 33 Additional Information ... tracks with the jog dial ... 15 Playing repeatedly 16 - Manual Recording Sound Adjustment Adjusting the sound 23 Timer Falling asleep to the radio 19 - CD-TAPE Synchro Recording Recording on this system 6 About ATRAC CDs and MP3 CDs ........ 8 Getting Started ...
Operating Instructions
Page 15
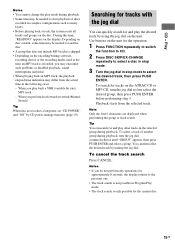
.... • When playing back an MP3 track, the playback elapsed time indication may encounter such problems as many layers. • Before playing back a track, the system reads all tracks and groups on the display. To select a track of discs recorded in the following cases. - You can then select the desired track.... Depending on the unit for and play the desired track by using the jog dial on the unit. When you perform fast forward or rewind (Manual Search) Tip When disc access takes a long time, set "CD POWER" and "ON" by turning the jog dial. Searching for tracks with the jog dial...
.... • When playing back an MP3 track, the playback elapsed time indication may encounter such problems as many layers. • Before playing back a track, the system reads all tracks and groups on the display. To select a track of discs recorded in the following cases. - You can then select the desired track.... Depending on the unit for and play the desired track by using the jog dial on the unit. When you perform fast forward or rewind (Manual Search) Tip When disc access takes a long time, set "CD POWER" and "ON" by turning the jog dial. Searching for tracks with the jog dial...

Operating Instructions
Page 18
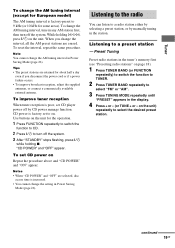
... function to TUNER. 2 Press TUNER BAND repeatedly to select "FM" or "AM". 3 Press TUNING MODE repeatedly until "AUTO" appears in steps 3 and 4 of "Manual tuning preset" . 5 Press TUNER MEMORY. on the unit) repeatedly to select the preset number of the stations that time, "TUNED" and "STEREO" (for a station...to 20 FM stations and 10 AM stations. At that can preset up to stop Set the frequency of the desired radio station as the system scans for an FM stereo program only) appear. Automatic tuning preset You can automatically tune in all of the station you want to the ...
... function to TUNER. 2 Press TUNER BAND repeatedly to select "FM" or "AM". 3 Press TUNING MODE repeatedly until "AUTO" appears in steps 3 and 4 of "Manual tuning preset" . 5 Press TUNER MEMORY. on the unit) repeatedly to select the preset number of the stations that time, "TUNED" and "STEREO" (for a station...to 20 FM stations and 10 AM stations. At that can preset up to stop Set the frequency of the desired radio station as the system scans for an FM stereo program only) appear. Automatic tuning preset You can automatically tune in all of the station you want to the ...
Operating Instructions
Page 19
... set to select "FM" or "AM". 3 Press TUNING MODE repeatedly until "PRESET" appears in any AM station first, then turn off by manually tuning in the tuner's memory first (see "Presetting radio stations" on page 18). 1 Press TUNER BAND (or FUNCTION repeatedly) to switch the function...adjust the supplied antennas, or connect a commercially available external antenna. To improve tuner reception When tuner reception is poor, set CD player power off the system. 3 After "STANDBY" stops flashing, press ?/1 while holding JL, press ?/1 on . CD power is increased. • You cannot change the ...
... set to select "FM" or "AM". 3 Press TUNING MODE repeatedly until "PRESET" appears in any AM station first, then turn off by manually tuning in the tuner's memory first (see "Presetting radio stations" on page 18). 1 Press TUNER BAND (or FUNCTION repeatedly) to switch the function...adjust the supplied antennas, or connect a commercially available external antenna. To improve tuner reception When tuner reception is poor, set CD player power off the system. 3 After "STANDBY" stops flashing, press ?/1 while holding JL, press ?/1 on . CD power is increased. • You cannot change the ...
Operating Instructions
Page 20
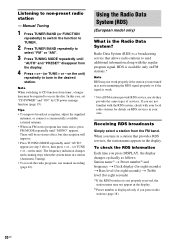
...program signal. Note When switching to tune in a station (Automatic Tuning). • To record the radio programs, use manual recording (page 22). Using the Radio Data System (RDS) (European model only) What is available only on the unit). To check the RDS information Each time you ...are tuned in the display. RDS is the Radio Data System? If you tune in a station that allows radio stations to access the disc. Receiving RDS broadcasts Simply select a station from the display. 4 Press + or - (or TUNE + or - Manual Tuning 1 Press TUNER BAND (or FUNCTION repeatedly) to...
...program signal. Note When switching to tune in a station (Automatic Tuning). • To record the radio programs, use manual recording (page 22). Using the Radio Data System (RDS) (European model only) What is available only on the unit). To check the RDS information Each time you ...are tuned in the display. RDS is the Radio Data System? If you tune in a station that allows radio stations to access the disc. Receiving RDS broadcasts Simply select a station from the display. 4 Press + or - (or TUNE + or - Manual Tuning 1 Press TUNER BAND (or FUNCTION repeatedly) to...
Operating Instructions
Page 22
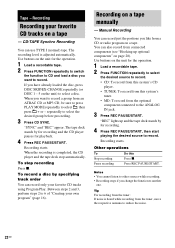
... CD tracks using Program Play. If you have already loaded the disc, press DISC SKIP/EX-CHANGE repeatedly (or DISC 1 - 5 on a tape manually - "SYNC" and "REC" appear. When the recording is adjusted automatically. Recording on the unit) to record. When you want to another one. ...To stop automatically. Other operations To Stop recording Pause recording Do this system's tuner. • MD: To record from the optional component connected to record. Use buttons on page 28). You can record only your favorite CD tracks on the unit...
... CD tracks using Program Play. If you have already loaded the disc, press DISC SKIP/EX-CHANGE repeatedly (or DISC 1 - 5 on a tape manually - "SYNC" and "REC" appear. When the recording is adjusted automatically. Recording on the unit) to record. When you want to another one. ...To stop automatically. Other operations To Stop recording Pause recording Do this system's tuner. • MD: To record from the optional component connected to record. Use buttons on page 28). You can record only your favorite CD tracks on the unit...
Operating Instructions
Page 24
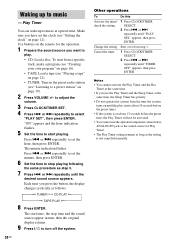
...1 Press CLOCK/TIMER SELECT. 2 Press . Make sure you want to play starts (about 15 seconds before the preset time). • If the system is not canceled manually. to select "PLAY SET", then press ENTER. or > repeatedly to set the hour, then press ENTER. Change the setting Start over from the ...sound source appear in the preset radio station (see "Setting the clock" on page 19). 2 Press VOLUME +/- Each time you use the optional component connected to ANALOG IN jack as the setting is on about 15 seconds before the preset time, the Play Timer will not be activated. •...
...1 Press CLOCK/TIMER SELECT. 2 Press . Make sure you want to play starts (about 15 seconds before the preset time). • If the system is not canceled manually. to select "PLAY SET", then press ENTER. or > repeatedly to set the hour, then press ENTER. Change the setting Start over from the ...sound source appear in the preset radio station (see "Setting the clock" on page 19). 2 Press VOLUME +/- Each time you use the optional component connected to ANALOG IN jack as the setting is on about 15 seconds before the preset time, the Play Timer will not be activated. •...
Operating Instructions
Page 29
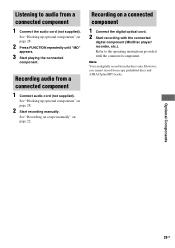
... 28. 2 Press FUNCTION repeatedly until "MD" appears. 3 Start playing the connected component. Refer to audio from a connected component 1 Connect audio cord (not supplied). However, you cannot record from the discs only. See "Recording on a tape manually" on page 28. 2 Start recording manually. Optional Components 29GB Note You can digitally record from copy prohibited discs and...
... 28. 2 Press FUNCTION repeatedly until "MD" appears. 3 Start playing the connected component. Refer to audio from a connected component 1 Connect audio cord (not supplied). However, you cannot record from the discs only. See "Recording on a tape manually" on page 28. 2 Start recording manually. Optional Components 29GB Note You can digitally record from copy prohibited discs and...
Marketing Specifications
Page 2
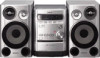
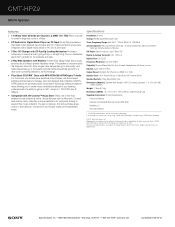
... 245mm) Weight: 17.8lbs (8.1 Kg) Dimensions (WHD): 7.5 x 10.6 x 16.1" (190 x 269.5 x 408.3mm) main unit Supplied Accessories: Power Requirements Instruction Manual Remote Commander® Remote Control (RM-SC3) Batteries x 2 FM Lead Antenna 1. s Plays Back CD-R/RW1 Discs with a digital music device or PC via a 2.5mm...92127 • 1-800-222-7669 • www.sony.com Last Updated 2005-03-22 ® s 5 Disc CD Changer with Woofers A three driver design helps ensure audio accuracy by providing a greater frequency range. CMT-HPZ9 Micro System features v 170 Watts Total: 85 Watts per ...
... 245mm) Weight: 17.8lbs (8.1 Kg) Dimensions (WHD): 7.5 x 10.6 x 16.1" (190 x 269.5 x 408.3mm) main unit Supplied Accessories: Power Requirements Instruction Manual Remote Commander® Remote Control (RM-SC3) Batteries x 2 FM Lead Antenna 1. s Plays Back CD-R/RW1 Discs with a digital music device or PC via a 2.5mm...92127 • 1-800-222-7669 • www.sony.com Last Updated 2005-03-22 ® s 5 Disc CD Changer with Woofers A three driver design helps ensure audio accuracy by providing a greater frequency range. CMT-HPZ9 Micro System features v 170 Watts Total: 85 Watts per ...

