SonicStage Ver. 2.3
Page 5
... XP/Windows 2000 Professional can be used only with the standard (factory) settings. • We do not ensure trouble-free operation of the original manufacturer-installed operating system • Multi-boot environment • Multi-monitor environment • Macintosh Notes • We do not ensure trouble-free operation on all computers that is required in order to use the SonicStage Ver. 2.3. Computer Operating System Display Others IBM PC/AT or...
... XP/Windows 2000 Professional can be used only with the standard (factory) settings. • We do not ensure trouble-free operation of the original manufacturer-installed operating system • Multi-boot environment • Multi-monitor environment • Macintosh Notes • We do not ensure trouble-free operation on all computers that is required in order to use the SonicStage Ver. 2.3. Computer Operating System Display Others IBM PC/AT or...
Limited Warranty
Page 1
... PRODUCT. This warranty is valid only in material or workmanship as fuses or batteries). For your authorized dealer, call: 1-800-488-SONY (7669) General Stereo/Hifi Components/Tape Decks ® CD Players/Mini Disc Players/Audio Systems Hifi Audio LIMITED WARRANTY Sony Electronics Inc. ("Sony") warrants this Product is within 90 days of the date of sale, the limitation on how long an implied warranty lasts, so the...
... PRODUCT. This warranty is valid only in material or workmanship as fuses or batteries). For your authorized dealer, call: 1-800-488-SONY (7669) General Stereo/Hifi Components/Tape Decks ® CD Players/Mini Disc Players/Audio Systems Hifi Audio LIMITED WARRANTY Sony Electronics Inc. ("Sony") warrants this Product is within 90 days of the date of sale, the limitation on how long an implied warranty lasts, so the...
Operating Instructions
Page 2
... CATV system installer: This reminder is intended to alert the user to which can radiate radio frequency energy and, if not installed and used in a residential installation. Should you notice an abnormality in the unit, disconnect the main plug from that any interference received, including interference that may cause harmful interference to the following measures: - CAUTION You are designed to operate...
... CATV system installer: This reminder is intended to alert the user to which can radiate radio frequency energy and, if not installed and used in a residential installation. Should you notice an abnormality in the unit, disconnect the main plug from that any interference received, including interference that may cause harmful interference to the following measures: - CAUTION You are designed to operate...
Operating Instructions
Page 4
... a tape 21 Playing a tape 21 Tape - Manual Recording Sound Adjustment Adjusting the sound 23 Timer Falling asleep to the radio 19 - Play Timer Timer recording radio programs........... 25 - Power Saving Mode Viewing information about the disc in the display 26 Changing the load disc illumination..... 27 Viewing the tuner information in the display 27 Optional Components Hooking up the system 10 Setting the clock 12 CD - Program Play Tuner Presetting radio stations 18 Listening to music 23 - Manual Tuning Using the Radio Data System (RDS).... 20 (European model...
... a tape 21 Playing a tape 21 Tape - Manual Recording Sound Adjustment Adjusting the sound 23 Timer Falling asleep to the radio 19 - Play Timer Timer recording radio programs........... 25 - Power Saving Mode Viewing information about the disc in the display 26 Changing the load disc illumination..... 27 Viewing the tuner information in the display 27 Optional Components Hooking up the system 10 Setting the clock 12 CD - Program Play Tuner Presetting radio stations 18 Listening to music 23 - Manual Tuning Using the Radio Data System (RDS).... 20 (European model...

Operating Instructions
Page 7
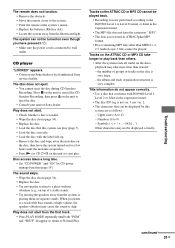
... tape, or a sticker still left on it has not been correctly finalized. A Multi Session CD is a recording method that enables adding of data using the Track-At-Once method. Furthermore, the disc will not play • CD-ROMs • CD-Rs/CD-RWs other than ISO9660 Level 1 and 2, folder names or file names may not be displayed...
... tape, or a sticker still left on it has not been correctly finalized. A Multi Session CD is a recording method that enables adding of data using the Track-At-Once method. Furthermore, the disc will not play • CD-ROMs • CD-Rs/CD-RWs other than ISO9660 Level 1 and 2, folder names or file names may not be displayed...

Operating Instructions
Page 17
Play 6 Program additional discs or tracks. Using the jog dial Use buttons on the unit for the operation. 1 Press FUNCTION repeatedly to switch the function to 5 7 Press N (or CD HS on the unit). The program step number appears, followed by using the jog dial. • The program you select an ATRAC3plus/MP3 track. 17GB However, the program is cleared from the end of Perform steps 4 and 5 in...
Play 6 Program additional discs or tracks. Using the jog dial Use buttons on the unit for the operation. 1 Press FUNCTION repeatedly to switch the function to 5 7 Press N (or CD HS on the unit). The program step number appears, followed by using the jog dial. • The program you select an ATRAC3plus/MP3 track. 17GB However, the program is cleared from the end of Perform steps 4 and 5 in...
Operating Instructions
Page 19
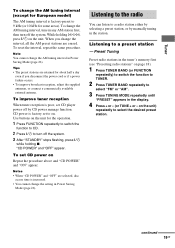
... preset station. To reset the interval, repeat the same procedure. To improve tuner reception When tuner reception is poor, set CD player power off the system. Tuner To change the AM tuning interval (except for European model) The AM tuning interval is factory-preset to 9 kHz (or 10 kHz for the operation. 1 Press FUNCTION repeatedly to switch the function to CD. 2 Press ?/1 to turn off by manually tuning in the station. Use buttons on . To set to a radio station...
... preset station. To reset the interval, repeat the same procedure. To improve tuner reception When tuner reception is poor, set CD player power off the system. Tuner To change the AM tuning interval (except for European model) The AM tuning interval is factory-preset to 9 kHz (or 10 kHz for the operation. 1 Press FUNCTION repeatedly to switch the function to CD. 2 Press ?/1 to turn off by manually tuning in the station. Use buttons on . To set to a radio station...
Operating Instructions
Page 20
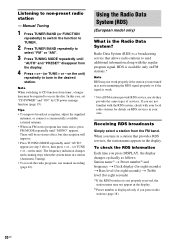
...". 3 Press TUNING MODE repeatedly until "MONO" appears. In this case, set "CD POWER" and "ON" by CD power manage function (page 19). Tips • To improve broadcast reception, adjust the supplied antennas, or connect a commercially available external antenna. • When an FM stereo program has static noise, press FM MODE repeatedly until "AUTO" and "PRESET" disappear from the FM band. Using the Radio Data System (RDS) (European model only...
...". 3 Press TUNING MODE repeatedly until "MONO" appears. In this case, set "CD POWER" and "ON" by CD power manage function (page 19). Tips • To improve broadcast reception, adjust the supplied antennas, or connect a commercially available external antenna. • When an FM stereo program has static noise, press FM MODE repeatedly until "AUTO" and "PRESET" disappear from the FM band. Using the Radio Data System (RDS) (European model only...
Operating Instructions
Page 22
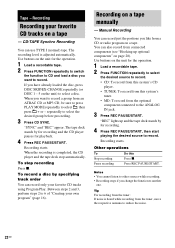
... operation. 1 Load a recordable tape. 2 Press FUNCTION repeatedly to select the desired source to the ANALOG IN jack. 3 Press REC PAUSE/START. You can also record from connected components (see "Hooking up and the tape deck stands by specifying track order You can record only your favorite CD tracks using Program Play. Recording starts. Press REC PAUSE/START. Tip For recording from the tuner: If noise is adjusted...
... operation. 1 Load a recordable tape. 2 Press FUNCTION repeatedly to select the desired source to the ANALOG IN jack. 3 Press REC PAUSE/START. You can also record from connected components (see "Hooking up and the tape deck stands by specifying track order You can record only your favorite CD tracks using Program Play. Recording starts. Press REC PAUSE/START. Tip For recording from the tuner: If noise is adjusted...
Operating Instructions
Page 24
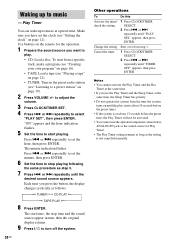
... music at the same time, the Sleep Timer has priority. • Do not operate the system from the time the system turns on until "PLAY SEL" appears, then press ENTER. Use buttons on page 19). 2 Press VOLUME +/- To start playing. or > repeatedly to set the clock (see "Setting the clock" on page 21). • TUNER: Tune in turn, then the original display returns. 9 Press ?/1 to a preset station" on the remote for Play...
... music at the same time, the Sleep Timer has priority. • Do not operate the system from the time the system turns on until "PLAY SEL" appears, then press ENTER. Use buttons on page 19). 2 Press VOLUME +/- To start playing. or > repeatedly to set the clock (see "Setting the clock" on page 21). • TUNER: Tune in turn, then the original display returns. 9 Press ?/1 to a preset station" on the remote for Play...
Operating Instructions
Page 26
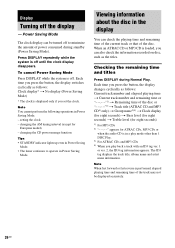
... button, the display switches cyclically as follows: Current track number and elapsed playing time t Current track number and remaining time or "- -.- -"1) t Remaining time of the disc. changing the CD power manage function Tips • STANDBY indicator lights up even in Power Saving Mode. • The timer continues to minimize the amount of the track may not be turned off until the clock display disappears. Viewing information about the disc in Power...
... button, the display switches cyclically as follows: Current track number and elapsed playing time t Current track number and remaining time or "- -.- -"1) t Remaining time of the disc. changing the CD power manage function Tips • STANDBY indicator lights up even in Power Saving Mode. • The timer continues to minimize the amount of the track may not be turned off until the clock display disappears. Viewing information about the disc in Power...
Operating Instructions
Page 27
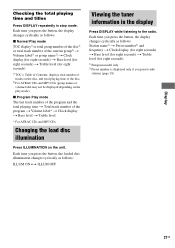
... may not be displayed depending on the play mode) x Program Play mode The last track number of the program and the total playing time t Total track number of Contents; Each time you press the button, the loaded disc illumination changes cyclically as follows: Station name1) t Preset number2) and frequency t Clock display (for eight seconds) t Bass level (for eight seconds) t Treble level (for eight seconds) 1) TOC = Table of the program t Volume label* t Clock display t Bass level t Treble level * For ATRAC CDs...
... may not be displayed depending on the play mode) x Program Play mode The last track number of the program and the total playing time t Total track number of Contents; Each time you press the button, the loaded disc illumination changes cyclically as follows: Station name1) t Preset number2) and frequency t Clock display (for eight seconds) t Bass level (for eight seconds) t Treble level (for eight seconds) 1) TOC = Table of the program t Volume label* t Clock display t Bass level t Treble level * For ATRAC CDs...

Operating Instructions
Page 28
... disc using a digital component connected to this system. Refer to the operating instructions provided with a digital optical input jack. You can connect optional components. Notes • There is no digital audio output from the component through this system. repeatedly (or turn the VOLUME control on the connected component. • Before connecting or disconnecting the audio cord (not supplied), press VOLUME - If the jack is set to CD. B CD DIGITAL OUT jack Use a digital optical cord (square, not supplied) to turn down the volume. 28GB Optional Components Hooking...
... disc using a digital component connected to this system. Refer to the operating instructions provided with a digital optical input jack. You can connect optional components. Notes • There is no digital audio output from the component through this system. repeatedly (or turn the VOLUME control on the connected component. • Before connecting or disconnecting the audio cord (not supplied), press VOLUME - If the jack is set to CD. B CD DIGITAL OUT jack Use a digital optical cord (square, not supplied) to turn down the volume. 28GB Optional Components Hooking...

Operating Instructions
Page 30
... the rear of the system? After STANDBY indicator stops flashing, reconnect the power cord and turn VOLUME control on the unit clockwise. • Make sure the headphones are correctly and firmly connected. 2 Find your Sony dealer or local authorized Sony service facility. If "CANT LOCK" still appears, contact your problem in the display. • A power interruption has occurred. "Timer recording radio programs" (page 25) There is no audio output during...
... the rear of the system? After STANDBY indicator stops flashing, reconnect the power cord and turn VOLUME control on the unit clockwise. • Make sure the headphones are correctly and firmly connected. 2 Find your Sony dealer or local authorized Sony service facility. If "CANT LOCK" still appears, contact your problem in the display. • A power interruption has occurred. "Timer recording radio programs" (page 25) There is no audio output during...
Operating Instructions
Page 31
... (e.g., on top of a stable stand). • Try moving the system to eject the disc. • Consult your Sony dealer or local authorized Sony service facility. Title information do not appear correctly. • Use a disc that can play (page 7). • Load the disc correctly. • Load the disc with bass sounds at the system's sensor. • Replace the batteries (R6/size AA). • Locate the...
... (e.g., on top of a stable stand). • Try moving the system to eject the disc. • Consult your Sony dealer or local authorized Sony service facility. Title information do not appear correctly. • Use a disc that can play (page 7). • Load the disc correctly. • Load the disc with bass sounds at the system's sensor. • Replace the batteries (R6/size AA). • Locate the...
Operating Instructions
Page 32
...; Turn on the connected component. • Refer to the operating instructions supplied with adhesive tape (page 35). • The tape has wound to turn on the unit for the operation. 1 Disconnect the power cord. 2 Reconnect the power cord. 3 Press ?/1 to the end. Load a cassette. • The tab has been removed from the speaker cords as follows: Use buttons on the system. 4 Press x, ILLUMINATION and ?/1. The system is a decrease in sound level...
...; Turn on the connected component. • Refer to the operating instructions supplied with adhesive tape (page 35). • The tape has wound to turn on the unit for the operation. 1 Disconnect the power cord. 2 Reconnect the power cord. 3 Press ?/1 to the end. Load a cassette. • The tab has been removed from the speaker cords as follows: Use buttons on the system. 4 Press x, ILLUMINATION and ?/1. The system is a decrease in sound level...
Operating Instructions
Page 34
... expose the disc to direct sunlight or heat sources such as it any questions or problems concerning your system, please consult your nearest Sony dealer. Wipe the disc from the wall outlet (mains) if it is not to 30 minutes turn off . • Unplug the system from the center out. • Do not use this unit. On the speaker system This speaker system is not...
... expose the disc to direct sunlight or heat sources such as it any questions or problems concerning your system, please consult your nearest Sony dealer. Wipe the disc from the wall outlet (mains) if it is not to 30 minutes turn off . • Unplug the system from the center out. • Do not use this unit. On the speaker system This speaker system is not...
Operating Instructions
Page 36
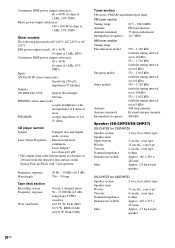
... PHONES (stereo mini jack): accepts headphones with an impedance of 8 ohms or more SPEAKER: accepts impedance of 6 to 16 ohms CD player section System Compact disc and digital audio system Laser Diode Properties Emission duration: continuous Laser Output*: Less than 44.6 µW * This output is the value measurement at a distance of 200 mm from the objective lens surface on the Optical Pick-up Block with the tuning interval set at...
... PHONES (stereo mini jack): accepts headphones with an impedance of 8 ohms or more SPEAKER: accepts impedance of 6 to 16 ohms CD player section System Compact disc and digital audio system Laser Diode Properties Emission duration: continuous Laser Output*: Less than 44.6 µW * This output is the value measurement at a distance of 200 mm from the objective lens surface on the Optical Pick-up Block with the tuning interval set at...
Marketing Specifications
Page 1
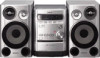
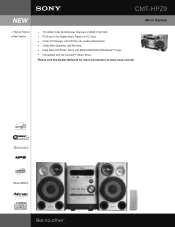
CMT-HPZ9 Micro System v Step-up Feature 3New Feature v 170 Watts Total: 85 Watts per Channel x 2 (RMS 10% THD) v PC/Audio In for Digital Music Players or PC Input s 5 Disc CD Changer with CD Pop-Up Loading Mechanism s 3 Way Main Speakers with Woofers s Plays Back CD-R/RW1 Discs with MP3/ATRAC3®/ATRAC3plus™ Audio s Compatible with the Connect™ Music Store Please visit the Dealer Network for more information at www.sony.com/dn
CMT-HPZ9 Micro System v Step-up Feature 3New Feature v 170 Watts Total: 85 Watts per Channel x 2 (RMS 10% THD) v PC/Audio In for Digital Music Players or PC Input s 5 Disc CD Changer with CD Pop-Up Loading Mechanism s 3 Way Main Speakers with Woofers s Plays Back CD-R/RW1 Discs with MP3/ATRAC3®/ATRAC3plus™ Audio s Compatible with the Connect™ Music Store Please visit the Dealer Network for more information at www.sony.com/dn
Marketing Specifications
Page 2
.... CMT-HPZ9 Micro System features v 170 Watts Total: 85 Watts per song, using 700MB CD-R/RW media, compressing in Rear Output Power: 85 Watts Per Channel x 2 (RMS 10% THD) Speaker Unit: 4 3/4" Woofer Driver; 2" Mid Driver; 3/4" Tweeter Driver Speaker System: 3 Way Bass Reflex Type Dimensions (Approx.): Speaker Wire (length): 4.9 Ft (1.5 meters), Speaker: 7" x 12"x 9.6" (180 x 296 x 245mm) Weight: 17.8lbs (8.1 Kg) Dimensions (WHD): 7.5 x 10.6 x 16.1" (190 x 269.5 x 408.3mm) main unit Supplied Accessories: Power Requirements Instruction Manual Remote Commander...
.... CMT-HPZ9 Micro System features v 170 Watts Total: 85 Watts per song, using 700MB CD-R/RW media, compressing in Rear Output Power: 85 Watts Per Channel x 2 (RMS 10% THD) Speaker Unit: 4 3/4" Woofer Driver; 2" Mid Driver; 3/4" Tweeter Driver Speaker System: 3 Way Bass Reflex Type Dimensions (Approx.): Speaker Wire (length): 4.9 Ft (1.5 meters), Speaker: 7" x 12"x 9.6" (180 x 296 x 245mm) Weight: 17.8lbs (8.1 Kg) Dimensions (WHD): 7.5 x 10.6 x 16.1" (190 x 269.5 x 408.3mm) main unit Supplied Accessories: Power Requirements Instruction Manual Remote Commander...


