Operating Instructions
Page 1
Refer to them whenever you call upon your Sony dealer regarding this product. 4-234-818-11 (2) Micro Hi-Fi Component System Operating Instructions Owner's Record The model and serial numbers are located on the bottom. Model No Serial No CMT-EP50 © 2001 Sony Corporation Record the serial number in the space provided below.
Refer to them whenever you call upon your Sony dealer regarding this product. 4-234-818-11 (2) Micro Hi-Fi Component System Operating Instructions Owner's Record The model and serial numbers are located on the bottom. Model No Serial No CMT-EP50 © 2001 Sony Corporation Record the serial number in the space provided below.
Operating Instructions
Page 3
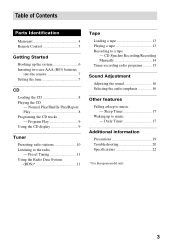
... time 7 CD Loading the CD 8 Playing the CD - Daily Timer 17 Additional information Precautions 19 Troubleshooting 20 Specifications 22 * For European model only 3 Preset Tuning 11 Using the Radio Data System (RDS 11 Tape Loading a tape 13 Playing a tape 13 Recording to the radio - Program Play 9 Using the CD display 9 Tuner Presetting...
... time 7 CD Loading the CD 8 Playing the CD - Daily Timer 17 Additional information Precautions 19 Troubleshooting 20 Specifications 22 * For European model only 3 Preset Tuning 11 Using the Radio Data System (RDS 11 Tape Loading a tape 13 Playing a tape 13 Recording to the radio - Program Play 9 Using the CD display 9 Tuner Presetting...
Operating Instructions
Page 4
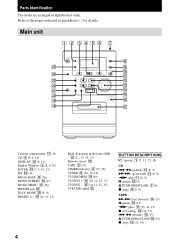
...) qf (13) X (pause) wd (13) nN (play) qa (13, 14, 15) z (recording) ws (14, 15) . Main unit 1 2 3456 7 8 wg 9 q; qk (10, 11, 12) RDS (European model only)/DIR w; (12, 13, 14, 15) Remote sensor wg TAPE 3 (13) TIMER indicator 2 (15, 18) TUNER 6 (10, 11, 14) TUNER MEM ql (10) TUNING + qf...
...) qf (13) X (pause) wd (13) nN (play) qa (13, 14, 15) z (recording) ws (14, 15) . Main unit 1 2 3456 7 8 wg 9 q; qk (10, 11, 12) RDS (European model only)/DIR w; (12, 13, 14, 15) Remote sensor wg TAPE 3 (13) TIMER indicator 2 (15, 18) TUNER 6 (10, 11, 14) TUNER MEM ql (10) TUNING + qf...
Operating Instructions
Page 5
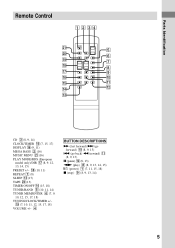
... qa qf qs qd CD 3 (8, 9, 14) CLOCK/TIMER qg (7, 15, 17) DISPLAY qh (9, 11) MEGA BASS 2 (16) MUSIC MENU wa (16) PLAY MODE/RDS (European model only)/DIR qj (8, 9, 12, 13, 14, 15) PRESET +/- Parts Identification Remote Control 1 2 34 wa 5 w; 6 ql 7 qk 8 qj 9 qh q;
... qa qf qs qd CD 3 (8, 9, 14) CLOCK/TIMER qg (7, 15, 17) DISPLAY qh (9, 11) MEGA BASS 2 (16) MUSIC MENU wa (16) PLAY MODE/RDS (European model only)/DIR qj (8, 9, 12, 13, 14, 15) PRESET +/- Parts Identification Remote Control 1 2 34 wa 5 w; 6 ql 7 qk 8 qj 9 qh q;
Operating Instructions
Page 7
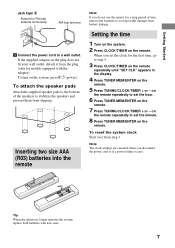
...the remote repeatedly to a wall outlet. If the supplied adaptor on the remote. 5 Press TUNING/CLOCK/TIMER + or - When you set the clock for models equipped with new ones. 7 Getting Started Jack type B Extend the FM lead antenna horizontally. To attach the speaker pads Attach the supplied speaker pads to...into the remote Note If you disconnect the power cord or if a power failure occurs. on the remote. Setting the time 1 Turn on the system. 2 Press CLOCK/TIMER on the system, press [/ 1 (power). on the remote. 7 Press TUNING/CLOCK/TIMER + or - To turn on the remote. To reset the...
...the remote repeatedly to a wall outlet. If the supplied adaptor on the remote. 5 Press TUNING/CLOCK/TIMER + or - When you set the clock for models equipped with new ones. 7 Getting Started Jack type B Extend the FM lead antenna horizontally. To attach the speaker pads Attach the supplied speaker pads to...into the remote Note If you disconnect the power cord or if a power failure occurs. on the remote. Setting the time 1 Turn on the system. 2 Press CLOCK/TIMER on the system, press [/ 1 (power). on the remote. 7 Press TUNING/CLOCK/TIMER + or - To turn on the remote. To reset the...
Operating Instructions
Page 10
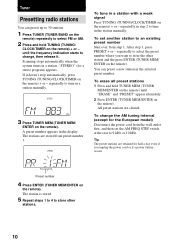
...the station manually. To erase all preset stations 1 Press and hold TUNING (TUNING/ CLOCK/TIMER on the remote) + or - "STEREO" (for the European model) Disconnect the power cord from preset number 1. After step 3, press PRESET + or - To change , then release it doesn't stop automatically, press TUNING (... on the remote) + or - The station is stored. 5 Repeat steps 1 to 4 to 9 kHz or 10 kHz. Scanning stops automatically when the system tunes in the display. repeatedly in step 2 to select FM or AM. 2 Press and hold TUNER MEM (TUNER MEM/ENTER on the remote). repeatedly to...
...the station manually. To erase all preset stations 1 Press and hold TUNING (TUNING/ CLOCK/TIMER on the remote) + or - "STEREO" (for the European model) Disconnect the power cord from preset number 1. After step 3, press PRESET + or - To change , then release it doesn't stop automatically, press TUNING (... on the remote) + or - The station is stored. 5 Repeat steps 1 to 4 to 9 kHz or 10 kHz. Scanning stops automatically when the system tunes in the display. repeatedly in step 2 to select FM or AM. 2 Press and hold TUNER MEM (TUNER MEM/ENTER on the remote). repeatedly to...

Operating Instructions
Page 11
... memory first. 1 Press TUNER (TUNER/BAND on the remote) repeatedly to non-preset radio stations Use manual or automatic tuning in the display. Radio Data System (RDS) is tuned. When you press DISPLAY, the display changes as follows: Frequency t RDS name* t RDS TEXT* t RDS type* t Clock display... in the display. This tuner offers convenient RDS features like station name display and location of services. Using the Radio Data System (RDS) (European model only) What is available only on RDS services in your local radio stations for details on FM stations.* Note RDS may ...
... memory first. 1 Press TUNER (TUNER/BAND on the remote) repeatedly to non-preset radio stations Use manual or automatic tuning in the display. Radio Data System (RDS) is tuned. When you press DISPLAY, the display changes as follows: Frequency t RDS name* t RDS TEXT* t RDS type* t Clock display... in the display. This tuner offers convenient RDS features like station name display and location of services. Using the Radio Data System (RDS) (European model only) What is available only on RDS services in your local radio stations for details on FM stations.* Note RDS may ...
Operating Instructions
Page 22
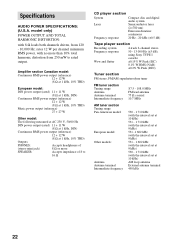
... 1 kHz, DIN) Continuous RMS power output (reference) 12 + 12 W (8 Ω at 1 kHz, 10% THD) Music power output (reference) 27 + 27 W Other model: The following measured at AC 230 V, 50/60 Hz DIN power output (rated) 11 + 11 W (8 Ω at 1 kHz, DIN) Continuous RMS power output (reference) 12...(λ=780 nm) Emission duration: continuous 20 Hz - 20 kHz (±0.5 dB) Tape player section Recording system Frequency response Wow and flutter 4-track 2-channel stereo 50 - 13 000 Hz (±3 dB), using Sony TYPE I cassette ±0.15% W.Peak (IEC) 0.1% W.RMS (NAB) ±0.2% W.Peak (DIN) ...
... 1 kHz, DIN) Continuous RMS power output (reference) 12 + 12 W (8 Ω at 1 kHz, 10% THD) Music power output (reference) 27 + 27 W Other model: The following measured at AC 230 V, 50/60 Hz DIN power output (rated) 11 + 11 W (8 Ω at 1 kHz, DIN) Continuous RMS power output (reference) 12...(λ=780 nm) Emission duration: continuous 20 Hz - 20 kHz (±0.5 dB) Tape player section Recording system Frequency response Wow and flutter 4-track 2-channel stereo 50 - 13 000 Hz (±3 dB), using Sony TYPE I cassette ±0.15% W.Peak (IEC) 0.1% W.RMS (NAB) ±0.2% W.Peak (DIN) ...

Operating Instructions
Page 23
... antenna (1) Speaker pads (8) Design and specifications are subject to change without notice. Additional Information 23 Speaker Speaker system Speaker units Nominal impedance Dimensions (w/h/d) Mass General Power requirements North American model: European model: Mexican model: Argentine model: Hong Kong model: Other models: Bass-reflex type Full range 10 cm, cone type 8 Ω Approx. 145 × 238 × 171...
... antenna (1) Speaker pads (8) Design and specifications are subject to change without notice. Additional Information 23 Speaker Speaker system Speaker units Nominal impedance Dimensions (w/h/d) Mass General Power requirements North American model: European model: Mexican model: Argentine model: Hong Kong model: Other models: Bass-reflex type Full range 10 cm, cone type 8 Ω Approx. 145 × 238 × 171...


