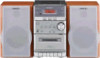
Operating Instructions
Page 2
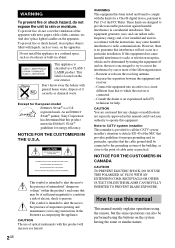
...the remote, but the same operations can radiate radio frequency energy and, if not installed and used in this manual This manual mainly explains operations using the buttons on the system having the same or similar names. Do not install the appliance in a confined space, such as a CLASS ... the apparatus. Don't throw away the battery with news papers, table-cloths, curtains, etc. As an ENERGY STAR® partner, Sony Corporation has determined that interference will increase eye hazard. 2GB WARNING This equipment has been tested and found to comply with this equipment. If...
...the remote, but the same operations can radiate radio frequency energy and, if not installed and used in this manual This manual mainly explains operations using the buttons on the system having the same or similar names. Do not install the appliance in a confined space, such as a CLASS ... the apparatus. Don't throw away the battery with news papers, table-cloths, curtains, etc. As an ENERGY STAR® partner, Sony Corporation has determined that interference will increase eye hazard. 2GB WARNING This equipment has been tested and found to comply with this equipment. If...

Operating Instructions
Page 3
...own program 7 - Power Saving Mode Viewing information about the disc in the display 14 Optional Components Hooking up the system 4 Setting the clock 5 CD - Manual Tuning Tape - Manual Recording Sound Adjustment Adjusting the sound 12 Timer Falling asleep to the radio 9 - Daily Timer...- Play Loading a tape 10 Playing a tape 10 Tape - Sleep Timer Waking up to use this manual 2 Getting Started Hooking up optional components......... 15 Troubleshooting Problems and remedies 16 Messages 18 Additional Information Precautions 18 Specifications 20 List of Contents How ...
...own program 7 - Power Saving Mode Viewing information about the disc in the display 14 Optional Components Hooking up the system 4 Setting the clock 5 CD - Manual Tuning Tape - Manual Recording Sound Adjustment Adjusting the sound 12 Timer Falling asleep to the radio 9 - Daily Timer...- Play Loading a tape 10 Playing a tape 10 Tape - Sleep Timer Waking up to use this manual 2 Getting Started Hooking up optional components......... 15 Troubleshooting Problems and remedies 16 Messages 18 Additional Information Precautions 18 Specifications 20 List of Contents How ...

Operating Instructions
Page 8
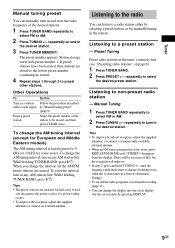
... not appear and the scanning does not stop mode. Preset number 4 Repeat steps 1 through 4 of the CD compartment. Each time you open the lid of "Manual tuning preset" (page 9). 3 Press TUNER MEMORY. However, the program is cleared when you press the button, a track is tuned in stop mode. Automatic tuning preset...
... not appear and the scanning does not stop mode. Preset number 4 Repeat steps 1 through 4 of the CD compartment. Each time you open the lid of "Manual tuning preset" (page 9). 3 Press TUNER MEMORY. However, the program is cleared when you press the button, a track is tuned in stop mode. Automatic tuning preset...
Operating Instructions
Page 9
...8). 1 Press TUNER BAND. 2 Press PRESET +/- Scanning stops when the system tunes in and store the radio frequency of the station to be no station. 4 Repeat steps 1 through 3 to preset other stations. Tuner Manual tuning preset You can manually tune in a station (Automatic Tuning). • To record the radio ... The AM tuning interval is factory-preset to the radio You can change the display into the clock display (for the six seconds) by manually tuning in any AM station first. There will improve. • In step 2, press and hold TUNING +/- until "STEREO" disappears from ...
...8). 1 Press TUNER BAND. 2 Press PRESET +/- Scanning stops when the system tunes in and store the radio frequency of the station to be no station. 4 Repeat steps 1 through 3 to preset other stations. Tuner Manual tuning preset You can manually tune in a station (Automatic Tuning). • To record the radio ... The AM tuning interval is factory-preset to the radio You can change the display into the clock display (for the six seconds) by manually tuning in any AM station first. There will improve. • In step 2, press and hold TUNING +/- until "STEREO" disappears from ...

Operating Instructions
Page 11
... Recording your favorite CD tracks using Program Play. After the system has created a blank space of "Creating your own program" (page 7). Other operations To Do this system's tuner. • MD: To record from the optional component connected to select tracks (after step 2 and before step ...4). You can record just the portions you like from a CD, you want to record. 3 Press CD N to switch the function to 5 of about 10 seconds on a tape manually...
... Recording your favorite CD tracks using Program Play. After the system has created a blank space of "Creating your own program" (page 7). Other operations To Do this system's tuner. • MD: To record from the optional component connected to select tracks (after step 2 and before step ...4). You can record just the portions you like from a CD, you want to record. 3 Press CD N to switch the function to 5 of about 10 seconds on a tape manually...
Operating Instructions
Page 15
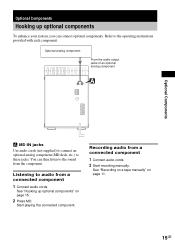
See "Hooking up optional components To enhance your system, you can then listen to the operating instructions provided with each component. See "Recording on a tape manually" on page 15. 2 Press MD. You can connect optional components. Recording audio from the component. Optional analog component From the audio output jacks of an optional analog component Optional Components A MD IN jacks Use...
See "Hooking up optional components To enhance your system, you can then listen to the operating instructions provided with each component. See "Recording on a tape manually" on page 15. 2 Press MD. You can connect optional components. Recording audio from the component. Optional analog component From the audio output jacks of an optional analog component Optional Components A MD IN jacks Use...

