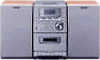
Operating Instructions
Page 3
... information Precautions 16 Troubleshooting 17 Specifications 19 * For European model only 3 Sleep Timer 15 Waking up the system 6 Inserting two size AAA (R03) batteries into the remote 7 Setting the time 7 CD Loading the CD 8 Playing the CD - CD Synchro Recording/Recording Manually 13 Sound Adjustment Adjusting the sound 14 Selecting the audio emphasis 14 Other...
... information Precautions 16 Troubleshooting 17 Specifications 19 * For European model only 3 Sleep Timer 15 Waking up the system 6 Inserting two size AAA (R03) batteries into the remote 7 Setting the time 7 CD Loading the CD 8 Playing the CD - CD Synchro Recording/Recording Manually 13 Sound Adjustment Adjusting the sound 14 Selecting the audio emphasis 14 Other...
Operating Instructions
Page 4
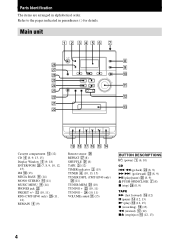
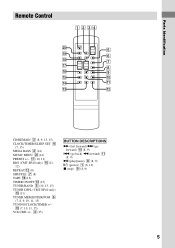
... ql qk qj qh qg qf Remote sensor wk REPEAT wj (8) SHUFFLE wa (8) TAPE 3 (12) TIMER indicator 2 (15) TUNER 6 (10, 13, 15) TUNER DSPL (CMT-EP40 only) wh (11) TUNER MEM w; (10) TUNING + wd (10, 11) TUNING - wg wf qa wd ws qs wa qd w; wf (10, 11) VOLUME ...control qa (15) BUTTON DESCRIPTIONS @/1 (power) 1 (6, 10) CD . m (go back) wf (8, 9) M > (go forward) wd (8, 9) u (play/pause) wg (8, 9) Z PUSH OPEN/CLOSE 7 (8) x (stop) wh (8, 9) TAPE M (fast forward) qh (12) X (pause) qf (12, 13)...
... ql qk qj qh qg qf Remote sensor wk REPEAT wj (8) SHUFFLE wa (8) TAPE 3 (12) TIMER indicator 2 (15) TUNER 6 (10, 13, 15) TUNER DSPL (CMT-EP40 only) wh (11) TUNER MEM w; (10) TUNING + wd (10, 11) TUNING - wg wf qa wd ws qs wa qd w; wf (10, 11) VOLUME ...control qa (15) BUTTON DESCRIPTIONS @/1 (power) 1 (6, 10) CD . m (go back) wf (8, 9) M > (go forward) wd (8, 9) u (play/pause) wg (8, 9) Z PUSH OPEN/CLOSE 7 (8) x (stop) wh (8, 9) TAPE M (fast forward) qh (12) X (pause) qf (12, 13)...
Operating Instructions
Page 5
qf qa qd qs CD/REMAIN 3 (8, 9, 13, 15) CLOCK/TIMER/SLEEP SET qf (7, 15) MEGA BASS 2 (14) MUSIC MENU w; (14) PRESET +/- qj (10, 11) RDS (CMT-EP40 only) qh (11, 12) REPEAT qs (8) SHUFFLE 7 (8) TAPE ql (12) TIMER ON/OFF qd (15) TUNER/BAND 5 (10, 13, 15) TUNER DSPL (CMT-EP40 only) qg (11...
qf qa qd qs CD/REMAIN 3 (8, 9, 13, 15) CLOCK/TIMER/SLEEP SET qf (7, 15) MEGA BASS 2 (14) MUSIC MENU w; (14) PRESET +/- qj (10, 11) RDS (CMT-EP40 only) qh (11, 12) REPEAT qs (8) SHUFFLE 7 (8) TAPE ql (12) TIMER ON/OFF qd (15) TUNER/BAND 5 (10, 13, 15) TUNER DSPL (CMT-EP40 only) qg (11...

Operating Instructions
Page 8
... the CD in different play a CD single (8 cm CD), place it when you play modes. Press again to resume play , press and hold M > (to close the lid of the compartment. 3 Press Z PUSH OPEN/CLOSE down to go forward) or . Remove the CD Press Z PUSH OPEN/CLOSE. 8 Normal Play/Shuffle Play/Repeat Play This system lets...
... the CD in different play a CD single (8 cm CD), place it when you play modes. Press again to resume play , press and hold M > (to close the lid of the compartment. 3 Press Z PUSH OPEN/CLOSE down to go forward) or . Remove the CD Press Z PUSH OPEN/CLOSE. 8 Normal Play/Shuffle Play/Repeat Play This system lets...

Operating Instructions
Page 9
...on the current CD t Elapsed ...Using the CD display Press REMAIN (CD/REMAIN on ...the remote). The track is programed. The next program step number appears, and "PROGRAM" flashes. 5 To program additional tracks, repeat steps 3 to 28 tracks in the order you press the button, the selected track number and the programed step number appear in the display in the display. 3 Press . CD... Programing the CD tracks - Program Play starts. The program you made will be played. 1 Press CD (CD/REMAIN on the remote), then place a CD...CD (CD/REMAIN on the remote) and ENTER/PGM (TUNER...
...on the current CD t Elapsed ...Using the CD display Press REMAIN (CD/REMAIN on ...the remote). The track is programed. The next program step number appears, and "PROGRAM" flashes. 5 To program additional tracks, repeat steps 3 to 28 tracks in the order you press the button, the selected track number and the programed step number appear in the display in the display. 3 Press . CD... Programing the CD tracks - Program Play starts. The program you made will be played. 1 Press CD (CD/REMAIN on the remote), then place a CD...CD (CD/REMAIN on the remote) and ENTER/PGM (TUNER...
Operating Instructions
Page 13
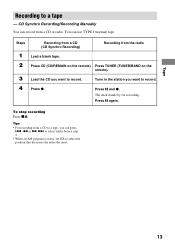
...you can press . To stop recording Press xZ. Tips • For recording from the radio 1 Load a blank tape. 2 Press CD (CD/REMAIN on the remote). 3 Load the CD you want to a tape -- Tune in the station you want to select the position that decreases the noise the most. 13 You... can record from a CD or radio. The deck stands by for recording. Tape Recording to record. CD Synchro Recording/Recording Manually You can use TYPE I (normal) tape. Press TUNER (TUNER/BAND on the remote...
...you can press . To stop recording Press xZ. Tips • For recording from the radio 1 Load a blank tape. 2 Press CD (CD/REMAIN on the remote). 3 Load the CD you want to a tape -- Tune in the station you want to select the position that decreases the noise the most. 13 You... can record from a CD or radio. The deck stands by for recording. Tape Recording to record. CD Synchro Recording/Recording Manually You can use TYPE I (normal) tape. Press TUNER (TUNER/BAND on the remote...

Operating Instructions
Page 15
...TIMER/ SLEEP SET on the remote. 15 Waking up to music - on the remote. 8 Press ENTER/PGM (TUNER MEM/ ENTER/PGM on the remote). 9 Press CD (CD/REMAIN on the remote) or TUNER (TUNER/BAND on the remote) depending on the remote to turn off time) changes as follows: 90 y 80 y 70... the button, the minute display (the turn off automatically. Make sure you have set the system to select the minutes until "SLEEP OFF" appears in the preset station you can fall asleep to play . • CD: Load a CD. • Radio: Tune in the display. 2 Press TUNING/CLOCK/TIMER + or - Start over from ...
...TIMER/ SLEEP SET on the remote. 15 Waking up to music - on the remote. 8 Press ENTER/PGM (TUNER MEM/ ENTER/PGM on the remote). 9 Press CD (CD/REMAIN on the remote) or TUNER (TUNER/BAND on the remote) depending on the remote to turn off time) changes as follows: 90 y 80 y 70... the button, the minute display (the turn off automatically. Make sure you have set the system to select the minutes until "SLEEP OFF" appears in the preset station you can fall asleep to play . • CD: Load a CD. • Radio: Tune in the display. 2 Press TUNING/CLOCK/TIMER + or - Start over from ...

Operating Instructions
Page 16
.... 16 To prevent a malfunction, do so may damage the system. Wipe the CD from the wall outlet (mains) if it is placed in locations where it any questions or problems concerning your stereo system, please consult your nearest Sony dealer. Besides, the discs, which are not yet finalized at...do not cover the ventilation hole for about an hour until the moisture evaporates. • When you have the component checked by the plug. Remove the CD and leave the system turned on this unit at a qualified service shop. Attempting to be played back because of scratches, dirt., recording...
.... 16 To prevent a malfunction, do so may damage the system. Wipe the CD from the wall outlet (mains) if it is placed in locations where it any questions or problems concerning your stereo system, please consult your nearest Sony dealer. Besides, the discs, which are not yet finalized at...do not cover the ventilation hole for about an hour until the moisture evaporates. • When you have the component checked by the plug. Remove the CD and leave the system turned on this unit at a qualified service shop. Attempting to be played back because of scratches, dirt., recording...

Operating Instructions
Page 18
... place the speakers farther away from the cassette. • The tape has reeled to 30 minutes. terminals are magnetized. Remove the CD and leave the system turned on page 17). Clean them (see "Demagnetizing the tape heads" on page 17). Noise increases or the high frequencies are ... them (see "Cleaning the tape heads" on the CD compartment. 18 Troubleshooting (continued) The remote does not function. • There is an obstacle between the remote and the system. • The remote is not pointing in the direction of the system's sensor. • The batteries have run down ....
... place the speakers farther away from the cassette. • The tape has reeled to 30 minutes. terminals are magnetized. Remove the CD and leave the system turned on page 17). Clean them (see "Demagnetizing the tape heads" on page 17). Noise increases or the high frequencies are ... them (see "Cleaning the tape heads" on the CD compartment. 18 Troubleshooting (continued) The remote does not function. • There is an obstacle between the remote and the system. • The remote is not pointing in the direction of the system's sensor. • The batteries have run down ....

Operating Instructions
Page 19
...AND TOTAL HARMONIC DISTORTION: with 4 Ω loads both channels driven, from 250 mW to 16 Ω CD player section System Laser Frequency response Compact disc and digital audio system Semiconductor laser (λ=780 nm) Emission duration: continuous 20 Hz - 20 kHz (±0.5 dB) Tape player ...section Recording system Frequency response Wow and flutter 4-track 2-channel stereo 50 - 13 000 Hz (±3 dB), using Sony TYPE I cassette ±0.15% W.Peak (IEC) 0.1% W.RMS (NAB) ±0.2% W.Peak (DIN)...
...AND TOTAL HARMONIC DISTORTION: with 4 Ω loads both channels driven, from 250 mW to 16 Ω CD player section System Laser Frequency response Compact disc and digital audio system Semiconductor laser (λ=780 nm) Emission duration: continuous 20 Hz - 20 kHz (±0.5 dB) Tape player ...section Recording system Frequency response Wow and flutter 4-track 2-channel stereo 50 - 13 000 Hz (±3 dB), using Sony TYPE I cassette ±0.15% W.Peak (IEC) 0.1% W.RMS (NAB) ±0.2% W.Peak (DIN)...


