Operating Instructions
Page 1
Record the serial number in the space provided below. Refer to them whenever you call upon your Sony dealer regarding this product. Serial No. Model No. CMT-ED2/ED2U ©1999 by Sony Corporation 3-867-342-13(1) Micro HiFi Component System Operating Instructions Owner's Record The model and serial numbers are located on the rear of the system.
Record the serial number in the space provided below. Refer to them whenever you call upon your Sony dealer regarding this product. Serial No. Model No. CMT-ED2/ED2U ©1999 by Sony Corporation 3-867-342-13(1) Micro HiFi Component System Operating Instructions Owner's Record The model and serial numbers are located on the rear of the system.

Operating Instructions
Page 2
...rear exterior. If this equipment does cause harmful interference to radio or television reception, which the receiver is provided to call CATV system installer's attention to the presence of Dolby Laboratories Licensing Corporation. 2 Connect the equipment into an outlet on a circuit different from...shock, do not expose the unit to Part 15 of the following measures: - NOTICE FOR THE CUSTOMERS IN THE U.S.A. Note on CATV system installer: This reminder is connected. - Increase the separation between the equipment and receiver. - Consult the dealer or an experienced radio/TV technician...
...rear exterior. If this equipment does cause harmful interference to radio or television reception, which the receiver is provided to call CATV system installer's attention to the presence of Dolby Laboratories Licensing Corporation. 2 Connect the equipment into an outlet on a circuit different from...shock, do not expose the unit to Part 15 of the following measures: - NOTICE FOR THE CUSTOMERS IN THE U.S.A. Note on CATV system installer: This reminder is connected. - Increase the separation between the equipment and receiver. - Consult the dealer or an experienced radio/TV technician...

Operating Instructions
Page 3
... of Contents Getting Started Step 1: Hooking up to music - CD Synchro Recording 14 Listening to a tape - Preset .. 9 Connecting optional components 10 Basic Operations Playing a CD - Program Play 22 Sound Adjustment Generating a more dynamic sound .......... 26 Selecting the sound mode 26 Other... Features Using the Radio Data System (RDS)* .... 27 Falling asleep to music - Sleep Timer .. 27 Waking up the system 4 Step 2: Setting the time 7 Step 3: Presetting radio stations - Repeat Play 20 Playing ...
... of Contents Getting Started Step 1: Hooking up to music - CD Synchro Recording 14 Listening to a tape - Preset .. 9 Connecting optional components 10 Basic Operations Playing a CD - Program Play 22 Sound Adjustment Generating a more dynamic sound .......... 26 Selecting the sound mode 26 Other... Features Using the Radio Data System (RDS)* .... 27 Falling asleep to music - Sleep Timer .. 27 Waking up the system 4 Step 2: Setting the time 7 Step 3: Presetting radio stations - Repeat Play 20 Playing ...

Operating Instructions
Page 4
... the supplied cords and accessories. and other models. The speaker grille design differs somewhat from the antennas to hook up the system Follow steps 1 through 6 of the U.S. U Push in on the tabs, pull downward, and then lift off 2 Connect the speakers. 1 Connect the right and left speaker ...
... the supplied cords and accessories. and other models. The speaker grille design differs somewhat from the antennas to hook up the system Follow steps 1 through 6 of the U.S. U Push in on the tabs, pull downward, and then lift off 2 Connect the speakers. 1 Connect the right and left speaker ...

Operating Instructions
Page 5
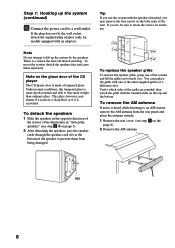
Pass the speaker cords through the holes on the speakers to make sure they are correctly and securely connected, reinstall the rear cover. Facing the front of the unit, attach the speaker connected to the SPEAKER R terminals onto the right side of the unit and the speaker connected to the SPEAKER L terminals onto the left side of the unit. Afterwards, push down while holding the glass door firmly with a voltage selector, set the speaker cord into the groove at the bottom of the unit. continued 5 VOLTAGE SELECTOR 3 For models with your hand, then set VOLTAGE SELECTOR to the local ...
Pass the speaker cords through the holes on the speakers to make sure they are correctly and securely connected, reinstall the rear cover. Facing the front of the unit, attach the speaker connected to the SPEAKER R terminals onto the right side of the unit and the speaker connected to the SPEAKER L terminals onto the left side of the unit. Afterwards, push down while holding the glass door firmly with a voltage selector, set the speaker cord into the groove at the bottom of the unit. continued 5 VOLTAGE SELECTOR 3 For models with your hand, then set VOLTAGE SELECTOR to the local ...
Operating Instructions
Page 6
... Slot 6 To replace the speaker grille To remove the speaker grille, grasp one of the other supplied grilles of tempered glass. To move the system, detach the speakers first and carry them from the rear panel and place the antenna outside. 1 Remove the rear cover. (see step 2-3 ...There is made of a different color. Tip If you use . + - Under normal conditions, this tempered glass is scratched. Step 1: Hooking up the system by the speakers. Note Do not attempt to prevent them separately. This glass, however, may remove the four screws on page 5). 2 After detaching the speakers...
... Slot 6 To replace the speaker grille To remove the speaker grille, grasp one of the other supplied grilles of tempered glass. To move the system, detach the speakers first and carry them from the rear panel and place the antenna outside. 1 Remove the rear cover. (see step 2-3 ...There is made of a different color. Tip If you use . + - Under normal conditions, this tempered glass is scratched. Step 1: Hooking up the system by the speakers. Note Do not attempt to prevent them separately. This glass, however, may remove the four screws on page 5). 2 After detaching the speakers...

Operating Instructions
Page 7
...When "DAILY" or "c REC" appears, press l/L repeatedly until it disappears. SU 000 continued 7 The clock uses a 24-hour system on the European model, and a 12-hour system on the page 5). To turn on batteries • Make sure the battery poles (plus/minus) are properly oriented. • Do ... last for a long period of time, remove the batteries to prevent possible damage from the rear panel and place the antenna outside. Notes on the system, press ?/1. ?/1 (Power) 3,5,7 e EE e Tip With normal use a new battery with new ones. Doing so may cause a malfunction. 1 2,4, 6,8 1 Press...
...When "DAILY" or "c REC" appears, press l/L repeatedly until it disappears. SU 000 continued 7 The clock uses a 24-hour system on the European model, and a 12-hour system on the page 5). To turn on batteries • Make sure the battery poles (plus/minus) are properly oriented. • Do ... last for a long period of time, remove the batteries to prevent possible damage from the rear panel and place the antenna outside. Notes on the system, press ?/1. ?/1 (Power) 3,5,7 e EE e Tip With normal use a new battery with new ones. Doing so may cause a malfunction. 1 2,4, 6,8 1 Press...
Operating Instructions
Page 8
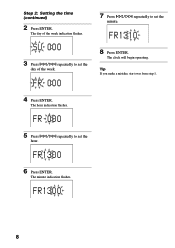
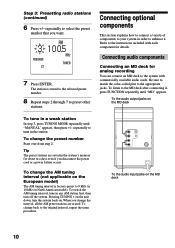
The clock will begin operating. FR1300 8 FR 000 5 Press l/L repeatedly to set the minute. FR1300 6 Press ENTER. The hour indication flashes. Tip If you make a mistake, start over from step 1. 4 Press ENTER. FR1310 8 Press ENTER. SU 000 3 Press l/L repeatedly to set the hour. The day of the week. The minute indication flashes. FR 000 7 Press l/L repeatedly to set the day of the week indication flashes. Step 2: Setting the time (continued) 2 Press ENTER.
The clock will begin operating. FR1300 8 FR 000 5 Press l/L repeatedly to set the minute. FR1300 6 Press ENTER. The hour indication flashes. Tip If you make a mistake, start over from step 1. 4 Press ENTER. FR1310 8 Press ENTER. SU 000 3 Press l/L repeatedly to set the hour. The day of the week. The minute indication flashes. FR 000 7 Press l/L repeatedly to set the day of the week indication flashes. Step 2: Setting the time (continued) 2 Press ENTER.
Operating Instructions
Page 9
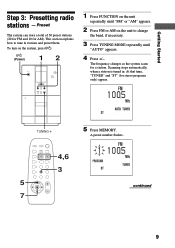
To turn on the unit to tune in . Preset The system can store a total of 30 preset stations (20 for FM and 10 for stereo programs only) appear. 1005 TUNING + 4,6 3 5 7 5 Press MEMORY. Scanning stops automatically when a ... +/-. This section explains how to change the band, if necessary. 3 Press TUNING MODE repeatedly until "FM" or "AM" appears. 2 Press FM or AM on the system, press ?/1. ?/1 (Power) 12 ?/1 + - A preset number flashes. 1 1005 continued 9 The frequency changes as the...
To turn on the unit to tune in . Preset The system can store a total of 30 preset stations (20 for FM and 10 for stereo programs only) appear. 1005 TUNING + 4,6 3 5 7 5 Press MEMORY. Scanning stops automatically when a ... +/-. This section explains how to change the band, if necessary. 3 Press TUNING MODE repeatedly until "FM" or "AM" appears. 2 Press FM or AM on the system, press ?/1. ?/1 (Power) 12 ?/1 + - A preset number flashes. 1 1005 continued 9 The frequency changes as the...
Operating Instructions
Page 10
... 3, press TUNING MODE repeatedly until "MD" appears. The station is factory-preset to the MD deck after connecting it . To change back to the system with each component for about two days even if you want. 3 1005 7 Press ENTER. Tip The preset stations are erased. To the audio input jacks on . Step...
... 3, press TUNING MODE repeatedly until "MD" appears. The station is factory-preset to the MD deck after connecting it . To change back to the system with each component for about two days even if you want. 3 1005 7 Press ENTER. Tip The preset stations are erased. To the audio input jacks on . Step...

Operating Instructions
Page 11
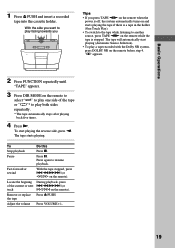
.... To listen to the PHONES jack. You may also connect a TV antenna for digital recording By connecting an MD deck to the system with a commercially available audio cord. To the digital input connector on the VCR Ground wire (not supplied) IEC standard socket connector (not...the appropriate jacks. Getting Started PHONES jack Connecting a VCR You can connect a VCR to the system with a commercially available optical cable, you can connect an external antenna to your system to get better reception. Connecting external antennas You can make a digital recording from a CD. ...
.... To listen to the PHONES jack. You may also connect a TV antenna for digital recording By connecting an MD deck to the system with a commercially available audio cord. To the digital input connector on the VCR Ground wire (not supplied) IEC standard socket connector (not...the appropriate jacks. Getting Started PHONES jack Connecting a VCR You can connect a VCR to the system with a commercially available optical cable, you can connect an external antenna to your system to get better reception. Connecting external antennas You can make a digital recording from a CD. ...

Operating Instructions
Page 12
Screw clamp Insulated wire (not supplied) AM bar antenna U Ground wire (not supplied) Important If you connect an external antenna, connect a ground wire to 15-meter (20- Leave the supplied AM bar antenna connected. to the U terminal with one end connected to a gas pipe. 12 to 50-foot), horizontally extended insulated wire, with a screw clamp. Connecting optional components (continued) AM antenna For the AM antenna, use a 6- To avoid causing a gas explosion, do not connect the ground wire to the AM ANTENNA terminals as shown below.
Screw clamp Insulated wire (not supplied) AM bar antenna U Ground wire (not supplied) Important If you connect an external antenna, connect a ground wire to 15-meter (20- Leave the supplied AM bar antenna connected. to the U terminal with one end connected to a gas pipe. 12 to 50-foot), horizontally extended insulated wire, with a screw clamp. Connecting optional components (continued) AM antenna For the AM antenna, use a 6- To avoid causing a gas explosion, do not connect the ground wire to the AM ANTENNA terminals as shown below.

Operating Instructions
Page 13
n x N .m X M> Z 1 Press A (or OPEN/CLOSE on the remote) to open the glass door and place a CD on the system, press ?/1. ?/1 (Power) 1 VOLUME +/- x X2 .m/M> OPEN/ CLOSE CD H l/L j/J 1 005 Playing time Track number To Stop playback Pause Select a track Locate a desired point in a track Remove or ...
n x N .m X M> Z 1 Press A (or OPEN/CLOSE on the remote) to open the glass door and place a CD on the system, press ?/1. ?/1 (Power) 1 VOLUME +/- x X2 .m/M> OPEN/ CLOSE CD H l/L j/J 1 005 Playing time Track number To Stop playback Pause Select a track Locate a desired point in a track Remove or ...
Operating Instructions
Page 14
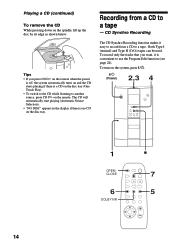
... makes it is a CD on the remote. To record only the tracks that you press CD H on the remote when the power is off, the system automatically turns on the disc tray. To turn on the spindle, lift up the disc by its edge as shown below. n x N .m X M> Z 1 OPEN/ ... to record from a CD to use the Program Edit function (see page 24). Playing a CD (continued) To remove the CD While pressing down on the system, press ?/1. ?/1 (Power) 2,3 4 A ?/1 + - The CD will automatically start playing (Automatic Source Selection). • "NO DISC" appears in the display if there is no...
... makes it is a CD on the remote. To record only the tracks that you press CD H on the remote when the power is off, the system automatically turns on the disc tray. To turn on the spindle, lift up the disc by its edge as shown below. n x N .m X M> Z 1 OPEN/ ... to record from a CD to use the Program Edit function (see page 24). Playing a CD (continued) To remove the CD While pressing down on the system, press ?/1. ?/1 (Power) 2,3 4 A ?/1 + - The CD will automatically start playing (Automatic Source Selection). • "NO DISC" appears in the display if there is no...

Operating Instructions
Page 15
... Recording. • You cannot start recording on the disc tray. 1 Press Z PUSH and insert a recordable tape into the cassette holder. Place with the Dolby NR system on, press DOLBY NR on the remote. "SYNCHRO" and "REC" appear. 6 Press DIR MODE on the remote to select "g" to record on one side of...
... Recording. • You cannot start recording on the disc tray. 1 Press Z PUSH and insert a recordable tape into the cassette holder. Place with the Dolby NR system on, press DOLBY NR on the remote. "SYNCHRO" and "REC" appear. 6 Press DIR MODE on the remote to select "g" to record on one side of...
Operating Instructions
Page 16
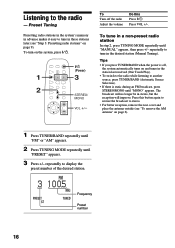
... reception, remove the rear cover and place the antenna outside (see "Step 3: Presetting radio stations" on page 9). To Turn off , the system automatically turns on and tunes in the station last received (One Touch Play). • To switch to the radio while listening to tune in ...those stations later (see "To remove the AM antenna" on the system, press ?/1. ?/1 (Power) 1 3 2 STEREO/ MONO VOL +/- Press this Press ?/1. Listening to tune in the desired station (Manual Tuning). repeatedly to the ...
... reception, remove the rear cover and place the antenna outside (see "Step 3: Presetting radio stations" on page 9). To Turn off , the system automatically turns on and tunes in the station last received (One Touch Play). • To switch to the radio while listening to tune in ...those stations later (see "To remove the AM antenna" on the system, press ?/1. ?/1 (Power) 1 3 2 STEREO/ MONO VOL +/- Press this Press ?/1. Listening to tune in the desired station (Manual Tuning). repeatedly to the ...

Operating Instructions
Page 17
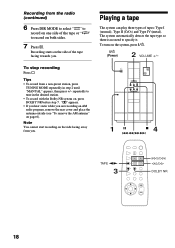
Both Type I (normal) and Type II (CrO2) tapes can be used. To turn on facing towards you want to record on the system, press ?/1. ?/1 (Power) ?/1 + - n x N .m X M> Z 4 1 Press TUNER/BAND repeatedly until "FM" or "AM" appears. 2 Press TUNING MODE repeatedly until "PRESET" appears. 3 Press +/- Basic Operations Recording from the radio ...
Both Type I (normal) and Type II (CrO2) tapes can be used. To turn on facing towards you want to record on the system, press ?/1. ?/1 (Power) ?/1 + - n x N .m X M> Z 4 1 Press TUNER/BAND repeatedly until "FM" or "AM" appears. 2 Press TUNING MODE repeatedly until "PRESET" appears. 3 Press +/- Basic Operations Recording from the radio ...
Operating Instructions
Page 18
... towards you are recording an AM radio program, remove the rear cover and place the antenna outside (see "To remove the AM antenna" on the system, press ?/1. ?/1 (Power) 2 VOLUME +/- ";" appears. • If you hear static while you . n x N .m X M> Z 1X x4 .m/M> TAPE nN 3 l/L j/J DOLBY NR 18 Tips ...from a non-preset station, press TUNING MODE repeatedly in the desired station. • To record with the Dolby NR system on both sides. 7 Press S. The system automatically detects the tape type so there is no need to specify it. To turn on page 6). To stop recording ...
... towards you are recording an AM radio program, remove the rear cover and place the antenna outside (see "To remove the AM antenna" on the system, press ?/1. ?/1 (Power) 2 VOLUME +/- ";" appears. • If you hear static while you . n x N .m X M> Z 1X x4 .m/M> TAPE nN 3 l/L j/J DOLBY NR 18 Tips ...from a non-preset station, press TUNING MODE repeatedly in the desired station. • To record with the Dolby NR system on both sides. 7 Press S. The system automatically detects the tape type so there is no need to specify it. To turn on page 6). To stop recording ...
Operating Instructions
Page 19
... the current or next .m/M> (or track l/L on the remote). With the side you press TAPE nN on the remote when the power is off, the system automatically turns on and starts playing the tape if there is a tape in the holder (One Touch Play). • To switch to the tape while... listening to play a tape recorded with the Dolby NR system, press DOLBY NR on the remote while the tape is stopped. To start playing (Automatic Source Selection). • To play facing towards you n x N AM .m BAND...
... the current or next .m/M> (or track l/L on the remote). With the side you press TAPE nN on the remote when the power is off, the system automatically turns on and starts playing the tape if there is a tape in the holder (One Touch Play). • To switch to the tape while... listening to play a tape recorded with the Dolby NR system, press DOLBY NR on the remote while the tape is stopped. To start playing (Automatic Source Selection). • To play facing towards you n x N AM .m BAND...
Operating Instructions
Page 20
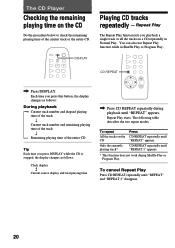
You can also use Repeat Play function while in Normal Play. Repeat Play starts. The CD Player Checking the remaining playing time on the CD Do the procedure below to check the remaining playing time of the entire CD Tip Each time you press DISPLAY while the CD is stopped, the display changes as follows: Clock display Y Current source display and total playing time , Press CD REPEAT repeatedly during Shuffle Play or Program Play. CD REPEAT repeatedly until "REPEAT 1" appears. * This function does not work during playback until "REPEAT" appears. To cancel Repeat Play Press CD REPEAT ...
You can also use Repeat Play function while in Normal Play. Repeat Play starts. The CD Player Checking the remaining playing time on the CD Do the procedure below to check the remaining playing time of the entire CD Tip Each time you press DISPLAY while the CD is stopped, the display changes as follows: Clock display Y Current source display and total playing time , Press CD REPEAT repeatedly during Shuffle Play or Program Play. CD REPEAT repeatedly until "REPEAT 1" appears. * This function does not work during playback until "REPEAT" appears. To cancel Repeat Play Press CD REPEAT ...