Operating Instructions
Page 2
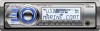
... harmful interference to Part 15 of materials will help . Model No. Connect the equipment into an outlet on , the user is encouraged to try to which can radiate radio frequency energy and, if not installed and used in separate service or guarantee documents. For the state of electrical and electronic equipment. Refer to these numbers whenever you will help prevent potential negative...
... harmful interference to Part 15 of materials will help . Model No. Connect the equipment into an outlet on , the user is encouraged to try to which can radiate radio frequency energy and, if not installed and used in separate service or guarantee documents. For the state of electrical and electronic equipment. Refer to these numbers whenever you will help prevent potential negative...
Operating Instructions
Page 3
... the satellite radio tuner module. If you do not set the Auto Off function, press and hold (OFF) until the display disappears each time you download a license for safety, performance or data integrity reasons require a permanent connection with an incorporated battery, this battery should be treated as household waste. "SAT Radio," "SAT Radio Ready," the SAT Radio and SAT Radio Ready logos and all other batteries, please view...
... the satellite radio tuner module. If you do not set the Auto Off function, press and hold (OFF) until the display disappears each time you download a license for safety, performance or data integrity reasons require a permanent connection with an incorporated battery, this battery should be treated as household waste. "SAT Radio," "SAT Radio Ready," the SAT Radio and SAT Radio Ready logos and all other batteries, please view...
Operating Instructions
Page 4
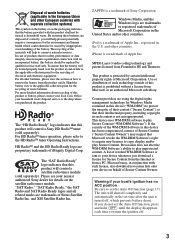
... Memory backup 17 Using optional equipment 18 Auxiliary audio equipment 18 CD changer 18 Marine remote commander RM-X60M/X11M 18 Rotary commander RM-X4S 19 Additional Information Precautions 20 Notes on this unit 6 Resetting the unit 6 Canceling the DEMO mode 6 Preparing the card remote commander 6 Setting the clock 6 Detaching the front panel 7 Attaching the front panel 7 Location of MP3/WMA/AAC files 20 About iPod 20 Maintenance 21 Removing the unit 22 Specifications 22 Troubleshooting 23 Error displays...
... Memory backup 17 Using optional equipment 18 Auxiliary audio equipment 18 CD changer 18 Marine remote commander RM-X60M/X11M 18 Rotary commander RM-X4S 19 Additional Information Precautions 20 Notes on this unit 6 Resetting the unit 6 Canceling the DEMO mode 6 Preparing the card remote commander 6 Setting the clock 6 Detaching the front panel 7 Attaching the front panel 7 Location of MP3/WMA/AAC files 20 About iPod 20 Maintenance 21 Removing the unit 22 Specifications 22 Troubleshooting 23 Error displays...

Operating Instructions
Page 5
Support site If you have any questions or for the latest support information on this product, please visit the web site below: For customers in Pan Asia: http://www.sony-asia.com/section/support http://www.sony-asia.com/caraudio/ Provides information on: • Models and manufacturers of compatible digital audio players • Supported MP3/WMA/AAC files 5 and Canada: http://esupport.sony.com http://www.xplodsony.com/ For customers in Europe: http://support.sony-europe.com For customers in Latin America: http://esupport.sony.com/ES/LA/ For customers in the U.S.A.
Support site If you have any questions or for the latest support information on this product, please visit the web site below: For customers in Pan Asia: http://www.sony-asia.com/section/support http://www.sony-asia.com/caraudio/ Provides information on: • Models and manufacturers of compatible digital audio players • Supported MP3/WMA/AAC files 5 and Canada: http://esupport.sony.com http://www.xplodsony.com/ For customers in Europe: http://support.sony-europe.com For customers in Latin America: http://esupport.sony.com/ES/LA/ For customers in the U.S.A.
Operating Instructions
Page 6
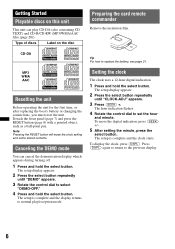
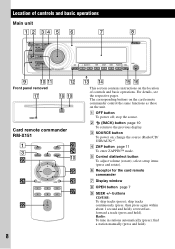
... play /reception mode. The setup display appears. 2 Press the select button repeatedly until "DEMO" appears. 3 Rotate the control dial to select "DEMO-OFF." 4 Press and hold the select button. Press (DSPL) again to return to set the hour and minute. MP3 WMA AAC Resetting the unit Before operating the unit for the first time, or after replacing the boat's battery or changing the connections, you must reset the unit. The setup is complete and the clock starts. Setting the clock The clock uses...
... play /reception mode. The setup display appears. 2 Press the select button repeatedly until "DEMO" appears. 3 Rotate the control dial to select "DEMO-OFF." 4 Press and hold the select button. Press (DSPL) again to return to set the hour and minute. MP3 WMA AAC Resetting the unit Before operating the unit for the first time, or after replacing the boat's battery or changing the connections, you must reset the unit. The setup is complete and the clock starts. Setting the clock The clock uses...
Operating Instructions
Page 8
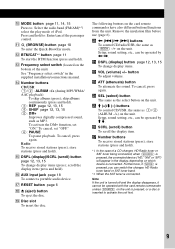
change the source (Radio/CD/ USB/AUX)*1. find a station manually (press and hold ). A OFF button To power off; stop the source. C SOURCE button To power on the unit. F Receptor for the card remote commander G Display window H OPEN button page 7 I SEEK +/- Location of controls and basic operations. The corresponding buttons on the card remote commander control the same functions as those on ; select setup items (press and rotate). buttons CD/USB: To skip tracks (press); Radio: To tune in stations automatically (press); For details, see...
change the source (Radio/CD/ USB/AUX)*1. find a station manually (press and hold ). A OFF button To power off; stop the source. C SOURCE button To power on the unit. F Receptor for the card remote commander G Display window H OPEN button page 7 I SEEK +/- Location of controls and basic operations. The corresponding buttons on the card remote commander control the same functions as those on ; select setup items (press and rotate). buttons CD/USB: To skip tracks (press); Radio: To tune in stations automatically (press); For details, see...
Operating Instructions
Page 9
... the case of a CD changer, HD Radio tuner or SAT tuner being connected; N Number buttons CD/USB: (1)/(2): ALBUM -/+ (during MP3/WMA/ AAC playback) To skip albums (press); Radio: To receive stored stations (press); P AUX input jack page 18 To connect a portable audio device. S Disc slot To insert the disc. w buttons To control CD/radio/USB, the same as (1)/(2) (ALBUM -/+) on which device is pressed, the connected device ("HD," "XM" or "SR") will appear in the supplied installation/connections manual. Setup, sound setting, etc., can be operated by M m. To...
... the case of a CD changer, HD Radio tuner or SAT tuner being connected; N Number buttons CD/USB: (1)/(2): ALBUM -/+ (during MP3/WMA/ AAC playback) To skip albums (press); Radio: To receive stored stations (press); P AUX input jack page 18 To connect a portable audio device. S Disc slot To insert the disc. w buttons To control CD/radio/USB, the same as (1)/(2) (ALBUM -/+) on which device is pressed, the connected device ("HD," "XM" or "SR") will appear in the supplied installation/connections manual. Setup, sound setting, etc., can be operated by M m. To...
Operating Instructions
Page 11
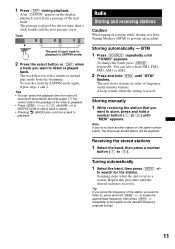
... the unit receives a station. To search a track by ZAPPIN mode again, repeat steps 1 and 2. A beep sounds when the setting is played for the station. to prevent an accident. The passage is stored. The unit stores stations in stations while driving, use Best Tuning Memory (BTM) to search for the set time, then a click sounds and the next passage starts. Tips • You can select from the beginning. Radio Storing and receiving stations...
... the unit receives a station. To search a track by ZAPPIN mode again, repeat steps 1 and 2. A beep sounds when the setting is played for the station. to prevent an accident. The passage is stored. The unit stores stations in stations while driving, use Best Tuning Memory (BTM) to search for the set time, then a click sounds and the next passage starts. Tips • You can select from the beginning. Radio Storing and receiving stations...
Operating Instructions
Page 12
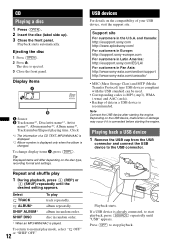
... USB connector and connect the USB device to stop playback. If a USB device is played. Playback starts automatically. To return to start playback, press (SOURCE) repeatedly until the desired setting appears. Note Connect the USB device after starting the engine. Press (OFF) to the USB connector. CD Playing a disc 1 Press (OPEN). 2 Insert the disc (label side up). 3 Close the front panel. disc in random order. * When an MP3/WMA/AAC is already connected, to normal play mode, select...
... USB connector and connect the USB device to stop playback. If a USB device is played. Playback starts automatically. To return to start playback, press (SOURCE) repeatedly until the desired setting appears. Note Connect the USB device after starting the engine. Press (OFF) to the USB connector. CD Playing a disc 1 Press (OPEN). 2 Insert the disc (label side up). 3 Close the front panel. disc in random order. * When an MP3/WMA/AAC is already connected, to normal play mode, select...
Operating Instructions
Page 13
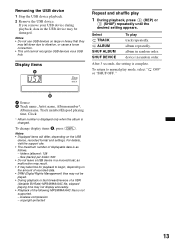
... may take time for playback to normal play mode, select " OFF" or "SHUF OFF. Notes • Displayed items will differ, depending on the amount of the following MP3/WMA/AAC files is as malfunction may result. • It may fall down due to vibration, or cause a loose connection. • This unit cannot recognize USB devices via a USB hub. If you remove your USB device during playback...
... may take time for playback to normal play mode, select " OFF" or "SHUF OFF. Notes • Displayed items will differ, depending on the amount of the following MP3/WMA/AAC files is as malfunction may result. • It may fall down due to vibration, or cause a loose connection. • This unit cannot recognize USB devices via a USB hub. If you remove your USB device during playback...
Operating Instructions
Page 14
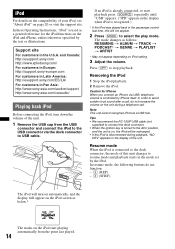
.../support http://www.sony-asia.com/caraudio/ Playing back iPod Before connecting the iPod, turn on automatically, and the display will turn down the volume of your iPod, see "About iPod" on the unit during playback, "NO DEV" appears in the display of this will not appear. 2 Press (MODE) to USB cable. If an iPod is recognized.) * If the iPod was played back in the U.S.A. Caution for the iPod functions on iPod setting. 3 Adjust the volume. Removing...
.../support http://www.sony-asia.com/caraudio/ Playing back iPod Before connecting the iPod, turn on automatically, and the display will turn down the volume of your iPod, see "About iPod" on the unit during playback, "NO DEV" appears in the display of this will not appear. 2 Press (MODE) to USB cable. If an iPod is recognized.) * If the iPod was played back in the U.S.A. Caution for the iPod functions on iPod setting. 3 Adjust the volume. Removing...

Operating Instructions
Page 15
Notes • The volume can operate an iPod connected to "RESUMING." Display items A Source (iPod) indication B Track name, Artist name, Album name, Track number/Elapsed playing time, Clock To change the display items Press (DSPL). The mode changes as follows: Track name t Artist name t Album name t MODE IPOD t Clock To exit the passenger control Press and hold (MODE). podcast in random order. genre in random order. Operating an iPod directly - Tip When album/podcast...
Notes • The volume can operate an iPod connected to "RESUMING." Display items A Source (iPod) indication B Track name, Artist name, Album name, Track number/Elapsed playing time, Clock To change the display items Press (DSPL). The mode changes as follows: Track name t Artist name t Album name t MODE IPOD t Clock To exit the passenger control Press and hold (MODE). podcast in random order. genre in random order. Operating an iPod directly - Tip When album/podcast...

Operating Instructions
Page 16
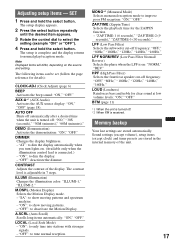
... selected item. Tip Other equalizer types are also adjustable. 16 Other functions Changing the sound settings Adjusting the sound characteristics 1 Press the select button repeatedly until "LOW," "MID" or "HI" appears. 4 Rotate the control dial to adjust the selected item. 3 Press (BACK). "-8 dB." Repeat steps 3 and 4 to normal play /reception mode. To restore the factory-set (follow the page reference for each connected auxiliary equipment: "+18 dB" - The larger the number...
... selected item. Tip Other equalizer types are also adjustable. 16 Other functions Changing the sound settings Adjusting the sound characteristics 1 Press the select button repeatedly until "LOW," "MID" or "HI" appears. 4 Rotate the control dial to adjust the selected item. 3 Press (BACK). "-8 dB." Repeat steps 3 and 4 to normal play /reception mode. To restore the factory-set (follow the page reference for each connected auxiliary equipment: "+18 dB" - The larger the number...
Operating Instructions
Page 17
...." Sound settings (except volume), setup items (except clock) and tuner presets are stored automatically. "OFF": deactivate the dimmer. LOCAL (Local Seek Mode) - "ZAP.TIME-1 (6 seconds)," "ZAP.TIME-2 (9 seconds)," "ZAP.TIME-3 (30 seconds)." M.DSPL (Motion Display) Selects the Motion Display mode. - A.SCRL (Auto Scroll) Scrolls long items automatically: "ON," "OFF." AUX-A*1 (AUX Audio) Activates the AUX source display: "ON," "OFF" (page 18). AUTO OFF Shuts off automatically after a desired time when the unit is on the source and setting. "AT...
...." Sound settings (except volume), setup items (except clock) and tuner presets are stored automatically. "OFF": deactivate the dimmer. LOCAL (Local Seek Mode) - "ZAP.TIME-1 (6 seconds)," "ZAP.TIME-2 (9 seconds)," "ZAP.TIME-3 (30 seconds)." M.DSPL (Motion Display) Selects the Motion Display mode. - A.SCRL (Auto Scroll) Scrolls long items automatically: "ON," "OFF." AUX-A*1 (AUX Audio) Activates the AUX source display: "ON," "OFF" (page 18). AUTO OFF Shuts off automatically after a desired time when the unit is on the source and setting. "AT...
Operating Instructions
Page 18
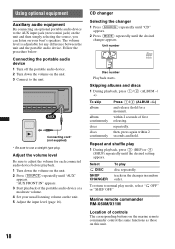
... functions as those on the unit. 2 Press (SOURCE) repeatedly until the desired changer appears. repeatedly. Using optional equipment Auxiliary audio equipment By connecting an optional portable audio device to the AUX input jack (stereo mini jack) on the unit and then simply selecting the source, you can listen on your usual listening volume on the unit. 3 Connect to the unit. AUX Connecting cord* (not supplied) * Be sure to normal play mode, select " OFF" or "SHUF OFF." Unit number Disc number...
... functions as those on the unit. 2 Press (SOURCE) repeatedly until the desired changer appears. repeatedly. Using optional equipment Auxiliary audio equipment By connecting an optional portable audio device to the AUX input jack (stereo mini jack) on the unit and then simply selecting the source, you can listen on your usual listening volume on the unit. 3 Connect to the unit. AUX Connecting cord* (not supplied) * Be sure to normal play mode, select " OFF" or "SHUF OFF." Unit number Disc number...
Operating Instructions
Page 20
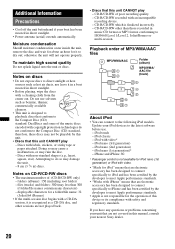
... disc. - displayable characters for the operation of this unit CANNOT play - CD-R/CD-RW other sessions are not played back. • Discs that this manual, consult your unit that are not covered in this unit CANNOT play - If you have any questions or problems concerning your nearest Sony dealer. 20 otherwise the unit will not operate properly. DualDiscs and some of MP3/WMA/AAC files MP3/WMA/AAC Folder (album) MP3/WMA/ AAC file (track) About iPod...
... disc. - displayable characters for the operation of this unit CANNOT play - CD-R/CD-RW other sessions are not played back. • Discs that this manual, consult your unit that are not covered in this unit CANNOT play - If you have any questions or problems concerning your nearest Sony dealer. 20 otherwise the unit will not operate properly. DualDiscs and some of MP3/WMA/AAC files MP3/WMA/AAC Folder (album) MP3/WMA/ AAC file (track) About iPod...

Operating Instructions
Page 22
... outputs (sure seal connectors) Speaker impedance: 4 - 8 ohms Maximum power output: 52 W × 4 (at 4 ohms) General Outputs: Audio outputs terminal (front/rear) Subwoofer output terminal (mono) Power antenna (aerial) relay control terminal Power amplifier control terminal Inputs: Remote controller input terminal Antenna (aerial) input terminal Telephone ATT control terminal Illumination control terminal BUS control input terminal BUS audio input terminal AUX input jack (stereo mini jack) USB signal input terminal Removing the unit 1 Remove the protection collar. 1 Detach the front panel...
... outputs (sure seal connectors) Speaker impedance: 4 - 8 ohms Maximum power output: 52 W × 4 (at 4 ohms) General Outputs: Audio outputs terminal (front/rear) Subwoofer output terminal (mono) Power antenna (aerial) relay control terminal Power amplifier control terminal Inputs: Remote controller input terminal Antenna (aerial) input terminal Telephone ATT control terminal Illumination control terminal BUS control input terminal BUS audio input terminal AUX input jack (stereo mini jack) USB signal input terminal Removing the unit 1 Remove the protection collar. 1 Detach the front panel...
Operating Instructions
Page 23
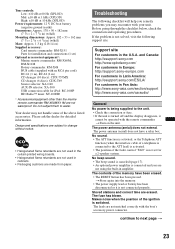
... CD changer (6 discs): CDX-T69 Source selector: XA-C40 AUX-IN selector: XA-300 USB connection cable for detailed information. The leads are erased. The power antenna (aerial) does not extend. No sound. • The ATT function is activated, or the Telephone ATT function (when the interface cable of the memory have a relay box. The power antenna (aerial) does not have been erased. • The RESET button has been pressed. Stored stations and correct time...
... CD changer (6 discs): CDX-T69 Source selector: XA-C40 AUX-IN selector: XA-300 USB connection cable for detailed information. The leads are erased. The power antenna (aerial) does not extend. No sound. • The ATT function is activated, or the Telephone ATT function (when the interface cable of the memory have a relay box. The power antenna (aerial) does not have been erased. • The RESET button has been pressed. Stored stations and correct time...
Operating Instructions
Page 24
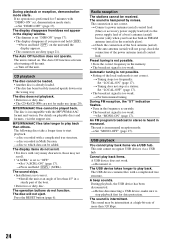
... protection. Radio reception The stations cannot be played back. t If the auto antenna (aerial) will not eject. t Tuning stops too frequently: Set "LOCAL-ON" (page 17). This unit cannot recognize USB devices via a USB hub. A beep sounds. If no operation is too weak. t Set "DEMO-OFF" (page 17). The Auto Off function activates after turning off the unit. For details on . a disc recorded in the rear/side glass). t Set "A.SCRL-ON" (page 17). Press the RESET button...
... protection. Radio reception The stations cannot be played back. t If the auto antenna (aerial) will not eject. t Tuning stops too frequently: Set "LOCAL-ON" (page 17). This unit cannot recognize USB devices via a USB hub. A beep sounds. If no operation is too weak. t Set "DEMO-OFF" (page 17). The Auto Off function activates after turning off the unit. For details on . a disc recorded in the rear/side glass). t Set "A.SCRL-ON" (page 17). Press the RESET button...
Operating Instructions
Page 25
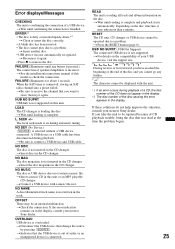
... the error indication remains on the compatibility of speakers/amplifiers is not supported. t Disconnect the USB device, then change the source by pressing (SOURCE). t Indicates that was not automatically recognized. If these solutions do not help improve the situation, consult your USB device, visit the support site. t Insert discs in the CD changer. NO NAME A disc/album/artist/track name is connected. RESET The CD unit, CD changer or USB device cannot be repaired because of CD playback trouble...
... the error indication remains on the compatibility of speakers/amplifiers is not supported. t Disconnect the USB device, then change the source by pressing (SOURCE). t Indicates that was not automatically recognized. If these solutions do not help improve the situation, consult your USB device, visit the support site. t Insert discs in the CD changer. NO NAME A disc/album/artist/track name is connected. RESET The CD unit, CD changer or USB device cannot be repaired because of CD playback trouble...


