Primary User Manual
Page 3
...Playing Repeatedly ...17 Playing in Random Order (Shuffle Play 17 Creating Your Own Program (Program Play 18 Playing Using a Timer ...20 Controlling Another CD Player (Advanced Mega Control 21 Fading In or Out ...22 Playing Alternately (No-Delay Play/X-Fade Play 23 Controlling the Player by Another unit 23... Storing Information About CDs (Custom Files) What You Can Do With the Custom Files 24 Labeling Discs (Disc Memo 24 Storing Custom File Information Using a K eyboard...
...Playing Repeatedly ...17 Playing in Random Order (Shuffle Play 17 Creating Your Own Program (Program Play 18 Playing Using a Timer ...20 Controlling Another CD Player (Advanced Mega Control 21 Fading In or Out ...22 Playing Alternately (No-Delay Play/X-Fade Play 23 Controlling the Player by Another unit 23... Storing Information About CDs (Custom Files) What You Can Do With the Custom Files 24 Labeling Discs (Disc Memo 24 Storing Custom File Information Using a K eyboard...
Primary User Manual
Page 4
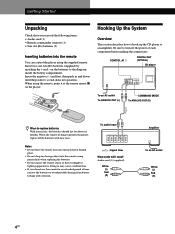
...new ones. Audio cord (1) (supplied) White (L) Red (R) Amplifier To an AC outlet White (L) Red (R) 4US CONTROL A1 DIGITAL OUT (OPTICAL) CD player To an AC outlet To ANALOG OUT (L) COMMAND MODE To ANALOG OUT (R) When to the diagram inside the battery compartment. Hooking Up the System... Overview This section describes how to hook up the CD player to direct sunlight or lighting apparatuses. Insert two size AA (R6) batteries (supplied) by matching the + and - Getting Started ...
...new ones. Audio cord (1) (supplied) White (L) Red (R) Amplifier To an AC outlet White (L) Red (R) 4US CONTROL A1 DIGITAL OUT (OPTICAL) CD player To an AC outlet To ANALOG OUT (L) COMMAND MODE To ANALOG OUT (R) When to the diagram inside the battery compartment. Hooking Up the System... Overview This section describes how to hook up the CD player to direct sunlight or lighting apparatuses. Insert two size AA (R6) batteries (supplied) by matching the + and - Getting Started ...
Primary User Manual
Page 5
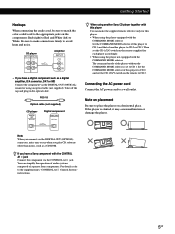
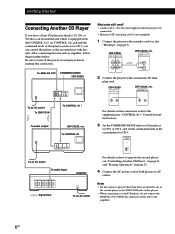
...the COMMAND MODE selector is slanted, it may occur when you have a digital component such as a CD-ROM. CD player 2ND CD ANALOG IN OUT L L R R Amplifier INPUT CD L R • If you have a Sony component with the CONTROL A1 jack Connect the component via the DIGITAL OUT (OPTICAL) connector using an ...the COMMAND MODE selector: Set the COMMAND MODE selector of this player to CD 1 and that of another Sony CD player together with this player You can simplify the operation of audio systems composed of separate Sony components. Take off the cap and plug in the optical cable. If ...
...the COMMAND MODE selector is slanted, it may occur when you have a digital component such as a CD-ROM. CD player 2ND CD ANALOG IN OUT L L R R Amplifier INPUT CD L R • If you have a Sony component with the CONTROL A1 jack Connect the component via the DIGITAL OUT (OPTICAL) connector using an ...the COMMAND MODE selector: Set the COMMAND MODE selector of this player to CD 1 and that of another Sony CD player together with this player You can simplify the operation of audio systems composed of separate Sony components. Take off the cap and plug in the optical cable. If ...
Primary User Manual
Page 6
CDP-CX355 2ND CD ANALOG IN OUT L L R R CDP-CX230, etc. CDP-CX355 CONTROL A1II CDP-CX230, etc. CONTROL A1 To an AC outlet To 2ND CD IN To CONTROL A1 To audio output CDP-CX230, etc. LINE OUT L R 2 Connect the players with this unit and an amplifier, follow the procedure below. ...Sony CD player in which 5, 50, 200, or 300 discs can be inserted and which is equipped with the CONTROL A1 (or CONTROL A1) jack and the command mode of that player can control that you can be set the command mode of the second player to CD 3. To ANALOG OUT COMMAND MODE CDP-CX355...
CDP-CX355 2ND CD ANALOG IN OUT L L R R CDP-CX230, etc. CDP-CX355 CONTROL A1II CDP-CX230, etc. CONTROL A1 To an AC outlet To 2ND CD IN To CONTROL A1 To audio output CDP-CX230, etc. LINE OUT L R 2 Connect the players with this unit and an amplifier, follow the procedure below. ...Sony CD player in which 5, 50, 200, or 300 discs can be inserted and which is equipped with the CONTROL A1 (or CONTROL A1) jack and the command mode of that player can control that you can be set the command mode of the second player to CD 3. To ANALOG OUT COMMAND MODE CDP-CX355...
Primary User Manual
Page 7
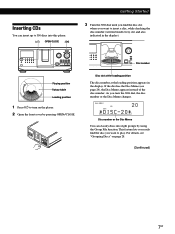
... JOG dial, the disc number or the Disc Memo changes. As you want to 300 discs into eight groups by pressing OPEN/CLOSE. GettPinlagyiSntgarCteDds Inserting CDs You can classify discs into this player. I/u OPEN/CLOSE JOG +100 I / u 3 Turn the JOG dial until you find the disc you turn on page 28...
... JOG dial, the disc number or the Disc Memo changes. As you want to 300 discs into eight groups by pressing OPEN/CLOSE. GettPinlagyiSntgarCteDds Inserting CDs You can classify discs into this player. I/u OPEN/CLOSE JOG +100 I / u 3 Turn the JOG dial until you find the disc you turn on page 28...
Primary User Manual
Page 8
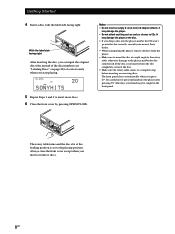
... removing discs. Be careful not to the player and/or the disc could result. ALL DISCS CD1 DISC SONYHITS 20 5 Repeat Steps 3 and 4 to CDs. The front panel closes automatically when you insert or remove discs. 8US Getting Started 4 Insert a disc with the label side facing right. It may be... the disc slot at a right angle to the rotary table, otherwise damage to put your hand into the player after pressing · otherwise your nearest Sony dealer. • When transporting the player, remove all discs from the player. • Make sure to insert the disc at the loading position is ...
... removing discs. Be careful not to the player and/or the disc could result. ALL DISCS CD1 DISC SONYHITS 20 5 Repeat Steps 3 and 4 to CDs. The front panel closes automatically when you insert or remove discs. 8US Getting Started 4 Insert a disc with the label side facing right. It may be... the disc slot at a right angle to the rotary table, otherwise damage to put your hand into the player after pressing · otherwise your nearest Sony dealer. • When transporting the player, remove all discs from the player. • Make sure to insert the disc at the loading position is ...
Primary User Manual
Page 9
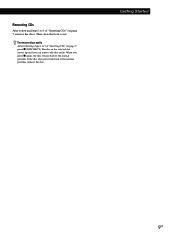
Then close the front cover. Removing CDs After following steps 1 to 3 of "Inserting CDs" on page 7, remove the discs. The disc in the selected slot moves up and you press p again, the disc returns back to the normal position, reinsert the disc. To remove discs easily After following Steps 1 to 3 of "Inserting CDs" on page 7, press p (DISC EJECT). When you can remove the disc easily. GettPinlagyiSntgarCteDds 9US If the disc does not return back to the normal position.
Then close the front cover. Removing CDs After following steps 1 to 3 of "Inserting CDs" on page 7, remove the discs. The disc in the selected slot moves up and you press p again, the disc returns back to the normal position, reinsert the disc. To remove discs easily After following Steps 1 to 3 of "Inserting CDs" on page 7, press p (DISC EJECT). When you can remove the disc easily. GettPinlagyiSntgarCteDds 9US If the disc does not return back to the normal position.
Primary User Manual
Page 10
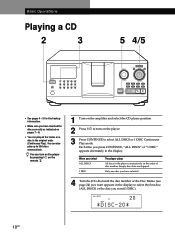
..." appears alternately in the display. ALL DISCS CD1 20 DISC *DISC-20* 10US Basic Operations Playing a CD 2 3 5 4/5 STANDBY I /u to turn on the player by pressing I/u on the remote Z 1 Turn on the amplifier and select the CD player position. 2 Press I / u TIMER OFF PLAY KEYBOARD CONTINUE SHUFFLE PROGRAM REPEAT TIME/TEXT GROUP 1 GROUP 2 GROUP...
..." appears alternately in the display. ALL DISCS CD1 20 DISC *DISC-20* 10US Basic Operations Playing a CD 2 3 5 4/5 STANDBY I /u to turn on the player by pressing I/u on the remote Z 1 Turn on the amplifier and select the CD player position. 2 Press I / u TIMER OFF PLAY KEYBOARD CONTINUE SHUFFLE PROGRAM REPEAT TIME/TEXT GROUP 1 GROUP 2 GROUP...

Primary User Manual
Page 12
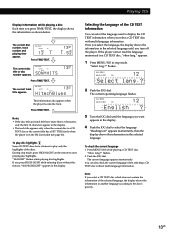
...the display. When you press TIME/TEXT again, the display shows the current disc number, total number of tracks, and total playing time of CD TEXT discs CD TEXT discs have information, such as the disc titles or artist names, memorized in a blank space on the discs where, on the remote in...Playing time of the track Checking the information of the disc momentarily. Then the display shows the disc title again. ALL DISCS CD TEXT CD1 DISC SONYHITS 12US Playing CDs Using the Display You can check the current disc title, artist name and track title. Current disc number ALL DISCS DISC ...
...the display. When you press TIME/TEXT again, the display shows the current disc number, total number of tracks, and total playing time of CD TEXT discs CD TEXT discs have information, such as the disc titles or artist names, memorized in a blank space on the discs where, on the remote in...Playing time of the track Checking the information of the disc momentarily. Then the display shows the disc title again. ALL DISCS CD TEXT CD1 DISC SONYHITS 12US Playing CDs Using the Display You can check the current disc title, artist name and track title. Current disc number ALL DISCS DISC ...
Primary User Manual
Page 13
..."Reading text" appears momentarily, then the display shows the information in stop mode, press HIGH-LIGHT on the remote to display the CD TEXT information when you press TIME/TEXT, the display shows the information as shown below. Press TIME/TEXT. 1 3 NEXT DISC MIN...of the selected language, the display shows the information in the display. GettPinlagyiSntgarCteDds Display information while playing a disc Each time you select a CD TEXT disc with multi-language information. To play only the highlights of the discs. "Hi LIGHT" flashes while playing disc highlights. appears....
..."Reading text" appears momentarily, then the display shows the information in stop mode, press HIGH-LIGHT on the remote to display the CD TEXT information when you press TIME/TEXT, the display shows the information as shown below. Press TIME/TEXT. 1 3 NEXT DISC MIN...of the selected language, the display shows the information in the display. GettPinlagyiSntgarCteDds Display information while playing a disc Each time you select a CD TEXT disc with multi-language information. To play only the highlights of the discs. "Hi LIGHT" flashes while playing disc highlights. appears....
Primary User Manual
Page 14
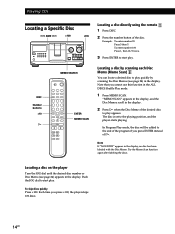
... ENTER instead of the desired disc to play quickly by scanning each Disc Memo (Memo Scan) Z You can locate a desired disc to play appears. Playing CDs Locating a Specific Disc ≠ AMS ± +100 JOG +100 I / u MEMO SEARCH DISC Number buttons >10 · ENTER MEMO SCAN Locating a disc directly using the remote...
... ENTER instead of the desired disc to play quickly by scanning each Disc Memo (Memo Scan) Z You can locate a desired disc to play appears. Playing CDs Locating a Specific Disc ≠ AMS ± +100 JOG +100 I / u MEMO SEARCH DISC Number buttons >10 · ENTER MEMO SCAN Locating a disc directly using the remote...
Primary User Manual
Page 16
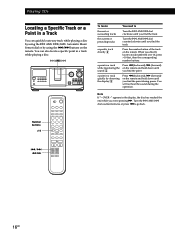
Playing CDs Locating a Specific Track or a Point in a Track You can also locate a specific point in a track while playing a disc. ≠ AMS ± +100 I / u To locate You ...
Playing CDs Locating a Specific Track or a Point in a Track You can also locate a specific point in a track while playing a disc. ≠ AMS ± +100 I / u To locate You ...
Primary User Manual
Page 18
Playing CDs Playing all the tracks on the current disc are played in random order, the next disc starts playing. You can specify the next disc to ...
Playing CDs Playing all the tracks on the current disc are played in random order, the next disc starts playing. You can specify the next disc to ...
Primary User Manual
Page 20
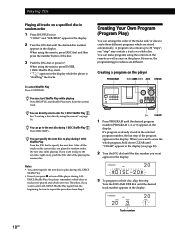
... the play mode buttons to select the desired play mode. 2 Set TIMER on other discs Repeat Steps 2 to 4 5 2 to 5 7 Press · to start playing. Playing CDs 6 To program other discs/tracks, do not want to erase appears in the display. 2 Hold down CLEAR until "CLEAR" appears in the program Press CLEAR...
... the play mode buttons to select the desired play mode. 2 Set TIMER on other discs Repeat Steps 2 to 4 5 2 to 5 7 Press · to start playing. Playing CDs 6 To program other discs/tracks, do not want to erase appears in the display. 2 Hold down CLEAR until "CLEAR" appears in the program Press CLEAR...
Primary User Manual
Page 21
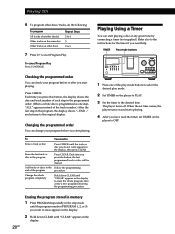
... second player directly using the supplied remote Z Set CD 1/2/3 on the remote to start playing. COMMAND MODE selector 21US GettPinlagyiSntgarCteDds Controlling Another CD Player (Advanced Mega Control) This unit can control a second CD player (see "Connecting Another CD Player" on both of the units will function. ... player again Press MEGA CONTROL. The MEGA CONTROL button goes off and you can control the master player. Even when a second CD player is the same position as the COMMAND MODE selector on this player. The controls indicated in the display light up. ALL ...
... second player directly using the supplied remote Z Set CD 1/2/3 on the remote to start playing. COMMAND MODE selector 21US GettPinlagyiSntgarCteDds Controlling Another CD Player (Advanced Mega Control) This unit can control a second CD player (see "Connecting Another CD Player" on both of the units will function. ... player again Press MEGA CONTROL. The MEGA CONTROL button goes off and you can control the master player. Even when a second CD player is the same position as the COMMAND MODE selector on this player. The controls indicated in the display light up. ALL ...

Primary User Manual
Page 22
... a Disc Memo to start fading out. Note The new Disc Memos are stored on this player's memory, so you cannot display them on the second CD player. "FADE" appears in "Labeling Discs" on page 24. Note Fading lasts for about one minute.) Note If each Disc Memo of the second... CD player has more than 13 characters, only the first 13 characters of that you cannot use the DIGITAL OUT (OPTICAL) connector. appears. 4 Push the JOG ...
... a Disc Memo to start fading out. Note The new Disc Memos are stored on this player's memory, so you cannot display them on the second CD player. "FADE" appears in "Labeling Discs" on page 24. Note Fading lasts for about one minute.) Note If each Disc Memo of the second... CD player has more than 13 characters, only the first 13 characters of that you cannot use the DIGITAL OUT (OPTICAL) connector. appears. 4 Push the JOG ...
Primary User Manual
Page 23
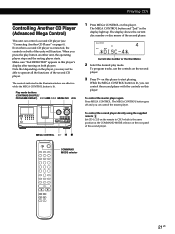
... do this case, operate the other player starts play without a break in the second player is mixed. To return to a Sony MD deck compatible with the Mega Control function or operate a Sony MD deck by fading in. is mixed. You can perform the operation above correctly only when you select X-Fade Play... selected. To change the method (No-Delay or X-Fade) during X-Fade Play. You can change the current player at any play mode (see "Connecting Another CD Player" on each track. Notes • You can select the interval, 30, 60 or 90 seconds.
... do this case, operate the other player starts play without a break in the second player is mixed. To return to a Sony MD deck compatible with the Mega Control function or operate a Sony MD deck by fading in. is mixed. You can perform the operation above correctly only when you select X-Fade Play... selected. To change the method (No-Delay or X-Fade) during X-Fade Play. You can change the current player at any play mode (see "Connecting Another CD Player" on each track. Notes • You can select the interval, 30, 60 or 90 seconds.

Primary User Manual
Page 24
...you have stored whenever you want to locate them easily Where are Custom Files stored? The flashing cursor ( ) appears. 24US Storing Information About CDs (Custom Files) What You Can Do With the Custom Files The player can store three types of information called "Custom Files" for about one... discs on the player MENU/NO YES JOG +100 I /u to 13 characters and have stored remains, since each slot. When you select a CD TEXT disc The disc title is also stored automatically. flashes. 3 Push the JOG dial. Erasing all Custom Files of all the Custom Files (Disc...
...you have stored whenever you want to locate them easily Where are Custom Files stored? The flashing cursor ( ) appears. 24US Storing Information About CDs (Custom Files) What You Can Do With the Custom Files The player can store three types of information called "Custom Files" for about one... discs on the player MENU/NO YES JOG +100 I /u to 13 characters and have stored remains, since each slot. When you select a CD TEXT disc The disc title is also stored automatically. flashes. 3 Push the JOG dial. Erasing all Custom Files of all the Custom Files (Disc...
Primary User Manual
Page 26
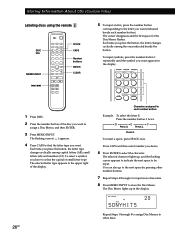
.... The cursor disappears and the first space for the Disc Memo flashes. To select a symbol, you have to select the character. Press 3. Storing Information About CDs (Custom Files) Labeling discs using the remote Z DISC DEL MEMO INPUT =/+ SPACE CAPS Number buttons ENTER CLEAR 5 To input a letter, press the number button corresponding...
.... The cursor disappears and the first space for the Disc Memo flashes. To select a symbol, you have to select the character. Press 3. Storing Information About CDs (Custom Files) Labeling discs using the remote Z DISC DEL MEMO INPUT =/+ SPACE CAPS Number buttons ENTER CLEAR 5 To input a letter, press the number button corresponding...

Primary User Manual
Page 27
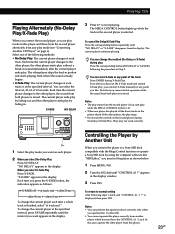
... disc sequentially using the keyboard, disconnect the keyboard then reconnect it to the incorrect character. You can label discs of the second CD player See "Labeling discs of the second CD player" on the front panel of selected item While holding down the Shift key, press the Delete key. Shift Shift Ctrl...
... disc sequentially using the keyboard, disconnect the keyboard then reconnect it to the incorrect character. You can label discs of the second CD player See "Labeling discs of the second CD player" on the front panel of selected item While holding down the Shift key, press the Delete key. Shift Shift Ctrl...


