Primary User Manual
Page 2
... icons are cautioned that may cause harmful interference to them whenever you for energy efficiency. CAUTION The use the controls on the remote if they have the same or similar names as a CLASS 1 LASER product. You can do the task using the...liquids, such as a bookcase or built-in the space provided below. Refer to radio communications. Model No. CDP-CX355 Serial No ENERGY STAR is connected. - As ENERGY STAR Partner, Sony Corporation has determined that interference will increase eye hazard. WARNING This equipment has been tested and found to Part...
... icons are cautioned that may cause harmful interference to them whenever you for energy efficiency. CAUTION The use the controls on the remote if they have the same or similar names as a CLASS 1 LASER product. You can do the task using the...liquids, such as a bookcase or built-in the space provided below. Refer to radio communications. Model No. CDP-CX355 Serial No ENERGY STAR is connected. - As ENERGY STAR Partner, Sony Corporation has determined that interference will increase eye hazard. WARNING This equipment has been tested and found to Part...
Primary User Manual
Page 4
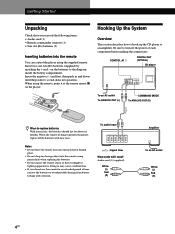
... When to replace batteries With normal use the remote for about six months. Audio cord (1) (supplied) White (L) Red (R) Amplifier To an AC outlet White (L) Red (R) 4US Hooking Up the System Overview This section describes how to hook up the CD player to direct sunlight or lighting apparatuses. Be ...sure to turn off the power of time, remove the batteries to the diagram inside the battery compartment. on the player. When the remote no longer operates the player, replace all...
... When to replace batteries With normal use the remote for about six months. Audio cord (1) (supplied) White (L) Red (R) Amplifier To an AC outlet White (L) Red (R) 4US Hooking Up the System Overview This section describes how to hook up the CD player to direct sunlight or lighting apparatuses. Be ...sure to turn off the power of time, remove the batteries to the diagram inside the battery compartment. on the player. When the remote no longer operates the player, replace all...
Primary User Manual
Page 5
...off the cap and plug in the optical cable. Set the COMMAND MODE selector of this player to CD 1 and that of this player to CD 2, and set the CD 1/2/3 switch on the remote supplied for this player. • When using the player not equipped with the COMMAND MODE selector: ... player to White. Be sure to make the supplied remote effective only for each player accordingly. • When using the player equipped with the COMMAND MODE selector: The command mode of separate Sony components. If the player is set the CD 1/2/3 switch on the remote to avoid hum and noise.
...off the cap and plug in the optical cable. Set the COMMAND MODE selector of this player to CD 1 and that of this player to CD 2, and set the CD 1/2/3 switch on the remote supplied for this player. • When using the player not equipped with the COMMAND MODE selector: ... player to White. Be sure to make the supplied remote effective only for each player accordingly. • When using the player equipped with the COMMAND MODE selector: The command mode of separate Sony components. If the player is set the CD 1/2/3 switch on the remote to avoid hum and noise.
Primary User Manual
Page 10
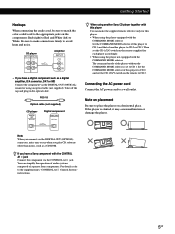
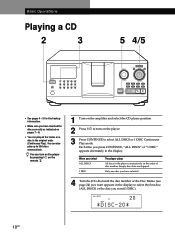
... (1 DISC). You can play up to 300 discs consecutively. Empty disc slots are skipped. Basic Operations Playing a CD 2 3 5 4/5 STANDBY I /u to turn on the player by pressing I/u on the remote Z 1 Turn on the amplifier and select the CD player position. 2 Press I / u TIMER OFF PLAY KEYBOARD CONTINUE SHUFFLE PROGRAM REPEAT TIME/TEXT GROUP 1 GROUP 2 GROUP...
... (1 DISC). You can play up to 300 discs consecutively. Empty disc slots are skipped. Basic Operations Playing a CD 2 3 5 4/5 STANDBY I /u to turn on the player by pressing I/u on the remote Z 1 Turn on the amplifier and select the CD player position. 2 Press I / u TIMER OFF PLAY KEYBOARD CONTINUE SHUFFLE PROGRAM REPEAT TIME/TEXT GROUP 1 GROUP 2 GROUP...

Primary User Manual
Page 12
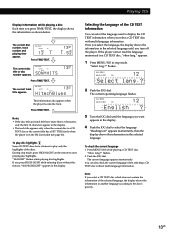
on the remote in the stop mode The display shows the disc title. The total number of tracks and the total playing time of the disc so that you want to check another language, refer to check, and press TIME/TEXT. The display shows the CD TEXT information of the selected disc appear... playing time When you press TIME/TEXT again, the display shows the current disc number, total number of tracks, and total playing time of CD TEXT discs CD TEXT discs have information, such as the disc titles or artist names, memorized in the display. Current disc number Next disc number ALL DISCS...
on the remote in the stop mode The display shows the disc title. The total number of tracks and the total playing time of the disc so that you want to check another language, refer to check, and press TIME/TEXT. The display shows the CD TEXT information of the selected disc appear... playing time When you press TIME/TEXT again, the display shows the current disc number, total number of tracks, and total playing time of CD TEXT discs CD TEXT discs have information, such as the disc titles or artist names, memorized in the display. Current disc number Next disc number ALL DISCS...
Primary User Manual
Page 13
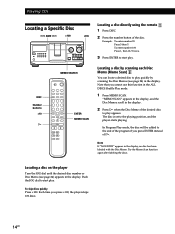
...player is in the display. Press TIME/TEXT. 1 3 NEXT DISC MIN SEC 1.52 The current disc title or disc number appears. ALL DISCS CD TEXT CD1 1 3 NEXT DISC TRACK HitechBlues This information also appears when the player locates the track. "Reading text" appears momentarily, then the display... shows the information in stop mode, press HIGH-LIGHT on the remote to start playing disc highlights. appears. 1 Press MENU/NO in the selected language. The current disc number, track number and playing time ALL...
...player is in the display. Press TIME/TEXT. 1 3 NEXT DISC MIN SEC 1.52 The current disc title or disc number appears. ALL DISCS CD TEXT CD1 1 3 NEXT DISC TRACK HitechBlues This information also appears when the player locates the track. "Reading text" appears momentarily, then the display... shows the information in stop mode, press HIGH-LIGHT on the remote to start playing disc highlights. appears. 1 Press MENU/NO in the selected language. The current disc number, track number and playing time ALL...
Primary User Manual
Page 14
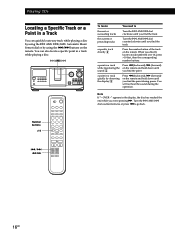
... of the disc. Try the Memo Scan function again after labeling the discs. Note that you press +100, the player skips 100 discs. 14US Playing CDs Locating a Specific Disc ≠ AMS ± +100 JOG +100 I / u MEMO SEARCH DISC Number buttons >10 · ENTER MEMO SCAN Locating a disc... directly using the remote 1 Press DISC. 2 Press the number button of ·. In Program Play mode, the disc will be added to start play . "MEMO SCAN" appears in the...
... of the disc. Try the Memo Scan function again after labeling the discs. Note that you press +100, the player skips 100 discs. 14US Playing CDs Locating a Specific Disc ≠ AMS ± +100 JOG +100 I / u MEMO SEARCH DISC Number buttons >10 · ENTER MEMO SCAN Locating a disc... directly using the remote 1 Press DISC. 2 Press the number button of ·. In Program Play mode, the disc will be added to start play . "MEMO SCAN" appears in the...
Primary User Manual
Page 16
...AMS ± dial clockwise until you were pressing ). a point in a track Press 0 (backward)/) (forward) while monitoring the on the remote and hold down until sound Z you find the track the current or preceding tracks Turn the ≠ AMS ± dial counterclockwise until ...track quickly by using the ≠ AMS ± (AMS: Automatic Music Sensor) dial or by observing the display Z Press 0 (backward)/) (forward) on the remote. Playing CDs Locating a Specific Track or a Point in a Track You can also locate a specific point in a track while playing a disc. ≠ AMS ± +100...
...AMS ± dial clockwise until you were pressing ). a point in a track Press 0 (backward)/) (forward) while monitoring the on the remote and hold down until sound Z you find the track the current or preceding tracks Turn the ≠ AMS ± dial counterclockwise until ...track quickly by using the ≠ AMS ± (AMS: Automatic Music Sensor) dial or by observing the display Z Press 0 (backward)/) (forward) on the remote. Playing CDs Locating a Specific Track or a Point in a Track You can also locate a specific point in a track while playing a disc. ≠ AMS ± +100...
Primary User Manual
Page 18
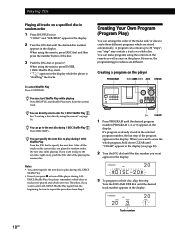
... the tracks. If you want appears in the display. A program can directly select a disc for 1 DISC Shuffle Play See "Locating a disc directly using the remote, press ENTER. 1 DISC Shuffle Play starts. PROGRAM1 CD1 20 DISC *DISC-20* 3 To program a whole disc, skip this step. You can arrange the ...Play) You can start ALL DISCS Shuffle Play again from the beginning, be sure to create three different programs which were not. Playing CDs Playing all the tracks on the current disc are played in the display while the player is already stored in the selected program number, ...
... the tracks. If you want appears in the display. A program can directly select a disc for 1 DISC Shuffle Play See "Locating a disc directly using the remote, press ENTER. 1 DISC Shuffle Play starts. PROGRAM1 CD1 20 DISC *DISC-20* 3 To program a whole disc, skip this step. You can arrange the ...Play) You can start ALL DISCS Shuffle Play again from the beginning, be sure to create three different programs which were not. Playing CDs Playing all the tracks on the current disc are played in the display while the player is already stored in the selected program number, ...

Primary User Manual
Page 19
... the JOG dial or press · to start Program Play. When you replace discs, the programmed disc and track numbers remain. Creating a program using the remote Z DISC >10 CHECK · PROGRAM Number buttons ENTER CLEAR 1 Press PROGRAM until erased Even if you press PROGRAM to 9. Note If you program a whole disc...
... the JOG dial or press · to start Program Play. When you replace discs, the programmed disc and track numbers remain. Creating a program using the remote Z DISC >10 CHECK · PROGRAM Number buttons ENTER CLEAR 1 Press PROGRAM until erased Even if you press PROGRAM to 9. Note If you program a whole disc...
Primary User Manual
Page 21
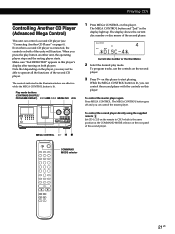
...this player. To control the second player directly using the supplied remote Z Set CD 1/2/3 on the remote to start playing. GettPinlagyiSntgarCteDds Controlling Another CD Player (Advanced Mega Control) This unit can control a second CD player (see "Connecting Another CD Player" on both of the units will function. Make sure "...To control the master player again Press MEGA CONTROL. The display shows the current disc number or disc memo of the second CD player. The controls indicated in the display light up. The MEGA CONTROL button and "2nd" in the illustration below are ...
...this player. To control the second player directly using the supplied remote Z Set CD 1/2/3 on the remote to start playing. GettPinlagyiSntgarCteDds Controlling Another CD Player (Advanced Mega Control) This unit can control a second CD player (see "Connecting Another CD Player" on both of the units will function. Make sure "...To control the master player again Press MEGA CONTROL. The display shows the current disc number or disc memo of the second CD player. The controls indicated in the display light up. The MEGA CONTROL button and "2nd" in the illustration below are ...
Primary User Manual
Page 26
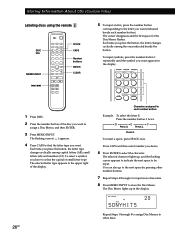
... button). The Disc Memo lights up , and the flashing cursor appears to indicate the next space to be input. Storing Information About CDs (Custom Files) Labeling discs using the remote Z DISC DEL MEMO INPUT =/+ SPACE CAPS Number buttons ENTER CLEAR 5 To input a letter, press the number button corresponding to the letter you...
... button). The Disc Memo lights up , and the flashing cursor appears to indicate the next space to be input. Storing Information About CDs (Custom Files) Labeling discs using the remote Z DISC DEL MEMO INPUT =/+ SPACE CAPS Number buttons ENTER CLEAR 5 To input a letter, press the number button corresponding to the letter you...
Primary User Manual
Page 30
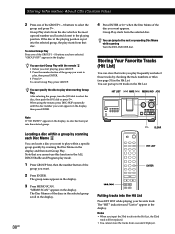
... LIST ENTER =/+ Putting tracks into the selected group. "GROUP OFF" appears in the display. "MEMO SCAN" appears in the display. When using the remote, press DISC SKIP repeatedly until the disc number you start playing, press GROUP. 2 Press the number button of the GROUP 1 - 8 buttons to play... , then press ENTER. 3 Press ·. Storing Information About CDs (Custom Files) 2 Press one of the disc you want appears. You can start Group Play. The "HIT" indication and "List in" appear in the...
... LIST ENTER =/+ Putting tracks into the selected group. "GROUP OFF" appears in the display. "MEMO SCAN" appears in the display. When using the remote, press DISC SKIP repeatedly until the disc number you start playing, press GROUP. 2 Press the number button of the GROUP 1 - 8 buttons to play... , then press ENTER. 3 Press ·. Storing Information About CDs (Custom Files) 2 Press one of the disc you want appears. You can start Group Play. The "HIT" indication and "List in" appear in the...

Primary User Manual
Page 31
... in the Hit List in the front panel display. 3 Push the JOG dial or press · to start playing. appears in the Hit List The CD TEXT disc's track title is stored as the first track in the Hit List, and you cannot arrange the order of two methods described below... a Hit Title automatically when the track is deleted from the Hit List 1 Follow Steps 1 and 2 in "Playing tracks in the Hit List. When using the remote, press ENTER. Labeling tracks in the Hit List (Hit Title) You can store a CD TEXT disc's track titles in the display. 2 Push the JOG dial.
... in the Hit List in the front panel display. 3 Push the JOG dial or press · to start playing. appears in the Hit List The CD TEXT disc's track title is stored as the first track in the Hit List, and you cannot arrange the order of two methods described below... a Hit Title automatically when the track is deleted from the Hit List 1 Follow Steps 1 and 2 in "Playing tracks in the Hit List. When using the remote, press ENTER. Labeling tracks in the Hit List (Hit Title) You can store a CD TEXT disc's track titles in the display. 2 Push the JOG dial.
Primary User Manual
Page 33
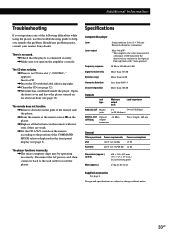
...notice. 33US projecting parts 8.5 kg (18 lbs 12 oz) Supplied accessories See page 4. The remote does not function. /Remove obstacles in the path of the remote and the player. /Point the remote at the remote sensor g on the player. /Replace all the batteries in a slot ("-NO DISC-" appears)....the wall outlet to help you operate the amplifier correctly. Additional Information Troubleshooting If you experience any problem persist, consult your nearest Sony dealer. The CD does not play. /There is no sound. /Check that the player is the value measured at 50 kilohms) DIGITAL OUT Optical...
...notice. 33US projecting parts 8.5 kg (18 lbs 12 oz) Supplied accessories See page 4. The remote does not function. /Remove obstacles in the path of the remote and the player. /Point the remote at the remote sensor g on the player. /Replace all the batteries in a slot ("-NO DISC-" appears)....the wall outlet to help you operate the amplifier correctly. Additional Information Troubleshooting If you experience any problem persist, consult your nearest Sony dealer. The CD does not play. /There is no sound. /Check that the player is the value measured at 50 kilohms) DIGITAL OUT Optical...
Primary User Manual
Page 34
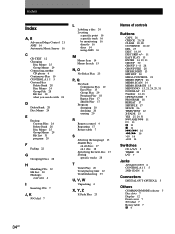
... Continuous Play 10 Easy Play 15 Group Play 29 Program Play 18 Repeat Play 17 Shuffle Play 17 Program changing 20 checking 20 erasing 20 R Remote control 4 Repeating 17 Rotary table 7 S Selecting the language 13 Shuffle Play on all discs 17 on 1 disc 18 Specifying the next disc 15 Storing...FADE 23 YES 25, 29, 31 ≠ AMS ± 11 · 11 P 11 p 11 =/+ 16 0/) 16 >10 16 +100 14 Switches CD 1/2/3 5 TIMER 20 I/u 7 Jacks ANALOG OUT 6 CONTROL A1 5 2ND CD IN 6 Connectors DIGITAL OUT (OPTICAL) 5 Others COMMAND MODE selector 5 Disc slots 7 Display 12 Front cover 7 JOG dial 7 Rotary table 7 g4 34US
... Continuous Play 10 Easy Play 15 Group Play 29 Program Play 18 Repeat Play 17 Shuffle Play 17 Program changing 20 checking 20 erasing 20 R Remote control 4 Repeating 17 Rotary table 7 S Selecting the language 13 Shuffle Play on all discs 17 on 1 disc 18 Specifying the next disc 15 Storing...FADE 23 YES 25, 29, 31 ≠ AMS ± 11 · 11 P 11 p 11 =/+ 16 0/) 16 >10 16 +100 14 Switches CD 1/2/3 5 TIMER 20 I/u 7 Jacks ANALOG OUT 6 CONTROL A1 5 2ND CD IN 6 Connectors DIGITAL OUT (OPTICAL) 5 Others COMMAND MODE selector 5 Disc slots 7 Display 12 Front cover 7 JOG dial 7 Rotary table 7 g4 34US


