Primary User Manual
Page 2
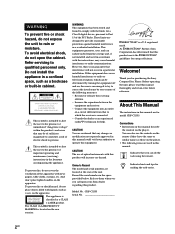
... presence of important operating and maintenance (servicing) instructions in this manual could void your Sony dealer regarding this product meets the ENERGY STAR guidelines for model CDP-CX355. About This Manual The instructions in a confined space, such as a CLASS 1 LASER product. Do not install the appliance in this product will not occur in cabinet. This symbol is connected. - To prevent fire...
... presence of important operating and maintenance (servicing) instructions in this manual could void your Sony dealer regarding this product meets the ENERGY STAR guidelines for model CDP-CX355. About This Manual The instructions in a confined space, such as a CLASS 1 LASER product. Do not install the appliance in this product will not occur in cabinet. This symbol is connected. - To prevent fire...
Primary User Manual
Page 4
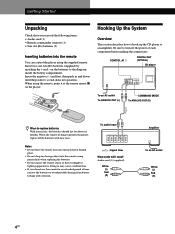
... turn off the power of time, remove the batteries to avoid possible damage from battery leakage and corrosion. CONTROL A1 DIGITAL OUT (OPTICAL) CD player To an AC outlet To ANALOG OUT (L) COMMAND MODE To ANALOG OUT (R) When to replace batteries With normal use the remote for about six months. When using the supplied remote. To audio input : Signal flow What cords will I need? When the remote no longer operates the player, replace...
... turn off the power of time, remove the batteries to avoid possible damage from battery leakage and corrosion. CONTROL A1 DIGITAL OUT (OPTICAL) CD player To an AC outlet To ANALOG OUT (L) COMMAND MODE To ANALOG OUT (R) When to replace batteries With normal use the remote for about six months. When using the supplied remote. To audio input : Signal flow What cords will I need? When the remote no longer operates the player, replace...
Primary User Manual
Page 5
... you have a Sony component with the CONTROL A1 jack Connect the component via the DIGITAL OUT (OPTICAL) connector using an optical cable (not supplied). Connecting the AC power cord Connect the AC power cord to the supplementary "CONTROL A1 Control System" instructions. 5US Then set the CD 1/2/3 switch on the components: Red (right) to Red and White (left) to White. If the player is set the CD 1/2/3 switch on a horizontal place. For details, refer to a wall outlet. GettPinlagyiSntgarCteDds Hookups When connecting the audio cord, be sure...
... you have a Sony component with the CONTROL A1 jack Connect the component via the DIGITAL OUT (OPTICAL) connector using an optical cable (not supplied). Connecting the AC power cord Connect the AC power cord to the supplementary "CONTROL A1 Control System" instructions. 5US Then set the CD 1/2/3 switch on the components: Red (right) to Red and White (left) to White. If the player is set the CD 1/2/3 switch on a horizontal place. For details, refer to a wall outlet. GettPinlagyiSntgarCteDds Hookups When connecting the audio cord, be sure...
Primary User Manual
Page 6
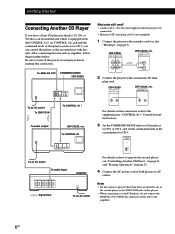
... to operate the second player, see also "Hookups" on this connection, refer to the supplementary "CONTROL A1 Control System" instructions. 3 Set the COMMAND MODE selector of this player to CD 1 or CD 2, and set to CD 3, you intend to the amplifier. 6US Be sure to turn off the power of the second player to the 2ND CD IN jacks of this player. • When connecting a second CD player, do not connect the DIGITAL OUT (OPTICAL) connector of this connection. CONTROL...
... to operate the second player, see also "Hookups" on this connection, refer to the supplementary "CONTROL A1 Control System" instructions. 3 Set the COMMAND MODE selector of this player to CD 1 or CD 2, and set to CD 3, you intend to the amplifier. 6US Be sure to turn off the power of the second player to the 2ND CD IN jacks of this player. • When connecting a second CD player, do not connect the DIGITAL OUT (OPTICAL) connector of this connection. CONTROL...
Primary User Manual
Page 8
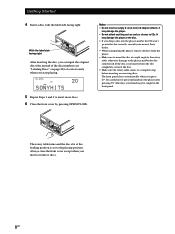
... disc. • Make sure the rotary table comes to locate it easily when you can input the original disc titles instead of the disc numbers (see "Labeling Discs" on page 24) to a complete stop before inserting or removing discs. It may be caught in the front panel. With the label side facing right After inserting the disc, you start playing. ALL DISCS CD1 DISC...
... disc. • Make sure the rotary table comes to locate it easily when you can input the original disc titles instead of the disc numbers (see "Labeling Discs" on page 24) to a complete stop before inserting or removing discs. It may be caught in the front panel. With the label side facing right After inserting the disc, you start playing. ALL DISCS CD1 DISC...
Primary User Manual
Page 10
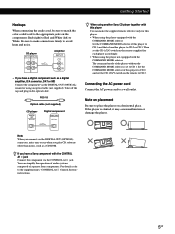
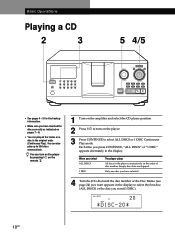
... MEGA CONTROL X-FADE NO DELAY FADER OPEN/ CLOSE DISC EJECT • See pages 4 - 5 for the hookup information. • Make sure you have selected 4 Turn the JOG dial until the disc number or the Disc Memo (see page 24) you want appears in the display to select the first disc (ALL DISCS) or the disc you want (1 DISC). You can play up to select ALL DISCS or 1 DISC Continuous Play mode. Only one disc you...
... MEGA CONTROL X-FADE NO DELAY FADER OPEN/ CLOSE DISC EJECT • See pages 4 - 5 for the hookup information. • Make sure you have selected 4 Turn the JOG dial until the disc number or the Disc Memo (see page 24) you want appears in the display to select the first disc (ALL DISCS) or the disc you want (1 DISC). You can play up to select ALL DISCS or 1 DISC Continuous Play mode. Only one disc you...
Primary User Manual
Page 11
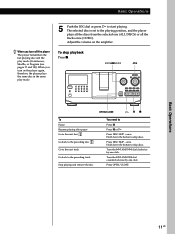
Adjust the volume on the player again, therefore, the player plays the same disc in the same play mode (Continuous, Shuffle, or Program (see pages 17 and 18)). once. Press OPEN/CLOSE Basic Operations 11US Basic Operations When you turn off the player The player remembers the last playing disc and the play mode. 5 Push the JOG dial or press · to start playing. To stop playback Press p. ≠ AMS ±...
Adjust the volume on the player again, therefore, the player plays the same disc in the same play mode (Continuous, Shuffle, or Program (see pages 17 and 18)). once. Press OPEN/CLOSE Basic Operations 11US Basic Operations When you turn off the player The player remembers the last playing disc and the play mode. 5 Push the JOG dial or press · to start playing. To stop playback Press p. ≠ AMS ±...
Primary User Manual
Page 13
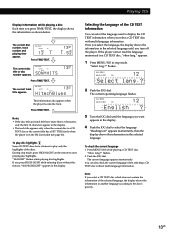
... operating language flashes. ALL DISCS MULTI CD TEXT CD1 12 English ? 3 Turn the JOG dial until you select the language, the display shows the information in stop mode, press HIGH-LIGHT on the remote to play only the highlights of the discs. To check the current language 1 Press MENU/NO while playing a CD TEXT disc. If you select a CD TEXT disc with multi-language information. "Show lang.?" You can select the language used...
... operating language flashes. ALL DISCS MULTI CD TEXT CD1 12 English ? 3 Turn the JOG dial until you select the language, the display shows the information in stop mode, press HIGH-LIGHT on the remote to play only the highlights of the discs. To check the current language 1 Press MENU/NO while playing a CD TEXT disc. If you select a CD TEXT disc with multi-language information. "Show lang.?" You can select the language used...
Primary User Manual
Page 14
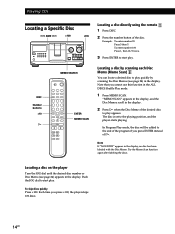
... disc is set to start play. Push the JOG dial to the playing position, and the player starts playing. "MEMO SCAN" appears in the display, and the Disc Memos scroll in the display . To skip discs quickly Press +100. Playing CDs Locating a Specific Disc ≠ AMS ± +100 JOG +100 I / u MEMO SEARCH DISC Number buttons >10 · ENTER MEMO SCAN Locating a disc directly using the remote 1 Press DISC. 2 Press the number button of the desired disc...
... disc is set to start play. Push the JOG dial to the playing position, and the player starts playing. "MEMO SCAN" appears in the display, and the Disc Memos scroll in the display . To skip discs quickly Press +100. Playing CDs Locating a Specific Disc ≠ AMS ± +100 JOG +100 I / u MEMO SEARCH DISC Number buttons >10 · ENTER MEMO SCAN Locating a disc directly using the remote 1 Press DISC. 2 Press the number button of the desired disc...
Primary User Manual
Page 15
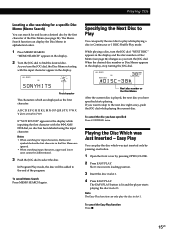
... button. 1 Open the front cover by the first character of the program. Note The Easy Play function can only play the disc in the display. While playing a disc, turn the JOG dial. If you have specified starts playing. As you turn the JOG dial, the Disc Memos starting with the ≠ AMS ± dial, no disc has been labeled using the input character. Specifying the Next Disc to Play...
... button. 1 Open the front cover by the first character of the program. Note The Easy Play function can only play the disc in the display. While playing a disc, turn the JOG dial. If you have specified starts playing. As you turn the JOG dial, the Disc Memos starting with the ≠ AMS ± dial, no disc has been labeled using the input character. Specifying the Next Disc to Play...
Primary User Manual
Page 16
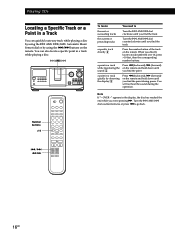
... the operation. Note If "- OVER -" appears in the display, the disc has reached the end while you directly locate a track numbered over 10, press >10 first, then the corresponding number buttons. Playing CDs Locating a Specific Track or a Point in a Track You can also locate a specific point in a track while playing a disc. ≠ AMS ± +100 I / u To locate You need to go back. You can quickly...
... the operation. Note If "- OVER -" appears in the display, the disc has reached the end while you directly locate a track numbered over 10, press >10 first, then the corresponding number buttons. Playing CDs Locating a Specific Track or a Point in a Track You can also locate a specific point in a track while playing a disc. ≠ AMS ± +100 I / u To locate You need to go back. You can quickly...
Primary User Manual
Page 18
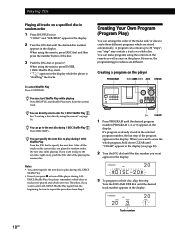
... the selected program number, the last step of the program appears in the display. To cancel Shuffle Play Press CONTINUE. If you want to skip to create three different programs which were not. Creating Your Own Program (Program Play) You can directly select a disc for 1 DISC Shuffle Play See "Locating a disc directly using the remote, press ENTER. 1 DISC Shuffle Play starts. "1 DISC" and "SHUFFLE" appear in the display. 2 Turn the JOG dial until the disc number...
... the selected program number, the last step of the program appears in the display. To cancel Shuffle Play Press CONTINUE. If you want to skip to create three different programs which were not. Creating Your Own Program (Program Play) You can directly select a disc for 1 DISC Shuffle Play See "Locating a disc directly using the remote, press ENTER. 1 DISC Shuffle Play starts. "1 DISC" and "SHUFFLE" appear in the display. 2 Turn the JOG dial until the disc number...
Primary User Manual
Page 20
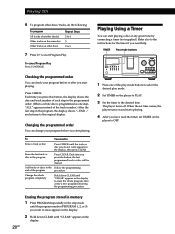
... press this button, the display shows the disc and track number of each step in the programmed order. (When a whole disc is programmed as one of the play mode buttons to select the desired play mode. 2 Set TIMER on other discs Repeat Steps 2 to 4 5 2 to 5 7 Press · to OFF. 20US Erasing the program stored in memory 1 Press PROGRAM repeatedly in the program, the display shows "- Playing CDs 6 To program other discs/tracks, do...
... press this button, the display shows the disc and track number of each step in the programmed order. (When a whole disc is programmed as one of the play mode buttons to select the desired play mode. 2 Set TIMER on other discs Repeat Steps 2 to 4 5 2 to 5 7 Press · to OFF. 20US Erasing the program stored in memory 1 Press PROGRAM repeatedly in the program, the display shows "- Playing CDs 6 To program other discs/tracks, do...
Primary User Manual
Page 21
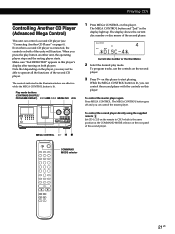
... disc memo of the second CD player. Even when a second CD player is lit. When you can control a second CD player (see "Connecting Another CD Player" on both players. The controls indicated in the display light up. Play mode buttons (CONTINUE/SHUFFLE/ PROGRAM/REPEAT) ≠ AMS ± MENU/NO JOG +100 I / u MEGA CONTROL · P p 1 Press MEGA CONTROL on this player. To program tracks, use the controls on the second player. 3 Press · on this player to operate all the functions...
... disc memo of the second CD player. Even when a second CD player is lit. When you can control a second CD player (see "Connecting Another CD Player" on both players. The controls indicated in the display light up. Play mode buttons (CONTINUE/SHUFFLE/ PROGRAM/REPEAT) ≠ AMS ± MENU/NO JOG +100 I / u MEGA CONTROL · P p 1 Press MEGA CONTROL on this player. To program tracks, use the controls on the second player. 3 Press · on this player to operate all the functions...
Primary User Manual
Page 23
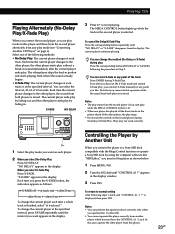
...-Delay Play Press NO DELAY. Each time the current player changes to a Sony MD deck compatible with the Mega Control function or operate a Sony MD deck by fading in the display. To change the current player each player. 2 When you operate Disc 1 to the other player, the other player, the sound from any point of the following steps 1 and 2, and "CONTROL A1 ?" When you start X-Fade at any play while the MEGA CONTROL button...
...-Delay Play Press NO DELAY. Each time the current player changes to a Sony MD deck compatible with the Mega Control function or operate a Sony MD deck by fading in the display. To change the current player each player. 2 When you operate Disc 1 to the other player, the other player, the sound from any point of the following steps 1 and 2, and "CONTROL A1 ?" When you start X-Fade at any play while the MEGA CONTROL button...
Primary User Manual
Page 28
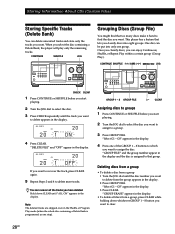
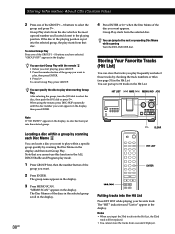
... you start playing. 2 Turn the JOG dial to select the disc you classify discs into only one of the GROUP 1 - 8 buttons to which you want to assign to a group. 3 Press GROUP FILE. "Select G1 - "Select G1 - "DELETE FILE" and "OFF" appear in the display. 3 Press CLEAR. G8" appears in the display. This player has a feature that too many discs make it hard to find...
... you start playing. 2 Turn the JOG dial to select the disc you classify discs into only one of the GROUP 1 - 8 buttons to which you want to assign to a group. 3 Press GROUP FILE. "Select G1 - "Select G1 - "DELETE FILE" and "OFF" appear in the display. 3 Press CLEAR. G8" appears in the display. This player has a feature that too many discs make it hard to find...
Primary User Manual
Page 30
... use this function in the display and then start playing, press GROUP. 2 Press the number button of the group you want . 2 Press ENTER. You can put into the selected group, the play frequently and select those tracks by scanning the Disc Memo in the ALL DISCS Shuffle and Program play mode. 1 Press GROUP first, then the number button of the group you play starts from a second CD player. The Disc...
... use this function in the display and then start playing, press GROUP. 2 Press the number button of the group you want . 2 Press ENTER. You can put into the selected group, the play frequently and select those tracks by scanning the Disc Memo in the ALL DISCS Shuffle and Program play mode. 1 Press GROUP first, then the number button of the group you play starts from a second CD player. The Disc...
Primary User Manual
Page 32
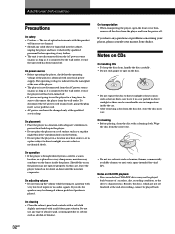
... into the cabinet, unplug the player and have any questions or problems concerning your player, please consult your local power supply. On cleaning • Before playing, clean the disc with very low level inputs or no audio signals. On transportation • When transporting the player, open the front cover then remove all the discs from a cold to direct sunlight or heat sources such as hot air ducts...
... into the cabinet, unplug the player and have any questions or problems concerning your player, please consult your local power supply. On cleaning • Before playing, clean the disc with very low level inputs or no audio signals. On transportation • When transporting the player, open the front cover then remove all the discs from a cold to direct sunlight or heat sources such as hot air ducts...
Primary User Manual
Page 33
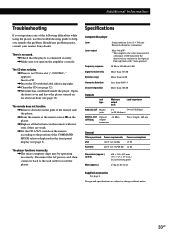
... the front panel display (see page 32). Specifications Compact disc player Laser Semiconductor laser (λ = 780 nm) Emission duration: continuous Laser output Max 44.6 µW* * This output is no sound. /Check that the player is connected securely. /Make sure you operate the amplifier correctly. Insert a CD. /Insert the CD with new ones if they are subject to reset the player. Design and specifications are weak. /Set the CD 1/2/3 switch on for...
... the front panel display (see page 32). Specifications Compact disc player Laser Semiconductor laser (λ = 780 nm) Emission duration: continuous Laser output Max 44.6 µW* * This output is no sound. /Check that the player is connected securely. /Make sure you operate the amplifier correctly. Insert a CD. /Insert the CD with new ones if they are subject to reset the player. Design and specifications are weak. /Set the CD 1/2/3 switch on for...
Primary User Manual
Page 34
... List 30 Hookups overview 4 I Inserting CDs 7 J, K JOG dial 7 L Labeling a disc 24 Locating a specific point 16 a specific track 16 by monitoring 16 directly 16 discs 14 using AMS 16 M Memo Scan 14 Memo Search 15 N, O No-Delay Play 23 P, Q Playback Continuous Play 10 Easy Play 15 Group Play 29 Program Play 18 Repeat Play 17 Shuffle Play 17 Program changing 20 checking 20 erasing 20 R Remote control 4 Repeating 17 Rotary table 7 S Selecting the...
... List 30 Hookups overview 4 I Inserting CDs 7 J, K JOG dial 7 L Labeling a disc 24 Locating a specific point 16 a specific track 16 by monitoring 16 directly 16 discs 14 using AMS 16 M Memo Scan 14 Memo Search 15 N, O No-Delay Play 23 P, Q Playback Continuous Play 10 Easy Play 15 Group Play 29 Program Play 18 Repeat Play 17 Shuffle Play 17 Program changing 20 checking 20 erasing 20 R Remote control 4 Repeating 17 Rotary table 7 S Selecting the...


