
Limited Warranty (US Only)
Page 1
... not apply to you. PARTS: In addition, Sony will repair or replace the Product, at its original packaging or packaging affording an equal degree of protection, to any Sony authorized service facility. 4-557-172-02 General Stereo/Hifi Components/Tape Decks ® CD Players/Mini Disc Players/Audio Systems Hifi Audio LIMITED WARRANTY Sony Electronics Inc. ("Sony") warrants this Product is within 90 days of the date of sale, the limitation on...
... not apply to you. PARTS: In addition, Sony will repair or replace the Product, at its original packaging or packaging affording an equal degree of protection, to any Sony authorized service facility. 4-557-172-02 General Stereo/Hifi Components/Tape Decks ® CD Players/Mini Disc Players/Audio Systems Hifi Audio LIMITED WARRANTY Sony Electronics Inc. ("Sony") warrants this Product is within 90 days of the date of sale, the limitation on...
Operating Instructions
Page 2
... not installed and used in the literature accompanying the appliance. - Refer to qualified personnel only. However, there is located on , the user is intended to alert the user to Part 15 of important operating and maintenance (servicing) instructions in this manual thoroughly and retain it for making the task easier. Increase the separation between the equipment and receiver. - Owner's Record The model and serial numbers...
... not installed and used in the literature accompanying the appliance. - Refer to qualified personnel only. However, there is located on , the user is intended to alert the user to Part 15 of important operating and maintenance (servicing) instructions in this manual thoroughly and retain it for making the task easier. Increase the separation between the equipment and receiver. - Owner's Record The model and serial numbers...

Operating Instructions
Page 3
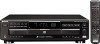
... ...4 Connecting Another CD Player 6 Playing a CD ...8 Playing CDs Using the Display ...10 Replacing Discs While Playing a Disc 12 Locating a Specific Disc ...13 Locating a Specific Track 14 Locating a Particular Point in a Track 14 Playing Repeatedly ...14 Playing in Random Order (Shuffle Play 15 Creating Your Own Program (Program Play 16 Controlling Another CD Player (Advanced Mega Control 18 Playing Alternately (No-Delay Play/X-Fade Play 20 Recording From CDs Recording Your Own Program 21 Recording a CD by Specifying Tape Length (Time Edit 21 Fading In or Out ...22 Adjusting the...
... ...4 Connecting Another CD Player 6 Playing a CD ...8 Playing CDs Using the Display ...10 Replacing Discs While Playing a Disc 12 Locating a Specific Disc ...13 Locating a Specific Track 14 Locating a Particular Point in a Track 14 Playing Repeatedly ...14 Playing in Random Order (Shuffle Play 15 Creating Your Own Program (Program Play 16 Controlling Another CD Player (Advanced Mega Control 18 Playing Alternately (No-Delay Play/X-Fade Play 20 Recording From CDs Recording Your Own Program 21 Recording a CD by Specifying Tape Length (Time Edit 21 Fading In or Out ...22 Adjusting the...
Operating Instructions
Page 5
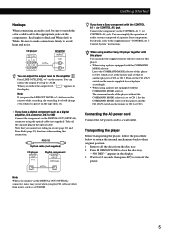
... OPTICAL Digital component DIGITAL INPUT OPTICAL If you play CD software other than music, such as a digital amplifier, D/A converter, DAT or MD Connect the component via the CONTROL A1 (or CONTROL A1) jack. "-NO DISC-" appears in the optical cable. buttons on the remote while recording, the recording level will change even when it is set the CD 1/2/3 switch on the remote supplied for this player and the CD 1/2/3 switch on the remote to CD 2 or CD 3. Getting Started Hookups When connecting an audio cord...
... OPTICAL Digital component DIGITAL INPUT OPTICAL If you play CD software other than music, such as a digital amplifier, D/A converter, DAT or MD Connect the component via the CONTROL A1 (or CONTROL A1) jack. "-NO DISC-" appears in the optical cable. buttons on the remote while recording, the recording level will change even when it is set the CD 1/2/3 switch on the remote supplied for this player and the CD 1/2/3 switch on the remote to CD 2 or CD 3. Getting Started Hookups When connecting an audio cord...

Operating Instructions
Page 6
... the supplementary "CONTROL-A1 Control System" instructions. 3 Set the COMMAND MODE selector of each player before making this connection, refer to operate the second player, see also "Hookups" on page 5). plug cord. CONTROL A1 To audio output CDP-CX300, etc. COMMAND MODE To LINE OUT CDP-CE535 To 2ND CD IN To CONTROL A1 To an AC outlet What cords will I need? • Audio cord (1) (Use the cord supplied with the player to turn off the power of each player. After connecting this player. Be...
... the supplementary "CONTROL-A1 Control System" instructions. 3 Set the COMMAND MODE selector of each player before making this connection, refer to operate the second player, see also "Hookups" on page 5). plug cord. CONTROL A1 To audio output CDP-CX300, etc. COMMAND MODE To LINE OUT CDP-CE535 To 2ND CD IN To CONTROL A1 To an AC outlet What cords will I need? • Audio cord (1) (Use the cord supplied with the player to turn off the power of each player. After connecting this player. Be...

Operating Instructions
Page 8
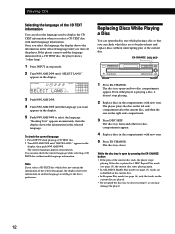
... 1 DISC Continuous Play mode. Each time you 've selected 8 When you select ALL DISCS 1 DISC The player plays All discs in the player consecutively in the empty disc compartments. I / u CONTINUE SHUFFLE PROGRAM REPEAT DISC CHECK DISC 1 DISC 2 DISC 3 DISC 4 DISC 5 PHONES INPUT FADER TIME/ EDIT/ PEAK TEXT TIME FADE SEARCH EXCHANGE DISC SKIP OPEN/CLOSE AMS (DISC) (-AMS+) CHECK CLEAR NO DELAY X-FADE PUSH ENTER MEGA CONTROL • See pages 4 - 5 for the hookup information. 1 Turn on the disc tray. Basic Operations Playing a CD 25 6 43 Connect...
... 1 DISC Continuous Play mode. Each time you 've selected 8 When you select ALL DISCS 1 DISC The player plays All discs in the player consecutively in the empty disc compartments. I / u CONTINUE SHUFFLE PROGRAM REPEAT DISC CHECK DISC 1 DISC 2 DISC 3 DISC 4 DISC 5 PHONES INPUT FADER TIME/ EDIT/ PEAK TEXT TIME FADE SEARCH EXCHANGE DISC SKIP OPEN/CLOSE AMS (DISC) (-AMS+) CHECK CLEAR NO DELAY X-FADE PUSH ENTER MEGA CONTROL • See pages 4 - 5 for the hookup information. 1 Turn on the disc tray. Basic Operations Playing a CD 25 6 43 Connect...

Operating Instructions
Page 9
...; OPEN/CLOSE Basic Operations 9 DISC 1 - 5 · P p DISC SKIP I / u CONTINUE SHUFFLE PROGRAM REPEAT DISC CHECK DISC 1 DISC 2 DISC 3 DISC 4 DISC 5 PHONES INPUT FADER TIME/ EDIT/ PEAK TEXT TIME FADE SEARCH To Pause Resume play after pause Go to the next track Go back to the preceding track Go to the next disc Select a disc directly Stop play Press p. The disc tray closes and the player plays all the tracks once (Continuous Play). The headphones volume will change even when it is preset on the remote while recording...
...; OPEN/CLOSE Basic Operations 9 DISC 1 - 5 · P p DISC SKIP I / u CONTINUE SHUFFLE PROGRAM REPEAT DISC CHECK DISC 1 DISC 2 DISC 3 DISC 4 DISC 5 PHONES INPUT FADER TIME/ EDIT/ PEAK TEXT TIME FADE SEARCH To Pause Resume play after pause Go to the next track Go back to the preceding track Go to the next disc Select a disc directly Stop play Press p. The disc tray closes and the player plays all the tracks once (Continuous Play). The headphones volume will change even when it is preset on the remote while recording...

Operating Instructions
Page 10
... shown in Continuous Play mode. Playing CDs Using the Display You can check information about the disc using the display. Notes on a disc have been played, the semi- INPUT TIME/TEXT ≠ AMS ± Checking the total number and playing time of the remaining time. The display shows the current disc number, the total number of the track and the music calendar. circled disc number disappears. Press TIME/TEXT. 10 Current disc number Playing time ALL DISCS DISC 1 12 TRACK 1 345 MIN SEC...
... shown in Continuous Play mode. Playing CDs Using the Display You can check information about the disc using the display. Notes on a disc have been played, the semi- INPUT TIME/TEXT ≠ AMS ± Checking the total number and playing time of the remaining time. The display shows the current disc number, the total number of the track and the music calendar. circled disc number disappears. Press TIME/TEXT. 10 Current disc number Playing time ALL DISCS DISC 1 12 TRACK 1 345 MIN SEC...
Operating Instructions
Page 12
... doesn't stop mode. 2 Turn ≠ AMS ± until the language you select a CD TEXT disc which does not contain the information of the selected language, the display shows the information in the compartments with new ones. Replacing Discs While Playing a Disc You can open by pressing the EX-CHANGE button • If the play of the current disc. The disc tray closes. The disc tray turns and other lang)." 1 Press INPUT in...
... doesn't stop mode. 2 Turn ≠ AMS ± until the language you select a CD TEXT disc which does not contain the information of the selected language, the display shows the information in the compartments with new ones. Replacing Discs While Playing a Disc You can open by pressing the EX-CHANGE button • If the play of the current disc. The disc tray closes. The disc tray turns and other lang)." 1 Press INPUT in...

Operating Instructions
Page 13
... while playing a disc. Playing CDs Locating a Specific Disc You can extend the playing time during scanning the discs Press DISC CHECK repeatedly until the playing time you want , press · to show you find the disc A specific disc directly DISC 1 - 5. DISC 1 - 5 DISC CHECK · DISC SKIP DISC Number buttons ENTER · You can locate any disc before you start playing while the disc tray is open. The disc tray turns to continue playing. 13 When using the remote, follow the procedure below. 1 Press DISC. 2 Press the number button...
... while playing a disc. Playing CDs Locating a Specific Disc You can extend the playing time during scanning the discs Press DISC CHECK repeatedly until the playing time you want , press · to show you find the disc A specific disc directly DISC 1 - 5. DISC 1 - 5 DISC CHECK · DISC SKIP DISC Number buttons ENTER · You can locate any disc before you start playing while the disc tray is open. The disc tray turns to continue playing. 13 When using the remote, follow the procedure below. 1 Press DISC. 2 Press the number button...

Operating Instructions
Page 14
..." appears in any track while playing a disc using the AMS (Automatic Music Sensor) control or number buttons on the remote. The player repeats the discs/tracks as follows: 14 Each time you press the button, the playing time changes cyclically. 0/) To locate Press A point while ) (forward) or 0 (backward) and monitoring the sound hold down until you find the point. REPEAT Press REPEAT while playing a disc. You can extend the playing time during the operation. When you find...
..." appears in any track while playing a disc using the AMS (Automatic Music Sensor) control or number buttons on the remote. The player repeats the discs/tracks as follows: 14 Each time you press the button, the playing time changes cyclically. 0/) To locate Press A point while ) (forward) or 0 (backward) and monitoring the sound hold down until you find the point. REPEAT Press REPEAT while playing a disc. You can extend the playing time during the operation. When you find...

Operating Instructions
Page 15
... the player is "shuffling" the tracks. 15 Press DISC 1 - 5 to ALL DISCS Shuffle Play, press SHUFFLE twice. Shuffle Play on one disc You can specify discs during ALL DISCS Shuffle Play mode, and the tracks on the disc you want is being played, press REPEAT repeatedly until "REPEAT 1" appears in a random order. Playing CDs When the disc is played in The player repeats ALL DISCS Continuous Play (page 8) All the tracks on all discs 1 DISC Continuous Play (page 8) All the tracks on the current disc ALL DISCS Shuffle Play...
... the player is "shuffling" the tracks. 15 Press DISC 1 - 5 to ALL DISCS Shuffle Play, press SHUFFLE twice. Shuffle Play on one disc You can specify discs during ALL DISCS Shuffle Play mode, and the tracks on the disc you want is being played, press REPEAT repeatedly until "REPEAT 1" appears in a random order. Playing CDs When the disc is played in The player repeats ALL DISCS Continuous Play (page 8) All the tracks on all discs 1 DISC Continuous Play (page 8) All the tracks on the current disc ALL DISCS Shuffle Play...

Operating Instructions
Page 17
... playing time 7 To program other discs or tracks, do the following: To program All tracks on other discs Other tracks on the same disc Other tracks on the disc are deleted from the program, and the rest of the program is played in Step 5. You can select a track directly using the remote Z 1 Press PROGRAM. PROGRAM 12345 A DISC-[1] CD1 4 Press ENTER to select the track. Playing CDs The program remains even after a while. Creating a program using the number buttons Press the number button...
... playing time 7 To program other discs or tracks, do the following: To program All tracks on other discs Other tracks on the same disc Other tracks on the disc are deleted from the program, and the rest of the program is played in Step 5. You can select a track directly using the remote Z 1 Press PROGRAM. PROGRAM 12345 A DISC-[1] CD1 4 Press ENTER to select the track. Playing CDs The program remains even after a while. Creating a program using the number buttons Press the number button...

Operating Instructions
Page 18
... disc and track numbers and the playing time of the track. Each time you press the play button on both of the second CD player 1 Press MEGA CONTROL. Follow the programming procedure Hold down CLEAR until the track you start playing. When you press the button, the last track will function. The controls indicated in the display. Controlling Another CD Player (Advanced Mega Control) This unit can control a second CD player (see "Connecting Another CD Player" on this button, the display shows the track (the disc and track numbers...
... disc and track numbers and the playing time of the track. Each time you press the play button on both of the second CD player 1 Press MEGA CONTROL. Follow the programming procedure Hold down CLEAR until the track you start playing. When you press the button, the last track will function. The controls indicated in the display. Controlling Another CD Player (Advanced Mega Control) This unit can control a second CD player (see "Connecting Another CD Player" on this button, the display shows the track (the disc and track numbers...

Operating Instructions
Page 19
... new Disc Memos are loaded to Press P Press p Turn ≠ AMS (DISC) ± until the display shows the disc number you want • To do other operations, use the controls on the second player or the supplied remote. • The AMS buttons (=/+) and search buttons (0/)) on the remote operate the second player as the COMMAND MODE selector on this player's memory, so you can label discs of the second player. Playing CDs To Pause Stop play...
... new Disc Memos are loaded to Press P Press p Turn ≠ AMS (DISC) ± until the display shows the disc number you want • To do other operations, use the controls on the second player or the supplied remote. • The AMS buttons (=/+) and search buttons (0/)) on the remote operate the second player as the COMMAND MODE selector on this player's memory, so you can label discs of the second player. Playing CDs To Pause Stop play...
Operating Instructions
Page 20
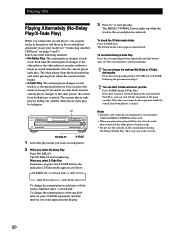
... play stops. • Do not use the controls on the second player during play Press the corresponding button (NO DELAY or X-FADE) following methods: • No-Delay Play: The current player changes at track end." Select one player has played all the discs/tracks in the player ahead of the following the procedure in Step 2. The other player, the sound from both players is mixed. To check the X-Fade mode...
... play stops. • Do not use the controls on the second player during play Press the corresponding button (NO DELAY or X-FADE) following methods: • No-Delay Play: The current player changes at track end." Select one player has played all the discs/tracks in the player ahead of the following the procedure in Step 2. The other player, the sound from both players is mixed. To check the X-Fade mode...
Operating Instructions
Page 23
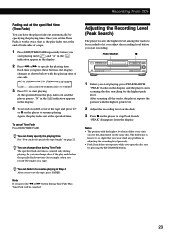
... playing time of a tape. 1 Press EDIT/TIME FADE repeatedly before you start playing. Recording From CDs Fading out at the specified time (Time Fade) You can have the player fade out automatically by pressing the EX-CHANGE button. 23 Each time you press the 0 or ) button during playing. Once you set the Time Fade, it works twice, that you won't find any problem in the display. 2 Press 0 or ) to let you adjust...
... playing time of a tape. 1 Press EDIT/TIME FADE repeatedly before you start playing. Recording From CDs Fading out at the specified time (Time Fade) You can have the player fade out automatically by pressing the EX-CHANGE button. 23 Each time you press the 0 or ) button during playing. Once you set the Time Fade, it works twice, that you won't find any problem in the display. 2 Press 0 or ) to let you adjust...
Operating Instructions
Page 27
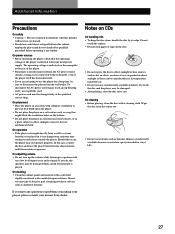
... qualified service shop. The operating voltage is played. never pull the cord. • AC power cord must be changed only at the rear of the player is connected to direct sunlight, excessive dust or mechanical shock. On cleaning • Before playing, clean the disc with a mild detergent solution. Should this case, remove the disc and leave the player turned on for a long time, be damaged. • After playing, store the disc...
... qualified service shop. The operating voltage is played. never pull the cord. • AC power cord must be changed only at the rear of the player is connected to direct sunlight, excessive dust or mechanical shock. On cleaning • Before playing, clean the disc with a mild detergent solution. Should this case, remove the disc and leave the player turned on for a long time, be damaged. • After playing, store the disc...
Operating Instructions
Page 28
... Sony dealer. Should any of the player. The remote does not function. /Remove the obstacles in the remote with new ones if they are subject to help you operate the amplifier correctly. /Adjust the output level using the LINE OUT LEVEL +/- projecting parts 5.4 kg (11 lbs 15 oz) Supplied accessories Audio cord (2 phono plugs - 2 phono plugs) (1) Remote commander (remote) (1) Size AA (R6) batteries (2) Design and specifications are weak. /Set the CD 1/2/3 switch on the player. /Replace...
... Sony dealer. Should any of the player. The remote does not function. /Remove the obstacles in the remote with new ones if they are subject to help you operate the amplifier correctly. /Adjust the output level using the LINE OUT LEVEL +/- projecting parts 5.4 kg (11 lbs 15 oz) Supplied accessories Audio cord (2 phono plugs - 2 phono plugs) (1) Remote commander (remote) (1) Size AA (R6) batteries (2) Design and specifications are weak. /Set the CD 1/2/3 switch on the player. /Replace...

Operating Instructions
Page 29
... 23 Playback Continuous Play 8 X-Fade Play 20 No-Delay Play 20 Playing alternately 20 Program Play 16 Repeat Play 14 Shuffle Play 15 Program 16 changing 18 checking 18 for recording 21 R Recording 21 a program 21 using Time Edit 21 Remaining time 10 Remote control 4 Repeating 14 Replacing discs while playing a disc 12 S Scanning. See Music Scan Searching. Index Index A, B Advanced Mega Control 18 AMS 14 Automatic Music Sensor. See AMS C, D CD TEXT 11 Changing the Disc Memos 19 Connecting 4 another CD player 6 Continuous Play 8 Controlling another CD player 18...
... 23 Playback Continuous Play 8 X-Fade Play 20 No-Delay Play 20 Playing alternately 20 Program Play 16 Repeat Play 14 Shuffle Play 15 Program 16 changing 18 checking 18 for recording 21 R Recording 21 a program 21 using Time Edit 21 Remaining time 10 Remote control 4 Repeating 14 Replacing discs while playing a disc 12 S Scanning. See Music Scan Searching. Index Index A, B Advanced Mega Control 18 AMS 14 Automatic Music Sensor. See AMS C, D CD TEXT 11 Changing the Disc Memos 19 Connecting 4 another CD player 6 Continuous Play 8 Controlling another CD player 18...


