
Operating Instructions (primary manual)
Page 3
Increase the separation between the equipment and receiver. - Consult the dealer or an experienced radio/TV technician for a Class B digital device, pursuant to Part 15 of the following measures: - For customers in a particular installation. However, there is no guarantee that to ...
Increase the separation between the equipment and receiver. - Consult the dealer or an experienced radio/TV technician for a Class B digital device, pursuant to Part 15 of the following measures: - For customers in a particular installation. However, there is no guarantee that to ...

Operating Instructions (primary manual)
Page 4
... Sports lesson mode (p. 39) Functions to use in editing (in the recording mode) •Watching the picture on a wide-screen TV Wide mode (p. 34) •Playing back the picture on a TV without connecting a cord •Recording with the date/time SUPER LASER LINK (p. 33) (CCD-TRV98 only) Date and time (p. 27) •Enhancing old tapes...
... Sports lesson mode (p. 39) Functions to use in editing (in the recording mode) •Watching the picture on a wide-screen TV Wide mode (p. 34) •Playing back the picture on a TV without connecting a cord •Recording with the date/time SUPER LASER LINK (p. 33) (CCD-TRV98 only) Date and time (p. 27) •Enhancing old tapes...

Operating Instructions (primary manual)
Page 5
... SEARCH 28 Playback - Basics Playing back a tape 29 Viewing the recording on pictures 27 Checking the recording - Basics Recording a picture 20 Shooting backlit subjects - NightShot 26 Superimposing the date and time on TV 32 Customizing Your Camcorder Changing the menu settings 51 Troubleshooting Types of ... pack 12 Connecting to a wall outlet 16 Step 2 Setting the date and time ........ 17 Step 3 Inserting a cassette 19 Recording - Picture effect 38 Using the PROGRAM AE function .... 39 Adjusting the exposure manually ...... 41 Focusing manually 42 Superimposing a title ...
... SEARCH 28 Playback - Basics Playing back a tape 29 Viewing the recording on pictures 27 Checking the recording - Basics Recording a picture 20 Shooting backlit subjects - NightShot 26 Superimposing the date and time on TV 32 Customizing Your Camcorder Changing the menu settings 51 Troubleshooting Types of ... pack 12 Connecting to a wall outlet 16 Step 2 Setting the date and time ........ 17 Step 3 Inserting a cassette 19 Recording - Picture effect 38 Using the PROGRAM AE function .... 39 Adjusting the exposure manually ...... 41 Focusing manually 42 Superimposing a title ...

Operating Instructions (primary manual)
Page 8
... - - z TRV88 - 560× - To view your recordings on your camcorder are for illustration purposes. e.g. TRV58 - 460× - - z TRV98 z 560× z z Note on TV color systems TV color systems differ from country to CAMERA. Before you read ...through this manual are shown in the table below. Otherwise, the model name is indicated in the text, for example, "CCD...
... - - z TRV88 - 560× - To view your recordings on your camcorder are for illustration purposes. e.g. TRV58 - 460× - - z TRV98 z 560× z z Note on TV color systems TV color systems differ from country to CAMERA. Before you read ...through this manual are shown in the table below. Otherwise, the model name is indicated in the text, for example, "CCD...

Operating Instructions (primary manual)
Page 32
...the operating instructions of the A/V connecting cable. If your TV has an S video jack Connect using the A/V connecting cable supplied with your TV. Open the jack cover. Connect the S video cable (optional) to the S video jacks on both your TV and the RFU adaptor. You can operate the playback ... monitor playback pictures on the LCD screen. Viewing the recording on TV Connect your camcorder to your TV with the A/V connecting cable supplied with your camcorder to the LINE IN input on the VCR by using an S video cable (optional) to obtain high-quality pictures. Refer to...
...the operating instructions of the A/V connecting cable. If your TV has an S video jack Connect using the A/V connecting cable supplied with your TV. Open the jack cover. Connect the S video cable (optional) to the S video jacks on both your TV and the RFU adaptor. You can operate the playback ... monitor playback pictures on the LCD screen. Viewing the recording on TV Connect your camcorder to your TV with the A/V connecting cable supplied with your camcorder to the LINE IN input on the VCR by using an S video cable (optional) to obtain high-quality pictures. Refer to...

Operating Instructions (primary manual)
Page 33
...operation Attach the power supply such as the AC power adaptor to your camcorder, and insert the recorded tape. (1) After connecting your camcorder to the operating instructions of Sony Corporation. 33 The lamp on TV Using the AV cordless IR receiver - is a trademark of the AV cordless IR receiver. Basics...switch on the AV cordless IR receiver to ON. (2) Set the POWER switch to your TV or VCR, you turn off automatically. To cancel the super laser link function Press SUPER LASER LINK. Playback - CCD-TRV98 only Once you connect the AV cordless IR receiver (optional) to PLAYER. (3) Turn...
...operation Attach the power supply such as the AC power adaptor to your camcorder, and insert the recorded tape. (1) After connecting your camcorder to the operating instructions of Sony Corporation. 33 The lamp on TV Using the AV cordless IR receiver - is a trademark of the AV cordless IR receiver. Basics...switch on the AV cordless IR receiver to ON. (2) Set the POWER switch to your TV or VCR, you turn off automatically. To cancel the super laser link function Press SUPER LASER LINK. Playback - CCD-TRV98 only Once you connect the AV cordless IR receiver (optional) to PLAYER. (3) Turn...

Operating Instructions (primary manual)
Page 34
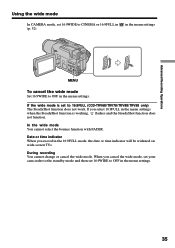
Refer to the operating instructions of the widescreen TV to the zoom mode, a picture without black bands appears [d]. 16:9FULL The picture during recording in the 16:9FULL mode [e], or playing back on a normal TV [b] or a wide-screen TV [c]. If you can record a cinema-like picture (CINEMA) or a 16:9...on the 16:9 wide-screen TV (16:9FULL). CINEMA Black bands appear on the screen during recording in the CINEMA mode [a], playing back on a normal TV [f] or a wide-screen TV [g] is horizontally compressed. - If you set the screen mode of the wide-screen TV to watch pictures of normal ...
Refer to the operating instructions of the widescreen TV to the zoom mode, a picture without black bands appears [d]. 16:9FULL The picture during recording in the 16:9FULL mode [e], or playing back on a normal TV [b] or a wide-screen TV [c]. If you can record a cinema-like picture (CINEMA) or a 16:9...on the 16:9 wide-screen TV (16:9FULL). CINEMA Black bands appear on the screen during recording in the CINEMA mode [a], playing back on a normal TV [f] or a wide-screen TV [g] is horizontally compressed. - If you set the screen mode of the wide-screen TV to watch pictures of normal ...
Operating Instructions (primary manual)
Page 35
... cannot change or cancel the wide mode. In the wide mode You cannot select the bounce function with FADER. Advanced Recording Operations Using the wide mode In CAMERA mode, set 16:9WIDE to OFF in the menu settings. 35 in the menu settings MENU To cancel the wide mode Set 16:9WIDE... 16:9FULL (CCD-TRV68/TRV78/TRV88/TRV98 only) The SteadyShot function does not work. If you select 16:9FULL in the menu settings when the SteadyShot function is set to OFF in the 16:9FULL mode, the date or time indicator will be widened on wide-screen TVs. When you record in the menu...
... cannot change or cancel the wide mode. In the wide mode You cannot select the bounce function with FADER. Advanced Recording Operations Using the wide mode In CAMERA mode, set 16:9WIDE to OFF in the menu settings. 35 in the menu settings MENU To cancel the wide mode Set 16:9WIDE... 16:9FULL (CCD-TRV68/TRV78/TRV88/TRV98 only) The SteadyShot function does not work. If you select 16:9FULL in the menu settings when the SteadyShot function is set to OFF in the 16:9FULL mode, the date or time indicator will be widened on wide-screen TVs. When you record in the menu...

Operating Instructions (primary manual)
Page 38
.... SEPIA : The picture gets sepia. When you turn the power off Your camcorder automatically returns to OFF in films or on the TV. STRETCH [f] : The picture expands horizontally. [a] [b] [c] [d] [e] [f] (1) In CAMERA mode, select P EFFECT in in the menu settings. (p. 52). (2) Select the desired picture effect mode in monochrome (black-and-white). AR T SEP...
.... SEPIA : The picture gets sepia. When you turn the power off Your camcorder automatically returns to OFF in films or on the TV. STRETCH [f] : The picture expands horizontally. [a] [b] [c] [d] [e] [f] (1) In CAMERA mode, select P EFFECT in in the menu settings. (p. 52). (2) Select the desired picture effect mode in monochrome (black-and-white). AR T SEP...

Operating Instructions (primary manual)
Page 52
...POWER switch CAMERA CAMERA CAMERA CAMERA CAMERA CAMERA * CCD-TRV68/TRV78/TRV88/TRV98 only 52 If you set to OFF, digital zoom is deactivated and up to the position of each item z is the default setting. Menu items differ according to 20× is carried out. Icon/item PROGRAM AE P EFFECT Mode -- -- To record in ... To cancel the SteadyShot function. Natural pictures are displayed as the following icons: MANUAL SET CAMERA SET PLAYER SET LCD SET TAPE SET SETUP MENU OTHERS Depending on the TV to 40×/560× is carried out. If you set to 40×/460×, digital zoom...
...POWER switch CAMERA CAMERA CAMERA CAMERA CAMERA CAMERA * CCD-TRV68/TRV78/TRV88/TRV98 only 52 If you set to OFF, digital zoom is deactivated and up to the position of each item z is the default setting. Menu items differ according to 20× is carried out. Icon/item PROGRAM AE P EFFECT Mode -- -- To record in ... To cancel the SteadyShot function. Natural pictures are displayed as the following icons: MANUAL SET CAMERA SET PLAYER SET LCD SET TAPE SET SETUP MENU OTHERS Depending on the TV to 40×/560× is carried out. If you set to 40×/460×, digital zoom...

Operating Instructions (primary manual)
Page 53
...CAMERA To reduce intensity To increase intensity Notes on the LCD screen with the SEL/PUSH EXEC dial. If you have dubbed over and recorded the signal of a TV game or similar machine. The other than 5 minutes after removing the power source The "EDIT" and "COMMANDER" (CCD... for "Digital Noise Reduction". Your camcorder prevents excessive compensation for camera-shake. To adjust the brightness on the SteadyShot function (CCD-TRV68/TRV78/TRV88/TRV98 only) • The SteadyShot function will not correct excessive camera-shake. • Attachment of movement DNR stands for "Time...
...CAMERA To reduce intensity To increase intensity Notes on the LCD screen with the SEL/PUSH EXEC dial. If you have dubbed over and recorded the signal of a TV game or similar machine. The other than 5 minutes after removing the power source The "EDIT" and "COMMANDER" (CCD... for "Digital Noise Reduction". Your camcorder prevents excessive compensation for camera-shake. To adjust the brightness on the SteadyShot function (CCD-TRV68/TRV78/TRV88/TRV98 only) • The SteadyShot function will not correct excessive camera-shake. • Attachment of movement DNR stands for "Time...

Operating Instructions (primary manual)
Page 56
... show the display on the LCD screen and viewfinder PLAYER CAMERA To show the display on the TV screen, LCD screen and viewfinder To light up the camera recording lamp at the front of your camcorder CAMERA To turn the camera recording lamp off so that the subject is not aware of ... CAMERA To output the melody when you set time. Changing the menu settings Icon/item Mode WORLD TIME -- The clock changes by the time difference you start/stop PLAYER recording or when an unusual condition occurs CAMERA on your camcorder To output the beep sound instead of the recording * CCD-TRV49...
... show the display on the LCD screen and viewfinder PLAYER CAMERA To show the display on the TV screen, LCD screen and viewfinder To light up the camera recording lamp at the front of your camcorder CAMERA To turn the camera recording lamp off so that the subject is not aware of ... CAMERA To output the melody when you set time. Changing the menu settings Icon/item Mode WORLD TIME -- The clock changes by the time difference you start/stop PLAYER recording or when an unusual condition occurs CAMERA on your camcorder To output the beep sound instead of the recording * CCD-TRV49...

Operating Instructions (primary manual)
Page 64
... in the standard 8 mm system. Additional Information - When you use a Hi8 video cassette, recording and playback are automatically selected according to country, you play back a tape recorded on a different video recorder on a Hi8 video cassette in the LP mode, recording is carried out in the Hi8 system. Foreign 8 mm video Because TV color systems differ from country to the format in foreign...
... in the standard 8 mm system. Additional Information - When you use a Hi8 video cassette, recording and playback are automatically selected according to country, you play back a tape recorded on a different video recorder on a Hi8 video cassette in the LP mode, recording is carried out in the Hi8 system. Foreign 8 mm video Because TV color systems differ from country to the format in foreign...

Operating Instructions (primary manual)
Page 66
The following shows TV color systems used overseas. AC-L10A/L10B/L10C [a] [b] Your camcorder is an NTSC system based camcorder. If you want to 240 V AC, 50/60 Hz. ... clock to the local time by time difference You can use your camcorder within 100 V to view the playback picture on a TV, it must be an NTSC system based TV with VIDEO/AUDIO input jack. Simple setting of the wall outlet [b]. PAL system Australia, Austria, Belgium, China, Czech Republic, Denmark, Finland, Germany, Great...
The following shows TV color systems used overseas. AC-L10A/L10B/L10C [a] [b] Your camcorder is an NTSC system based camcorder. If you want to 240 V AC, 50/60 Hz. ... clock to the local time by time difference You can use your camcorder within 100 V to view the playback picture on a TV, it must be an NTSC system based TV with VIDEO/AUDIO input jack. Simple setting of the wall outlet [b]. PAL system Australia, Austria, Belgium, China, Czech Republic, Denmark, Finland, Germany, Great...

Operating Instructions (primary manual)
Page 80
...out 37 FADER 36 FOCUS 42 Grip strap 77 Heads 68 Hi8 system 64 M, N Manual focus 42 Menu settings 51 Mirror...zoom 23 PROGRAM AE 39 R Recording and playback systems 64 Recording mode 54 Recording time 14 Remaining battery time ...33 S VIDEO OUT jack 32, 50 T, U, V Tape counter 25 TBC 53 Telephoto 23 Title 43 Transition 28 TV color systems... 66 W, X, Y, Z Warning indicators 62 Wide-angle 23 Wide mode 34 WORLD TIME 56 Write-protect tab 19 Zoom 23 I, J, K, L "InfoLITHIUM" battery ........ 65 Infrared rays emitter ........ 26, 33 LCD screen 21 LP mode 54 Sony...
...out 37 FADER 36 FOCUS 42 Grip strap 77 Heads 68 Hi8 system 64 M, N Manual focus 42 Menu settings 51 Mirror...zoom 23 PROGRAM AE 39 R Recording and playback systems 64 Recording mode 54 Recording time 14 Remaining battery time ...33 S VIDEO OUT jack 32, 50 T, U, V Tape counter 25 TBC 53 Telephoto 23 Title 43 Transition 28 TV color systems... 66 W, X, Y, Z Warning indicators 62 Wide-angle 23 Wide mode 34 WORLD TIME 56 Write-protect tab 19 Zoom 23 I, J, K, L "InfoLITHIUM" battery ........ 65 Infrared rays emitter ........ 26, 33 LCD screen 21 LP mode 54 Sony...

