
Operating Instructions
Page 1
CCD-TRV Model No. AC-L Serial No. Serial No. Refer to these numbers whenever you call upon your Sony dealer regarding this manual thoroughly, and retain it for future reference. Record the serial number in the space provided below. CCD-TRV98 CCD-TRV49/TRV58/TRV68/TRV78/ TRV88/TRV98 ©2001 Sony Corporation Model No. Owner's Record The model and serial numbers are located on the bottom. 3-065-648-11 (3) Video Camera Recorder Operating Instructions Before operating the unit, please read this product.
CCD-TRV Model No. AC-L Serial No. Serial No. Refer to these numbers whenever you call upon your Sony dealer regarding this manual thoroughly, and retain it for future reference. Record the serial number in the space provided below. CCD-TRV98 CCD-TRV49/TRV58/TRV68/TRV78/ TRV88/TRV98 ©2001 Sony Corporation Model No. Owner's Record The model and serial numbers are located on the bottom. 3-065-648-11 (3) Video Camera Recorder Operating Instructions Before operating the unit, please read this product.

Operating Instructions
Page 6
...cover. The compartment opens automatically. The cassette compartment automatically goes down. AC power adaptor (supplied) Inserting a cassette (p. 19) 1 Open the lid of the cassette compartment. Connecting the power cord (p. 16) Use the battery pack when using your camcorder. Close the lid of the cassette compartment, and press EJECT. Connect... tab on the cassette compartment. Quick Start Guide 6 Quick Start Guide This chapter introduces you to the basic features of your camcorder outdoors (p. 11). See the page in parentheses "( )" for more information.
...cover. The compartment opens automatically. The cassette compartment automatically goes down. AC power adaptor (supplied) Inserting a cassette (p. 19) 1 Open the lid of the cassette compartment. Connecting the power cord (p. 16) Use the battery pack when using your camcorder. Close the lid of the cassette compartment, and press EJECT. Connect... tab on the cassette compartment. Quick Start Guide 6 Quick Start Guide This chapter introduces you to the basic features of your camcorder outdoors (p. 11). See the page in parentheses "( )" for more information.

Operating Instructions
Page 10
Checking supplied accessories Make sure that the following accessories are supplied with your camcorder. 1 2 3 4 5 6 7 1 Wireless Remote Commander (1) (p. 78) CCD-TRV49/TRV78/TRV98 only 4 Size AA (R6) battery for Remote Commander (2) (p. 78) CCD-TRV49/TRV78/TRV98 only 2 AC-L10A/L10B/L10C AC power adaptor (1), Power cord (1) (p. 12) 3 NP-F330 battery pack (1) (p. 11, 12) 5 A/V connecting cable (1) (p. 32) 6 Shoulder...
Checking supplied accessories Make sure that the following accessories are supplied with your camcorder. 1 2 3 4 5 6 7 1 Wireless Remote Commander (1) (p. 78) CCD-TRV49/TRV78/TRV98 only 4 Size AA (R6) battery for Remote Commander (2) (p. 78) CCD-TRV49/TRV78/TRV98 only 2 AC-L10A/L10B/L10C AC power adaptor (1), Power cord (1) (p. 12) 3 NP-F330 battery pack (1) (p. 11, 12) 5 A/V connecting cable (1) (p. 32) 6 Shoulder...
Operating Instructions
Page 12
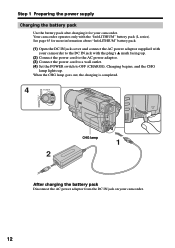
Charging begins, and the CHG lamp lights up . (2) Connect the power cord to the AC power adaptor. (3) Connect the power cord to a wall outlet. (4) Set the POWER switch to... POWER PLAYER OFF (CHARGE) CAMERA CHG lamp 1 2 After charging the battery pack Disconnect the AC power adaptor from the DC IN jack on your camcorder. Your camcorder operates only with the plug's v mark facing up . Step 1 Preparing the power supply Charging ..."InfoLITHIUM" battery pack. (1) Open the DC IN jack cover and connect the AC power adaptor supplied with your camcorder to OFF (CHARGE). See page 65 for your...
Charging begins, and the CHG lamp lights up . (2) Connect the power cord to the AC power adaptor. (3) Connect the power cord to a wall outlet. (4) Set the POWER switch to... POWER PLAYER OFF (CHARGE) CAMERA CHG lamp 1 2 After charging the battery pack Disconnect the AC power adaptor from the DC IN jack on your camcorder. Your camcorder operates only with the plug's v mark facing up . Step 1 Preparing the power supply Charging ..."InfoLITHIUM" battery pack. (1) Open the DC IN jack cover and connect the AC power adaptor supplied with your camcorder to OFF (CHARGE). See page 65 for your...

Operating Instructions
Page 13
...the power supply Notes •Prevent metallic objects from coming into contact with the battery pack. If the power may cause a short-circuit, damaging the AC power adaptor. •Keep the battery pack dry. •When the battery pack is correct. While charging the battery pack, the CHG lamp does...F330 (supplied) NP-F530/F550 NP-F730/F730H/F750 NP-F930/F950 NP-F960 Full charge 150 210 300 390 420 Approximate number of the AC power adaptor. Something is not installed correctly. - This may go off although the battery remaining indicator indicates that the battery pack has enough ...
...the power supply Notes •Prevent metallic objects from coming into contact with the battery pack. If the power may cause a short-circuit, damaging the AC power adaptor. •Keep the battery pack dry. •When the battery pack is correct. While charging the battery pack, the CHG lamp does...F330 (supplied) NP-F530/F550 NP-F730/F730H/F750 NP-F930/F950 NP-F960 Full charge 150 210 300 390 420 Approximate number of the AC power adaptor. Something is not installed correctly. - This may go off although the battery remaining indicator indicates that the battery pack has enough ...

Operating Instructions
Page 16
... outlet, even if the set itself has been turned off the power. Using a car battery Use Sony DC Adaptor/Charger (optional). 16 Step 1 Preparing the power supply Connecting to a wall outlet When you use your camcorder for a long time, we recommend that the battery pack cannot supply any trouble occurs with the... the power cord to a wall outlet. 1 2, 3 PRECAUTION The set is not disconnected from the wall outlet as soon as it from a wall outlet using the AC power adaptor, if any power if the power cord is connected to the DC IN jack, even when the power cord is attached to your...
... outlet, even if the set itself has been turned off the power. Using a car battery Use Sony DC Adaptor/Charger (optional). 16 Step 1 Preparing the power supply Connecting to a wall outlet When you use your camcorder for a long time, we recommend that the battery pack cannot supply any trouble occurs with the... the power cord to a wall outlet. 1 2, 3 PRECAUTION The set is not disconnected from the wall outlet as soon as it from a wall outlet using the AC power adaptor, if any power if the power cord is connected to the DC IN jack, even when the power cord is attached to your...

Operating Instructions
Page 32
... cable (optional) to obtain high-quality pictures. You can operate the playback control buttons in the same way as when you power your camcorder from a wall outlet using the AC power adaptor (p. 16). Open the jack cover. Refer to the operating instructions of your TV and the RFU adaptor. With this connection...
... cable (optional) to obtain high-quality pictures. You can operate the playback control buttons in the same way as when you power your camcorder from a wall outlet using the AC power adaptor (p. 16). Open the jack cover. Refer to the operating instructions of your TV and the RFU adaptor. With this connection...

Operating Instructions
Page 33
Playback - For details, refer to the operating instructions of Sony Corporation. 33 is a trademark of the AV cordless IR receiver. Adjust the position of SUPER LASER LINK lights up. (5) Press N on your camcorder to PLAYER. (3) Turn the TV on and set the TV/VCR selector on the ...LASER LINK Super laser link emitter Before operation Attach the power supply such as the AC power adaptor to your camcorder, and insert the recorded tape. (1) After connecting your TV or VCR, you turn off automatically. CCD-TRV98 only Once you connect the AV cordless IR receiver (optional) to VCR....
Playback - For details, refer to the operating instructions of Sony Corporation. 33 is a trademark of the AV cordless IR receiver. Adjust the position of SUPER LASER LINK lights up. (5) Press N on your camcorder to PLAYER. (3) Turn the TV on and set the TV/VCR selector on the ...LASER LINK Super laser link emitter Before operation Attach the power supply such as the AC power adaptor to your camcorder, and insert the recorded tape. (1) After connecting your TV or VCR, you turn off automatically. CCD-TRV98 only Once you connect the AV cordless IR receiver (optional) to VCR....

Operating Instructions
Page 59
... the cassette and leave your camcorder for at least 1 hour to a wall outlet. (p. 16) •The tape was ejected after recording. •You have used the battery pack in an extremely hot or cold environment for cassette ejection work . c Connect the AC power adaptor to acclimatize. (p....search function does not work . • The power source is not connected to operate. c Install a charged battery pack. (p. 11, 12) • The AC power adaptor is disconnected. c Replace with a new battery pack. (p. 11) • The battery is not fully charged. c Charge the battery pack fully again...
... the cassette and leave your camcorder for at least 1 hour to a wall outlet. (p. 16) •The tape was ejected after recording. •You have used the battery pack in an extremely hot or cold environment for cassette ejection work . c Connect the AC power adaptor to acclimatize. (p....search function does not work . • The power source is not connected to operate. c Install a charged battery pack. (p. 11, 12) • The AC power adaptor is disconnected. c Replace with a new battery pack. (p. 11) • The battery is not fully charged. c Charge the battery pack fully again...

Operating Instructions
Page 60
... up. • The AC power adaptor is wrong with the battery pack. c Contact your Sony dealer or local authorized Sony service facility. c Set it to ON. (p. 56) • Something is not set to OFF in about 1 minute. c Connect it again, then operate your camcorder. If the functions still do not work . (CCD-TRV49/TRV78/TRV98...
... up. • The AC power adaptor is wrong with the battery pack. c Contact your Sony dealer or local authorized Sony service facility. c Set it to ON. (p. 56) • Something is not set to OFF in about 1 minute. c Connect it again, then operate your camcorder. If the functions still do not work . (CCD-TRV49/TRV78/TRV98...

Operating Instructions
Page 61
...window If a 5-digit code is not an "InfoLITHIUM" battery pack. c Contact your Sony dealer or local authorized Sony service facility and inform them of your camcorder as a 5-digit code (a combination of the AC power adaptor or remove the battery pack. This function displays the current condition of your... camcorder. Five-digit display C:04:ss C:21:ss C:22:ss C:31:ss C:32:ss...
...window If a 5-digit code is not an "InfoLITHIUM" battery pack. c Contact your Sony dealer or local authorized Sony service facility and inform them of your camcorder as a 5-digit code (a combination of the AC power adaptor or remove the battery pack. This function displays the current condition of your... camcorder. Five-digit display C:04:ss C:21:ss C:22:ss C:31:ss C:32:ss...

Operating Instructions
Page 65
... no more , and as the approximate shooting time. • The E mark indicating there is little remaining battery time sometimes blinks depending on your camcorder. Put the battery in a pocket close to maintain the battery's functions. • To use : - Remaining battery time indicator • If ...for communicating information related to operating conditions between your body to warm it up on your camcorder in a fully charged state, or the battery pack is to your camcorder and an AC power adaptor. Battery capacity drops little by little as you start using the high-power battery...
... no more , and as the approximate shooting time. • The E mark indicating there is little remaining battery time sometimes blinks depending on your camcorder. Put the battery in a pocket close to maintain the battery's functions. • To use : - Remaining battery time indicator • If ...for communicating information related to operating conditions between your body to warm it up on your camcorder in a fully charged state, or the battery pack is to your camcorder and an AC power adaptor. Battery capacity drops little by little as you start using the high-power battery...

Operating Instructions
Page 66
...easily set the clock to the local time by time difference You can use a commercially available AC plug adaptor [a], if necessary, depending on a TV, it must be an NTSC system based TV with your camcorder in the menu settings. Simple setting of the wall outlet [b]. See page 56 for more ...information. 66 Select WORLD TIME in any country or area with the AC power adaptor supplied with VIDEO/AUDIO input jack. PAL-M system Brazil...
...easily set the clock to the local time by time difference You can use a commercially available AC plug adaptor [a], if necessary, depending on a TV, it must be an NTSC system based TV with your camcorder in the menu settings. Simple setting of the wall outlet [b]. See page 56 for more ...information. 66 Select WORLD TIME in any country or area with the AC power adaptor supplied with VIDEO/AUDIO input jack. PAL-M system Brazil...

Operating Instructions
Page 69
It will be completely discharged in rechargeable lithium cell so as you do not use your camcorder and have it checked by a Sony dealer before operating it out. (2) Clean the surface with a commercially available blower for a still camera. (3) Turn the eyecup in a cold place, a ... POWER switch. Be particularly careful of the lens. •Keep the POWER switch set to house current using the AC power adaptor supplied with your camcorder, and leave your camcorder with the POWER switch turned off for more than 24 hours. Charging the rechargeable lithium cell: •Connect your...
It will be completely discharged in rechargeable lithium cell so as you do not use your camcorder and have it checked by a Sony dealer before operating it out. (2) Clean the surface with a commercially available blower for a still camera. (3) Turn the eyecup in a cold place, a ... POWER switch. Be particularly careful of the lens. •Keep the POWER switch set to house current using the AC power adaptor supplied with your camcorder, and leave your camcorder with the POWER switch turned off for more than 24 hours. Charging the rechargeable lithium cell: •Connect your...

Operating Instructions
Page 70
... the lens, remove them with a soft cloth. •Clean the camcorder body with a dry soft cloth, or a soft cloth lightly moistened with a soft brush to be repaired. Vibrating 70 Very humid - AC power adaptor •Unplug the unit from the sand or dust. Dusty or dirty - On handling tapes ... sandy beach or in light. If this malfunction cannot be used for a long time. To disconnect the power cord, pull it may cause your camcorder is in or out. AM receivers and video equipment disturb AM reception and video operation. •The unit becomes warm during charging, keep it ....
... the lens, remove them with a soft cloth. •Clean the camcorder body with a dry soft cloth, or a soft cloth lightly moistened with a soft brush to be repaired. Vibrating 70 Very humid - AC power adaptor •Unplug the unit from the sand or dust. Dusty or dirty - On handling tapes ... sandy beach or in light. If this malfunction cannot be used for a long time. To disconnect the power cord, pull it may cause your camcorder is in or out. AM receivers and video equipment disturb AM reception and video operation. •The unit becomes warm during charging, keep it ....

Operating Instructions
Page 72
... format cassette Hi8 or standard 8 Recording/playback time (using 120 min. Viewfinder LCD screen Power requirements Electric viewfinder (monochrome) Picture 100 - 240 V AC, 50/60 Hz Image device CCD-TRV49/TRV58/TRV68/ Power consumption CCD-TRV49/TRV58: TRV78: 23 W 3.0 mm (1/6 type) CCD 6.2 cm (2.5 type) Output voltage Approx. 270 000 pixels (Effective: Approx. 250 000 pixels) CCD-TRV68/TRV78...
... format cassette Hi8 or standard 8 Recording/playback time (using 120 min. Viewfinder LCD screen Power requirements Electric viewfinder (monochrome) Picture 100 - 240 V AC, 50/60 Hz Image device CCD-TRV49/TRV58/TRV68/ Power consumption CCD-TRV49/TRV58: TRV78: 23 W 3.0 mm (1/6 type) CCD 6.2 cm (2.5 type) Output voltage Approx. 270 000 pixels (Effective: Approx. 250 000 pixels) CCD-TRV68/TRV78...

Operating Instructions
Page 80
Index A, B AC power adaptor 12 Adjusting viewfinder 24 A/V connecting cable 32, 50 BACK LIGHT 25 Battery pack 11 Beep 56 BOUNCE 36... jack 73 EDIT 53 END SEARCH 28, 31 Exposure 41 F, G, H Fade in/out 37 FADER 36 FOCUS 42 Grip strap 77 Heads 68 Hi8 system 64 M, N Manual focus 42 Menu settings 51 Mirror mode 21 Moisture condensation .......... 67 MONOTONE 36 Mosaic fader 36 NIGHTSHOT 26 NTSC system 66... tab 19 Zoom 23 I, J, K, L "InfoLITHIUM" battery ........ 65 Infrared rays emitter ........ 26, 33 LCD screen 21 LP mode 54 Sony Corporation Printed in Japan 306564811
Index A, B AC power adaptor 12 Adjusting viewfinder 24 A/V connecting cable 32, 50 BACK LIGHT 25 Battery pack 11 Beep 56 BOUNCE 36... jack 73 EDIT 53 END SEARCH 28, 31 Exposure 41 F, G, H Fade in/out 37 FADER 36 FOCUS 42 Grip strap 77 Heads 68 Hi8 system 64 M, N Manual focus 42 Menu settings 51 Mirror mode 21 Moisture condensation .......... 67 MONOTONE 36 Mosaic fader 36 NIGHTSHOT 26 NTSC system 66... tab 19 Zoom 23 I, J, K, L "InfoLITHIUM" battery ........ 65 Infrared rays emitter ........ 26, 33 LCD screen 21 LP mode 54 Sony Corporation Printed in Japan 306564811


