
Operating Instructions (primary manual)
Page 1
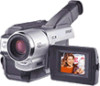
Model No. Owner's Record The model and serial numbers are located on the bottom. CCD-TRV Model No. AC-L Serial No. Serial No. 3-065-648-11 (3) Video Camera Recorder Operating Instructions Before operating the unit, please read this product. Refer to these numbers whenever you call upon your Sony dealer regarding this manual thoroughly, and retain it for future reference. CCD-TRV98 CCD-TRV49/TRV58/TRV68/TRV78/ TRV88/TRV98 ©2001 Sony Corporation Record the serial number in the space provided below.
Model No. Owner's Record The model and serial numbers are located on the bottom. CCD-TRV Model No. AC-L Serial No. Serial No. 3-065-648-11 (3) Video Camera Recorder Operating Instructions Before operating the unit, please read this product. Refer to these numbers whenever you call upon your Sony dealer regarding this manual thoroughly, and retain it for future reference. CCD-TRV98 CCD-TRV49/TRV58/TRV68/TRV78/ TRV88/TRV98 ©2001 Sony Corporation Record the serial number in the space provided below.
Operating Instructions (primary manual)
Page 5
... date and time ........ 17 Step 3 Inserting a cassette 19 Recording - Basics Playing back a tape 29 Viewing the recording on pictures 27 Checking the recording - BACK LIGHT 25 Shooting in light 47 5 Picture effect 38 Using the PROGRAM AE function .... 39 Adjusting the exposure manually ...... 41 Focusing manually 42 Superimposing a title 43 Making your camcorder abroad 66 Maintenance information and precautions 67 Specifications 72 Quick Reference Identifying the parts and controls ...... 73 Index Back cover Advanced Recording Operations Using the wide mode...
... date and time ........ 17 Step 3 Inserting a cassette 19 Recording - Basics Playing back a tape 29 Viewing the recording on pictures 27 Checking the recording - BACK LIGHT 25 Shooting in light 47 5 Picture effect 38 Using the PROGRAM AE function .... 39 Adjusting the exposure manually ...... 41 Focusing manually 42 Superimposing a title 43 Making your camcorder abroad 66 Maintenance information and precautions 67 Specifications 72 Quick Reference Identifying the parts and controls ...... 73 Index Back cover Advanced Recording Operations Using the wide mode...
Operating Instructions (primary manual)
Page 7
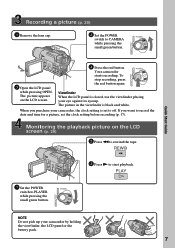
... stop recording, press the red button again. PLAY 1 Set the POWER switch to record the date and time for a picture, set to rewind the tape. If you purchase your camcorder, the clock setting is black and white. OFF (CHARGE) PLAYER POWER CAMERA NOTE Do not pick up your eye against its eyecup. OFF (CHARGE) PLAYER POWER CAMERA Quick Start Guide 3 Open the LCD panel while pressing OPEN. OFF (CHARGE) PLAYER POWER CAMERA Viewfinder When the LCD panel is closed, use the viewfinder placing your camcorder...
... stop recording, press the red button again. PLAY 1 Set the POWER switch to record the date and time for a picture, set to rewind the tape. If you purchase your camcorder, the clock setting is black and white. OFF (CHARGE) PLAYER POWER CAMERA NOTE Do not pick up your eye against its eyecup. OFF (CHARGE) PLAYER POWER CAMERA Quick Start Guide 3 Open the LCD panel while pressing OPEN. OFF (CHARGE) PLAYER POWER CAMERA Viewfinder When the LCD panel is closed, use the viewfinder placing your camcorder...

Operating Instructions (primary manual)
Page 8
... model used for example, "CCD-TRV98 only." The CCD-TRV98 is being carried out. Types of your camcorder, check the model number by looking at the bottom of differences CCDRemote sensor Digital zoom SUPER LASER LINK SteadyShot z Provided - z TRV78 z 560× - As you need an NTSC system-based TV. 8 e.g. Set the POWER switch to country. When you carry out an operation, you start reading this manual and operating your camcorder...
... model used for example, "CCD-TRV98 only." The CCD-TRV98 is being carried out. Types of your camcorder, check the model number by looking at the bottom of differences CCDRemote sensor Digital zoom SUPER LASER LINK SteadyShot z Provided - z TRV78 z 560× - As you need an NTSC system-based TV. 8 e.g. Set the POWER switch to country. When you carry out an operation, you start reading this manual and operating your camcorder...
Operating Instructions (primary manual)
Page 18
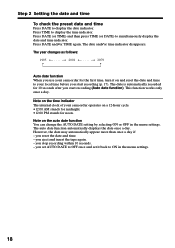
... start recording (Auto date function). Press TIME to display the date indicator. The year changes as follows: 1995 T t 2001 T t 2079 Auto date function When you use your camcorder for noon. The auto date function automatically displays the date once a day. you set AUTO DATE to OFF once and set it on and reset the date and time to simultaneously display the date and time indicator. Press DATE (or TIME) and then press TIME (or DATE) to your camcorder operates on the auto date function You can change the AUTO DATE setting...
... start recording (Auto date function). Press TIME to display the date indicator. The year changes as follows: 1995 T t 2001 T t 2079 Auto date function When you use your camcorder for noon. The auto date function automatically displays the date once a day. you set AUTO DATE to OFF once and set it on and reset the date and time to simultaneously display the date and time indicator. Press DATE (or TIME) and then press TIME (or DATE) to your camcorder operates on the auto date function You can change the AUTO DATE setting...
Operating Instructions (primary manual)
Page 20
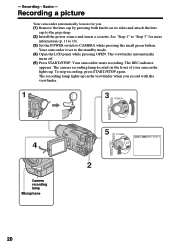
...). (3) Set the POWER switch to the grip strap. (2) Install the power source and insert a cassette. The viewfinder automatically turns off. (5) Press START/STOP. The REC indicator appears. To stop recording, press START/STOP again. - Your camcorder is set to "Step 3" for you record with the viewfinder. 1 3 POWER PLAYER OFF (CHARGE) CAMERA 4 Camera recording lamp Microphone PLAYER 5 POWER 40min REC 0:00:01 OFF (CHARGE) CAMERA 2 20 Recording - The camera recording lamp located on its sides and attach the lens cap...
...). (3) Set the POWER switch to the grip strap. (2) Install the power source and insert a cassette. The viewfinder automatically turns off. (5) Press START/STOP. The REC indicator appears. To stop recording, press START/STOP again. - Your camcorder is set to "Step 3" for you record with the viewfinder. 1 3 POWER PLAYER OFF (CHARGE) CAMERA 4 Camera recording lamp Microphone PLAYER 5 POWER 40min REC 0:00:01 OFF (CHARGE) CAMERA 2 20 Recording - The camera recording lamp located on its sides and attach the lens cap...
Operating Instructions (primary manual)
Page 21
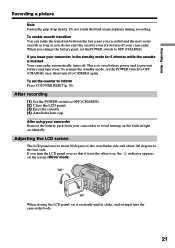
...-in light accidentally. After using your camcorder Remove the battery pack from your camcorder. To enable smooth transition You can make the transition between the last scene you recorded and the next scene smooth as long as you do not eject the cassette even if you change the battery pack, set the POWER switch to OFF (CHARGE). After recording (1) Set the POWER switch to the lens side. Adjusting the LCD screen The LCD panel...
...-in light accidentally. After using your camcorder Remove the battery pack from your camcorder. To enable smooth transition You can make the transition between the last scene you recorded and the next scene smooth as long as you do not eject the cassette even if you change the battery pack, set the POWER switch to OFF (CHARGE). After recording (1) Set the POWER switch to the lens side. Adjusting the LCD screen The LCD panel...

Operating Instructions (primary manual)
Page 32
... S VIDEO Black VIDEO AUDIO If your TV is already connected to a VCR Connect your camcorder to the LINE IN input on the VCR by using an S video cable (optional) to obtain high-quality pictures. Refer to the operating instructions of the A/V connecting cable. Viewing the recording on TV Connect your camcorder to your TV with the A/V connecting cable supplied with your TV. Set the input selector on the VCR to connect the yellow (video) plug of your camcorder to watch the playback picture...
... S VIDEO Black VIDEO AUDIO If your TV is already connected to a VCR Connect your camcorder to the LINE IN input on the VCR by using an S video cable (optional) to obtain high-quality pictures. Refer to the operating instructions of the A/V connecting cable. Viewing the recording on TV Connect your camcorder to your TV with the A/V connecting cable supplied with your TV. Set the input selector on the VCR to connect the yellow (video) plug of your camcorder to watch the playback picture...
Operating Instructions (primary manual)
Page 33
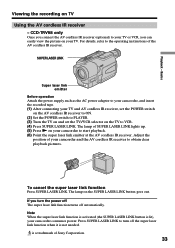
... super laser link function Press SUPER LASER LINK. For details, refer to obtain clear playback pictures. The lamp of Sony Corporation. 33 Press SUPER LASER LINK to your camcorder, and insert the recorded tape. (1) After connecting your camcorder consumes power. Adjust the position of the AV cordless IR receiver. The lamp on TV Using the AV cordless IR receiver - CCD-TRV98 only Once...
... super laser link function Press SUPER LASER LINK. For details, refer to obtain clear playback pictures. The lamp of Sony Corporation. 33 Press SUPER LASER LINK to your camcorder, and insert the recorded tape. (1) After connecting your camcorder consumes power. Adjust the position of the AV cordless IR receiver. The lamp on TV Using the AV cordless IR receiver - CCD-TRV98 only Once...

Operating Instructions (primary manual)
Page 35
... cannot select the bounce function with FADER. Date or time indicator When you cancel the wide mode, set your camcorder to the standby mode and then set 16:9WIDE to 16:9FULL (CCD-TRV68/TRV78/TRV88/TRV98 only) The SteadyShot function does not work. During recording You cannot change or cancel the wide mode. Advanced Recording Operations Using the wide mode In CAMERA mode, set 16:9WIDE to OFF in the menu settings.
... cannot select the bounce function with FADER. Date or time indicator When you cancel the wide mode, set your camcorder to the standby mode and then set 16:9WIDE to 16:9FULL (CCD-TRV68/TRV78/TRV88/TRV98 only) The SteadyShot function does not work. During recording You cannot change or cancel the wide mode. Advanced Recording Operations Using the wide mode In CAMERA mode, set 16:9WIDE to OFF in the menu settings.
Operating Instructions (primary manual)
Page 50
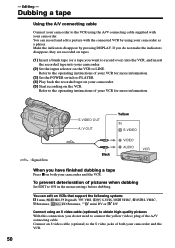
... operating instructions of both your VCR for more information. - You can record and edit a picture with your camcorder to ON in the menu settings before dubbing. If you do not need to connect the yellow (video) plug of pictures when dubbing Set EDIT to the VCR using the A/V connecting cable supplied with the connected VCR by pressing DISPLAY. To prevent deterioration of the A/V connecting cable. Dubbing a tape Using the A/V connecting cable Connect your camcorder. You can edit on VCRs that support...
... operating instructions of both your VCR for more information. - You can record and edit a picture with your camcorder to ON in the menu settings before dubbing. If you do not need to connect the yellow (video) plug of pictures when dubbing Set EDIT to the VCR using the A/V connecting cable supplied with the connected VCR by pressing DISPLAY. To prevent deterioration of the A/V connecting cable. Dubbing a tape Using the A/V connecting cable Connect your camcorder. You can edit on VCRs that support...

Operating Instructions (primary manual)
Page 52
... can operate at the moment. To use the NightShot Light function (p. 26) To cancel the NightShot Light function POWER switch CAMERA CAMERA CAMERA CAMERA CAMERA CAMERA * CCD-TRV68/TRV78/TRV88/TRV98 only 52 If you set to OFF, digital zoom is deactivated and up to 20× is carried out. Selecting the mode setting of the POWER switch. Menu items differ according to the position of each item z is the default setting. The screen shows...
... can operate at the moment. To use the NightShot Light function (p. 26) To cancel the NightShot Light function POWER switch CAMERA CAMERA CAMERA CAMERA CAMERA CAMERA * CCD-TRV68/TRV78/TRV88/TRV98 only 52 If you set to OFF, digital zoom is deactivated and up to 20× is carried out. Selecting the mode setting of the POWER switch. Menu items differ according to the position of each item z is the default setting. The screen shows...

Operating Instructions (primary manual)
Page 54
... setting on a tape with the red mark on ORC setting •Each time you set . 54 Notes on the cassette exposed. (i. Changing the menu settings Icon/item Mode Meaning POWER switch REC MODE z SP To record in SP (Standard Play) mode CAMERA LP To increase the recording time to the standby mode. e. the tape is already set ORC TO SET, a non-recorded section of tape rewinding, forwarding or picture search in PLAYER mode PLAYER CAMERA ON To always display the remaining tape...
... setting on a tape with the red mark on ORC setting •Each time you set . 54 Notes on the cassette exposed. (i. Changing the menu settings Icon/item Mode Meaning POWER switch REC MODE z SP To record in SP (Standard Play) mode CAMERA LP To increase the recording time to the standby mode. e. the tape is already set ORC TO SET, a non-recorded section of tape rewinding, forwarding or picture search in PLAYER mode PLAYER CAMERA ON To always display the remaining tape...
Operating Instructions (primary manual)
Page 56
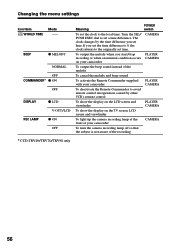
Changing the menu settings Icon/item Mode WORLD TIME -- Turn the SEL/ PUSH EXEC dial to set time. If you set the clock to the originally set a time difference. The clock changes by other VCR's remote control To show the display on the LCD screen and viewfinder PLAYER CAMERA To show the display on the TV screen, LCD screen and viewfinder To light up the camera recording lamp at the front of your camcorder CAMERA To turn the camera recording lamp off...
Changing the menu settings Icon/item Mode WORLD TIME -- Turn the SEL/ PUSH EXEC dial to set time. If you set the clock to the originally set a time difference. The clock changes by other VCR's remote control To show the display on the LCD screen and viewfinder PLAYER CAMERA To show the display on the TV screen, LCD screen and viewfinder To light up the camera recording lamp at the front of your camcorder CAMERA To turn the camera recording lamp off...

Operating Instructions (primary manual)
Page 57
.... c Install a fully charged battery pack. (p. 11, 12) The image on the screen, the self-diagnosis display function has worked. c Set it to OFF in the viewfinder. • The video heads may be dirty. c Set FOCUS to MANUAL to AUTO. (p. 42) • Shooting conditions are not suitable for autofocus. If "C:ss:ss" appears on the viewfinder screen • The viewfinder lens is set to troubleshoot the problem. c Set it to focus manually. (p. 42) The x indicator flashes...
.... c Install a fully charged battery pack. (p. 11, 12) The image on the screen, the self-diagnosis display function has worked. c Set it to OFF in the viewfinder. • The video heads may be dirty. c Set FOCUS to MANUAL to AUTO. (p. 42) • Shooting conditions are not suitable for autofocus. If "C:ss:ss" appears on the viewfinder screen • The viewfinder lens is set to troubleshoot the problem. c Set it to focus manually. (p. 42) The x indicator flashes...

Operating Instructions (primary manual)
Page 58
... elapse after you set the POWER switch to CAMERA or DEMO MODE is set to ON in the menu settings without a cassette inserted, your camcorder automatically starts the demonstration. c Turn up the volume. (p. 29) 58 No sound or only a low sound is not adjusted correctly. c Set it . (p. 25) In the playback mode Symptom The tape does not move when a video control button is pressed. c Set it to OFF, or use the NightShot function in a dark place...
... elapse after you set the POWER switch to CAMERA or DEMO MODE is set to ON in the menu settings without a cassette inserted, your camcorder automatically starts the demonstration. c Turn up the volume. (p. 29) 58 No sound or only a low sound is not adjusted correctly. c Set it . (p. 25) In the playback mode Symptom The tape does not move when a video control button is pressed. c Set it to OFF, or use the NightShot function in a dark place...

Operating Instructions (primary manual)
Page 72
Specifications Video camera recorder Output connectors S video output Storage temperature -20 °C to +60 °C (-4 °F to +140 °F) Dimensions (approx.) 4-pin mini DIN 104 × 109 × 223 mm System Video recording system 2 rotary heads Helical scanning FM system Audio recording system Rotary heads, FM system Video signal NTSC color, EIA standards Usable cassette 8mm video format cassette Hi8 or standard 8 Recording/playback time (using 120 min. infrared lighting. 72 10 °C to 30 °C (50 °...
Specifications Video camera recorder Output connectors S video output Storage temperature -20 °C to +60 °C (-4 °F to +140 °F) Dimensions (approx.) 4-pin mini DIN 104 × 109 × 223 mm System Video recording system 2 rotary heads Helical scanning FM system Audio recording system Rotary heads, FM system Video signal NTSC color, EIA standards Usable cassette 8mm video format cassette Hi8 or standard 8 Recording/playback time (using 120 min. infrared lighting. 72 10 °C to 30 °C (50 °...
Operating Instructions (primary manual)
Page 74
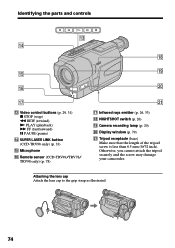
... less than 6.5 mm (9/32 inch). Identifying the parts and controls qd qf qk ql qg qh w; qj qd Video control buttons (p. 29, 31) x STOP (stop) m REW (rewind) N PLAY (playback) M FF (fastforward) X PAUSE (pause) qf SUPER LASER LINK button (CCD-TRV98 only) (p. 33) qg Microphone qh Remote sensor (CCD-TRV49/TRV78/ TRV98 only) (p. 78) wa qj Infrared rays emitter (p. 26, 33) qk NIGHTSHOT switch (p. 26) ql Camera recording lamp (p. 20) w;
... less than 6.5 mm (9/32 inch). Identifying the parts and controls qd qf qk ql qg qh w; qj qd Video control buttons (p. 29, 31) x STOP (stop) m REW (rewind) N PLAY (playback) M FF (fastforward) X PAUSE (pause) qf SUPER LASER LINK button (CCD-TRV98 only) (p. 33) qg Microphone qh Remote sensor (CCD-TRV49/TRV78/ TRV98 only) (p. 78) wa qj Infrared rays emitter (p. 26, 33) qk NIGHTSHOT switch (p. 26) ql Camera recording lamp (p. 20) w;

Operating Instructions (primary manual)
Page 75
Identifying the parts and controls ws wd wf wg ws Speaker wd LCD screen (p. 21) wf MENU button (p. 51) wg RESET button (p. 60) wh wj wk wl wh EXPOSURE button (p. 41) wj FADER button (p. 37) wk BACK LIGHT button (p. 25) wl FOCUS button (p. 42) Attaching the shoulder strap Attach the shoulder strap supplied with your camcorder to the hooks for the shoulder strap. Quick Reference 75
Identifying the parts and controls ws wd wf wg ws Speaker wd LCD screen (p. 21) wf MENU button (p. 51) wg RESET button (p. 60) wh wj wk wl wh EXPOSURE button (p. 41) wj FADER button (p. 37) wk BACK LIGHT button (p. 25) wl FOCUS button (p. 42) Attaching the shoulder strap Attach the shoulder strap supplied with your camcorder to the hooks for the shoulder strap. Quick Reference 75

Operating Instructions (primary manual)
Page 80
... Heads 68 Hi8 system 64 M, N Manual focus 42 Menu settings 51 Mirror mode 21 Moisture condensation .......... 67 MONOTONE 36 Mosaic fader 36 NIGHTSHOT 26 NTSC system 66 O, P, Q Operation indicators 79 ORC 54 Picture effect 38 Picture search 31 Playback pause 31 Power zoom 23 PROGRAM AE 39 R Recording and playback systems 64 Recording mode 54 Recording time 14 Remaining battery time indicator 25 Remaining tape indicator ...... 25 RESET 60 RFU adaptor 32 S Self-diagnosis display...
... Heads 68 Hi8 system 64 M, N Manual focus 42 Menu settings 51 Mirror mode 21 Moisture condensation .......... 67 MONOTONE 36 Mosaic fader 36 NIGHTSHOT 26 NTSC system 66 O, P, Q Operation indicators 79 ORC 54 Picture effect 38 Picture search 31 Playback pause 31 Power zoom 23 PROGRAM AE 39 R Recording and playback systems 64 Recording mode 54 Recording time 14 Remaining battery time indicator 25 Remaining tape indicator ...... 25 RESET 60 RFU adaptor 32 S Self-diagnosis display...


