Camera Operations Guide
Page 1
3-087-918-12(1) Camera Operations Guide Read this first Video Camera Recorder/Digital Video Camera Recorder CCD-TRV128/TRV228/TRV328/TRV428 DCR-TRV260/TRV265 © 2004 Sony Corporation
3-087-918-12(1) Camera Operations Guide Read this first Video Camera Recorder/Digital Video Camera Recorder CCD-TRV128/TRV228/TRV328/TRV428 DCR-TRV260/TRV265 © 2004 Sony Corporation

Camera Operations Guide
Page 3
... Hi8 , Digital8 video cassettes on this instruction manual, each model is indicated as follows. Notes on use . To view your recordings on a TV, you insert the connector plug forcibly in the wrong direction, the terminal may cause harmful interference to malfunction. Note on connecting other device Before connecting your camcorder to other materials may be some tiny black points and/ or bright points (white, red, blue, or...
... Hi8 , Digital8 video cassettes on this instruction manual, each model is indicated as follows. Notes on use . To view your recordings on a TV, you insert the connector plug forcibly in the wrong direction, the terminal may cause harmful interference to malfunction. Note on connecting other device Before connecting your camcorder to other materials may be some tiny black points and/ or bright points (white, red, blue, or...
Camera Operations Guide
Page 5
... 5: Setting the date and time 17 Step 6: Inserting a cassette tape 18 Step 7: Setting the screen language 19 Recording Recording movies 21 Recording for backlit subjects 27 Adjusting the exposure manually 28 Recording in dark places - NightShot plus 28 Adjusting the focus manually 29 Recording a picture using various effects 30 Fading in and out of Contents CCD-TRV128: CCD-TRV228: TRV128 CCD-TRV428: TRV428 TRV228 DCR-TRV260: TRV260 CCD-TRV328: TRV328 DCR-TRV265: TRV265 Read this first 2 Quick Start Guide Recording movies on a tape 8 Recording/Playing back...
... 5: Setting the date and time 17 Step 6: Inserting a cassette tape 18 Step 7: Setting the screen language 19 Recording Recording movies 21 Recording for backlit subjects 27 Adjusting the exposure manually 28 Recording in dark places - NightShot plus 28 Adjusting the focus manually 29 Recording a picture using various effects 30 Fading in and out of Contents CCD-TRV128: CCD-TRV228: TRV128 CCD-TRV428: TRV428 TRV228 DCR-TRV260: TRV260 CCD-TRV328: TRV328 DCR-TRV265: TRV265 Read this first 2 Quick Start Guide Recording movies on a tape 8 Recording/Playing back...
Camera Operations Guide
Page 7
... Using the (CAMERA SET) menu - 16:9 WIDE/STEADYSHOT, etc 47 Using the (PLAYER SET)/ (VCR SET) menu - HiFi SOUND/EDIT, etc 51 Using the (LCD SET) menu - Advanced operations Customizing Your Camcorder Changing the menu settings 43 Using the (MANUAL SET) menu - FRAME REC/INT.REC, etc. ......54 Using the (SETUP MENU) - Digital program editing ( TRV260/265 69 For TRV260/265: Refer also to other operating instructions supplied with your camcorder: • Editing images with your camcorder abroad 81 Usable cassette tapes 82 About the "InfoLITHIUM" battery...
... Using the (CAMERA SET) menu - 16:9 WIDE/STEADYSHOT, etc 47 Using the (PLAYER SET)/ (VCR SET) menu - HiFi SOUND/EDIT, etc 51 Using the (LCD SET) menu - Advanced operations Customizing Your Camcorder Changing the menu settings 43 Using the (MANUAL SET) menu - FRAME REC/INT.REC, etc. ......54 Using the (SETUP MENU) - Digital program editing ( TRV260/265 69 For TRV260/265: Refer also to other operating instructions supplied with your camcorder: • Editing images with your camcorder abroad 81 Usable cassette tapes 82 About the "InfoLITHIUM" battery...

Camera Operations Guide
Page 13
... not use the battery pack for a long time, use up the viewfinder. 2 Set the POWER switch to (CHG) OFF. 3 Slide the battery pack out in the battery pack. Battery Info DSPL/BATT INFO OPEN POWER switch BATTERY INFO BATTERY CHARGE LEVEL 0% 50% 100% REC TIME AVAILABLE LCD SCREEN: 81 min VIEWFINDER: 112 min A Battery charge level: Displays approximate remaining amount of the battery pack. Charging time Approximate number of the arrow while pressing the BATT (battery) release button down. The battery information...
... not use the battery pack for a long time, use up the viewfinder. 2 Set the POWER switch to (CHG) OFF. 3 Slide the battery pack out in the battery pack. Battery Info DSPL/BATT INFO OPEN POWER switch BATTERY INFO BATTERY CHARGE LEVEL 0% 50% 100% REC TIME AVAILABLE LCD SCREEN: 81 min VIEWFINDER: 112 min A Battery charge level: Displays approximate remaining amount of the battery pack. Charging time Approximate number of the arrow while pressing the BATT (battery) release button down. The battery information...
Camera Operations Guide
Page 23
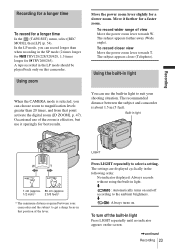
... settings are displayed cyclically in light. A tape recorded in light Press LIGHT repeatedly until no indicator appears on the screen. ,continued Recording 23 Occasional use it further for best results. m : Automatically turns on and off the built-in the LP mode should be played back only on . To record closer view Move the power zoom lever towards W. Using zoom Move the power zoom lever slightly for a longer time In the (TAPE SET) menu, select [REC MODE], then...
... settings are displayed cyclically in light. A tape recorded in light Press LIGHT repeatedly until no indicator appears on the screen. ,continued Recording 23 Occasional use it further for best results. m : Automatically turns on and off the built-in the LP mode should be played back only on . To record closer view Move the power zoom lever towards W. Using zoom Move the power zoom lever slightly for a longer time In the (TAPE SET) menu, select [REC MODE], then...
Camera Operations Guide
Page 26
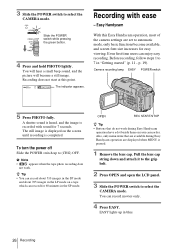
... CAMERA mode. Recording with sound for easy viewing. Even first time users can record movies only. 4 Press EASY. A shutter sound is heard, and the image is pressed. 1 Remove the lens cap. EASY lights up to (CHG) OFF. To turn the power off Slide the POWER switch up in "Getting started" (p. 11 - Slide the POWER switch while pressing the green button. 4 Press and hold PHOTO lightly. b Note • appears when the tape photo recording does not work during Easy Handycam operation...
... CAMERA mode. Recording with sound for easy viewing. Even first time users can record movies only. 4 Press EASY. A shutter sound is heard, and the image is pressed. 1 Remove the lens cap. EASY lights up to (CHG) OFF. To turn the power off Slide the POWER switch up in "Getting started" (p. 11 - Slide the POWER switch while pressing the green button. 4 Press and hold PHOTO lightly. b Note • appears when the tape photo recording does not work during Easy Handycam operation...
Camera Operations Guide
Page 40
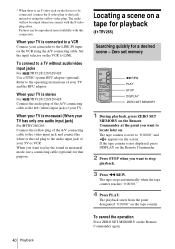
... device to be output when you want to a TV without audio/video input jacks For TRV128/228/328/428: Use a NTSC system RFU adaptor (optional). When you want to LINE. Set the input selector on the VCR to locate later on the Remote Commander at the point you connect with this connection. Zero set memory m REW PLAY STOP DISPLAY ZERO SET MEMORY 1 During playback, press ZERO SET MEMORY on . The audio will not be connected, connect the S video plug...
... device to be output when you want to a TV without audio/video input jacks For TRV128/228/328/428: Use a NTSC system RFU adaptor (optional). When you want to LINE. Set the input selector on the VCR to locate later on the Remote Commander at the point you connect with this connection. Zero set memory m REW PLAY STOP DISPLAY ZERO SET MEMORY 1 During playback, press ZERO SET MEMORY on . The audio will not be connected, connect the S video plug...

Camera Operations Guide
Page 51
... cassette on the power mode of your camcorder for more than 5 minutes. ,continued Customizing Your Camcorder 51 Customizing Your Camcorder Using the (PLAYER SET)/ (VCR SET) menu - You can adjust vary depending on this for TRV260/265.) To select these items, see "Changing the menu settings" (p. 43). The screen shows the items you cannot record a dual sound track on a tape in the menu (the PLAYER SET menu for TRV128/228/328/428, the VCR SET menu...
... cassette on the power mode of your camcorder for more than 5 minutes. ,continued Customizing Your Camcorder 51 Customizing Your Camcorder Using the (PLAYER SET)/ (VCR SET) menu - You can adjust vary depending on this for TRV260/265.) To select these items, see "Changing the menu settings" (p. 43). The screen shows the items you cannot record a dual sound track on a tape in the menu (the PLAYER SET menu for TRV128/228/328/428, the VCR SET menu...
Camera Operations Guide
Page 57
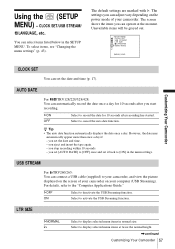
... G. AUTO DATE For TRV128/228/328/428: You can connect a USB cable (supplied) to [ON] in the menu settings. Select to display selected menu items in the SETUP MENU. you eject and insert the tape again. - USB STREAM For TRV260/265: You can automatically record the date once a day for 10 seconds after you set it back to your camcorder, and view the picture displayed on the screen of your camcorder on the power mode of...
... G. AUTO DATE For TRV128/228/328/428: You can connect a USB cable (supplied) to [ON] in the menu settings. Select to display selected menu items in the SETUP MENU. you eject and insert the tape again. - USB STREAM For TRV260/265: You can automatically record the date once a day for 10 seconds after you set it back to your camcorder, and view the picture displayed on the screen of your camcorder on the power mode of...
Camera Operations Guide
Page 59
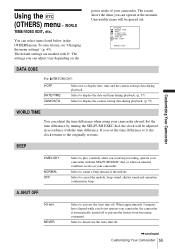
.../stop recording, operate your camcorder with the SEL/PUSH EXEC dial, or when an unusual condition occurs on the power mode of the melody. Select to cancel the melody, beep sound, shutter sound and operation confirmation beep. You can adjust the time difference when using your camcorder. The settings you can adjust vary depending on your camcorder, the camcorder is automatically turned off to display date, time and the camera settings data during playback. (p. 37) WORLD TIME...
.../stop recording, operate your camcorder with the SEL/PUSH EXEC dial, or when an unusual condition occurs on the power mode of the melody. Select to cancel the melody, beep sound, shutter sound and operation confirmation beep. You can adjust the time difference when using your camcorder. The settings you can adjust vary depending on your camcorder, the camcorder is automatically turned off to display date, time and the camera settings data during playback. (p. 37) WORLD TIME...
Camera Operations Guide
Page 77
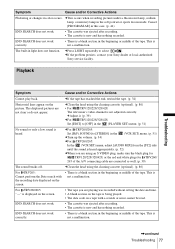
... SET) menu. (p. 51) No sound or only a low sound is not adjusted correctly. cIf the problem presists, contact your Sony dealer or local authorized Sony service facility. Playback Troubleshooting Symptom Cause and/or Corrective Actions Cannot play back. END SEARCH does not work . • The cassette was ejected after recording. • The cassette is being played. • The data code on the picture. cClean the head using an S VIDEO plug, make sure the black plug for TRV128/228...
... SET) menu. (p. 51) No sound or only a low sound is not adjusted correctly. cIf the problem presists, contact your Sony dealer or local authorized Sony service facility. Playback Troubleshooting Symptom Cause and/or Corrective Actions Cannot play back. END SEARCH does not work . • The cassette was ejected after recording. • The cassette is being played. • The data code on the picture. cClean the head using an S VIDEO plug, make sure the black plug for TRV128/228...
Camera Operations Guide
Page 78
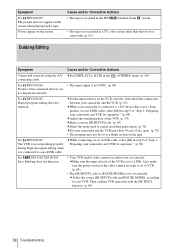
... camcorder is connected to a DV device that of the video camera recorder is set to cancel recording pause again. (p. 70) cSet your camcorder and the VCR more than that is not set correctly. cSet the input selector on the tape. c Select the correct [IR SETUP] code and [PAUSE MODE], according to your camcorder and VCR for operation." (p. 69) cAdjust the synchronization of the VCR. (p. 70) cEnter a correct [IR SETUP] code. (p. 65) cSelect the mode used to VCR...
... camcorder is connected to a DV device that of the video camera recorder is set to cancel recording pause again. (p. 70) cSet your camcorder and the VCR more than that is not set correctly. cSet the input selector on the tape. c Select the correct [IR SETUP] code and [PAUSE MODE], according to your camcorder and VCR for operation." (p. 69) cAdjust the synchronization of the VCR. (p. 70) cEnter a correct [IR SETUP] code. (p. 65) cSelect the mode used to VCR...
Camera Operations Guide
Page 87
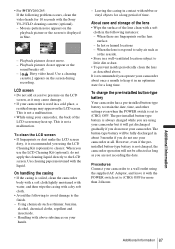
... the lens surface. - Procedures Connect your camcorder, the back of time. Using chemicals such as described above substances on the LCD screen. Use cleaning paper moistened with a dry soft cloth. • Avoid the following to avoid damage to retain the date, time, and other settings even when the POWER switch is used in a cold place, a residual image may heat up. Handling with the Sony V8-25CLD cleaning cassette (optional...
... the lens surface. - Procedures Connect your camcorder, the back of time. Using chemicals such as described above substances on the LCD screen. Use cleaning paper moistened with a dry soft cloth. • Avoid the following to avoid damage to retain the date, time, and other settings even when the POWER switch is used in a cold place, a residual image may heat up. Handling with the Sony V8-25CLD cleaning cassette (optional...
Camera Operations Guide
Page 88
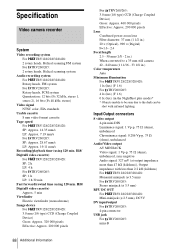
... min Fast forward/rewind time (using 120 min. Hi8/ Digital8 video cassette) Approx. 5 min Viewfinder Electric viewfinder (monochrome) Image device For TRV128/228/328/428: 3.0 mm (1/6 type) CCD (Charge Coupled Device) Gross: Approx. 320 000 pixels Effective: Approx. 200 000 pixels For TRV260/265: 3.0 mm (1/6 type) CCD (Charge Coupled Device) Gross: Approx. 460 000 pixels Effective: Approx. 290 000 pixels Lens Combined power zoom lens Filter diameter: 37 mm...
... min Fast forward/rewind time (using 120 min. Hi8/ Digital8 video cassette) Approx. 5 min Viewfinder Electric viewfinder (monochrome) Image device For TRV128/228/328/428: 3.0 mm (1/6 type) CCD (Charge Coupled Device) Gross: Approx. 320 000 pixels Effective: Approx. 200 000 pixels For TRV260/265: 3.0 mm (1/6 type) CCD (Charge Coupled Device) Gross: Approx. 460 000 pixels Effective: Approx. 290 000 pixels Lens Combined power zoom lens Filter diameter: 37 mm...
Camera Operations Guide
Page 97
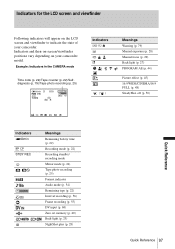
... STBY REC Meanings Remaining battery time (p. 22) Recording mode (p. 22) Recording standby/ recording mode Mirror mode (p. 24) Tape photo recording (p. 25) Format indicator Audio mode (p. 54) Remaining tape (p. 22) Interval recording (p. 56) Frame recording (p. 55) DV input (p. 68) Zero set memory (p. 40) Built-light (p. 23) NightShot plus (p. 28) Quick Reference 97 Indicators for the LCD screen and viewfinder Following indicators will appear on your camcorder. Indicators and their on-screen/viewfinder positions vary depending on the LCD screen and...
... STBY REC Meanings Remaining battery time (p. 22) Recording mode (p. 22) Recording standby/ recording mode Mirror mode (p. 24) Tape photo recording (p. 25) Format indicator Audio mode (p. 54) Remaining tape (p. 22) Interval recording (p. 56) Frame recording (p. 55) DV input (p. 68) Zero set memory (p. 40) Built-light (p. 23) NightShot plus (p. 28) Quick Reference 97 Indicators for the LCD screen and viewfinder Following indicators will appear on your camcorder. Indicators and their on-screen/viewfinder positions vary depending on the LCD screen and...
Camera Operations Guide
Page 98
... A A/V connecting cable 39, 61, 62 AC Adaptor 15 Adjusting the viewfinder... 16 AUDIO MIX 52 AUDIO MODE 54 AUTO DATE 57 AUTO SHTR 46 Auto shut off function (A.SHUT OFF 59 B BACK LIGHT 27 Battery Battery Info 13 Battery pack 12 Remaining battery time 22, 83 BEEP 59 BLACK FADER 30 Built-in light 23 BURN DVD/VCD 93 Button-type battery Commander 87 Remote Commander ... 95 C Camera settings data display 37 Cassette 18, 82 Charging the battery Battery Pack 12 Pre-installed button-type battery...
... A A/V connecting cable 39, 61, 62 AC Adaptor 15 Adjusting the viewfinder... 16 AUDIO MIX 52 AUDIO MODE 54 AUTO DATE 57 AUTO SHTR 46 Auto shut off function (A.SHUT OFF 59 B BACK LIGHT 27 Battery Battery Info 13 Battery pack 12 Remaining battery time 22, 83 BEEP 59 BLACK FADER 30 Built-in light 23 BURN DVD/VCD 93 Button-type battery Commander 87 Remote Commander ... 95 C Camera settings data display 37 Cassette 18, 82 Charging the battery Battery Pack 12 Pre-installed button-type battery...
Camera Operations Guide
Page 99
... 45 Picture search 35 Playing time 14 Power mode 15 PROGRAM AE 44 R Recording capacity Display 22 REMAIN 55 Recording lamp (REC LAMP 60 Recording mode (REC MODE)........22, 54 Recording time 13 Remote Commander ..........95 Remote sensor 92 RESET 93 S S video 40, 62 Self-diagnosis display ........79 Setting the date and time....17 Skip scan 35 SP (Standard Play) See Recording mode (REC MODE) STEADYSHOT 50 Stereo 21, 40 STRIPE FADER 31 Sub sound See HiFi SOUND T Tape counter 22 Tape photo recording...
... 45 Picture search 35 Playing time 14 Power mode 15 PROGRAM AE 44 R Recording capacity Display 22 REMAIN 55 Recording lamp (REC LAMP 60 Recording mode (REC MODE)........22, 54 Recording time 13 Remote Commander ..........95 Remote sensor 92 RESET 93 S S video 40, 62 Self-diagnosis display ........79 Setting the date and time....17 Skip scan 35 SP (Standard Play) See Recording mode (REC MODE) STEADYSHOT 50 Stereo 21, 40 STRIPE FADER 31 Sub sound See HiFi SOUND T Tape counter 22 Tape photo recording...
Marketing Specifications
Page 1
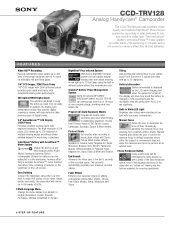
... home videos quickly and easily. Easy Dubbing Connect the Handycam camcorder to a VCR deck to a life shortening "memory effect". The InfoLithium® Battery with AccuPower™ Meter System Charge the battery at an optimal level. ➤Easy Handycam Button Using a camcorder can be intimidating for some people, so with low power consumption. Picture Effects Get creative when recording or playing back videos with improved resolution. Program AE (Auto Exposure) Modes Program AE modes...
... home videos quickly and easily. Easy Dubbing Connect the Handycam camcorder to a VCR deck to a life shortening "memory effect". The InfoLithium® Battery with AccuPower™ Meter System Charge the battery at an optimal level. ➤Easy Handycam Button Using a camcorder can be intimidating for some people, so with low power consumption. Picture Effects Get creative when recording or playing back videos with improved resolution. Program AE (Auto Exposure) Modes Program AE modes...
Marketing Specifications
Page 2
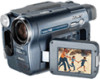
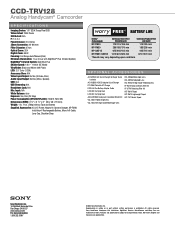
...-840mm Filter Diameter: 37mm Optical Zoom: 20X Digital Zoom: 990X Focusing: Full Range Auto/Manual (Dial) Minimum Illumination: 1 Lux (0 Lux with NightShot® Plus Infrared System) NightShot® Infrared System: NightShot Plus Shutter Speed: 1/60 - 1/4000 (AE Mode) Viewfinder: Black and White, 90K Pixels LCD: 2.5" Color (123K) Accessory Shoe: N/A Video Input/Output: No/Yes (S-Video, Mini) Audio Input/Output: No/Yes (Mono, Special) USB: N/A USB Streaming: N/A Headphone Jack: N/A Mic. Sony, AccuPower, Handycam, Hi8, InfoLithium, NightShot, Stamina...
...-840mm Filter Diameter: 37mm Optical Zoom: 20X Digital Zoom: 990X Focusing: Full Range Auto/Manual (Dial) Minimum Illumination: 1 Lux (0 Lux with NightShot® Plus Infrared System) NightShot® Infrared System: NightShot Plus Shutter Speed: 1/60 - 1/4000 (AE Mode) Viewfinder: Black and White, 90K Pixels LCD: 2.5" Color (123K) Accessory Shoe: N/A Video Input/Output: No/Yes (S-Video, Mini) Audio Input/Output: No/Yes (Mono, Special) USB: N/A USB Streaming: N/A Headphone Jack: N/A Mic. Sony, AccuPower, Handycam, Hi8, InfoLithium, NightShot, Stamina...


