Operating Instructions
Page 5
...a tape 27 Customizing Your Camcorder Changing the menu settings 46 Troubleshooting Types of contents Main Features 4 Quick Start Guide 6 Editing Dubbing a tape 45 Getting started Using this manual 8 Checking supplied accessories 10 Step 1 Preparing the power supply ... 11 Installing the battery...the PROGRAM AE function .... 34 Adjusting the exposure manually ...... 36 Focusing manually 37 Superimposing a title 38 Making your camcorder abroad 59 Maintenance information and precautions 60 Specifications 65 Quick Reference Identifying the parts and controls ...... 66 Index Back ...
...a tape 27 Customizing Your Camcorder Changing the menu settings 46 Troubleshooting Types of contents Main Features 4 Quick Start Guide 6 Editing Dubbing a tape 45 Getting started Using this manual 8 Checking supplied accessories 10 Step 1 Preparing the power supply ... 11 Installing the battery...the PROGRAM AE function .... 34 Adjusting the exposure manually ...... 36 Focusing manually 37 Superimposing a title 38 Making your camcorder abroad 59 Maintenance information and precautions 60 Specifications 65 Quick Reference Identifying the parts and controls ...... 66 Index Back ...
Operating Instructions
Page 6
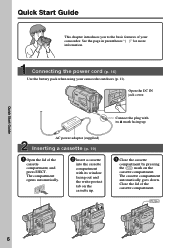
... facing out and the write-protect tab on the cassette up . Quick Start Guide 6 AC power adaptor (supplied) Inserting a cassette (p. 19) 1 Open the lid of the cassette compartment. Connecting the power cord (p. 16) Use the battery pack when using your camcorder. Quick Start Guide This chapter introduces you to the basic features of your...
... facing out and the write-protect tab on the cassette up . Quick Start Guide 6 AC power adaptor (supplied) Inserting a cassette (p. 19) 1 Open the lid of the cassette compartment. Connecting the power cord (p. 16) Use the battery pack when using your camcorder. Quick Start Guide This chapter introduces you to the basic features of your...
Operating Instructions
Page 10
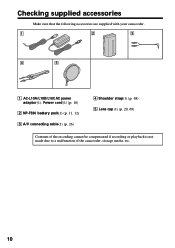
Checking supplied accessories Make sure that the following accessories are supplied with your camcorder. 1 2 3 4 5 1 AC-L10A/L10B/L10C AC power adaptor (1), Power cord (1) (p. 16) 2 NP-F330 battery pack(1) (p. 11, 12) 3 A/V connecting cable(1) (p. 26) 4 Shoulder strap(1) (p. 68) 5 Lens cap (1) (p. 20, 69) Contents of the recording cannot be compensated if recording or playback is not made due to a malfunction of the camcorder, storage media, etc. 10
Checking supplied accessories Make sure that the following accessories are supplied with your camcorder. 1 2 3 4 5 1 AC-L10A/L10B/L10C AC power adaptor (1), Power cord (1) (p. 16) 2 NP-F330 battery pack(1) (p. 11, 12) 3 A/V connecting cable(1) (p. 26) 4 Shoulder strap(1) (p. 68) 5 Lens cap (1) (p. 20, 69) Contents of the recording cannot be compensated if recording or playback is not made due to a malfunction of the camcorder, storage media, etc. 10
Operating Instructions
Page 11
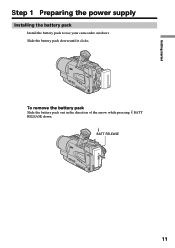
Getting started Step 1 Preparing the power supply Installing the battery pack Install the battery pack to use your camcorder outdoors. Slide the battery pack down . BATT RELEASE 11 To remove the battery pack Slide the battery pack out in the direction of the arrow while pressing BATT RELEASE down until it clicks.
Getting started Step 1 Preparing the power supply Installing the battery pack Install the battery pack to use your camcorder outdoors. Slide the battery pack down . BATT RELEASE 11 To remove the battery pack Slide the battery pack out in the direction of the arrow while pressing BATT RELEASE down until it clicks.
Operating Instructions
Page 12
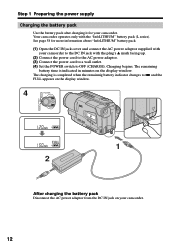
... battery indicator changes to OFF (CHARGE). Step 1 Preparing the power supply Charging the battery pack Use the battery pack after charging it for more information about "InfoLITHIUM" battery pack. (1) Open the DC IN jack cover and connect the AC power adaptor supplied with your camcorder to the DC IN jack with the "InfoLITHIUM" battery pack...
... battery indicator changes to OFF (CHARGE). Step 1 Preparing the power supply Charging the battery pack Use the battery pack after charging it for more information about "InfoLITHIUM" battery pack. (1) Open the DC IN jack cover and connect the AC power adaptor supplied with your camcorder to the DC IN jack with the "InfoLITHIUM" battery pack...
Operating Instructions
Page 13
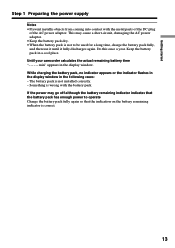
... window in a cool place. Until your camcorder calculates the actual remaining battery time "- - - - Something is not installed correctly. - min" appears in the display window. Do this once a year. Getting started Step 1 Preparing the power supply Notes • Prevent metallic objects from coming... into contact with the battery pack. The battery pack is wrong with the metal parts of the DC plug of the AC power adaptor.
... window in a cool place. Until your camcorder calculates the actual remaining battery time "- - - - Something is not installed correctly. - min" appears in the display window. Do this once a year. Getting started Step 1 Preparing the power supply Notes • Prevent metallic objects from coming... into contact with the battery pack. The battery pack is wrong with the metal parts of the DC plug of the AC power adaptor.
Operating Instructions
Page 14
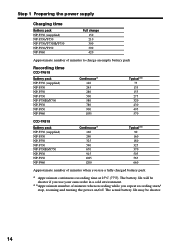
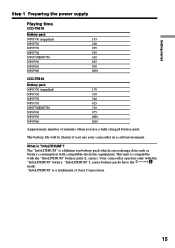
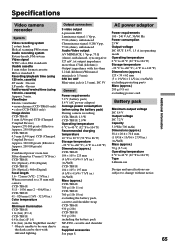
... life may be shorter if you use your camcorder in a cold environment. * *Approximate number of minutes when you repeat recording start/ stop, zooming and turning the power on/off. The battery life will be shorter. 14 Step 1 Preparing the power supply Charging time Battery pack NP-F330 (supplied) NP-F530/F550 NP-F730/F730H/F750...-F930 NP-F950 NP-F960 Continuous* 140 245 280 500 580 780 900 1035 Typical** 75 135 155 275 320 430 495 570 CCD-TR818 Battery pack NP-F330 (supplied) NP-F530 NP-F550 NP-F730 NP-F730H/F750 NP-F930 NP-F950 NP-F960 Continuous* 160 290 325 590 670 915 1025...
... life may be shorter if you use your camcorder in a cold environment. * *Approximate number of minutes when you repeat recording start/ stop, zooming and turning the power on/off. The battery life will be shorter. 14 Step 1 Preparing the power supply Charging time Battery pack NP-F330 (supplied) NP-F530/F550 NP-F730/F730H/F750...-F930 NP-F950 NP-F960 Continuous* 140 245 280 500 580 780 900 1035 Typical** 75 135 155 275 320 430 495 570 CCD-TR818 Battery pack NP-F330 (supplied) NP-F530 NP-F550 NP-F730 NP-F730H/F750 NP-F930 NP-F950 NP-F960 Continuous* 160 290 325 590 670 915 1025...
Operating Instructions
Page 15
... series). Getting started Step 1 Preparing the power supply Playing time CCD-TR618 Battery pack NP-F330 (supplied) NP-F530 NP-F550 NP-F730 NP-F730H/F750 NP-F930 NP-F950 NP-F960 145 260 295 525 610 825 930 1090 CCD-TR818 Battery pack NP-F330 (supplied) NP-F530 NP-F550 NP-F730 NP-...F730H/F750 NP-F930 NP-F950 NP-F960 170 305 340 625 710 975 1080 1260 Approximate number of Sony Corporation. 15 This unit is "InfoLITHIUM"? What is compatible with compatible electronic equipment. Your camcorder operates ...
... series). Getting started Step 1 Preparing the power supply Playing time CCD-TR618 Battery pack NP-F330 (supplied) NP-F530 NP-F550 NP-F730 NP-F730H/F750 NP-F930 NP-F950 NP-F960 145 260 295 525 610 825 930 1090 CCD-TR818 Battery pack NP-F330 (supplied) NP-F530 NP-F550 NP-F730 NP-...F730H/F750 NP-F930 NP-F950 NP-F960 170 305 340 625 710 975 1080 1260 Approximate number of Sony Corporation. 15 This unit is "InfoLITHIUM"? What is compatible with compatible electronic equipment. Your camcorder operates ...
Operating Instructions
Page 16
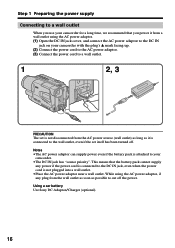
... . Using a car battery Use Sony DC Adaptor/Charger (optional). 16 While using the AC power adaptor. (1) Open the DC IN jack cover, and connect the AC power adaptor to the DC IN jack on your camcorder. •The DC IN jack has "source priority". Notes •The AC power adaptor can supply power even if the battery...
... . Using a car battery Use Sony DC Adaptor/Charger (optional). 16 While using the AC power adaptor. (1) Open the DC IN jack cover, and connect the AC power adaptor to the DC IN jack on your camcorder. •The DC IN jack has "source priority". Notes •The AC power adaptor can supply power even if the battery...
Operating Instructions
Page 19
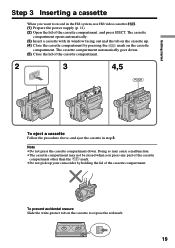
... 4,5 To eject a cassette Follow the procedure above, and eject the cassette in the Hi8 system, use Hi8 video cassettes . (1) Prepare the power supply (p. 11). (2) Open the lid of the cassette compartment. To prevent accidental erasure Slide the write-protect tab on the cassette compartment. The cassette... 19 The cassette compartment opens automatically. (3) Insert a cassette with its window facing out and the tab on the cassette up your camcorder by pressing the mark on the cassette to record in step 3. Getting started Step 3 Inserting a cassette When you press any part...
... 4,5 To eject a cassette Follow the procedure above, and eject the cassette in the Hi8 system, use Hi8 video cassettes . (1) Prepare the power supply (p. 11). (2) Open the lid of the cassette compartment. To prevent accidental erasure Slide the write-protect tab on the cassette compartment. The cassette... 19 The cassette compartment opens automatically. (3) Insert a cassette with its window facing out and the tab on the cassette up your camcorder by pressing the mark on the cassette to record in step 3. Getting started Step 3 Inserting a cassette When you press any part...
Operating Instructions
Page 26
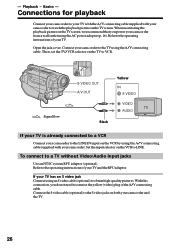
... the S video jacks on both your camcorder from a wall outlet using the A/V connecting cable supplied with your TV. Open the jack cover. Connect the S video cable (optional) to watch the playback picture on the VCR by using the AC power adaptor (p. 16). Refer to the LINE IN input on the TV screen...to a TV without Video/Audio input jacks Use an NTSC system RFU adaptor (optional). If your TV and the RFU adaptor. With this connection, you power your camcorder and the TV. 26 Set the input selector on the TV to VCR. : Signal flow S VIDEO OUT A/V OUT Yellow IN S VIDEO VIDEO ...
... the S video jacks on both your camcorder from a wall outlet using the A/V connecting cable supplied with your TV. Open the jack cover. Connect the S video cable (optional) to watch the playback picture on the VCR by using the AC power adaptor (p. 16). Refer to the LINE IN input on the TV screen...to a TV without Video/Audio input jacks Use an NTSC system RFU adaptor (optional). If your TV and the RFU adaptor. With this connection, you power your camcorder and the TV. 26 Set the input selector on the TV to VCR. : Signal flow S VIDEO OUT A/V OUT Yellow IN S VIDEO VIDEO ...

Operating Instructions
Page 44
...Sony XB-3D halogen lamp. Note To prevent the bulb from the built-in light unit. (3) Replace the bulb using a dry cloth. (4) Attach the bulb housing turning it with a dry cloth, etc. The supplied halogen lamp is smudged, wipe it completely. 44 If the bulb is not on the market. Remove the power... built-in light unit. 1 2 3 CAUTION •When replacing the bulb, use only the Sony XB-3D halogen lamp (optional) to reduce the risk of fire. •To prevent possible burn hazard, disconnect the power source before replacing and do not touch the bulb until the bulb becomes cool enough to...
...Sony XB-3D halogen lamp. Note To prevent the bulb from the built-in light unit. (3) Replace the bulb using a dry cloth. (4) Attach the bulb housing turning it with a dry cloth, etc. The supplied halogen lamp is smudged, wipe it completely. 44 If the bulb is not on the market. Remove the power... built-in light unit. 1 2 3 CAUTION •When replacing the bulb, use only the Sony XB-3D halogen lamp (optional) to reduce the risk of fire. •To prevent possible burn hazard, disconnect the power source before replacing and do not touch the bulb until the bulb becomes cool enough to...
Operating Instructions
Page 45
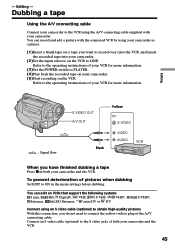
... into your VCR for more information. ( 3 )Set the POWER switch to the VCR using your camcorder as a player. ( 1 )Insert a blank tape (or a tape you have finished dubbing a tape Press xon both your camcorder. ( 5 )Start recording on your camcorder and the VCR. 45 Editing : Signal flow S VIDEO OUT... the recorded tape on the VCR. You can record and edit a picture with the connected VCR by using the A/V connecting cable supplied with your camcorder and the VCR. To prevent deterioration of pictures when dubbing Set EDIT to the S video jacks of your VCR for more information....
... into your VCR for more information. ( 3 )Set the POWER switch to the VCR using your camcorder as a player. ( 1 )Insert a blank tape (or a tape you have finished dubbing a tape Press xon both your camcorder. ( 5 )Start recording on your camcorder and the VCR. 45 Editing : Signal flow S VIDEO OUT... the recorded tape on the VCR. You can record and edit a picture with the connected VCR by using the A/V connecting cable supplied with your camcorder and the VCR. To prevent deterioration of pictures when dubbing Set EDIT to the S video jacks of your VCR for more information....
Operating Instructions
Page 59
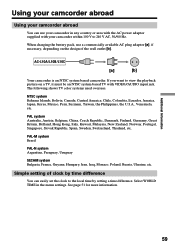
..., Peru, Surinam, Taiwan, the Philippines, the U.S.A., Venezuela, etc. Select WORLD TIME in any country or area with the AC power adaptor supplied with VIDEO/AUDIO input jack. When charging the battery pack, use your camcorder in the menu settings. PAL-M system Brazil PAL-N system Argentina, Paraguay, Uruguay SECAM system Bulgaria, France, Guyana, Hungary...
..., Peru, Surinam, Taiwan, the Philippines, the U.S.A., Venezuela, etc. Select WORLD TIME in any country or area with the AC power adaptor supplied with VIDEO/AUDIO input jack. When charging the battery pack, use your camcorder in the menu settings. PAL-M system Brazil PAL-N system Argentina, Paraguay, Uruguay SECAM system Bulgaria, France, Guyana, Hungary...

Operating Instructions
Page 62
... using your camcorder with the POWER switch turned off for a still camera. (3) Turn the eyecup in a clockwise direction, then replace the screw. The cell, however, will get inside the casing, unplug your camcorder and have it checked by a Sony dealer before...camcorder on 7.2 V (battery pack) or 8.4 V (AC power adaptor). •For DC or AC operation, use the accessories recommended in about 4 months if you are not using the AC power adaptor supplied with a commercially available blower for more than 24 hours. You may remove only the screw to build up inside the viewfinder (CCD...
... using your camcorder with the POWER switch turned off for a still camera. (3) Turn the eyecup in a clockwise direction, then replace the screw. The cell, however, will get inside the casing, unplug your camcorder and have it checked by a Sony dealer before...camcorder on 7.2 V (battery pack) or 8.4 V (AC power adaptor). •For DC or AC operation, use the accessories recommended in about 4 months if you are not using the AC power adaptor supplied with a commercially available blower for more than 24 hours. You may remove only the screw to build up inside the viewfinder (CCD...
Operating Instructions
Page 65
... g (1 lb 10 oz) excluding the battery pack, cassette and shoulder strap CCD-TR618: 930 g (2 lb) CCD-TR818: 910 g (2 lb) including the battery pack NP-F330, cassette and shoulder strap Supplied accessories See page 8. AC power adaptor Power requirements 100 - 240 V AC, 50/60 Hz Power consumption 23 W Output voltage DC OUT: 8.4 V, 1.5 A in operating mode Operating temperature 0 °...
... g (1 lb 10 oz) excluding the battery pack, cassette and shoulder strap CCD-TR618: 930 g (2 lb) CCD-TR818: 910 g (2 lb) including the battery pack NP-F330, cassette and shoulder strap Supplied accessories See page 8. AC power adaptor Power requirements 100 - 240 V AC, 50/60 Hz Power consumption 23 W Output voltage DC OUT: 8.4 V, 1.5 A in operating mode Operating temperature 0 °...


