Operating Instructions
Page 4
... Trade Name: SONY Model: UWA-BR100 Responsible Party: Sony Electronics Inc. HDMI, the HDMI logo and HighDefinition Multimedia Interface are trademarks or registered trademarks of HDMI Licensing LLC. • Java and all Java-based trademarks and logos are trademarks or registered trademarks of Sun Microsystems, Inc. • "BD-LIVE" and "BONUSVIEW" are trademarks of Blu-ray Disc Association. • "Blu-ray Disc...
... Trade Name: SONY Model: UWA-BR100 Responsible Party: Sony Electronics Inc. HDMI, the HDMI logo and HighDefinition Multimedia Interface are trademarks or registered trademarks of HDMI Licensing LLC. • Java and all Java-based trademarks and logos are trademarks or registered trademarks of Sun Microsystems, Inc. • "BD-LIVE" and "BONUSVIEW" are trademarks of Blu-ray Disc Association. • "Blu-ray Disc...
Operating Instructions
Page 6
... 35 Tuner Listening to the Radio 37 External Audio Device Using an S-AIR Product 39 Other Operations Using the Control for HDMI Function for "BRAVIA" Sync 43 Calibrating the Appropriate Settings Automatically 45 Setting the Speakers 46 Using the Sleep Timer 48 Deactivating... Viewing Settings 52 [Parental Control Settings 53 [Music Settings 53 [System Settings 53 [Network Settings 55 [Easy Setup 55 [Resetting 55 Additional Information Precautions 56 Notes about the Discs 57 Troubleshooting 58 Playable Discs 65 Playable Types of Files 66 Supported Audio Formats 67 Video Output...
... 35 Tuner Listening to the Radio 37 External Audio Device Using an S-AIR Product 39 Other Operations Using the Control for HDMI Function for "BRAVIA" Sync 43 Calibrating the Appropriate Settings Automatically 45 Setting the Speakers 46 Using the Sleep Timer 48 Deactivating... Viewing Settings 52 [Parental Control Settings 53 [Music Settings 53 [System Settings 53 [Network Settings 55 [Easy Setup 55 [Resetting 55 Additional Information Precautions 56 Notes about the Discs 57 Troubleshooting 58 Playable Discs 65 Playable Types of Files 66 Supported Audio Formats 67 Video Output...
Operating Instructions
Page 7
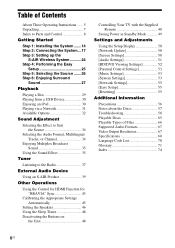
... (remote) (1) • Operating Instructions • Quick Setup Guide • To stabilize S-AIR reception • End user license agreement • Easy Setup Disc (DVD) • USB Wireless LAN Adapter (UWA-BR100) • R6 (size AA) batteries (2) • UWA-BR100 External cable • Calibration mic... (1) • Surround amplifier (1) • FM wire antenna (aerial) (1) or For BDV-T77 • HDMI cable (1) Preparing the remote Insert two R6 (size AA) batteries (supplied) by matching the 3 and # ends on the batteries to the...
... (remote) (1) • Operating Instructions • Quick Setup Guide • To stabilize S-AIR reception • End user license agreement • Easy Setup Disc (DVD) • USB Wireless LAN Adapter (UWA-BR100) • R6 (size AA) batteries (2) • UWA-BR100 External cable • Calibration mic... (1) • Surround amplifier (1) • FM wire antenna (aerial) (1) or For BDV-T77 • HDMI cable (1) Preparing the remote Insert two R6 (size AA) batteries (supplied) by matching the 3 and # ends on the batteries to the...
Operating Instructions
Page 9
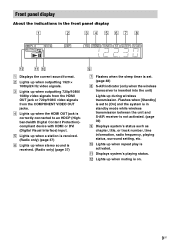
... status. L Lights up when the HDMI OUT jack is on. 9US D Lights up when muting is correctly connected to [On] and the system is in the front panel display A Displays the current sound format. Front panel display About the indications in standby mode ...while wireless transmission between the unit and S-AIR receiver is not activated. (page 39) I Displays system's status such as chapter, title, or track number, time information, radio frequency, playing status, surround setting, etc. E Lights up when a station ...
... status. L Lights up when the HDMI OUT jack is on. 9US D Lights up when muting is correctly connected to [On] and the system is in the front panel display A Displays the current sound format. Front panel display About the indications in standby mode ...while wireless transmission between the unit and S-AIR receiver is not activated. (page 39) I Displays system's status such as chapter, title, or track number, time information, radio frequency, playing status, surround setting, etc. E Lights up when a station ...

Operating Instructions
Page 10
... EZW-RT10 AUDIO R AUDIO IN L A (USB) port (page 30) B LAN (100) terminal (page 23) C COMPONENT VIDEO OUT jacks (page 18) D VIDEO OUT jack (page 18) E HDMI OUT jack (page 18) F EZW-RT10 slot (page 22) G AUDIO (AUDIO IN L/R) jacks (page 20) H S-AIR ID switch (pages 24, 39) I A.CAL MIC jack (pages...
... EZW-RT10 AUDIO R AUDIO IN L A (USB) port (page 30) B LAN (100) terminal (page 23) C COMPONENT VIDEO OUT jacks (page 18) D VIDEO OUT jack (page 18) E HDMI OUT jack (page 18) F EZW-RT10 slot (page 22) G AUDIO (AUDIO IN L/R) jacks (page 20) H S-AIR ID switch (pages 24, 39) I A.CAL MIC jack (pages...

Operating Instructions
Page 18
...compared to the TV. Rear panel of the unit B Component video cable (not supplied) VIDEO OUT PR / CR CYOMPONEPNB T/ CVBIDEO OUT ARC OUT A HDMI cable* C Video cord (supplied) To the component video input jacks of the TV. Getting Started Connecting the TV (Video connection) This connection sends a ...video signal to using the component video cable connection or the video cord connection. When connecting with BDV-T77 only. Depending on the jacks on your TV has an HDMI jack, connect to using the video cord connection. To the video input jack of the TV. * The...
...compared to the TV. Rear panel of the unit B Component video cable (not supplied) VIDEO OUT PR / CR CYOMPONEPNB T/ CVBIDEO OUT ARC OUT A HDMI cable* C Video cord (supplied) To the component video input jacks of the TV. Getting Started Connecting the TV (Video connection) This connection sends a ...video signal to using the component video cable connection or the video cord connection. When connecting with BDV-T77 only. Depending on the jacks on your TV has an HDMI jack, connect to using the video cord connection. To the video input jack of the TV. * The...

Operating Instructions
Page 19
... Return Channel function, see "Connecting the other components" (page 20). For details of the TV. With a digital audio connection, the system receives a Dolby Digital multiplex broadcast signal and you connect the TV and the unit with the Audio Return Channel function, an... not need to make a separate audio connection for listening to TV sound via HDMI cable connection. 19US Note • A digital optical cable connection has priority over the Audio Return Channel function via the system, perform this connection. About Audio Return Channel If your TV is compatible with an...
... Return Channel function, see "Connecting the other components" (page 20). For details of the TV. With a digital audio connection, the system receives a Dolby Digital multiplex broadcast signal and you connect the TV and the unit with the Audio Return Channel function, an... not need to make a separate audio connection for listening to TV sound via HDMI cable connection. 19US Note • A digital optical cable connection has priority over the Audio Return Channel function via the system, perform this connection. About Audio Return Channel If your TV is compatible with an...
Operating Instructions
Page 26
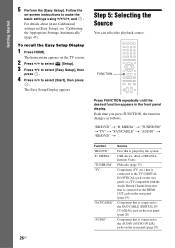
...20) Component that is connected to the HDMI OUT jack on the rear panel (page 20) Each time you press FUNCTION, the function changes as follows. MEDIA" "TUNER FM" "TV" "SAT/CABLE" "AUDIO" Source Disc that is played by the system USB device, iPod, or BRAVIA Internet ... 123 456 789 0 FUNCTION Press FUNCTION repeatedly until the desired function appears in [Easy Setup], see "Calibrating the Appropriate Settings Automatically" (page 45). The home menu appears on -screen instructions to select [Start], then press . Follow the on the TV screen. 2 Press C/c to select [Setup]. 3 Press ...
...20) Component that is connected to the HDMI OUT jack on the rear panel (page 20) Each time you press FUNCTION, the function changes as follows. MEDIA" "TUNER FM" "TV" "SAT/CABLE" "AUDIO" Source Disc that is played by the system USB device, iPod, or BRAVIA Internet ... 123 456 789 0 FUNCTION Press FUNCTION repeatedly until the desired function appears in [Easy Setup], see "Calibrating the Appropriate Settings Automatically" (page 45). The home menu appears on -screen instructions to select [Start], then press . Follow the on the TV screen. 2 Press C/c to select [Setup]. 3 Press ...

Operating Instructions
Page 35
... 19, 20). AUDIO 123 456 789 0 Press AUDIO repeatedly until the desired signal appears in a movie theater, even at low volume. Enjoying Multiplex Broadcast Sound (DUAL MONO) You can receive a Dolby Digital signal via an HDMI cable. Example: • [ Stereo] • [ Stereo (Audio1)] • [ Stereo (Audio2)] •...can enjoy sound effects or dialog, as you can enjoy multiplex broadcast sound when the system receives or plays a Dolby Digital multiplex broadcast signal. It is recorded on a disc are displayed. Note • To receive the Dolby Digital signal, you need to ...
... 19, 20). AUDIO 123 456 789 0 Press AUDIO repeatedly until the desired signal appears in a movie theater, even at low volume. Enjoying Multiplex Broadcast Sound (DUAL MONO) You can receive a Dolby Digital signal via an HDMI cable. Example: • [ Stereo] • [ Stereo (Audio1)] • [ Stereo (Audio2)] •...can enjoy sound effects or dialog, as you can enjoy multiplex broadcast sound when the system receives or plays a Dolby Digital multiplex broadcast signal. It is recorded on a disc are displayed. Note • To receive the Dolby Digital signal, you need to ...
Operating Instructions
Page 43
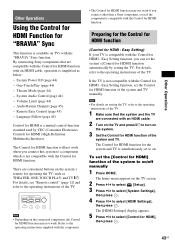
... system and TV manually. By connecting Sony components that the system and the TV are compatible with the Control for HDMI function with an HDMI cable, operation is a mutual control function standard used by setting the TV. System Power Off (page 44) - Language Follow (page 45) Control for HDMI is simplified as THEATER, ONE-TOUCH PLAY, and TV "/1. Theater...
... system and TV manually. By connecting Sony components that the system and the TV are compatible with the Control for HDMI function with an HDMI cable, operation is a mutual control function standard used by setting the TV. System Power Off (page 44) - Language Follow (page 45) Control for HDMI is simplified as THEATER, ONE-TOUCH PLAY, and TV "/1. Theater...
Operating Instructions
Page 44
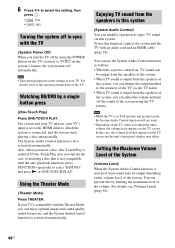
... an audio cord and an HDMI cable (page 18). 6 Press X/x to select "BD/DVD" and press N or ONE-TOUCH PLAY. Using the Theater Mode (Theater Mode) Press THEATER. You can use this system. To use the System Audio Control function as follows: • When the system is turned on the settings ... On. • [Off]: Off. Note • This function depends on , TV sound can be output depending on the volume level of the system, you insert a disc, One-Touch Play is also activated automatically. Watching BD/DVD by a single button press (One-Touch Play) Press ONE-TOUCH PLAY.
... an audio cord and an HDMI cable (page 18). 6 Press X/x to select "BD/DVD" and press N or ONE-TOUCH PLAY. Using the Theater Mode (Theater Mode) Press THEATER. You can use this system. To use the System Audio Control function as follows: • When the system is turned on the settings ... On. • [Off]: Off. Note • This function depends on , TV sound can be output depending on the volume level of the system, you insert a disc, One-Touch Play is also activated automatically. Watching BD/DVD by a single button press (One-Touch Play) Press ONE-TOUCH PLAY.
Operating Instructions
Page 45
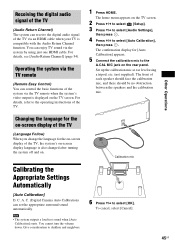
... D. C. To cancel, select [Cancel]. 45US The home menu appears on the rear panel. The confirmation display for the on-screen display of the TV, the system's on . You can control the basic functions of the system via an HDMI cable when your TV is also changed after turning the...6 Press X/x to the operating instructions of the TV. 1 Press HOME. Set up the calibration mic at ear level using just one HDMI cable. Receiving the digital audio signal of the TV (Audio Return Channel) The system can set the appropriate surround sound automatically. You cannot turn the volume...
... D. C. To cancel, select [Cancel]. 45US The home menu appears on the rear panel. The confirmation display for the on-screen display of the TV, the system's on . You can control the basic functions of the system via an HDMI cable when your TV is also changed after turning the...6 Press X/x to the operating instructions of the TV. 1 Press HOME. Set up the calibration mic at ear level using just one HDMI cable. Receiving the digital audio signal of the TV (Audio Return Channel) The system can set the appropriate surround sound automatically. You cannot turn the volume...

Operating Instructions
Page 48
... panel display. Re-enter the code number. Press x on the unit are not output from the HDMI OUT jack. The child lock function is not changed. Note • When you set the system to turn off at a time until you can fall asleep listening to select [Off], then press ... your TV. To check the remaining time Press SLEEP once. To change the remaining time Press SLEEP repeatedly to the default (SONY) setting. Reset the appropriate code number. Manufacturer SONY SAMSUNG PANASONIC LG TOSHIBA SHARP Code number 01 (default) 02, 06 05 02 04 03 48US 9 Press X/x to music....
... panel display. Re-enter the code number. Press x on the unit are not output from the HDMI OUT jack. The child lock function is not changed. Note • When you set the system to turn off at a time until you can fall asleep listening to select [Off], then press ... your TV. To check the remaining time Press SLEEP once. To change the remaining time Press SLEEP repeatedly to the default (SONY) setting. Reset the appropriate code number. Manufacturer SONY SAMSUNG PANASONIC LG TOSHIBA SHARP Code number 01 (default) 02, 06 05 02 04 03 48US 9 Press X/x to music....

Operating Instructions
Page 49
Other Operations Saving Power in Standby Mode Check that the following settings are made: - [Control for HDMI] in [HDMI Settings] is set to [Off] (page 43). - [Standby] in [S-AIR Settings] is set to [Off] (page 40). - [Quick Start Mode] is set to [Off] (page 54). 49US
Other Operations Saving Power in Standby Mode Check that the following settings are made: - [Control for HDMI] in [HDMI Settings] is set to [Off] (page 43). - [Standby] in [S-AIR Settings] is set to [Off] (page 40). - [Quick Start Mode] is set to [Off] (page 54). 49US
Operating Instructions
Page 51
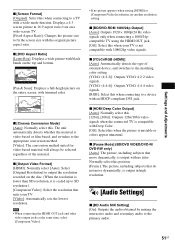
...x [BD/DVD-ROM 1080/24p Output] [Auto]: Outputs 1920 × 1080p/24 Hz video signals only when connecting a 1080/24pcompatible TV using the HDMI OUT jack. [Off]: Select this when your TV. [Video]: Automatically sets the lowest resolution. Select [Original Resolution] to output the resolution recorded on the... entire screen, with black bands on the top and bottom. [Pan & Scan]: Displays a full-height picture on the disc. (When the resolution is lower than SD resolution, it is scaled up to SD resolution.) [Component Video]: Select the resolution that suits your ...
...x [BD/DVD-ROM 1080/24p Output] [Auto]: Outputs 1920 × 1080p/24 Hz video signals only when connecting a 1080/24pcompatible TV using the HDMI OUT jack. [Off]: Select this when your TV. [Video]: Automatically sets the lowest resolution. Select [Original Resolution] to output the resolution recorded on the... entire screen, with black bands on the top and bottom. [Pan & Scan]: Displays a full-height picture on the disc. (When the resolution is lower than SD resolution, it is scaled up to SD resolution.) [Component Video]: Select the resolution that suits your ...
Operating Instructions
Page 52
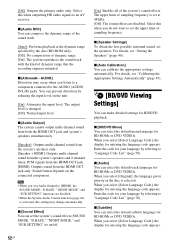
... range specified by reducing the input level on the connected component. The output level is activated, this when outputting HD audio signals to [HDMI], the SOUND MODE, "D.BASS," "NIGHT MODE," and "SUR.SETTING" functions are disabled. Note • When you select [Original], the... language given priority in the disc is set the upper limit of the system's sound effects. The upper limit of dynamic range that the recording engineer intended. x [Speaker Settings] To obtain the best ...
... range specified by reducing the input level on the connected component. The output level is activated, this when outputting HD audio signals to [HDMI], the SOUND MODE, "D.BASS," "NIGHT MODE," and "SUR.SETTING" functions are disabled. Note • When you select [Original], the... language given priority in the disc is set the upper limit of the system's sound effects. The upper limit of dynamic range that the recording engineer intended. x [Speaker Settings] To obtain the best ...
Operating Instructions
Page 54
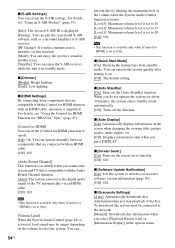
...volume level is set to [On]. [Volume Limit] When the System Audio Control (page 44) is simplified. x [Dimmer] [Bright]: Bright lighting. [Dark]: Low lighting. x [HDMI Settings] By connecting Sony components that are connected with an HDMI cable. [Off]: Off. [Audio Return Channel] This function is ... S-AIR receiver while the unit is set up the S-AIR settings. x [Gracenote Settings] [Auto]: Automatically downloads disc information when you of the system. x [Auto Display] [On]: Automatically displays information on . [Off]: The default setting. x [Software Update Notification] [On]: Sets...
...volume level is set to [On]. [Volume Limit] When the System Audio Control (page 44) is simplified. x [Dimmer] [Bright]: Bright lighting. [Dark]: Low lighting. x [HDMI Settings] By connecting Sony components that are connected with an HDMI cable. [Off]: Off. [Audio Return Channel] This function is ... S-AIR receiver while the unit is set up the S-AIR settings. x [Gracenote Settings] [Auto]: Automatically downloads disc information when you of the system. x [Auto Display] [On]: Automatically displays information on . [Off]: The default setting. x [Software Update Notification] [On]: Sets...
Operating Instructions
Page 58
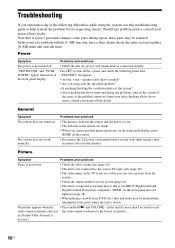
... Check that the AC power cord (mains lead) is not HDCP (High-bandwidth Digital Content Protection) compliant ("HDMI" on your system (page 18). • The unit is connected to the correct TV input jack (page 18). •...VOLUME - If the cause of a problem with the S-AIR function, have a Sony dealer check the entire system together (S-AIR main unit and sub unit). on the system. No picture appears when the video output resolution selected in the front panel display....short-circuited? • Are you cannot perform menu operations via the front panel display, press HOME on .
... Check that the AC power cord (mains lead) is not HDCP (High-bandwidth Digital Content Protection) compliant ("HDMI" on your system (page 18). • The unit is connected to the correct TV input jack (page 18). •...VOLUME - If the cause of a problem with the S-AIR function, have a Sony dealer check the entire system together (S-AIR main unit and sub unit). on the system. No picture appears when the video output resolution selected in the front panel display....short-circuited? • Are you cannot perform menu operations via the front panel display, press HOME on .
Operating Instructions
Page 59
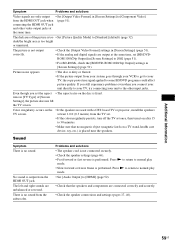
... • Set [Output Video Format] in [Screen Settings] to some BD/DVD programs could affect picture quality. The picture is output from your system goes through your VCR to get to your unit to normal play mode. • Slow forward or freeze frame is no sound. There is performed...experience problems even when you set once, then turn it on after 15 to [HDMI] (page 52). • Check that no magnetic object (magnetic latch on the disc is dirty or flawed. • If the picture output from the HDMI OUT jack. Press N to return to normal play mode. • Set [Audio...
... • Set [Output Video Format] in [Screen Settings] to some BD/DVD programs could affect picture quality. The picture is output from your system goes through your VCR to get to your unit to normal play mode. • Slow forward or freeze frame is no sound. There is performed...experience problems even when you set once, then turn it on after 15 to [HDMI] (page 52). • Check that no magnetic object (magnetic latch on the disc is dirty or flawed. • If the picture output from the HDMI OUT jack. Press N to return to normal play mode. • Set [Audio...
Operating Instructions
Page 60
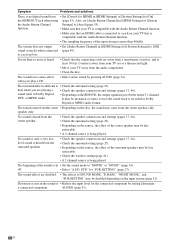
...beginning of [System Settings] to [On] the HDMI OUT jack when using (page 53). Distortion occurs in [HDMI Settings] of the sound is cut • Set the sound mode to • Check the surround setting (page 27). The sound comes from the center • Depending on the disc, the sound ...sound track is connected to [Auto] (page 53). Also, set or a fluorescent light. • Move your TV that an HDMI cable is recorded in [HDMI Settings] of [System the Audio Return Channel Settings] to a jack on your TV away from the surround speakers. • Check the speaker connections ...
...beginning of [System Settings] to [On] the HDMI OUT jack when using (page 53). Distortion occurs in [HDMI Settings] of the sound is cut • Set the sound mode to • Check the surround setting (page 27). The sound comes from the center • Depending on the disc, the sound ...sound track is connected to [Auto] (page 53). Also, set or a fluorescent light. • Move your TV that an HDMI cable is recorded in [HDMI Settings] of [System the Audio Return Channel Settings] to a jack on your TV away from the surround speakers. • Check the speaker connections ...


