
Operating Instructions
Page 4
...Surround System. * Manufactured under U.S. HDMI, the HDMI logo and HighDefinition Multimedia Interface are trademarks or registered trademarks of HDMI Licensing LLC. • Java and all Java-based trademarks and logos are trademarks or registered trademarks of Sun Microsystems, Inc. • "BD-LIVE" and "BONUSVIEW" are trademarks of Blu-ray Disc Association. • "Blu-ray Disc" is a trademark. • "Blu-ray Disc... This device complies with part 15 of Conformity Trade Name: SONY Model: UWA-BR100 Responsible Party: Sony Electronics Inc. Use of applicable Gracenote patents....
...Surround System. * Manufactured under U.S. HDMI, the HDMI logo and HighDefinition Multimedia Interface are trademarks or registered trademarks of HDMI Licensing LLC. • Java and all Java-based trademarks and logos are trademarks or registered trademarks of Sun Microsystems, Inc. • "BD-LIVE" and "BONUSVIEW" are trademarks of Blu-ray Disc Association. • "Blu-ray Disc" is a trademark. • "Blu-ray Disc... This device complies with part 15 of Conformity Trade Name: SONY Model: UWA-BR100 Responsible Party: Sony Electronics Inc. Use of applicable Gracenote patents....
Operating Instructions
Page 5
...the area. • The default setting is underlined. • The system is used for BDV-E770W and BDV-T77. Any difference in operation is clearly indicated in the text, for the surround amplifier, surround back amplifier, or S-AIR receiver in these Operating Instructions describe the controls... the surround amplifier, surround back amplifier, or S-AIR receiver is compatible with the S-AIR function, which allows transmission of sound between S-AIR products wirelessly. About These Operating Instructions • The instructions in this manual, "disc" is the model used . 5US BDV-E770W is...
...the area. • The default setting is underlined. • The system is used for BDV-E770W and BDV-T77. Any difference in operation is clearly indicated in the text, for the surround amplifier, surround back amplifier, or S-AIR receiver in these Operating Instructions describe the controls... the surround amplifier, surround back amplifier, or S-AIR receiver is compatible with the S-AIR function, which allows transmission of sound between S-AIR products wirelessly. About These Operating Instructions • The instructions in this manual, "disc" is the model used . 5US BDV-E770W is...
Operating Instructions
Page 6
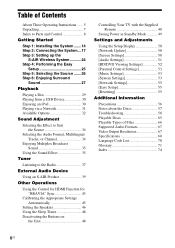
... Getting Started Step 1: Installing the System .......14 Step 2: Connecting the System ...17 Step 3: Setting up the S-AIR Wireless System ...........24 Step 4: Performing the Easy Setup 25 Step 5: Selecting the Source .......26 Step 6: Enjoying Surround Sound 27 Playback Playing a Disc 29 Playing from a USB Device... [Parental Control Settings 53 [Music Settings 53 [System Settings 53 [Network Settings 55 [Easy Setup 55 [Resetting 55 Additional Information Precautions 56 Notes about the Discs 57 Troubleshooting 58 Playable Discs 65 Playable Types of Files 66 Supported Audio Formats...
... Getting Started Step 1: Installing the System .......14 Step 2: Connecting the System ...17 Step 3: Setting up the S-AIR Wireless System ...........24 Step 4: Performing the Easy Setup 25 Step 5: Selecting the Source .......26 Step 6: Enjoying Surround Sound 27 Playback Playing a Disc 29 Playing from a USB Device... [Parental Control Settings 53 [Music Settings 53 [System Settings 53 [Network Settings 55 [Easy Setup 55 [Resetting 55 Additional Information Precautions 56 Notes about the Discs 57 Troubleshooting 58 Playable Discs 65 Playable Types of Files 66 Supported Audio Formats...
Operating Instructions
Page 7
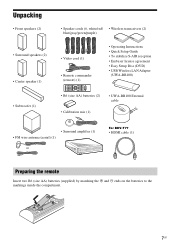
... S-AIR reception • End user license agreement • Easy Setup Disc (DVD) • USB Wireless LAN Adapter (UWA-BR100) • R6 (size AA) batteries (2) • UWA-BR100 External cable • Calibration mic (1) • Surround amplifier (1) • FM wire antenna (aerial) (1) or For BDV-T77 • HDMI cable (1) Preparing the remote Insert two R6...
... S-AIR reception • End user license agreement • Easy Setup Disc (DVD) • USB Wireless LAN Adapter (UWA-BR100) • R6 (size AA) batteries (2) • UWA-BR100 External cable • Calibration mic (1) • Surround amplifier (1) • FM wire antenna (aerial) (1) or For BDV-T77 • HDMI cable (1) Preparing the remote Insert two R6...
Operating Instructions
Page 9
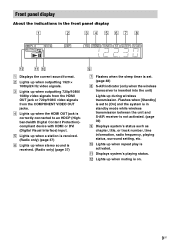
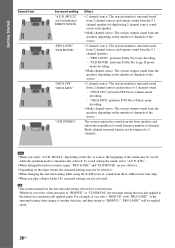
... in standby mode while wireless transmission between the unit and S-AIR receiver is not activated. (page 39) I Displays system's status such as chapter, title, or track number, time information, radio frequency, playing status, surround setting, etc. C Lights up when outputting 1920 × 1080p/24 Hz video signals. J Lights up when muting is...
... in standby mode while wireless transmission between the unit and S-AIR receiver is not activated. (page 39) I Displays system's status such as chapter, title, or track number, time information, radio frequency, playing status, surround setting, etc. C Lights up when outputting 1920 × 1080p/24 Hz video signals. J Lights up when muting is...

Operating Instructions
Page 11
... panel Rear panel S-AIR/STANDBY SURROUND SELECTOR L R A B C PAIRING S-AIR ID IMPEDANCE USE SURROUND SURROUND BACK 3-16 SPEAKERS EZW-RT10 A "/1 (Power) Turns the surround amplifier on , wireless transmission is activated and surround signals are not transmitting. The system is turned on /off. Flashes green quickly. The system is turned on and wireless transmission is turned off . Flashes green...
... panel Rear panel S-AIR/STANDBY SURROUND SELECTOR L R A B C PAIRING S-AIR ID IMPEDANCE USE SURROUND SURROUND BACK 3-16 SPEAKERS EZW-RT10 A "/1 (Power) Turns the surround amplifier on , wireless transmission is activated and surround signals are not transmitting. The system is turned on /off. Flashes green quickly. The system is turned on and wireless transmission is turned off . Flashes green...
Operating Instructions
Page 14
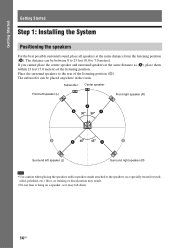
...If you cannot place the center speaker and surround speakers at the same distance from the listening position (A). Getting Started Getting Started Step 1: Installing the System Positioning the speakers For the best possible surround sound, place all speakers at the same ...distance as it may fall down. 14US Subwoofer Center speaker Front left speaker (L) Front right speaker (R) A A A 30 30 B A 45 45 A B Surround left speaker (L) Surround right speaker ...
...If you cannot place the center speaker and surround speakers at the same distance from the listening position (A). Getting Started Getting Started Step 1: Installing the System Positioning the speakers For the best possible surround sound, place all speakers at the same ...distance as it may fall down. 14US Subwoofer Center speaker Front left speaker (L) Front right speaker (R) A A A 30 30 B A 45 45 A B Surround left speaker (L) Surround right speaker ...
Operating Instructions
Page 15
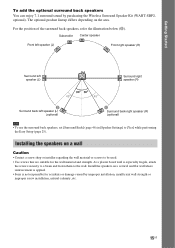
...Use screws that are suitable for accidents or damage caused by purchasing the Wireless Surround Speaker Kit (WAHT-SBP2, optional). Install the speakers on a vertical and flat wall where reinforcement is applied. • Sony is especially fragile, attach the screws securely to a beam and fasten them to... [Yes] while performing the Easy Setup (page 25). For the position of the surround back speakers, refer the illustration below (C). Installing the ...
...Use screws that are suitable for accidents or damage caused by purchasing the Wireless Surround Speaker Kit (WAHT-SBP2, optional). Install the speakers on a vertical and flat wall where reinforcement is applied. • Sony is especially fragile, attach the screws securely to a beam and fasten them to... [Yes] while performing the Easy Setup (page 25). For the position of the surround back speakers, refer the illustration below (C). Installing the ...

Operating Instructions
Page 16
... a wall Before installing the speakers on the back of the speaker Color tube Front left speaker (L): White Front right speaker (R): Red Center speaker: Green Surround left speaker (L): Blue Surround right speaker (R): Gray 1 Prepare screws (not supplied) that are suitable for the hole on a wall, connect the speaker cord to #. See the illustrations...
... a wall Before installing the speakers on the back of the speaker Color tube Front left speaker (L): White Front right speaker (R): Red Center speaker: Green Surround left speaker (L): Blue Surround right speaker (R): Gray 1 Prepare screws (not supplied) that are suitable for the hole on a wall, connect the speaker cord to #. See the illustrations...

Operating Instructions
Page 17
...speaker cords to a level where sound is not distorted. To connect speaker cords to the unit and surround amplifier When connecting to the unit and surround amplifier, insert the connector until all the other components to the appropriate terminals on the speakers: the speaker...-1U6SE SPEAKERS Blue (Surround left speaker (L)) To connect speaker cords to match the color of the SPEAKERS jacks of the speaker Connector (-) 17US Connecting the speakers The connector of the unit to #. Getting Started Step 2: Connecting the System For connecting the system, read the information on...
...speaker cords to a level where sound is not distorted. To connect speaker cords to the unit and surround amplifier When connecting to the unit and surround amplifier, insert the connector until all the other components to the appropriate terminals on the speakers: the speaker...-1U6SE SPEAKERS Blue (Surround left speaker (L)) To connect speaker cords to match the color of the SPEAKERS jacks of the speaker Connector (-) 17US Connecting the speakers The connector of the unit to #. Getting Started Step 2: Connecting the System For connecting the system, read the information on...

Operating Instructions
Page 22
To transmit sound from the unit to insert the wireless transceivers into the unit and S-AIR product. For details of the surround amplifier EZW-RT10 EZW-RT10 Wireless transceiver Wireless transceiver 22US Rear panel of the unit Rear panel of S-AIR products, see "Using an S-AIR Product" (page 39). Getting Started Inserting the wireless transceiver You can transmit sound from the unit, you need to an S-AIR product, such as the surround amplifier or S-AIR receiver.
To transmit sound from the unit to insert the wireless transceivers into the unit and S-AIR product. For details of the surround amplifier EZW-RT10 EZW-RT10 Wireless transceiver Wireless transceiver 22US Rear panel of the unit Rear panel of S-AIR products, see "Using an S-AIR Product" (page 39). Getting Started Inserting the wireless transceiver You can transmit sound from the unit, you need to an S-AIR product, such as the surround amplifier or S-AIR receiver.

Operating Instructions
Page 24
... wireless transmission, perform the following Steps. 1 Press "/1 to A. For details of the surround amplifier to the surround amplifier that "S-AIR" light up the surround amplifier. SURROUND SELECTOR SURROUND SURROUND BACK 3 Set the S-AIR ID switch of the surround amplifier to turn the system on. SURROUND SELECTOR SURROUND SURROUND BACK 4 Press "/1 to set up in standby mode or wireless transmission is activated...
... wireless transmission, perform the following Steps. 1 Press "/1 to A. For details of the surround amplifier to the surround amplifier that "S-AIR" light up the surround amplifier. SURROUND SELECTOR SURROUND SURROUND BACK 3 Set the S-AIR ID switch of the surround amplifier to turn the system on. SURROUND SELECTOR SURROUND SURROUND BACK 4 Press "/1 to set up in standby mode or wireless transmission is activated...
Operating Instructions
Page 25
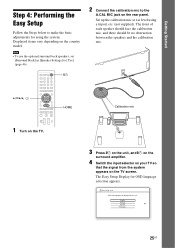
Set up the calibration mic at ear level using the system. Easy Setup - Note • To use the optional surround back speakers, set [Surround Back] in [Speaker Settings] to [Yes] (page 46). 123 456 789 0 "/1 C/X/x/c, HOME 2 Connect the calibration mic to the A.CAL MIC jack on the TV screen. AE.CCMAL-AMCI2C Calibration mic 1 Turn...
Set up the calibration mic at ear level using the system. Easy Setup - Note • To use the optional surround back speakers, set [Surround Back] in [Speaker Settings] to [Yes] (page 46). 123 456 789 0 "/1 C/X/x/c, HOME 2 Connect the calibration mic to the A.CAL MIC jack on the TV screen. AE.CCMAL-AMCI2C Calibration mic 1 Turn...

Operating Instructions
Page 27
...SYSTEM MENU. STD" The system discriminates the sound format of sound sources. SYSTEM MENU X/x/c, 123 456 789 0 Selecting surround settings based on the source. MULTI." Surround setting Effect "A.F.D. You can easily enjoy surround sound. About speaker output of movie theaters into your listening preference 1 Press SYSTEM...repeatedly until the surround setting you connect all the speakers to different kinds of the source and (AUTO FORMAT presents sound as it was recorded/encoded. The system menu turns off. Sound from Depending on your home. DIRECT STANDARD)...
...SYSTEM MENU. STD" The system discriminates the sound format of sound sources. SYSTEM MENU X/x/c, 123 456 789 0 Selecting surround settings based on the source. MULTI." Surround setting Effect "A.F.D. You can easily enjoy surround sound. About speaker output of movie theaters into your listening preference 1 Press SYSTEM...repeatedly until the surround setting you connect all the speakers to different kinds of the source and (AUTO FORMAT presents sound as it was recorded/encoded. The system menu turns off. Sound from Depending on your home. DIRECT STANDARD)...
Operating Instructions
Page 28
... input, "PRO LOGIC" and "PLII MOVIE" are not effective. • Depending on the disc or source, the beginning of the source. • 2 channel source: The system simulates surround sound from the S-AIR receiver may be applied again. 28US "NEO6 CIN" performs DTS Neo:6...broadcast sound is automatically selected. To avoid cutting the sound, select "A.F.D. Tip • The system memorizes the last surround setting selected for each speaker. • Multi-channel source: The system outputs sound from the speakers depending on the number of channels of the source. • ...
... input, "PRO LOGIC" and "PLII MOVIE" are not effective. • Depending on the disc or source, the beginning of the source. • 2 channel source: The system simulates surround sound from the S-AIR receiver may be applied again. 28US "NEO6 CIN" performs DTS Neo:6...broadcast sound is automatically selected. To avoid cutting the sound, select "A.F.D. Tip • The system memorizes the last surround setting selected for each speaker. • Multi-channel source: The system outputs sound from the speakers depending on the number of channels of the source. • ...
Operating Instructions
Page 39
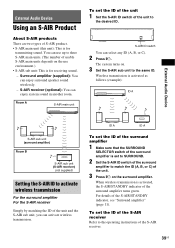
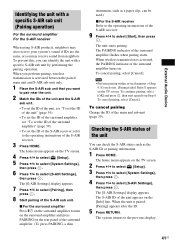
.../STANDBY indicator of usable S-AIR main units depends on . 3 Set the S-AIR sub unit to the operating instructions of the S-AIR/STANDBY indicator, see "Surround amplifier" (page 11). When wireless transmission is for receiving sound. - You can use environment.) • S-AIR sub unit: This is activated as follows ... the ID of the S-AIR receiver Refer to the same ID. S-AIR ID ABC S-AIR ID switch You can enjoy system sound in another room. The system turns on the use up to the desired ID. Wireless transmission is for transmitting sound. For details of the S-AIR receiver...
.../STANDBY indicator of usable S-AIR main units depends on . 3 Set the S-AIR sub unit to the operating instructions of the S-AIR/STANDBY indicator, see "Surround amplifier" (page 11). When wireless transmission is for receiving sound. - You can use environment.) • S-AIR sub unit: This is activated as follows ... the ID of the S-AIR receiver Refer to the same ID. S-AIR ID ABC S-AIR ID switch You can enjoy system sound in another room. The system turns on the use up to the desired ID. Wireless transmission is for transmitting sound. For details of the S-AIR receiver...
Operating Instructions
Page 40
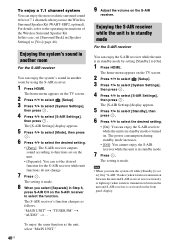
... the same function as follows. Enjoying the system's sound in another room by setting [Standby] to select the desired setting. • [On]: You can enjoy the more realistic surround sound effect of the Wireless Surround Speaker Kit. The home menu appears on the TV screen. 2 ...Press C/c to select [Setup]. 3 Press X/x to select [System Settings], then press . 4 Press X/x to select [S-AIR Settings], then press . The home menu appears on the TV ...
... the same function as follows. Enjoying the system's sound in another room by setting [Standby] to select the desired setting. • [On]: You can enjoy the more realistic surround sound effect of the Wireless Surround Speaker Kit. The home menu appears on the TV screen. 2 ...Press C/c to select [Setup]. 3 Press X/x to select [System Settings], then press . 4 Press X/x to select [S-AIR Settings], then press . The home menu appears on the TV ...
Operating Instructions
Page 41
...instrument, such as the S-AIR ID or pairing information. 1 Press HOME. x For the surround amplifier Press "/1 on the surround amplifier to turn on the surround amplifier and press PAIRING on the TV screen. 4 Press C/c to select [Setup]. 5 Press X/x to select [System Settings], then press . 6 Press X/x to select [Start], then...as a paper clip, can be used.) x For the S-AIR receiver Refer to the operating instructions of the surround amplifier turns on the [Info] line. The system returns to the operating instructions of the unit appears on . To cancel pairing Change the ID of the S-...
...instrument, such as the S-AIR ID or pairing information. 1 Press HOME. x For the surround amplifier Press "/1 on the surround amplifier to turn on the surround amplifier and press PAIRING on the TV screen. 4 Press C/c to select [Setup]. 5 Press X/x to select [System Settings], then press . 6 Press X/x to select [Start], then...as a paper clip, can be used.) x For the S-AIR receiver Refer to the operating instructions of the surround amplifier turns on the [Info] line. The system returns to the operating instructions of the unit appears on . To cancel pairing Change the ID of the S-...
Operating Instructions
Page 42
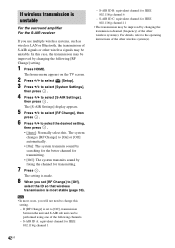
If wireless transmission is unstable For the surround amplifier For the S-AIR receiver If you use multiple wireless systems, such as wireless LAN or Bluetooth, the transmission of the other wireless system(s). 42US S-AIR ID C: equivalent channel for transmitting. 7 Press . S-AIR ID B: equivalent channel for IEEE 802.11b...made. 8 When you will not need to the operating instructions of the following [RF Change] setting. 1 Press HOME. The system changes [RF Change] to [Off], transmission between the unit and S-AIR sub unit can be improved by changing the following channels. -...
If wireless transmission is unstable For the surround amplifier For the S-AIR receiver If you use multiple wireless systems, such as wireless LAN or Bluetooth, the transmission of the other wireless system(s). 42US S-AIR ID C: equivalent channel for transmitting. 7 Press . S-AIR ID B: equivalent channel for IEEE 802.11b...made. 8 When you will not need to the operating instructions of the following [RF Change] setting. 1 Press HOME. The system changes [RF Change] to [Off], transmission between the unit and S-AIR sub unit can be improved by changing the following channels. -...
Operating Instructions
Page 45
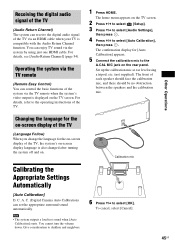
Operating the system via the TV remote (Remote Easy Control) You can set the appropriate surround sound automatically. Set up the calibration mic at ear level using just one HDMI cable. C. The home menu appears on the TV screen. 2 Press C/c to select [Setup]. 3 Press X/x to select [Audio Settings], then ...of the TV via an HDMI cable when your TV is also changed after turning the system off and on the TV screen. The front of the TV. 1 Press HOME. Note • The system outputs a loud test sound when [Auto Calibration] starts. Give consideration to children and ...
Operating the system via the TV remote (Remote Easy Control) You can set the appropriate surround sound automatically. Set up the calibration mic at ear level using just one HDMI cable. C. The home menu appears on the TV screen. 2 Press C/c to select [Setup]. 3 Press X/x to select [Audio Settings], then ...of the TV via an HDMI cable when your TV is also changed after turning the system off and on the TV screen. The front of the TV. 1 Press HOME. Note • The system outputs a loud test sound when [Auto Calibration] starts. Give consideration to children and ...


