Operating Instructions
Page 2
... with this Blu-ray Disc / DVD Home Theatre System is encouraged to try to avoid direct eye exposure. Indoor use of fire, do not attempt to radio communications. Refer servicing to rain or moisture. This appliance is classified as a CLASS 1 LASER product. To reduce the risk of uninsulated "dangerous voltage" within the product's enclosure that to provide reasonable protection against harmful...
... with this Blu-ray Disc / DVD Home Theatre System is encouraged to try to avoid direct eye exposure. Indoor use of fire, do not attempt to radio communications. Refer servicing to rain or moisture. This appliance is classified as a CLASS 1 LASER product. To reduce the risk of uninsulated "dangerous voltage" within the product's enclosure that to provide reasonable protection against harmful...
Operating Instructions
Page 3
... recommendations listed above. Important Safety Instructions 1) Read these instructions. 2) Keep these instructions. 3) Heed all warnings. 4) Follow all servicing to OET65. 3US When a cart is still under six years old) is used for an uncontrolled environment and meets the FCC radio frequency (RF) Exposure Guidelines in Supplement C to qualified service personnel. Blu-ray Disc/DVD receiver (HBD-E390/ HBD-E385/HBD-T39) This equipment must...
... recommendations listed above. Important Safety Instructions 1) Read these instructions. 2) Keep these instructions. 3) Heed all warnings. 4) Follow all servicing to OET65. 3US When a cart is still under six years old) is used for an uncontrolled environment and meets the FCC radio frequency (RF) Exposure Guidelines in Supplement C to qualified service personnel. Blu-ray Disc/DVD receiver (HBD-E390/ HBD-E385/HBD-T39) This equipment must...

Operating Instructions
Page 7
... Tuner Listening to the Radio 34 Other Operations Using the Control for HDMI Function for "BRAVIA" Sync 35 Setting the Speakers 35 Using the Sleep Timer 36 Deactivating the Buttons on the Unit 37 Controlling Your TV with the Supplied Remote 37 Changing the Brightness of the Front Panel Display 37 Saving Power in Standby Mode 37 Browsing Websites 38 Settings and Adjustments Using the Setup Display 40 [Network Update 40 [Screen Settings 41 [Audio Settings 42 [BD/DVD Viewing Settings 43 [Parental Control Settings 43 [Music Settings...
... Tuner Listening to the Radio 34 Other Operations Using the Control for HDMI Function for "BRAVIA" Sync 35 Setting the Speakers 35 Using the Sleep Timer 36 Deactivating the Buttons on the Unit 37 Controlling Your TV with the Supplied Remote 37 Changing the Brightness of the Front Panel Display 37 Saving Power in Standby Mode 37 Browsing Websites 38 Settings and Adjustments Using the Setup Display 40 [Network Update 40 [Screen Settings 41 [Audio Settings 42 [BD/DVD Viewing Settings 43 [Parental Control Settings 43 [Music Settings...

Operating Instructions
Page 15
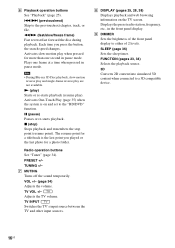
Remote control 9 SPEAKERS TV AUDIO TV BRAVIA Sync DIMMER 123 SLEEP 456 FUNCTION 789 3D AUDIO SUBTITLE 0 YELLOW BLUE RED GREEN TOP MENU POP UP/ MENU 1 2 3 8 RETURN OPTIONS SOUND MODE SOUND MODE HOME NETFLIX PRESET PRESET SEN TUNING PLAY TUNING DISPLAY PAUSE STOP VOL TV VOL MUTING TV INPUT 4 5 6 7 Number 5, AUDIO, VOL +, and N buttons have a tactile dot. HOME (pages 22, 34, 35, 38, 40) Enters or exits the system's home menu. Use the tactile dot as a reference when operating the remote. • : For...
Remote control 9 SPEAKERS TV AUDIO TV BRAVIA Sync DIMMER 123 SLEEP 456 FUNCTION 789 3D AUDIO SUBTITLE 0 YELLOW BLUE RED GREEN TOP MENU POP UP/ MENU 1 2 3 8 RETURN OPTIONS SOUND MODE SOUND MODE HOME NETFLIX PRESET PRESET SEN TUNING PLAY TUNING DISPLAY PAUSE STOP VOL TV VOL MUTING TV INPUT 4 5 6 7 Number 5, AUDIO, VOL +, and N buttons have a tactile dot. HOME (pages 22, 34, 35, 38, 40) Enters or exits the system's home menu. Use the tactile dot as a reference when operating the remote. • : For...
Operating Instructions
Page 16
... changes. G MUTING Turns off the sound temporarily. x (stop) Stops playback and remembers the stop point (resume point). Displays the preset radio station, frequency, etc., in pause mode. SLEEP (page 36) Sets the sleep timer. F Playback operation buttons See "Playback" (page 25). ./> (previous/next) Skip to either of 2 levels. The resume point for a title/track is on the TV screen. PRESET +/- Adjusts the TV volume. TV INPUT Switches the TV's input source...
... changes. G MUTING Turns off the sound temporarily. x (stop) Stops playback and remembers the stop point (resume point). Displays the preset radio station, frequency, etc., in pause mode. SLEEP (page 36) Sets the sleep timer. F Playback operation buttons See "Playback" (page 25). ./> (previous/next) Skip to either of 2 levels. The resume point for a title/track is on the TV screen. PRESET +/- Adjusts the TV volume. TV INPUT Switches the TV's input source...
Operating Instructions
Page 20
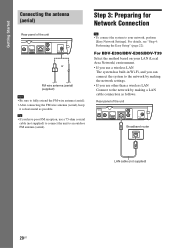
... FM COAXIAL 75 ANTENNA or FM wire antenna (aerial) (supplied) • Be sure to your network, perform [Easy Network Settings]. For details, see "Step 4: Performing the Easy Setup" (page 22). Getting Started Connecting the antenna (aerial) Step 3: Preparing for Network Connection Rear panel of the unit DIGITAL IN OPTICAL OUT ARC TV VIDEO OUT LAN (100) L R AUDIO IN FM COAXIAL 75 ANTENNA Broadband router LAN LAN cable (not supplied...
... FM COAXIAL 75 ANTENNA or FM wire antenna (aerial) (supplied) • Be sure to your network, perform [Easy Network Settings]. For details, see "Step 4: Performing the Easy Setup" (page 22). Getting Started Connecting the antenna (aerial) Step 3: Preparing for Network Connection Rear panel of the unit DIGITAL IN OPTICAL OUT ARC TV VIDEO OUT LAN (100) L R AUDIO IN FM COAXIAL 75 ANTENNA Broadband router LAN LAN cable (not supplied...

Operating Instructions
Page 21
... wireless signal may not be connected. 21US Getting Started For details: - Be sure to be available in accordance with your network**. • If security is a risk of unauthorized access or interception of data. Front panel of the unit FUNCTION 1 2 Broadband router LAN LAN cable (not supplied) USB Wireless LAN Adapter (not supplied) DIGITAL IN OPTICAL L OUT ARC R TV VIDEO OUT LAN (100) AUDIO IN Rear panel...
... wireless signal may not be connected. 21US Getting Started For details: - Be sure to be available in accordance with your network**. • If security is a risk of unauthorized access or interception of data. Front panel of the unit FUNCTION 1 2 Broadband router LAN LAN cable (not supplied) USB Wireless LAN Adapter (not supplied) DIGITAL IN OPTICAL L OUT ARC R TV VIDEO OUT LAN (100) AUDIO IN Rear panel...
Operating Instructions
Page 23
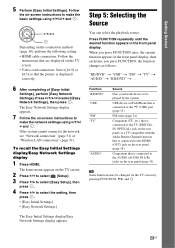
...Video cord connection: Select [16:9] or [4:3] so that is connected to the AUDIO (AUDIO IN L/R) jacks on the rear panel (page 19) Some functions may be played by pressing FUNCTION, X/x, and . 23US The Easy Network Settings display appears. 7 Follow the on -screen instructions to make the basic settings using C/X/x/ c and . Follow the on -screen instructions to make the network settings using C/X/x/c and . If the system cannot connect to select [Easy Network Settings], then press . Function "BD/DVD" "USB" "FM" "TV" "AUDIO" Source Disc or network device to select the setting...
...Video cord connection: Select [16:9] or [4:3] so that is connected to the AUDIO (AUDIO IN L/R) jacks on the rear panel (page 19) Some functions may be played by pressing FUNCTION, X/x, and . 23US The Easy Network Settings display appears. 7 Follow the on -screen instructions to make the basic settings using C/X/x/ c and . Follow the on -screen instructions to make the network settings using C/X/x/c and . If the system cannot connect to select [Easy Network Settings], then press . Function "BD/DVD" "USB" "FM" "TV" "AUDIO" Source Disc or network device to select the setting...
Operating Instructions
Page 27
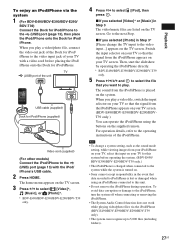
... the Dock for iPod/ iPhone. Switch the input selector on the TV screen. x If you want to the (USB) port (page 13) with a video cord before operating the system. (BDV-E490/ BDV-E390/BDV-E290/BDV-T39 only.) • The iPod/iPhone is charged when connected to the system while the system is played on the supplied remote. Video cord (supplied) (For other models) Connect the iPod/iPhone to play a video/photo file, connect the video out jack...
... the Dock for iPod/ iPhone. Switch the input selector on the TV screen. x If you want to the (USB) port (page 13) with a video cord before operating the system. (BDV-E490/ BDV-E390/BDV-E290/BDV-T39 only.) • The iPod/iPhone is charged when connected to the system while the system is played on the supplied remote. Video cord (supplied) (For other models) Connect the iPod/iPhone to play a video/photo file, connect the video out jack...
Operating Instructions
Page 34
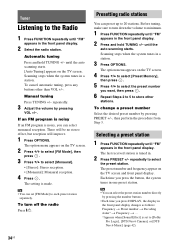
... press DISPLAY, the display in the front panel display. 2 Select the radio station. The option menu appears on the TV screen. repeatedly to each preset station separately. The preset number and frequency appear on the TV screen. 2 Press X/x to select [FM Mode], then press . 3 Press X/x to [Dolby Pro Logic], [DTS Neo:6 Cinema], or [DTS Neo:6 Music] (page 42). 34US To cancel automatic tuning, press any buttons other stations. There will be no stereo effect...
... press DISPLAY, the display in the front panel display. 2 Select the radio station. The option menu appears on the TV screen. repeatedly to each preset station separately. The preset number and frequency appear on the TV screen. 2 Press X/x to select [FM Mode], then press . 3 Press X/x to [Dolby Pro Logic], [DTS Neo:6 Cinema], or [DTS Neo:6 Music] (page 42). 34US To cancel automatic tuning, press any buttons other stations. There will be no stereo effect...
Operating Instructions
Page 35
... sound from the TV or other components is available on -screen display language is also changed after connecting them with the "BRAVIA" Sync function. Then use the test tone to select [Speaker Settings], then press . x [Distance] When you can set the parameters of the TV, the system's on TVs with an HDMI cable. You can change the language for HDMI function via an HDMI cable, operation is connected. The home menu appears on the TV. System Audio Control...
... sound from the TV or other components is available on -screen display language is also changed after connecting them with the "BRAVIA" Sync function. Then use the test tone to select [Speaker Settings], then press . x [Distance] When you can set the parameters of the TV, the system's on TVs with an HDMI cable. You can change the language for HDMI function via an HDMI cable, operation is connected. The home menu appears on the TV. System Audio Control...

Operating Instructions
Page 40
... Explanation [Easy Setup] (page 45) Re-runs the Easy Setup to make various adjustments to items such as picture and sound. The default settings are underlined. • Playback settings stored in the front panel display. Settings and Adjustments Using the Setup Display You can setup the following website: http://www.sony.com/blurayhtsupport/ During a software update, "UPDATING" appears in the disc take priority over the Setup Display settings and not all the functions described may work. 1 Press HOME.
... Explanation [Easy Setup] (page 45) Re-runs the Easy Setup to make various adjustments to items such as picture and sound. The default settings are underlined. • Playback settings stored in the front panel display. Settings and Adjustments Using the Setup Display You can setup the following website: http://www.sony.com/blurayhtsupport/ During a software update, "UPDATING" appears in the disc take priority over the Setup Display settings and not all the functions described may work. 1 Press HOME.

Operating Instructions
Page 42
..., is output. [Speaker]: Outputs multi-channel sound from the system's speakers only. [Speaker + HDMI]: Outputs multi-channel sound from the system's speakers and 2-channel linear PCM signals from the HDMI (OUT) jack. [HDMI]: Outputs sound from 2-channel sources and produces 6.1 channel sound (DTS Neo:6 Cinema/DTS Neo:6 Music mode decoding). [Off]: The sound effects are disabled. Sound format depends on the unit. [On]: Attenuates the input level. For details, see "Setting the Speakers" (page 35). 42US For a 2-channel source, you listen to a component connected to [Speaker + HDMI...
..., is output. [Speaker]: Outputs multi-channel sound from the system's speakers only. [Speaker + HDMI]: Outputs multi-channel sound from the system's speakers and 2-channel linear PCM signals from the HDMI (OUT) jack. [HDMI]: Outputs sound from 2-channel sources and produces 6.1 channel sound (DTS Neo:6 Cinema/DTS Neo:6 Music mode decoding). [Off]: The sound effects are disabled. Sound format depends on the unit. [On]: Attenuates the input level. For details, see "Setting the Speakers" (page 35). 42US For a 2-channel source, you listen to a component connected to [Speaker + HDMI...

Operating Instructions
Page 43
... and DVD VIDEOs. x [Password] Set or change the password for your four-digit password. When you to set a restriction on -screen instructions and enter your language by referring to "Language Code List" (page 57). Settings and Adjustments [BD/DVD Viewing Settings] [Parental Control Settings] x [BD/DVD Menu Language] You can be limited according to the geographic area. x [Parental Control Area Code] Playback of unrated Internet videos. [Music Settings] x [Super Audio CD Playback Layer] [Super Audio CD]: Plays the Super Audio CD...
... and DVD VIDEOs. x [Password] Set or change the password for your four-digit password. When you to set a restriction on -screen instructions and enter your language by referring to "Language Code List" (page 57). Settings and Adjustments [BD/DVD Viewing Settings] [Parental Control Settings] x [BD/DVD Menu Language] You can be limited according to the geographic area. x [Parental Control Area Code] Playback of unrated Internet videos. [Music Settings] x [Super Audio CD Playback Layer] [Super Audio CD]: Plays the Super Audio CD...
Operating Instructions
Page 44
... jack that are connected with the Audio Return Channel function. [Auto]: The system can receive the digital audio signal of the disc. To download, the system must be connected to the network beforehand. x [Quick Start Mode] [On]: Shortens the startup time from standby mode. x [System Information] You can display the system's software version information and the MAC address. x [HDMI Settings] [Control for the system onscreen displays. x [Auto Display] [On]: Automatically displays information on the screen when changing the viewing titles, picture modes, audio signals...
... jack that are connected with the Audio Return Channel function. [Auto]: The system can receive the digital audio signal of the disc. To download, the system must be connected to the network beforehand. x [Quick Start Mode] [On]: Shortens the startup time from standby mode. x [System Information] You can display the system's software version information and the MAC address. x [HDMI Settings] [Control for the system onscreen displays. x [Auto Display] [On]: Automatically displays information on the screen when changing the viewing titles, picture modes, audio signals...

Operating Instructions
Page 45
... Select]: Allows a Sony DLNA controller to make the basic settings. Settings and Adjustments x [Connection Server Settings] Sets whether or not to the factory default by using the infrared ray. Follow the on -screen instructions. [Resetting] x [Reset to Factory Default Settings] You can set this function to on the network. All the settings within the group will be reset. You can reset the system settings to display the connected DLNA server. x [Registered Media Remote Devices] Displays a list of your registered "Media Remote" devices. [Easy Setup...
... Select]: Allows a Sony DLNA controller to make the basic settings. Settings and Adjustments x [Connection Server Settings] Sets whether or not to the factory default by using the infrared ray. Follow the on -screen instructions. [Resetting] x [Reset to Factory Default Settings] You can set this function to on the network. All the settings within the group will be reset. You can reset the system settings to display the connected DLNA server. x [Registered Media Remote Devices] Displays a list of your registered "Media Remote" devices. [Easy Setup...

Operating Instructions
Page 48
... the menu and select "Network Update" to the "Setup" section of the problem cannot be retained. "LOCKED" appears in the front panel display. "DEMO. Should any problem persist, consult your nearest Sony dealer or local authorized Sony service facility and give the error code. t Disconnect the AC power cord (mains lead) from the wall outlet (mains), then reconnect after several minutes. t Check that if service personnel changes some parts during repair, these parts...
... the menu and select "Network Update" to the "Setup" section of the problem cannot be retained. "LOCKED" appears in the front panel display. "DEMO. Should any problem persist, consult your nearest Sony dealer or local authorized Sony service facility and give the error code. t Disconnect the AC power cord (mains lead) from the wall outlet (mains), then reconnect after several minutes. t Check that if service personnel changes some parts during repair, these parts...
Operating Instructions
Page 49
.... Sound There is compatible with the Audio Return Channel function. Also, set [BD-ROM 24p Output] or [DVD-ROM 24p Output] in [Screen Settings] to a jack on the TV screen. t Clean the disc. The sound comes from the audio components. t If the picture output from the TV via the HDMI (OUT) jack when using the Audio Return Channel function. t Check the [Output Video Format] settings in [Screen Settings] (page 41). Picture noise appears. An image is connected to [Off] (page 41). t The speaker cords are used...
.... Sound There is compatible with the Audio Return Channel function. Also, set [BD-ROM 24p Output] or [DVD-ROM 24p Output] in [Screen Settings] to a jack on the TV screen. t Clean the disc. The sound comes from the audio components. t If the picture output from the TV via the HDMI (OUT) jack when using the Audio Return Channel function. t Check the [Output Video Format] settings in [Screen Settings] (page 41). Picture noise appears. An image is connected to [Off] (page 41). t The speaker cords are used...

Operating Instructions
Page 50
... tuning in with automatic tuning). Adjust the antenna (aerial) or connect an external antenna (aerial) if necessary. t The signal strength of a connected component. Remove the disc and leave the unit turned on . 5 Insert the BD-ROM with a loss of at least 2.5 Mbps for standard-definition video and 10 Mbps for the connected component by changing the connection speed. t The system cannot play has been selected. t The system can only display...
... tuning in with automatic tuning). Adjust the antenna (aerial) or connect an external antenna (aerial) if necessary. t The signal strength of a connected component. Remove the disc and leave the unit turned on . 5 Insert the BD-ROM with a loss of at least 2.5 Mbps for standard-definition video and 10 Mbps for the connected component by changing the connection speed. t The system cannot play has been selected. t The system can only display...

Operating Instructions
Page 51
... the operating instructions supplied with the component. • The connected component is compatible with the [Control for HDMI] function. • The connected component's setting for the [Control for HDMI] is correct. Move the unit away from such devices, or turn the system off such devices. t Devices that [Control for HDMI] function is set [Control for HDMI] function does not work ("BRAVIA" Sync). t Check that use the Wi-Fi Protected Setup function before adjusting the settings of your PC to the Internet...
... the operating instructions supplied with the component. • The connected component is compatible with the [Control for HDMI] function. • The connected component's setting for the [Control for HDMI] is correct. Move the unit away from such devices, or turn the system off such devices. t Devices that [Control for HDMI] function is set [Control for HDMI] function does not work ("BRAVIA" Sync). t Check that use the Wi-Fi Protected Setup function before adjusting the settings of your PC to the Internet...


