Operating Instructions
Page 1
Blu-ray Disc™ / DVD Player Operating Instructions 4-418-506-12(1) Hookups and Settings Playback Internet Settings and Adjustments Additional Information BDP-S790
Blu-ray Disc™ / DVD Player Operating Instructions 4-418-506-12(1) Hookups and Settings Playback Internet Settings and Adjustments Additional Information BDP-S790
Operating Instructions
Page 3
... the apparatus. Install in any ventilation openings. Refer to correct the interference by the manufacturer, or sold with FCC radiation exposure limits set forth for help. Servicing is required when the apparatus has been damaged in accordance with the cart, stand, tripod, bracket, or ...on a circuit different from the apparatus. 11)Only use this product. Connect the equipment into your outlet, consult an electrician for your Sony dealer regarding this apparatus near water. 6) Clean only with one or more away from tip-over. 13) Unplug this apparatus during ...
... the apparatus. Install in any ventilation openings. Refer to correct the interference by the manufacturer, or sold with FCC radiation exposure limits set forth for help. Servicing is required when the apparatus has been damaged in accordance with the cart, stand, tripod, bracket, or ...on a circuit different from the apparatus. 11)Only use this product. Connect the equipment into your outlet, consult an electrician for your Sony dealer regarding this apparatus near water. 6) Clean only with one or more away from tip-over. 13) Unplug this apparatus during ...
Operating Instructions
Page 4
... moisture evaporates. • Do not install the player in an electric shock or fire. - On cleaning Clean the cabinet, panel, and controls with the limits set out in a very damp room, moisture may not operate properly. On replacement of the front panel. If you don't, the disc may limit reception of...
... moisture evaporates. • Do not install the player in an electric shock or fire. - On cleaning Clean the cabinet, panel, and controls with the limits set out in a very damp room, moisture may not operate properly. On replacement of the front panel. If you don't, the disc may limit reception of...
Operating Instructions
Page 9
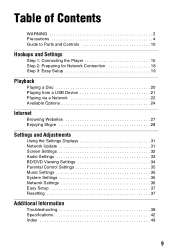
Table of Contents WARNING 2 Precautions 4 Guide to Parts and Controls 10 Hookups and Settings Step 1: Connecting the Player 15 Step 2: Preparing for Network Connection 18 Step 3: Easy Setup 19 Playback Playing a Disc 20...Available Options 24 Internet Browsing Websites 27 Enjoying Skype 28 Settings and Adjustments Using the Settings Displays 31 Network Update 31 Screen Settings 32 Audio Settings 33 BD/DVD Viewing Settings 34 Parental Control Settings 35 Music Settings 35 System Settings 35 Network Settings 36 Easy Setup 37 Resetting 37 Additional Information Troubleshooting ...
Table of Contents WARNING 2 Precautions 4 Guide to Parts and Controls 10 Hookups and Settings Step 1: Connecting the Player 15 Step 2: Preparing for Network Connection 18 Step 3: Easy Setup 19 Playback Playing a Disc 20...Available Options 24 Internet Browsing Websites 27 Enjoying Skype 28 Settings and Adjustments Using the Settings Displays 31 Network Update 31 Screen Settings 32 Audio Settings 33 BD/DVD Viewing Settings 34 Parental Control Settings 35 Music Settings 35 System Settings 35 Network Settings 36 Easy Setup 37 Resetting 37 Additional Information Troubleshooting ...
Operating Instructions
Page 10
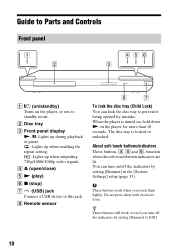
...off the indicators by mistake. B Disc tray C Front panel display N, X: Lights up during playback or pause. : Lights up when enabling the repeat setting. : Lights up when outputting 720p/1080i/1080p video signals. b These buttons work , even if you touch them with excessive force. z These buttons ... the player for more than 10 seconds. The disc tray is turned on, hold down N on /off the indicators by setting [Dimmer] to prevent it being opened by setting [Dimmer] in the [System Settings] setup (page 35). You can lock the disc tray to [Off]. 10 D Z (open/close) E N (play) F x ...
...off the indicators by mistake. B Disc tray C Front panel display N, X: Lights up during playback or pause. : Lights up when enabling the repeat setting. : Lights up when outputting 720p/1080i/1080p video signals. b These buttons work , even if you touch them with excessive force. z These buttons ... the player for more than 10 seconds. The disc tray is turned on, hold down N on /off the indicators by setting [Dimmer] to prevent it being opened by setting [Dimmer] in the [System Settings] setup (page 35). You can lock the disc tray to [Off]. 10 D Z (open/close) E N (play) F x ...
Operating Instructions
Page 12
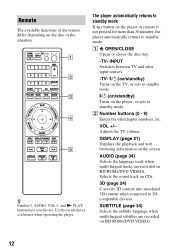
... z Number 5, AUDIO, VOL +, and N PLAY buttons have a tactile dot. INPUT Switches between TV and other input sources. -TV- [/1 (on/standby) Turns on the TV, or sets to standby mode. [/1 (on/standby) Turns on BD-ROMs/DVD VIDEOs. 12 Selects the sound track on the screen. Adjusts the TV volume. B Number buttons.... The player automatically returns to standby mode. VOL +/- AUDIO (page 34) Selects the language track when multi-lingual tracks are recorded on the player, or sets to standby mode If any button on the disc or the situation.
... z Number 5, AUDIO, VOL +, and N PLAY buttons have a tactile dot. INPUT Switches between TV and other input sources. -TV- [/1 (on/standby) Turns on the TV, or sets to standby mode. [/1 (on/standby) Turns on BD-ROMs/DVD VIDEOs. 12 Selects the sound track on the screen. Adjusts the TV volume. B Number buttons.... The player automatically returns to standby mode. VOL +/- AUDIO (page 34) Selects the language track when multi-lingual tracks are recorded on the player, or sets to standby mode If any button on the disc or the situation.
Operating Instructions
Page 14
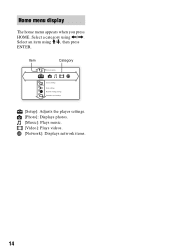
Home menu display The home menu appears when you press HOME. Select a category using
Home menu display The home menu appears when you press HOME. Select a category using
Operating Instructions
Page 15
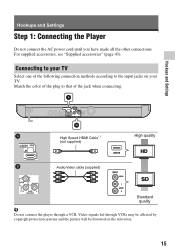
Connecting to the input jacks on the television. 15 Hookups and Settings High Speed HDMI Cable*1 (not supplied) Audio/video cable (supplied) High quality Standard quality b Do not connect the player through VCRs may be affected by ... on your TV Select one of the jack when connecting. Video signals fed through a VCR. For supplied accessories, see "Supplied accessories" (page 43). Hookups and Settings Step 1: Connecting the Player Do not connect the AC power cord until you have made all the other connections. Match the color of the plug...
Connecting to the input jacks on the television. 15 Hookups and Settings High Speed HDMI Cable*1 (not supplied) Audio/video cable (supplied) High quality Standard quality b Do not connect the player through VCRs may be affected by ... on your TV Select one of the jack when connecting. Video signals fed through a VCR. For supplied accessories, see "Supplied accessories" (page 43). Hookups and Settings Step 1: Connecting the Player Do not connect the AC power cord until you have made all the other connections. Match the color of the plug...
Operating Instructions
Page 16
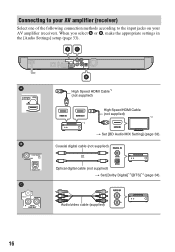
High Speed HDMI Cable*1 (not supplied) High Speed HDMI Cable (not supplied) *2 *1 t Set [BD Audio MIX Setting] (page 33). Coaxial digital cable (not supplied) or Optical digital cable (not supplied) t Set [Dolby Digital]*3/[DTS]*4 (page 34). Connecting to your AV amplifier (receiver) Select one of the following connection methods according to the input jacks on your AV amplifier (receiver). When you select A or B, make the appropriate settings in the [Audio Settings] setup (page 33). Audio/video cable (supplied) 16
High Speed HDMI Cable*1 (not supplied) High Speed HDMI Cable (not supplied) *2 *1 t Set [BD Audio MIX Setting] (page 33). Coaxial digital cable (not supplied) or Optical digital cable (not supplied) t Set [Dolby Digital]*3/[DTS]*4 (page 34). Connecting to your AV amplifier (receiver) Select one of the following connection methods according to the input jacks on your AV amplifier (receiver). When you select A or B, make the appropriate settings in the [Audio Settings] setup (page 33). Audio/video cable (supplied) 16
Operating Instructions
Page 17
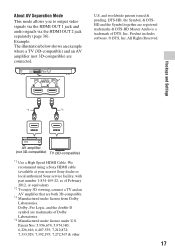
... are registered trademarks & DTS-HD Master Audio is a trademark of Dolby Laboratories. *4 Manufactured under license under license from Dolby Laboratories. Hookups and Settings *1 *1 AV amplifier (not 3D-compatible) TV (3D-compatible) *1 Use a High Speed HDMI Cable. and worldwide patents issued & pending. ... Inc. DTS-HD, the Symbol, & DTSHD and the Symbol together are connected. We recommend using a Sony HDMI cable (available at your nearest Sony dealer or local authorized Sony service facility, with part number 1-834-169-22, as of February 2012, or equivalent). *2 To enjoy...
... are registered trademarks & DTS-HD Master Audio is a trademark of Dolby Laboratories. *4 Manufactured under license under license from Dolby Laboratories. Hookups and Settings *1 *1 AV amplifier (not 3D-compatible) TV (3D-compatible) *1 Use a High Speed HDMI Cable. and worldwide patents issued & pending. ... Inc. DTS-HD, the Symbol, & DTSHD and the Symbol together are connected. We recommend using a Sony HDMI cable (available at your nearest Sony dealer or local authorized Sony service facility, with part number 1-834-169-22, as of February 2012, or equivalent). *2 To enjoy...
Operating Instructions
Page 18
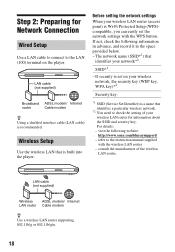
...to connect to the LAN (100) terminal on your wireless network, the security key (WEP key, WPA key)*2. Security key: *1 SSID (Service Set Identifier) is a name that is recommended. SSID*1: - refer to the instruction manual supplied with the WPS button. If not, check the following... website: http://www.sony.com/bluraysupport/ - Step 2: Preparing for information about the SSID and security key. For details: - If security is Wi-Fi Protected Setup ...
...to connect to the LAN (100) terminal on your wireless network, the security key (WEP key, WPA key)*2. Security key: *1 SSID (Service Set Identifier) is a name that is recommended. SSID*1: - refer to the instruction manual supplied with the WPS button. If not, check the following... website: http://www.sony.com/bluraysupport/ - Step 2: Preparing for information about the SSID and security key. For details: - If security is Wi-Fi Protected Setup ...

Operating Instructions
Page 19
Follow the on the batteries to make the basic settings using Step 3: Easy Setup When turned on for the first time Wait for a short while before the player turns on and starts [Easy Setup]. 1 Insert two Size AA (R6) batteries by matching the 3 and # ends on -screen instructions to the markings inside the battery compartment. 5 Perform [Easy Setup].
Follow the on the batteries to make the basic settings using Step 3: Easy Setup When turned on for the first time Wait for a short while before the player turns on and starts [Easy Setup]. 1 Insert two Size AA (R6) batteries by matching the 3 and # ends on -screen instructions to the markings inside the battery compartment. 5 Perform [Easy Setup].
Operating Instructions
Page 20
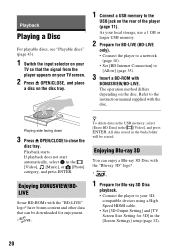
...a 1 GB or larger USB memory. 2 Prepare for BD-LIVE (BD-LIVE only). • Connect the player to a network (page 18). • Set [BD Internet Connection] to [Allow] (page 35). 3 Insert a BD-ROM with BONUSVIEW/BD-LIVE. Playback starts. Enjoying BONUSVIEW/BDLIVE Some BD-ROMs with the... automatically, select in the buda folder will be downloaded for 3D] in the [Screen Settings] setup (page 32). 20 compatible devices using a High Speed HDMI cable. • Set [3D Output Setting] and [TV Screen Size Setting for enjoyment. * z To delete data in the USB memory, select [Erase BD ...
...a 1 GB or larger USB memory. 2 Prepare for BD-LIVE (BD-LIVE only). • Connect the player to a network (page 18). • Set [BD Internet Connection] to [Allow] (page 35). 3 Insert a BD-ROM with BONUSVIEW/BD-LIVE. Playback starts. Enjoying BONUSVIEW/BDLIVE Some BD-ROMs with the... automatically, select in the buda folder will be downloaded for 3D] in the [Screen Settings] setup (page 32). 20 compatible devices using a High Speed HDMI cable. • Set [3D Output Setting] and [TV Screen Size Setting for enjoyment. * z To delete data in the USB memory, select [Erase BD ...
Operating Instructions
Page 21
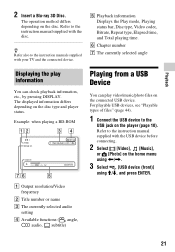
Example: when playing a BD-ROM A Output resolution/Video frequency B Title number or name C The currently selected audio setting D Available functions ( angle, audio, subtitle) Playing from a USB Device You can play information You can check playback information, etc., by pressing DISPLAY. Refer to the ...
Example: when playing a BD-ROM A Output resolution/Video frequency B Title number or name C The currently selected audio setting D Available functions ( angle, audio, subtitle) Playing from a USB Device You can play information You can check playback information, etc., by pressing DISPLAY. Refer to the ...
Operating Instructions
Page 24
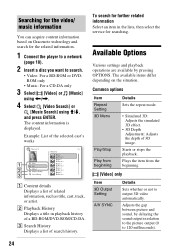
Searching for the video/ music information You can acquire content information based on Gracenote technology and search for the related information. 1 Connect the player to a network (page 18). 2 Insert a disc you want to search. • Video: For a BD-ROM or DVDROM only • Music: For a CD-DA only 3 Select [Video] or [Music] using
Searching for the video/ music information You can acquire content information based on Gracenote technology and search for the related information. 1 Connect the player to a network (page 18). 2 Insert a disc you want to search. • Video: For a BD-ROM or DVDROM only • Music: For a CD-DA only 3 Select [Video] or [Music] using
Operating Instructions
Page 25
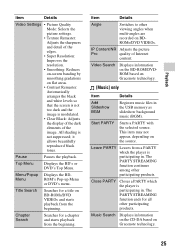
... Starts a PARTY with the selected source. Music Search Displays information on the CD-DA based on the source. Playback Item Details Video Settings • Picture Quality Mode: Selects the picture settings. • Texture Remaster: Adjusts the sharpness and detail of the edges. • Super Resolution: Improves the resolution. • Smoothing: Reduces on...
... Starts a PARTY with the selected source. Music Search Displays information on the CD-DA based on the source. Playback Item Details Video Settings • Picture Quality Mode: Selects the picture settings. • Texture Remaster: Adjusts the sharpness and detail of the edges. • Super Resolution: Improves the resolution. • Smoothing: Reduces on...
Operating Instructions
Page 26
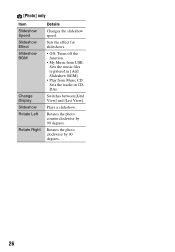
[Photo] only Item Slideshow Speed Slideshow Effect Slideshow BGM Change Display Slideshow Rotate Left Rotate Right Details Changes the slideshow speed. Switches between [Grid View] and [List View]. Sets the effect for slideshows. • Off: Turns off the function. • My Music from USB: Sets the music files registered in [Add Slideshow BGM]. • Play from Music CD: Sets the tracks in CDDAs. Rotates the photo counterclockwise by 90 degrees. 26 Rotates the photo clockwise by 90 degrees. Plays a slideshow.
[Photo] only Item Slideshow Speed Slideshow Effect Slideshow BGM Change Display Slideshow Rotate Left Rotate Right Details Changes the slideshow speed. Switches between [Grid View] and [List View]. Sets the effect for slideshows. • Off: Turns off the function. • My Music from USB: Sets the music files registered in [Add Slideshow BGM]. • Play from Music CD: Sets the tracks in CDDAs. Rotates the photo counterclockwise by 90 degrees. 26 Rotates the photo clockwise by 90 degrees. Plays a slideshow.
Operating Instructions
Page 27
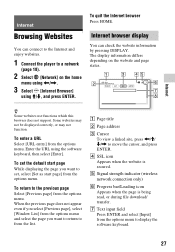
Internet Internet Browsing Websites You can connect to the Internet and enjoy websites. 1 Connect the player to a network (page 18). 2 Select [Network] on the home menu using
Internet Internet Browsing Websites You can connect to the Internet and enjoy websites. 1 Connect the player to a network (page 18). 2 Select [Network] on the home menu using
Operating Instructions
Page 28
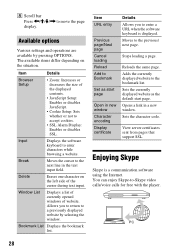
H Scroll bar Press
H Scroll bar Press
Operating Instructions
Page 29
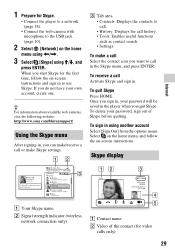
Internet 1 Prepare for Skype. • Connect the player to a network (page 18). • Connect the web camera with microphone to the USB jack (page 10). 2 Select [Network] on the home menu using
Internet 1 Prepare for Skype. • Connect the player to a network (page 18). • Connect the web camera with microphone to the USB jack (page 10). 2 Select [Network] on the home menu using


